
I'm A Tumbling Fool - Or Cleaning Bolts The Easy Way
 04-01-2017, 07:24 AM
#1
Senior Member


Thread Starter
Member Since: Jan 2008
Location: Easton, PA
Posts: 12,154
Received 2,031 Likes
on
1,103 Posts
St. Jude Donor '10

I have been cleaning up and reusing nuts, bolts, washers, and small parts from my corvette cars for a couple of years now and have accumulated quite a collection of them. I began trying to clean them up for purposing them once again and have just now relocated my cleaning station from my garage to my basement.
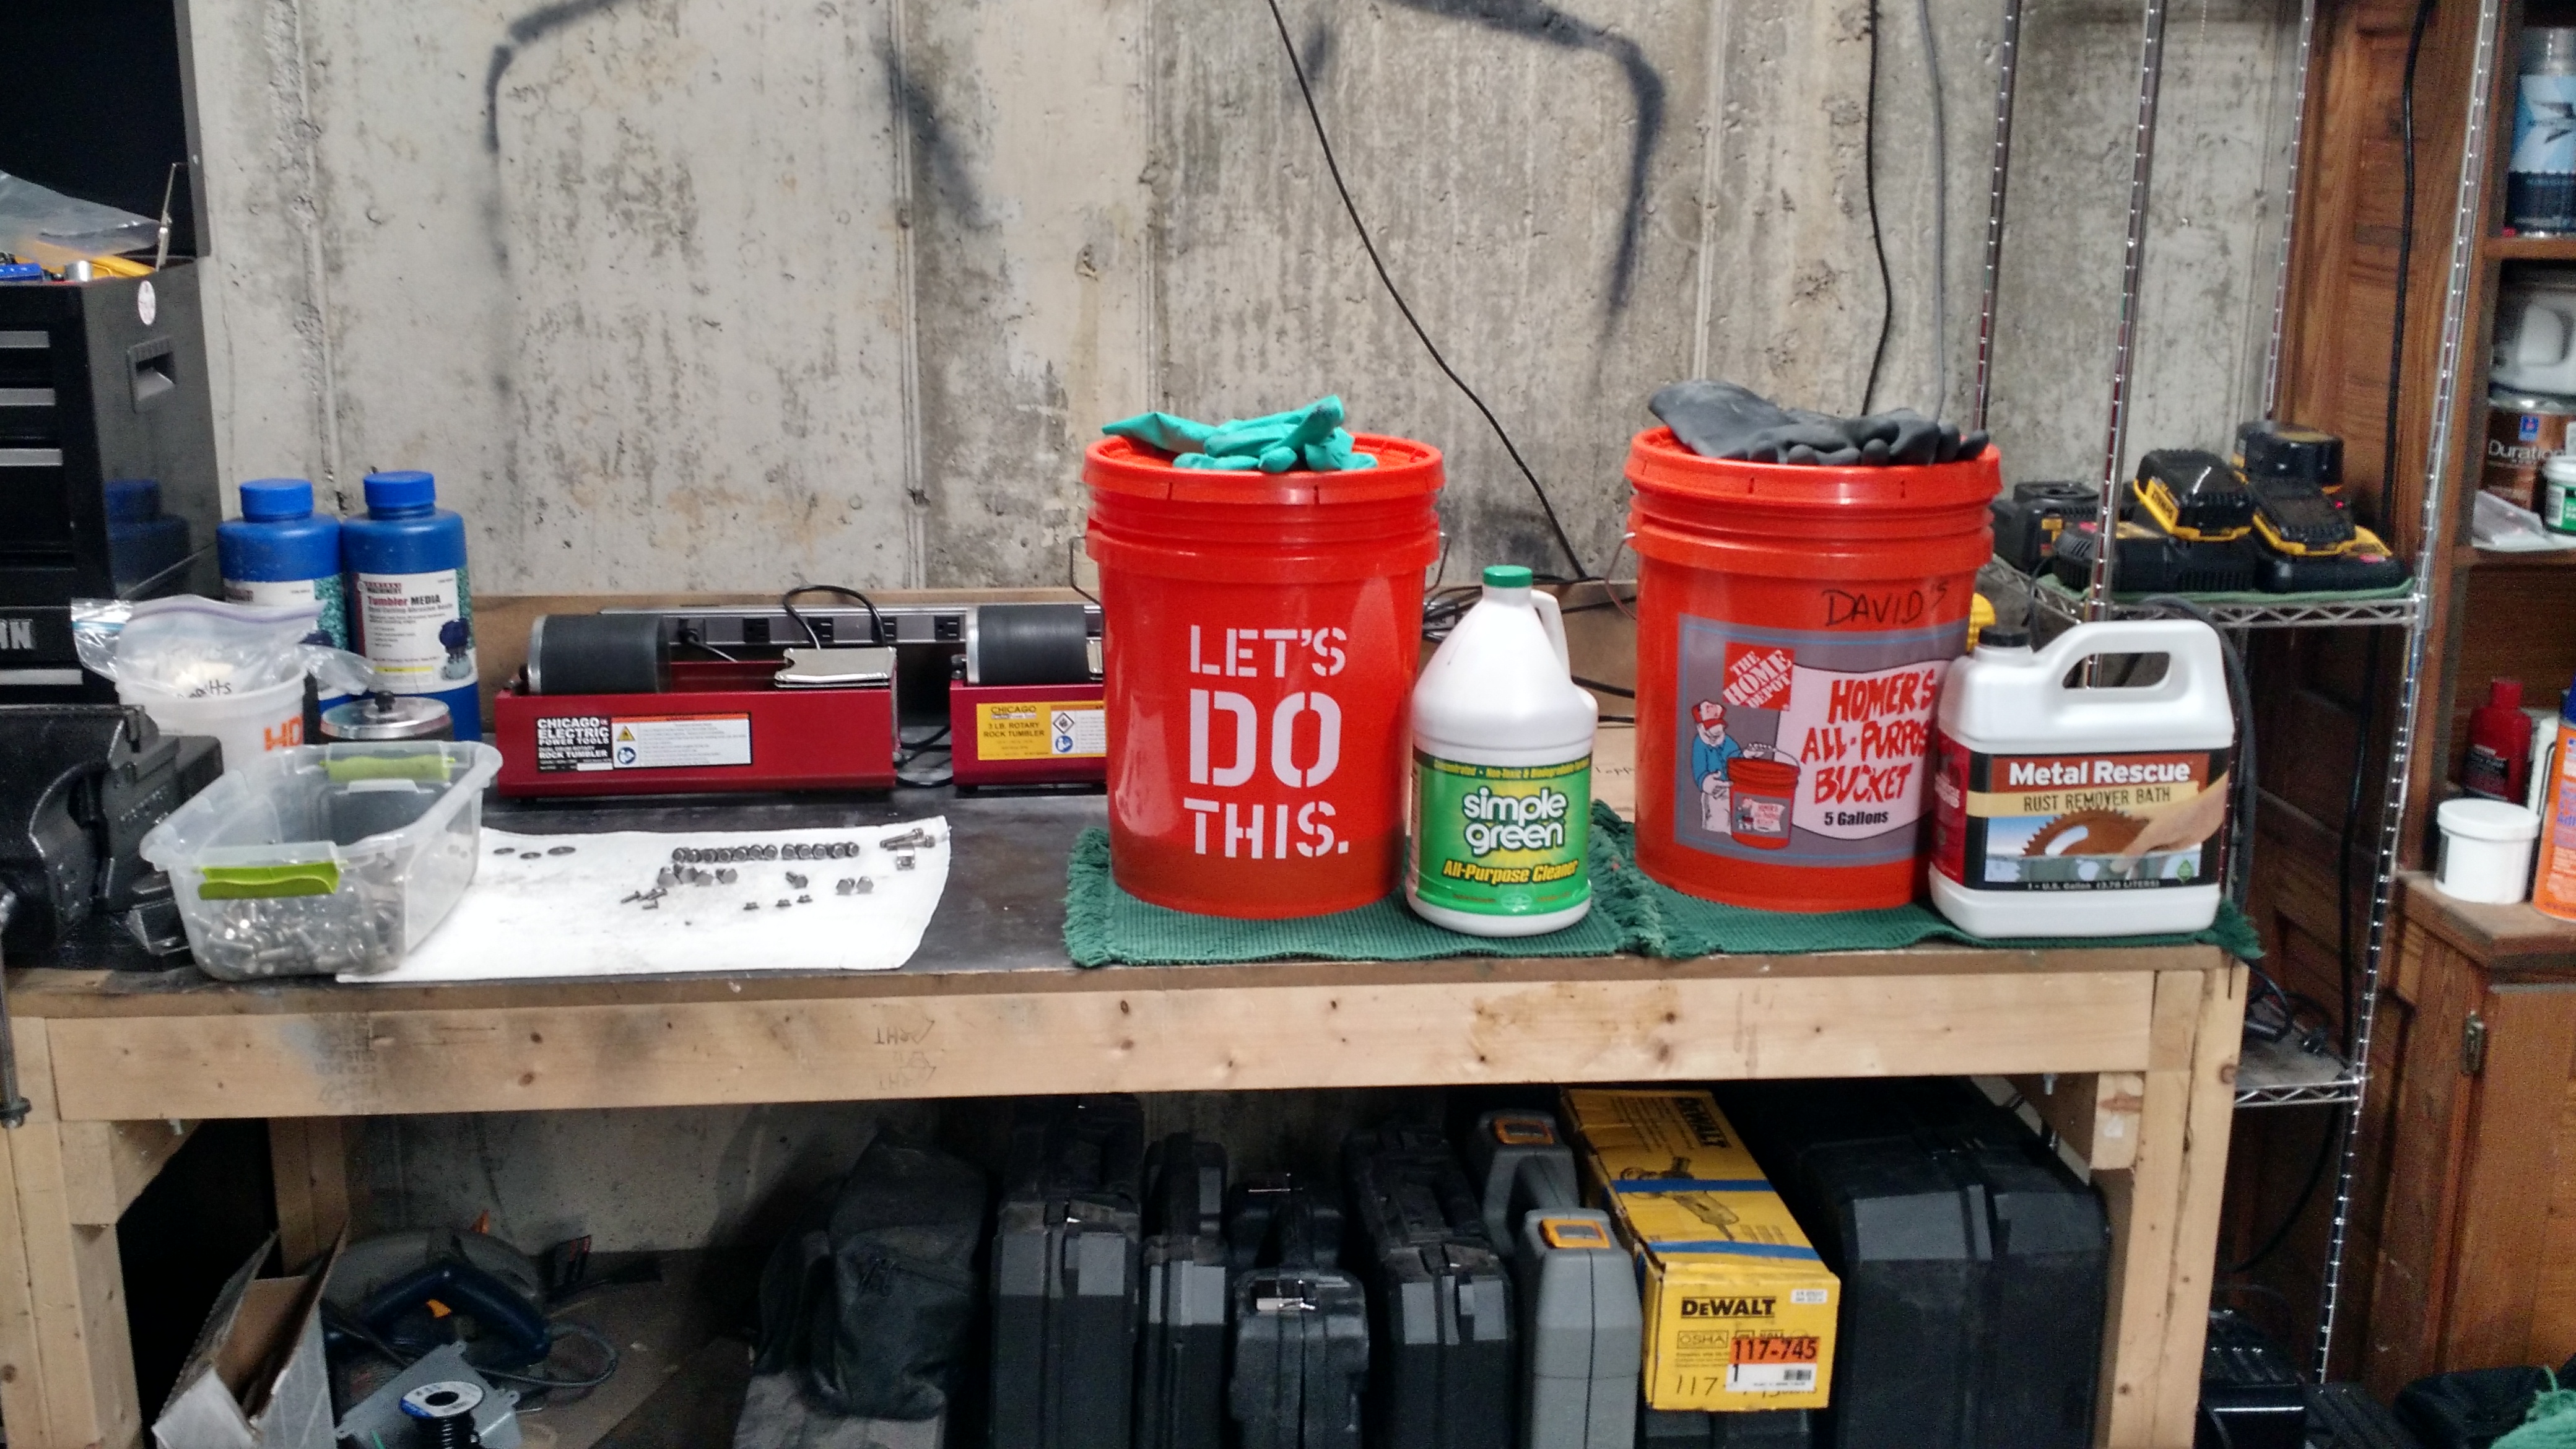
I am using Harbor Freight Single and Dual Drum Tumblers; two soaking stations, and a draining station for this work. I put the bottles to show my soaking station for grease is simply a H-D bucket with simple green; and my rust soaking station is another H-D bucket with metal rescue. I degrease the parts first; then soak them to remove rust before running them in the tumblers. Tumbling is done using Harbor Freight's green ceramic tumbling crystals.
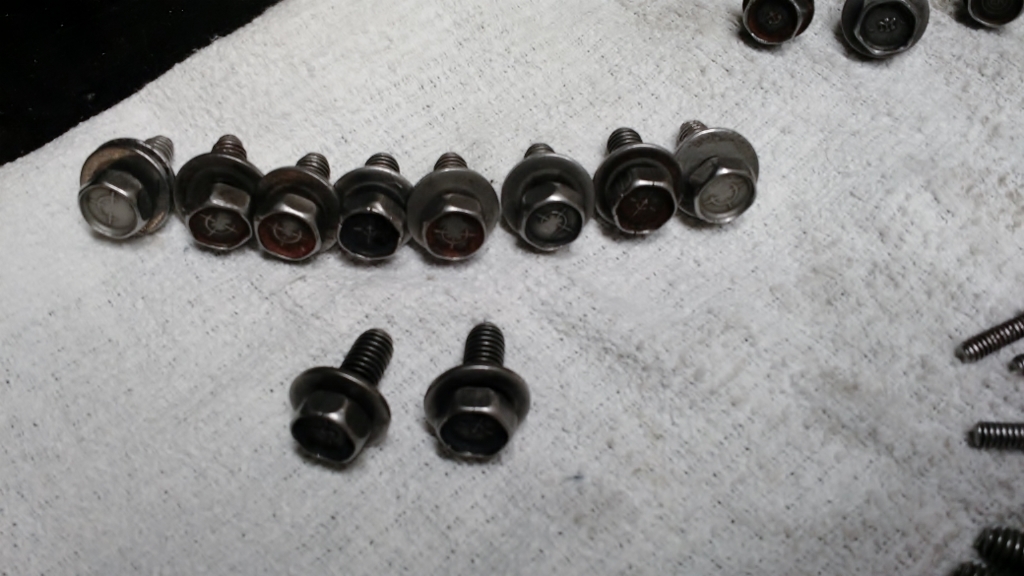
For small parts it works great, you just have to be patient. In these examples the parts have been degreased and tumbled, but the threads have not been cleared yet using a tap and die set.

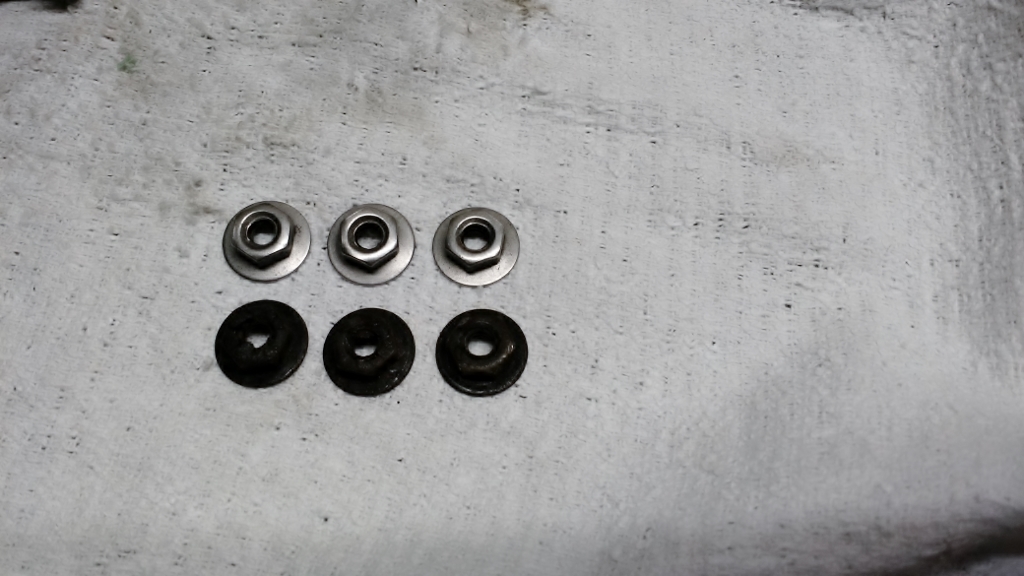
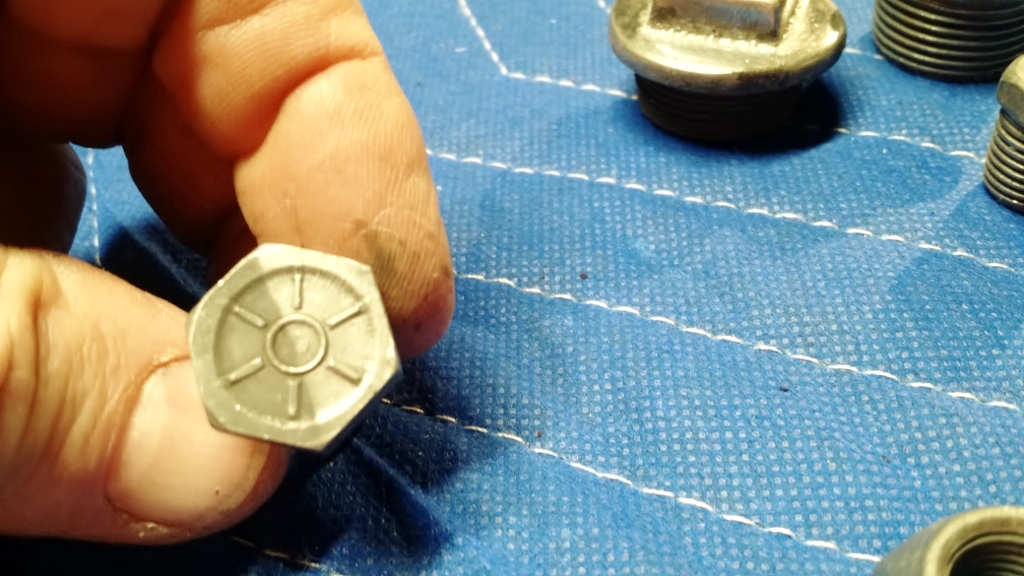
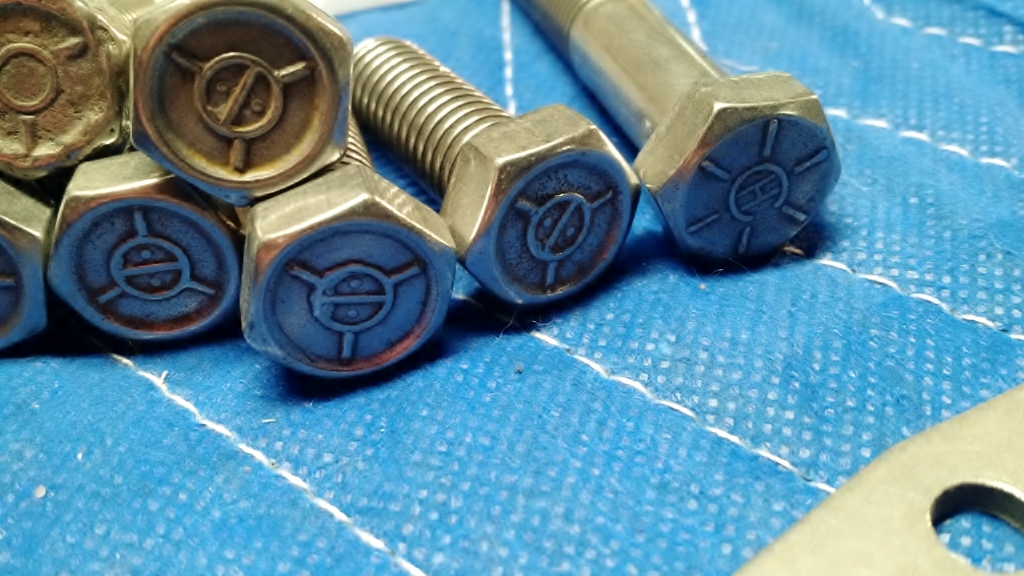
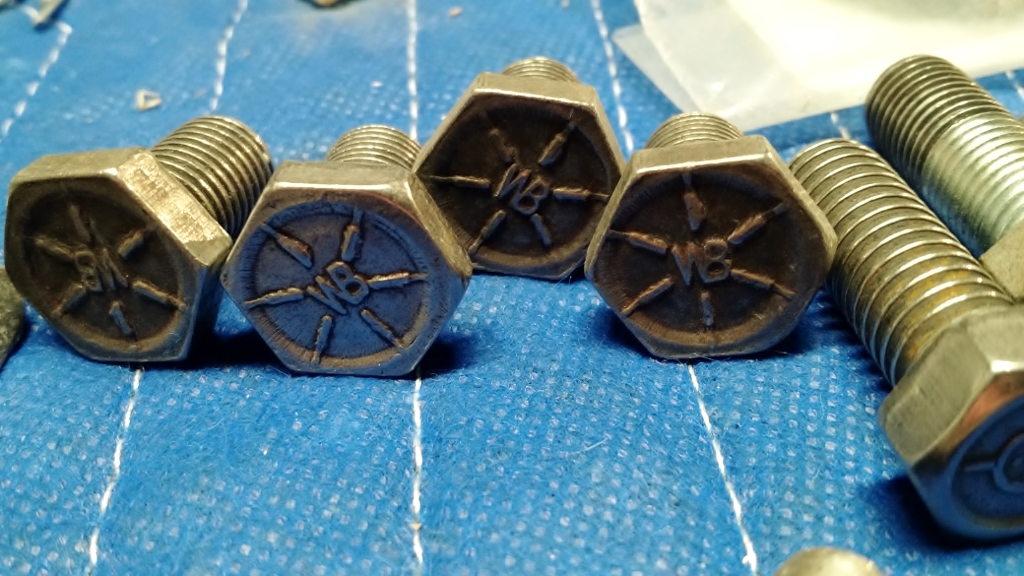
The bolts have me most fascinated. They clean up nicely and I love to reveal the bolt head stamping or symbols, and there are a bunch of them.
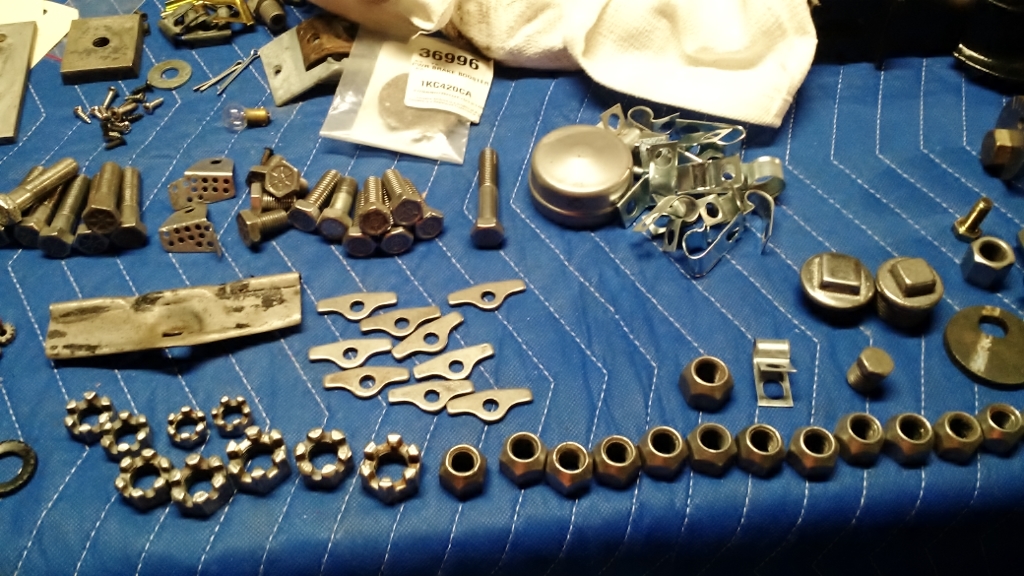
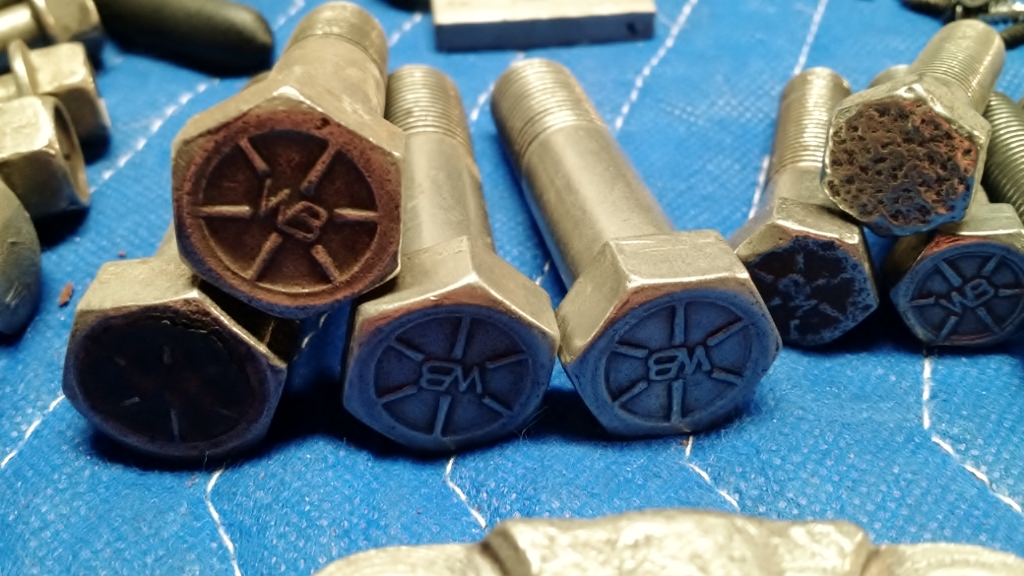
These were cleaned and tumbled but need more work to remove the hidden grease so they are once again going to be soaked and then tumbled in a ceramic crystal with simple green solution to see if we can get them cleaner.
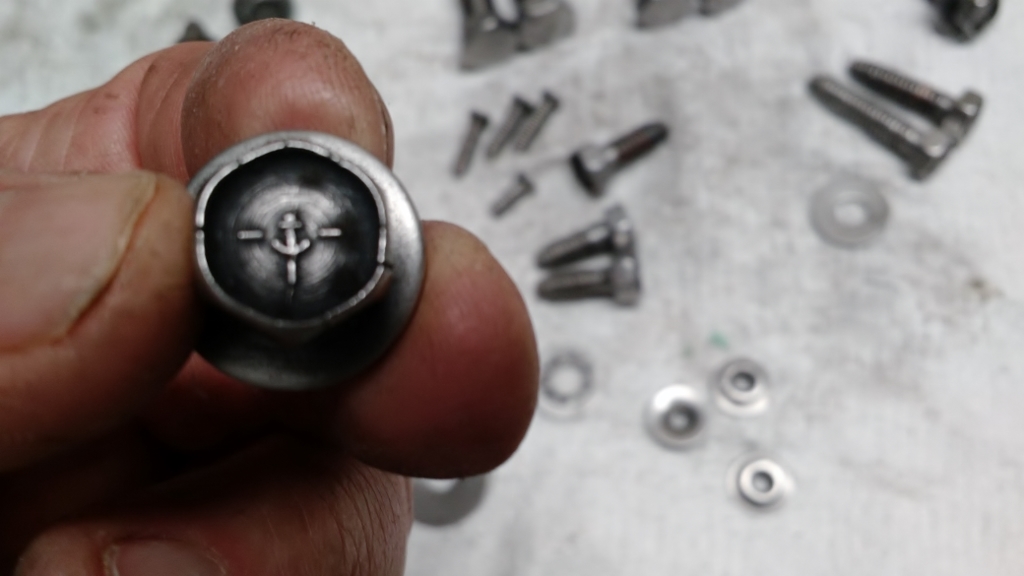
I will continue to work with my process to see what I can do to make these come out even better than they do now. Again, patience is the key to a successful outcome.
Oh, and don't overload the tumbler buckets, ask me how I know.
Let me know if I can provide any information that may help you capture your parts back from the rusty/greasy dead.
Best regards,
David Howard
AllVettes4Me
I am using Harbor Freight Single and Dual Drum Tumblers; two soaking stations, and a draining station for this work. I put the bottles to show my soaking station for grease is simply a H-D bucket with simple green; and my rust soaking station is another H-D bucket with metal rescue. I degrease the parts first; then soak them to remove rust before running them in the tumblers. Tumbling is done using Harbor Freight's green ceramic tumbling crystals.
For small parts it works great, you just have to be patient. In these examples the parts have been degreased and tumbled, but the threads have not been cleared yet using a tap and die set.
The bolts have me most fascinated. They clean up nicely and I love to reveal the bolt head stamping or symbols, and there are a bunch of them.
These were cleaned and tumbled but need more work to remove the hidden grease so they are once again going to be soaked and then tumbled in a ceramic crystal with simple green solution to see if we can get them cleaner.
I will continue to work with my process to see what I can do to make these come out even better than they do now. Again, patience is the key to a successful outcome.
Oh, and don't overload the tumbler buckets, ask me how I know.
Let me know if I can provide any information that may help you capture your parts back from the rusty/greasy dead.
Best regards,
David Howard
AllVettes4Me
Last edited by AllC34Me; 04-01-2017 at 07:26 AM.

The following 8 users liked this post by AllC34Me:
20mercury (04-01-2017),
CFLVette (04-05-2017),
dmaxx3500 (05-05-2018),
LenWoodruff (05-06-2018),
MattoonVette (04-20-2019),
and 3 others liked this post.


The following users liked this post:
AllC34Me (04-01-2017)
04-01-2017, 07:40 AM
#3
Safety Car

AMAZING David! Those look fantastic! I`m going to show this to my boys, and inspire them!
The following users liked this post:
AllC34Me (04-01-2017)
04-01-2017, 07:49 AM
#4
Team Owner


Great job.
The following users liked this post:
AllC34Me (04-01-2017)
04-01-2017, 08:18 AM
#5
Senior Member
Thread Starter
Member Since: Jan 2008
Location: Easton, PA
Posts: 12,154
Received 2,031 Likes
on
1,103 Posts
St. Jude Donor '10
I still have a ways to go to be assured I can do no more but I think I am on the right path now. I'll post more as I learn more. Share thoughts, ideas, learnings here as well. 
Thanks for following along.
David
Thanks for following along.
David
04-01-2017, 08:24 AM
#6
Burning Brakes

Hi David,
Those are really coming out great! Thanks for sharing your process ( technique). I was wondering if you have them cataloged in some form, so that you know the application of each. I always found it interesting to actually discover all the different head markings used over the years on the corvette. Before I became interested in Corvettes/restoration, a bolt was always just a bolt to me, just as long as it was the correct thread and fit the part.
Now, I found myself checking the head markings on every bolt I pick up
Tooch

The following users liked this post:
AllC34Me (04-07-2017)
04-01-2017, 08:41 AM
#7
Burning Brakes
They really turned out great. So now when I'm not tumbling brass for reloading ammunition I can put my tumbler to work full time tumbling bolts, etc.
Cool
Cool
The following users liked this post:
AllC34Me (04-07-2017)
The following users liked this post:
AllC34Me (04-01-2017)
04-01-2017, 02:55 PM
#9
Race Director

These look great David! Another forem member posted the tip of adding some Dawn into the tumbling media to help get rid of the hidden grease. Don't remember if it was the same media he used but probably worth a shot.
The following users liked this post:
AllC34Me (04-07-2017)
04-01-2017, 03:02 PM
#10
Burning Brakes
But what do you do for corrosion prevention? I have done this, but it is easier to send the bolts i want done to my plater that can refinish them in black oxide or silver cad as needed so they dont rust after installation.
your thoughts?
bigredbrad
your thoughts?
bigredbrad
04-01-2017, 04:21 PM
#11
Team Owner
Member Since: Sep 2006
Location: Westminster Maryland
Posts: 30,173
Likes: 0
Received 2,878 Likes
on
2,515 Posts
Hi Tooch,
I was given a list of fastener suppliers and their identifying head marks from the 70s.
It more than 220 suppliers. Some I'm familiar with but many I've never seen.
I find it to be a really interesting part of restoration.
Regards,
Alan
This same fellow has done a lot of work (and continues to) on identifying typical fastener finishes based on application.
04-01-2017, 05:17 PM
#12
Team Owner
Member Since: Feb 2003
Location: Sitting in his Nowhere land Hanover Pa
Posts: 49,006
Received 6,943 Likes
on
4,782 Posts
2015 C2 of Year Finalist

Hi Tooch,
I was given a list of fastener suppliers and their identifying head marks from the 70s.
It more than 220 suppliers. Some I'm familiar with but many I've never seen.
I find it to be a really interesting part of restoration.
Regards,
Alan
This same fellow has done a lot of work (and continues to) on identifying typical fastener finishes based on application.
I was given a list of fastener suppliers and their identifying head marks from the 70s.
It more than 220 suppliers. Some I'm familiar with but many I've never seen.
I find it to be a really interesting part of restoration.
Regards,
Alan
This same fellow has done a lot of work (and continues to) on identifying typical fastener finishes based on application.
I have seen a list of about ten posted on the NCRS TDB
04-01-2017, 05:50 PM
#13
Senior Member
Thread Starter
Member Since: Jan 2008
Location: Easton, PA
Posts: 12,154
Received 2,031 Likes
on
1,103 Posts
St. Jude Donor '10
Hi David,
Those are really coming out great! Thanks for sharing your process ( technique). I was wondering if you have them cataloged in some form, so that you know the application of each. I always found it interesting to actually discover all the different head markings used over the years on the corvette. Before I became interested in Corvettes/restoration, a bolt was always just a bolt to me, just as long as it was the correct thread and fit the part.
Now, I found myself checking the head markings on every bolt I pick up
Tooch
Those are really coming out great! Thanks for sharing your process ( technique). I was wondering if you have them cataloged in some form, so that you know the application of each. I always found it interesting to actually discover all the different head markings used over the years on the corvette. Before I became interested in Corvettes/restoration, a bolt was always just a bolt to me, just as long as it was the correct thread and fit the part.
Now, I found myself checking the head markings on every bolt I pick up
Tooch
04-01-2017, 05:55 PM
#14
Senior Member
Thread Starter
Member Since: Jan 2008
Location: Easton, PA
Posts: 12,154
Received 2,031 Likes
on
1,103 Posts
St. Jude Donor '10
04-03-2017, 07:56 AM
#15
Le Mans Master

Member Since: Mar 2001
Location: Watkinsville, GA and Glen Cove, NY
Posts: 5,789
Received 855 Likes
on
626 Posts
Guess I will be on my way to Harbor Freight today. Damn you David!
Good stuff. I have about 30 marked baggies from my body removal. Better get busy.
Good stuff. I have about 30 marked baggies from my body removal. Better get busy.
Last edited by 69ttop502; 04-03-2017 at 07:57 AM.
04-03-2017, 09:28 AM
#16
Senior Member
Thread Starter
Member Since: Jan 2008
Location: Easton, PA
Posts: 12,154
Received 2,031 Likes
on
1,103 Posts
St. Jude Donor '10

 04-03-2017, 10:02 AM
#18
Burning Brakes

Very nice. Thanks for posting this David. It never ceases to amaze me how gratifying it is to take a dirty, greasy, rusty piece of 40+ year old steel and make it look brand new. In all that I have done to my car, reconditioning parts and pieces always gives me the most satisfaction.
04-03-2017, 10:16 AM
#19
Senior Member
Thread Starter
Member Since: Jan 2008
Location: Easton, PA
Posts: 12,154
Received 2,031 Likes
on
1,103 Posts
St. Jude Donor '10
For corrosion I have clear coated my own bolts in the past after clearing the threads, but that is just me. These bolts I am cleaning now are for fun and discovery; but I understand your point and it is well taken.
Thanks for sharing.
David Howard
AllVettes4Me
04-03-2017, 11:35 AM
#20
Burning Brakes
The second thought is by sending them out you are giving away the fun of bringing back old, rusty, nasty parts. Half or more of this activity is the adventure of discovery. I love to do the research, discovery, and reporting the findings to those that can use the data.
David Howard
AllVettes4Me
David Howard
AllVettes4Me
Hi David - Thanks for your reply. And please dont get me wrong, I fully appreciate your way of doing it, and I appreciate the minutiae of learning about each and every bolt and nut on these old cars. My concern is when I get done tumbling a bolt to its original condition, what do I do next to get it closer to be ready for factory installation. In the case of many GM bolts, that step is have them coated with what I call black oxide. In the past I have tumbled, wire brush wheel, brass brush, sandblast, glass bead and all sorts of cleaning to the bolts, and then have tried multiple different types and shades of black paint. Ultimately none of those look as good or factory correct as having the plater do them for me. I even wasted hundreds of dollars trying my hand at using a electroplating setup, trying to add plating to them myself.
At the end of the day, taken to my plater, a handful to a small coffee can of bolts costs me in the $25 range no matter if I have precleaned them, or I take them in rusty crusty and greasy. At for me, the work vs cost reward is just not there, especially when considering the final product that I get back with that satiny black finish that looks so good. AND, I dont have to worry about knocking the paint off with a wrench when I install the fastener.
Ive only been doing this for about 15 years, so I still have lots and lots to learn, thats why I asked the question. I was just wondering what another restorer does to save and reuse these original and correct bolts.
Thank you for your photos and conversation, I really appreciate it.
bigredbrad
Last edited by bigredbrad; 04-03-2017 at 11:35 AM.
The following 2 users liked this post by bigredbrad:
LenWoodruff (05-06-2018),
mikem350 (04-03-2017)