When you click on links to various merchants on this site and make a purchase, this can result in this site earning a commission. Affiliate programs and affiliations include, but are not limited to, the eBay Partner Network.
I got your PM and I am GOOD with your decision. The bumper in this photo looks good. It is even and consistent.
Not that this matters...and I am writing this not so much for you or to make things any worse...but rather to those who may read this and not understand that the amount of time it takes to check how all the parts need to fit. So...if some people feel that doing this type of work is easy and not that hard....they are partly correct...but what some may not realize that in some areas of these Corvettes...if parts are not checked and test fitted before any bonding of panels or what-have-you...it will show up when you least expect it and then say...'OOOPS'. I am writing this because I HAVE done the exact same thing a long time ago.
As a follow up FWIW, I just came across reference photos of my top surround after installation of the headlight bar, before installing the top surround on the vehicle. Appears I DID install the bar correctly, bottomed out on the surround. Yet I can't get the bumper installed high enough? ?? I wonder now if the new headlight bar that I installed is not of the correct dimensions. I have my original bar and will compare measurements tomorrow to see if that is the problem. Too late to do anything about it now but at least I'll know why it's screwed up.
Keep in mind that I have not been by your side when you work on this so just by this last photo I can tell you that when I saved it and zoomed in on it....I did not see any rivets and also it looks like the metal brace is where it needs to be...but when I look at the photos of your previous posts that show how the rivets are in the panel....it looks differently. It looks like the center dropped down when it was riveted compared to the last photo you just added.
Keep in mind that I have not been by your side when you work on this so just by this last photo I can tell you that when I saved it and zoomed in on it....I did not see any rivets and also it looks like the metal brace is where it needs to be...but when I look at the photos of your previous posts that show how the rivets are in the panel....it looks differently. It looks like the center dropped down when it was riveted compared to the last photo you just added.
DUB
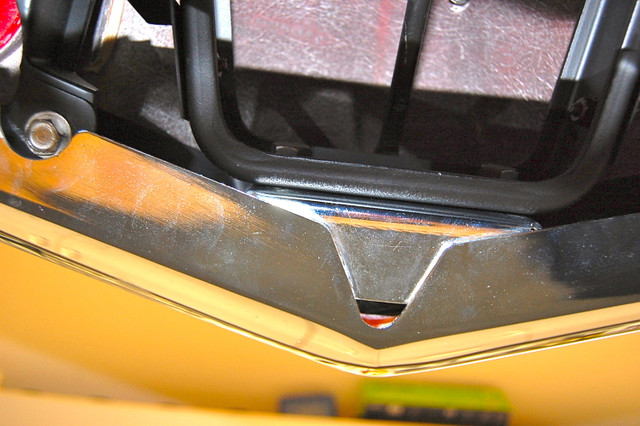
Here are some more photos, lets see if we can spot rivets in place. I assumed the photo I posted with the headlights in had a riveted headlight bar in place. Looks like the center of the headlight bar is down against the fiberglass as far as it can go. You can see the excess fiberglass on each side which I trimmed down but still didn't help because the middle is the important point. I now see in the last photo that I trimmed the middle of the top surround to meet the reinforcement bar in the other 2 photos. I didn't get to measure the height of the replacement bar vs. my orginal bar, I've been working on final assembly of my 1967. While I cannot see them, I would assume the bar in riveted in the photos. It looks flush down as far as it can go?
I just posted this last night in another thread... Not sure it offers any result for you twin... but it's something to consider.
I've had the same problem with both on the front Alan, mostly with the imported.... But I've also had this issue with the NOS GM bumpers years ago. At one point I was actually taking pictures of original cars to document this but I've lost track of the pictures so I can't post them.
What is odd about this issue is I can take the bumper off my 70 (original GM) and put it on my 72 and it fits horrible. Neither car has been crashed and if I tried to put the one off my 72 (Original late production NOS GM) on the 70 it's too tight in the corners.... But when I sit them side by side they don't look much different... when I measured them from tip to tip there was a difference.
Since the die stamping these bumpers would probably have been the same, you have to wonder if it wasn't wearing out over time and causing the issue... or and as I've said for years with the urethane bumpers (and fiberglass bumpers)... the front ends were glued up so fast and sloppy I'm sure that it attributed to their fit issue as well. Same deal, I can take a flexy bumper and put it on one car and it'll fit, take it to another one and it'll fit but sloppy.
Just get it as close as you can without cracking anything.... there isn't any bending of the bumper.
Today.. I took some pictures of the NOS bumper on my 72, hopefully I can post them tomorrow.
Like I had mentioned.....I still feel that the metal bracket that is riveted to the top hood surround is lower in the center and correct the further you get to the ends.
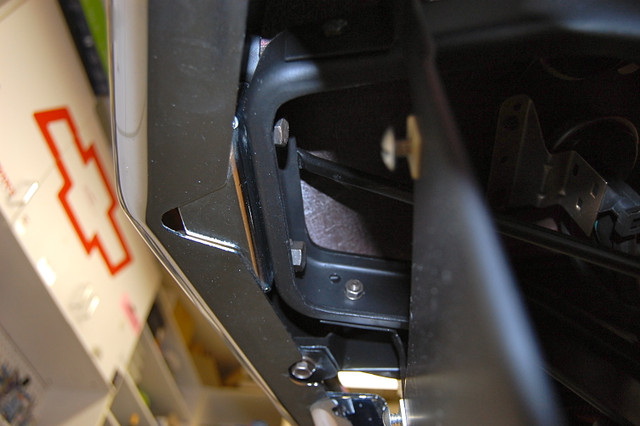
I am looking at the center of each rivet in relation to the GIVEN body contour that the metal brace is shaped to just above teh area where these rivets are installed. The center of the rivets much further down on the center...but the center of the rivets get much closer to the contour line in the top hood surround the closer to the ends you get.....and when you look at some of your current photos....you can see a rather large air gap/space between this metal bracket and the underside of the top hood surround in the area of this metal brace in the center....where you are having this problem.
The rivets that hold this metal bracket in place l should have the center of them be the same all the way across the front of the car. Yours are angled downwards when you get to the center.
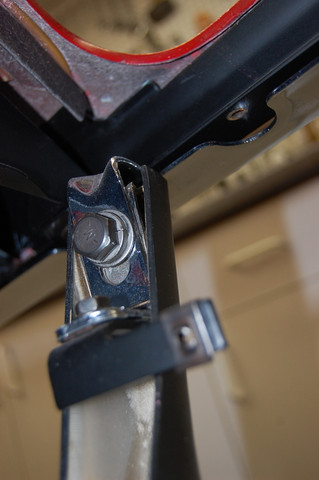
You can see that the metal brace in this corner is fitting the contour of the top hood surround correctly. And knowing that the contour of the top hood surround is the same all the way across the front edge...and the metal brace is stamped the same way with the contour in it being the same all the way across the brace...this is why I still feel the center is too low and the rivets are indicating to me that it is low.
I just posted this last night in another thread... Not sure it offers any result for you twin... but it's something to consider.
I've had the same problem with both on the front Alan, mostly with the imported.... But I've also had this issue with the NOS GM bumpers years ago. At one point I was actually taking pictures of original cars to document this but I've lost track of the pictures so I can't post them.
What is odd about this issue is I can take the bumper off my 70 (original GM) and put it on my 72 and it fits horrible. Neither car has been crashed and if I tried to put the one off my 72 (Original late production NOS GM) on the 70 it's too tight in the corners.... But when I sit them side by side they don't look much different... when I measured them from tip to tip there was a difference.
Since the die stamping these bumpers would probably have been the same, you have to wonder if it wasn't wearing out over time and causing the issue... or and as I've said for years with the urethane bumpers (and fiberglass bumpers)... the front ends were glued up so fast and sloppy I'm sure that it attributed to their fit issue as well. Same deal, I can take a flexy bumper and put it on one car and it'll fit, take it to another one and it'll fit but sloppy.
Just get it as close as you can without cracking anything.... there isn't any bending of the bumper.
Today.. I took some pictures of the NOS bumper on my 72, hopefully I can post them tomorrow.
IMHO,
Willcox
Thanks Willcox, FWIW the bumper is a GM Bumper bought from Paragon. I held my original bumper up and the fittment is the same, lousy. I put a new top pm surround on (GM repro parts from Ecklers) and pm fenders. If I put the reinforcement bar on correctly, that only leaves the top surround as a potential issue.
Didn't get to work on the cars today, I was putting in Tomato plants.
"How to Theoretically (in your dreams) Reshape (bend) a Chrome Bumper"
Note: For entertainment purposes only!
Would I actually do this if I were you? No!
List of things needed: Fire Extinguisher. Thick leather work gloves. Vice. Soft pine or fir 1/2" thick slats. Black Marker. Hand-held Propane bottle-torch. Tape measure. Infrared Gun to measure temperature of heated bumper. Roll of Electrician's Tape. Air compressor (if available). Nerves of Steel. Time (plenty of it). Patience (plenty of it).
1. Make sure you have enough money to buy another bumper if something goes wr-wr-wrong.
2. Cover each jaw of a vice with SOFT 1/2" thick pine or fir slats. (Attach the wooden slats to jaws with electrician's tape)
3. Temporarily install bumper on car and adjust to get the best fit at the long/straight sections of the bumper . DO NOT force the bumper---It should be in a "relaxed state" when it is tightened in place. DO NOT HEAT BUMPER WHILE IT IS ON THE CAR!.
4. Use black marker to label areas that need to be reshaped.
5. Clamp bumper in vice horizontally near center of bumper....WATCH TO MAKE SURE BUMPER DOES NOT BEGIN TO "FLATTEN" AS VICE IS TIGHTENED....IT DOES NOT TAKE A LOT OF PRESSURE TO DAMAGE BUMPER.
6. If necessary, reshape the "V" of the bumper first by using the torch held AT LEAST ONE FOOT AWAY FROM CENTER AREA OF BUMPER/ALWAYS HEAT BUMPER AT "INSIDE" to approximately 200*F. DO NOT HEAT BUMPER UNTIL CHROME DISCOLORS.
7. Measuring from tip-to-tip/end-to-end, bend heated bumper about 1/4" inward OR outward---depending on gap needed between edge of bumper and fiberglass....hold bumper in place until it cools (do not cool it with liquids...low pressure air nozzle held at least one foot away from heated area can be used for cooling ).
8. Test-fit cooled bumper on car. This procedure may have to be done several times to create a uniform gap between bumper edge and fiberglass.
9. Next.........If necessary, Reshape one end/curve of bumper using above technique. Clamp the short end of the bumper in the vice and hold the "half" of the bumper nearest the clamped end to apply needed bending force while heat is applied. (The bumper end can also be slightly "twisted" by slightly rotating the long half while it is being bent in order to get a better fit/gap).
10. Cool and test-fit the bumper.
11. Use above technique to reshape the other end/curve if necessary.
NOTE: It could take several hours of shaping/test-fitting.
Last edited by doorgunner; 06-02-2017 at 09:45 AM.
Like I had mentioned.....I still feel that the metal bracket that is riveted to the top hood surround is lower in the center and correct the further you get to the ends.
I am looking at the center of each rivet in relation to the GIVEN body contour that the metal brace is shaped to just above teh area where these rivets are installed. The center of the rivets much further down on the center...but the center of the rivets get much closer to the contour line in the top hood surround the closer to the ends you get.....and when you look at some of your current photos....you can see a rather large air gap/space between this metal bracket and the underside of the top hood surround in the area of this metal brace in the center....where you are having this problem.
The rivets that hold this metal bracket in place l should have the center of them be the same all the way across the front of the car. Yours are angled downwards when you get to the center.
You can see that the metal brace in this corner is fitting the contour of the top hood surround correctly. And knowing that the contour of the top hood surround is the same all the way across the front edge...and the metal brace is stamped the same way with the contour in it being the same all the way across the brace...this is why I still feel the center is too low and the rivets are indicating to me that it is low.
DUB
Yes, SOMETHING happened when I riveted the bar on. It SHOULD have been bottomed out flat on the underside of the top surround since the top surround was turned over and the gravity weight of the bar would have made it flat. I spent time this morning and while the new bumper isn't exactly as wide as the oem, it's only 1/16" less wide which would only be 1/32" difference on the top. Both bars measure about the same as best as I can measure the one that is on the car. I can now see that when looking underneath, there is a slight air gap which looks at most 1/4", closer maybe to .20". I can fit a bit of my fingertip, and I have skinny fingers, between the bar and the fiberglass. I guess there isn't much margin for error even though themounting bracket on the car allows for 1" vertical movement. I'll now know better on my next front end replacement. . Thanks
I've decided to try and remove the bar (with a heat gun, carefully. I apologize, do I need to remove the hood to get the headlight assemblies out? I know they come out from the bottom. I drill the rivets out, right? Then punch them thru? Thanks.
I've decided to try and remove the bar (with a heat gun, carefully. I apologize, do I need to remove the hood to get the headlight assemblies out? I know they come out from the bottom. I drill the rivets out, right? Then punch them thru? Thanks.
I have to laugh because I see myself in you. 13 days and decided you can't live with the problem. Better to bite the bullet and fix it than never being able to look past the problem when admiring your car. This kind of stuff just gnaws at you until you do something about it.
I suppose if it were me I would try heating the metal bar and see if I could work a utility knife in between the panel and the support. It would really suck trying to blend that paint beyond the immediate repair area.
Hi TWR,
I'd say no to the first question, (take the bezels off), and yes to the second!
Good Luck!
Regards,
Alan
Hi Alan, I was expecting a yes on #1. I guess it might be possible to get the 3 side assembly bolts off w/o getting the hood off but you (I) would have to access them all from underneath because trying with the hood up, the ratchet handle swings too close to the hood.

 04-19-2017, 06:20 PM


 I was putting in Tomato plants.


 next front end replacement.
  . Thanks


