
1969 bumper fit after new nose
 04-16-2017, 02:41 PM
#1
Melting Slicks

Thread Starter
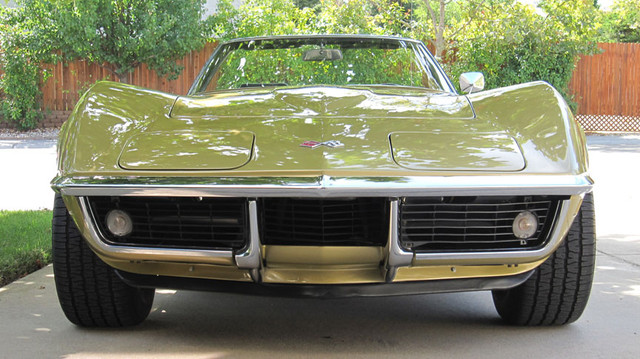
Ok, so after buying this Paragon bumper about 5 years ago, I'm finally getting around to installing it. I pulled my Motion style nose off and replaced it with GM repro pieces. I did a test fit prior to final assembly and thought everything lined up pretty good. This photo shows the bumper too low doesn't it? Is there a margin for error? How low can you go? Thanks for the help.
 04-16-2017, 03:44 PM
#2
Team Owner

Member Since: Sep 2006
Location: Westminster Maryland
Posts: 30,173
Likes: 0
Received 2,878 Likes
on
2,515 Posts

Hi TR,
Yes. I'd find that bumper to be too low.
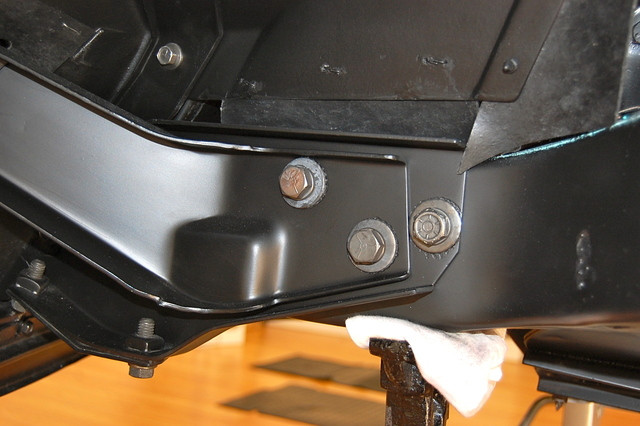
The height of the bumper is controlled by the position of the 2 large bumper brackets at each end, and the 'horseshoe' bracket in the center.
The end brackets are adjustable using the 2 bolts on each that go through the frame extensions while the center bracket is adjustable using shims between it and the front cross member.
How large are the 2 holes in the 'corners' of the clip? Enough room for the bolts to move a little?
Regards,
Alan

Do 69 cars have these small 'corner' brackets? If so, they come into play too.
Yes. I'd find that bumper to be too low.
The height of the bumper is controlled by the position of the 2 large bumper brackets at each end, and the 'horseshoe' bracket in the center.
The end brackets are adjustable using the 2 bolts on each that go through the frame extensions while the center bracket is adjustable using shims between it and the front cross member.
How large are the 2 holes in the 'corners' of the clip? Enough room for the bolts to move a little?
Regards,
Alan
Do 69 cars have these small 'corner' brackets? If so, they come into play too.
04-16-2017, 04:43 PM
#3
Melting Slicks
Thread Starter
Alan, thanks for the reply. I don't think the end brackets are the (major) problem. I've already loosened the Horseshoe bracket to allow some movement of the bumper upward. I'll have to shim underneath the bracket. I'll look at it tomorrow. I still have to drill the fiberglass to allow bolts to connect to the bumper ends. Hopefully I'll be able to get the 2 holes drilled in the right position and at the right angle so when I push the bolts thru underneath it will be in line with the threads on the bumper. Tomorrow is another day.
Last edited by TWINRAY; 04-16-2017 at 04:44 PM.
04-16-2017, 05:18 PM
#4
Team Owner
Member Since: Sep 2006
Location: Westminster Maryland
Posts: 30,173
Likes: 0
Received 2,878 Likes
on
2,515 Posts
Hi TW,
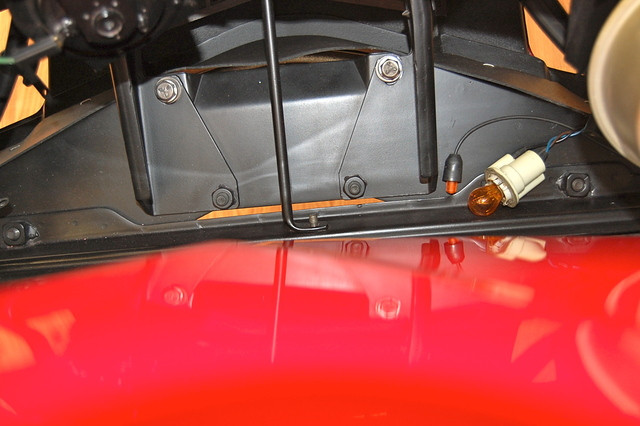
The is the front corner on an un-hit body.
You can see the hole is larger than the bolt and the hole's edges are chamfered to reduce the chance that the bolt or bumper will damage the fiberglass and paint.
Maybe it'll give you some guidance.
Regards,
Alan

The is the front corner on an un-hit body.
You can see the hole is larger than the bolt and the hole's edges are chamfered to reduce the chance that the bolt or bumper will damage the fiberglass and paint.
Maybe it'll give you some guidance.
Regards,
Alan
 04-17-2017, 09:26 AM
#6
Melting Slicks
Thread Starter
 I found my test fit photo and see that it was a bit low too but should be able to be adjusted.
The following users liked this post:
MISTERZ06 (04-17-2017)
04-17-2017, 09:35 AM
#7
Melting Slicks
Thread Starter
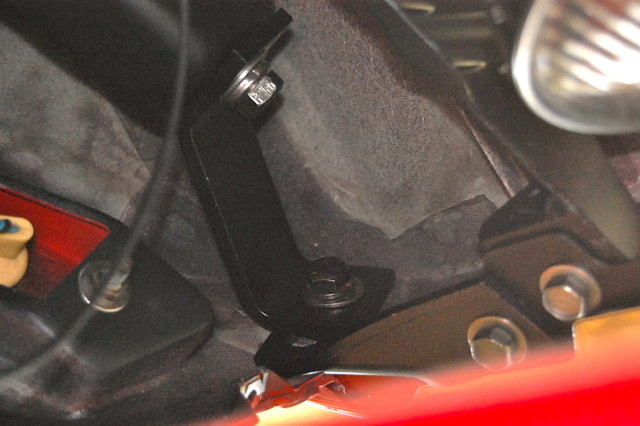
I think I have to start out by positioning the horseshoe bracket higher. THEN go about attaching the bumper. I can now see by this other reference photo, my bracket is positioned too low now after installing the new nose.


The following users liked this post:
MISTERZ06 (04-17-2017)
04-17-2017, 10:37 AM
#10
Team Owner
Member Since: Sep 2006
Location: Westminster Maryland
Posts: 30,173
Likes: 0
Received 2,878 Likes
on
2,515 Posts
Hi TR,
Remember, the bottom of the bumper-ettes must align with the chrome trim running around the side and lower portion of the grill openings.
I believe they should be part of your fitting process too.
The chrome trim can throw a 'kink' into obtaining a nice fit because THEIR position is really determined by the fiberglass portions of the lower front fenders and valance panel.
Here's an example of quite a good fit/alignment on one side, but a poor fit on the other.
If you look carefully it appears the bumper is 'low' on the right-side which is 'contributing' to the poor bumper-ette fit.
Regards,
Alan
Last edited by Alan 71; 04-17-2017 at 10:46 AM.
The following users liked this post:
MISTERZ06 (04-17-2017)
04-17-2017, 11:18 AM
#11
Melting Slicks
Thread Starter
, I'm glad you brought that to my attention. Obviously a mock up is in order before everything gets buttoned up. Regards, Fred
04-17-2017, 11:19 AM
#12
Melting Slicks
Thread Starter
The following users liked this post:
MISTERZ06 (04-19-2017)
04-17-2017, 05:15 PM
#13
Melting Slicks
Thread Starter
[QUOTE=Alan 71 Hi TR,
Remember, the bottom of the bumper-ettes must align with the chrome trim running around the side and lower portion of the grill openings.
I believe they should be part of your fitting process too.
Regards,
Alan
[/QUOTE]
 Just test fitted my bumperettes.
  .
.
Remember, the bottom of the bumper-ettes must align with the chrome trim running around the side and lower portion of the grill openings.
I believe they should be part of your fitting process too.
Regards,
Alan
[/QUOTE]
Just test fitted my bumperettes. .
Last edited by TWINRAY; 04-18-2017 at 08:16 AM.
The following users liked this post:
MISTERZ06 (04-19-2017)
04-18-2017, 04:44 PM
#14
Melting Slicks
Thread Starter
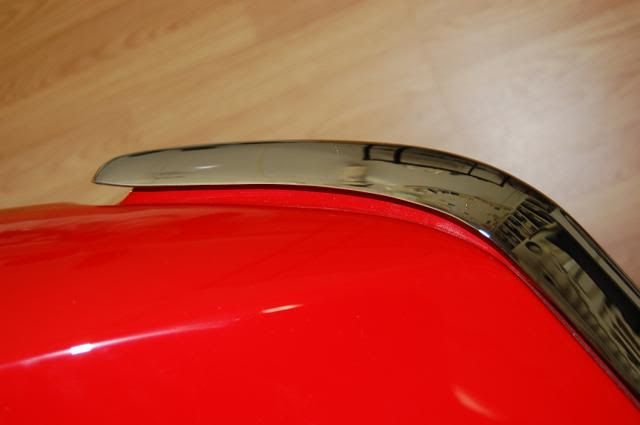
I finally figured out today what I did wrong. My new top surround should have come with an attached FRONT BUMPER REINFORCEMENT BAR but didn't. The top surround was advertised as a GM Repro part and whether it is or not I'll probably never know. The seller sent me the reinforcement bar and I rivited (and for good measure epoxyed) it on. I lined it up toward the outside (if you know what I mean) instead of the inside (or topside) of the new surround. When looking at my old nose today looking for a clue, I noticed the difference in the length of the "lip." The extended distance prohibits the bumper from raising high enough. If I didn't epoxy the reinforcement bar on, I could "just" drill out the rivets, push the bar up and re-rivet it on. But with the epoxy, I'll never get it loose without destroying something. I was able to grind down some of the lip that was fiberglass but that still won't get the bumper to the oem height. It's better now but still a bit too low but that's the way it goes.
Last edited by TWINRAY; 04-19-2017 at 08:35 AM. Reason: Bumper reinforcement bar , not HEADER BAR.
The following users liked this post:
MISTERZ06 (04-19-2017)
04-18-2017, 07:15 PM
#15
Race Director


Sad to say...but..
I can see how the rivet line angles down when you get to the center....but yet the rivets at the end are basically centered in the width of the flange of the top hood surround edge.
FOR WHAT THIS IS WORTH TO YOU;
Hypothetically....I your car were in my shop and this happened...I would have to fix it due to obvious reasons. This can be corrected without a lot grief. Or at least...once I realize what I have to do I get it done and not dwell on what it takes. I try to keep motivated and keep moving in the direction of progress to getting the problem resolved.
YES...you will need to break out the paint gun again...but that is not that bad due to you would ONLY be painting on the flat surface where the rivets are installed and able to 'back-tape' across the curve in the body just above the rives and HIDE the blend line.
With that being able to be easily done....keeping a positive outlook on it. The I would drill out all of the rivets...and using a heat gun and pieces of metal to direct the heat onto the metal support that you epoxied onto the underside of the front lip of the top hood surround. Also..the metal or whatever you use to try to keep the heat from hitting the fiberglass where it is not needed. BUT...also keep in mind...the amount of heat that is needed to get the epoxy to release is usually still below the temperatures of ruining paint.
Becasue you are concentrating the heat on the steel support....it will heat up and begin to soften/weaken the epoxy so you can get it to begin to pry off...which I KNOW it will do without damaging the fiberglass because you are not allowing it to get teh fiberglass HOT....ONLY the metal support and the epoxy that touches that surface of the metal support. This the bonding surface between the metal support and epoxy is where the epoxy will break loose.
IF you choose to do this...keep in mind you are trying to take off a rigid piece of metal that will not bend...so when you begin to heat it up...you have to keep moving the heat further down the support so when it does start to release...you can use something thin to keep applying slight pressure where you get it to start to release and eventually it will come off.
Once it is off. I would do the filling in on the holes and get the epoxy off and re-install it so the bumper will fit.
For me this is easy....compared to a two-tone 1981 Corvette that I did about 25+ years ago that when I had painted it....I missed how the dog leg of the drivers quarter did not match up flush with the door the way I wanted it...and WITH FRESH PAINT....I heated up the dog-leg and separated it from the lock pillar an moved it out and bonded it back in a and re-painted that area and re-applied the special tape that separated teh two tone colors and got the car done.
Just saying....I have 100% faith on your ability to do this if you choose to do it.
DUB
04-18-2017, 07:27 PM
#16
Melting Slicks
Thread Starter
^^ Hey Buddy, hope all is well. Thanks for your detailed information. Will review this situation tomorrow and get back to you, Regards, Fred
Last edited by TWINRAY; 04-18-2017 at 07:29 PM.


 04-19-2017, 05:28 PM
#19
Race Director
Thanks for asking and I am doing well.
Not trying to sway your decision...but honesty.. I KNOW you can do this and get it right if YOU have any doubts. I have no doubts on your ability. For what ever that is worth.
DUB
The following users liked this post:
TWINRAY (04-25-2017)