
71 headlight height
 04-25-2017, 10:55 AM
#1
Instructor

Thread Starter

Member Since: Jun 2003
Location: New Fairfield CT
Posts: 143
Likes: 0
Received 0 Likes
on
0 Posts

rebuilding 71 vette nose and surround bar. Installed new surround bar, rebuild headlight buckets, all adjustments done. Drivers side right height on open is correct, passenger side 1" lower on open. No adjustments will change it. brought and replaced bucket assembly on drivers side as was on disassembly cracked, but reused passenger side unit, the one that is lower. Surround bar was installed with correct bonding strip and west adhesive and clamped every inch. No gaps on surround bar. could the unit I brought on ebuy that's a different year? Should I just bring the correct one down to the other side height? I have read shims were needed on any other than 68 - 72. I have run out of adjustment ideas and searched all the forum. I have done the pivots the down stop adjustment the up stop bracket. I need to get this finished so I can paint back to Ontario orange. I would not mind 1/8 or 1/4 difference but 1" is noticeable. After all the correct fiberglass panels and bonding strips in this project this is driving me crazy. Any ideas out there. There was old collision damage on the front end that I found on disassembly, had a lower valance and passenger fender made of resin and cardboard.
 04-25-2017, 11:11 AM
#2
Team Owner


Member Since: Jun 2000
Location: Southbound
Posts: 38,928
Likes: 0
Received 1,468 Likes
on
1,247 Posts
Cruise-In II Veteran

Passenger's side could be 75 and later. If so, they need 1/2" spacers under each front foot for use in the 68-74 cars.

Last edited by Easy Mike; 04-25-2017 at 11:12 AM.
04-25-2017, 12:36 PM
#3
Team Owner
Member Since: Sep 2006
Location: Westminster Maryland
Posts: 30,173
Likes: 0
Received 2,878 Likes
on
2,515 Posts
Hi sr,
This is the part of the head light frame that Mike suggested you take a look at.
This is a 71 right side frame.
There are no shims in place.
??
Regards,
Alan
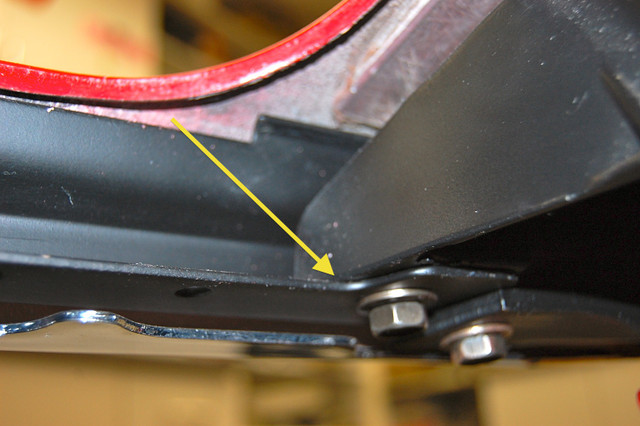
Right side� inner.
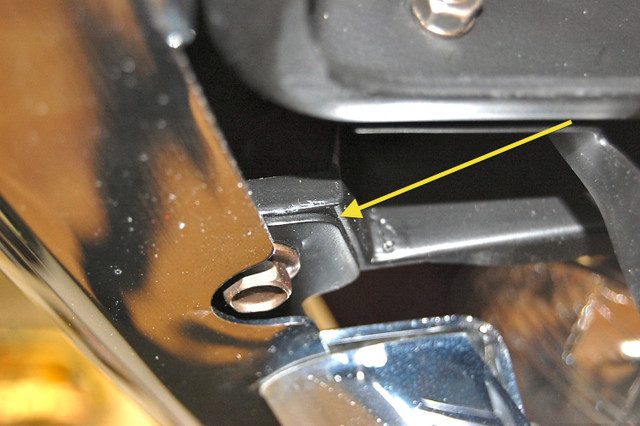
Right side� outer.
This is the part of the head light frame that Mike suggested you take a look at.
This is a 71 right side frame.
There are no shims in place.
??
Regards,
Alan
Right side� inner.
Right side� outer.
Last edited by Alan 71; 04-25-2017 at 12:36 PM.
04-25-2017, 04:22 PM
#4
Instructor
Thread Starter
Member Since: Jun 2003
Location: New Fairfield CT
Posts: 143
Likes: 0
Received 0 Likes
on
0 Posts
Added shims under passenger side and it worked, I guess where someone did the other crappy body work they also used the wrong headlight assemble. Thanks all
04-25-2017, 04:24 PM
#5
Team Owner
Member Since: Sep 2006
Location: Westminster Maryland
Posts: 30,173
Likes: 0
Received 2,878 Likes
on
2,515 Posts
Hi sr,
GOOD!
Regards,
Alan
GOOD!
Regards,
Alan
04-25-2017, 05:48 PM
#6
Team Owner

Interesting. I've noticed when doing all my recent headlight work that my right headlight bucket when open is about a 1/4 lower than the left bucket. When closed they both match the rest of the body. I looked in the AIM on if this is correctable but there doesn't seem to be any "open" adjustments. Maybe I need a shim on the right then adjust the closed position back to the body.
My Daniel Stern relay kit should be in soon so I guess I have another "while your in there" project.
My car was hit in that area before I owned it and I've replaced the header bar that was cracked. My guess is the body work done years ago is not quite right.
My Daniel Stern relay kit should be in soon so I guess I have another "while your in there" project.
My car was hit in that area before I owned it and I've replaced the header bar that was cracked. My guess is the body work done years ago is not quite right.
04-26-2017, 06:47 AM
#7
Team Owner
Member Since: Jun 2000
Location: Southbound
Posts: 38,928
Likes: 0
Received 1,468 Likes
on
1,247 Posts
Cruise-In II Veteran
 04-26-2017, 09:35 AM
#8
Pro


First my apologies to Stockray for jumping onboard your thread but I have a similar problem in that my 73 drivers side headlight does not fully close about 3/8" high and no adjustment will correct it. Would the 75 and later cause this problem also?
04-26-2017, 12:34 PM
#9
Team Owner
Member Since: Sep 2006
Location: Westminster Maryland
Posts: 30,173
Likes: 0
Received 2,878 Likes
on
2,515 Posts
Hi gr8,
Have you tried the adjustment at this point? (Photo) It's a small hex head.
Have you attempted to do an adjustment on the clevis on the end of the shaft coming out of the actuator?
Regards,
Alan
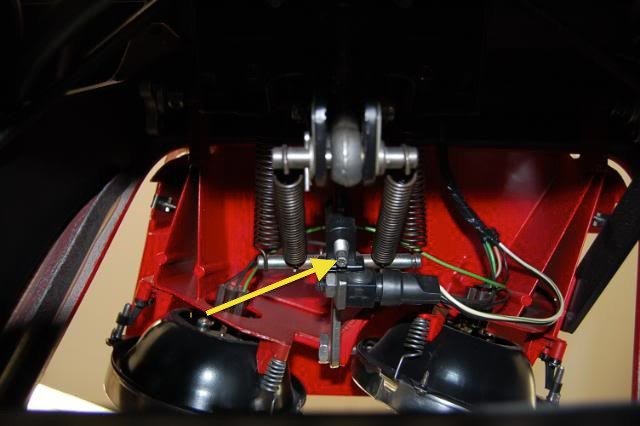
Have you tried the adjustment at this point? (Photo) It's a small hex head.
Have you attempted to do an adjustment on the clevis on the end of the shaft coming out of the actuator?
Regards,
Alan
04-26-2017, 06:06 PM
#10
Pro
I've tried those adjustments Alan to no avail. Another member suggested I shorten the threaded rod on the actuator that the has the clevis on it. I am thinking I should try using the half inch shims first. I was wondering if any other member has run into this issue.
04-27-2017, 07:55 AM
#11
Team Owner
Member Since: Sep 2006
Location: Westminster Maryland
Posts: 30,173
Likes: 0
Received 2,878 Likes
on
2,515 Posts
Hi gr8,
It's tough to even guess what might be causing your mis-fit without seeing the mechanism.
?
Regards,
Alan
It's tough to even guess what might be causing your mis-fit without seeing the mechanism.
?
Regards,
Alan
04-27-2017, 09:17 AM
#12
Burning Brakes

gr8,
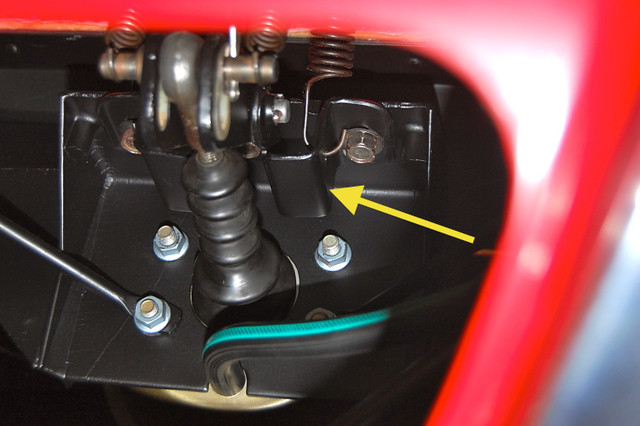
There is a bracket located just beneath the headlight door that the clevis and all other parts attach to. This is the component that will adjust the headlight door height issue. There is a slotted hole right smack dab in the middle of it that allows the adjustment for height. You would simply loosen the bolts connected to it, and raise or lower the headlight lid. You would need to disconnect the clevis to do this, but you will need to readjust it anyway after you're done. Picture of said bracket below....
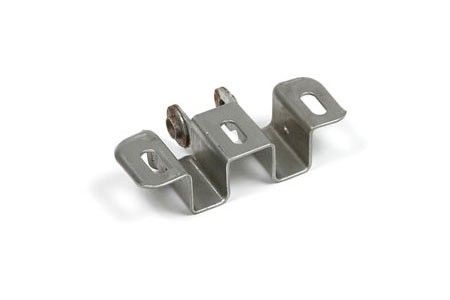
There is a bracket located just beneath the headlight door that the clevis and all other parts attach to. This is the component that will adjust the headlight door height issue. There is a slotted hole right smack dab in the middle of it that allows the adjustment for height. You would simply loosen the bolts connected to it, and raise or lower the headlight lid. You would need to disconnect the clevis to do this, but you will need to readjust it anyway after you're done. Picture of said bracket below....
 04-27-2017, 12:56 PM
#13
Pro
gr8,
There is a bracket located just beneath the headlight door that the clevis and all other parts attach to. This is the component that will adjust the headlight door height issue. There is a slotted hole right smack dab in the middle of it that allows the adjustment for height. You would simply loosen the bolts connected to it, and raise or lower the headlight lid. You would need to disconnect the clevis to do this, but you will need to readjust it anyway after you're done. Picture of said bracket below....
There is a bracket located just beneath the headlight door that the clevis and all other parts attach to. This is the component that will adjust the headlight door height issue. There is a slotted hole right smack dab in the middle of it that allows the adjustment for height. You would simply loosen the bolts connected to it, and raise or lower the headlight lid. You would need to disconnect the clevis to do this, but you will need to readjust it anyway after you're done. Picture of said bracket below....
04-27-2017, 02:43 PM
#14
Team Owner
Member Since: Sep 2006
Location: Westminster Maryland
Posts: 30,173
Likes: 0
Received 2,878 Likes
on
2,515 Posts
Hi Dave,
Good One!
I'm not sure if I'd EVER have remembered the adjustment available in that bracket's location.
Thanks!
Regards,
Alan
Good One!
I'm not sure if I'd EVER have remembered the adjustment available in that bracket's location.
Thanks!
Regards,
Alan