When you click on links to various merchants on this site and make a purchase, this can result in this site earning a commission. Affiliate programs and affiliations include, but are not limited to, the eBay Partner Network.
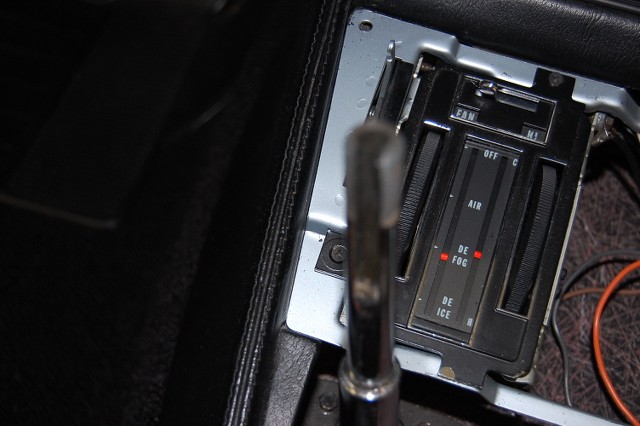
I searched the threads and cannot find what I am looking for. I was able to get the E-console off and now trying to remove the shift console assembly. I took out the obvious 4 screws, removed the shifter ball/button/spring, even got the tiny little allen screws out of the VENT *****, BUT I cannot get the plastic plate insert or assembly to budge and since mine are NOT broken and they are $260+ to replace, I need to know how to get them off!! I just want to refurbish them and take off the tunnel cover and prep dye it before the carpet goes in.
YES, I looked at the AIM, but apparently I am either missing something or there is spilled soda/coffee/glue locking that plastic in place!
Are there support groups on CF for restoration peeps thinking of tapping out????? Talk me down!!
What are you calling "plastic"? The shifter plate is metal. Did you remove the nuts from the two studs at the bottom of the cluster bezel? You will not be able to reach the fiber optics bezel until you have access from underneath.
What are you calling "plastic"? The shifter plate is metal. Did you remove the nuts from the two studs at the bottom of the cluster bezel? You will not be able to reach the fiber optics bezel until you have access from underneath.
Well color me stupid. Thanks, I "***"umed these plate parts were plastic. Even the smaller indicator plates are metal? Will try to get underneath. Since I have the carpet out and E console out what is the best approach to those nuts Easy Mike? Planned to restore, but gotta get it off first. This is my first experience at disassembling a classic car. The "well no sh!#" stuff to you guys, is new to me. Sorry for the seemingly simple questions but I'm getting exhausted spending hours doing things forum members say takes 20 minutes.
Hi c1n,
Normally when the 4 screws at the corners of the shifter plate are removed you can begin to make progress lifting the plate free from the console itself. (Start to lift it up so that you can begin to disconnect things so it can be lifted free.)
BUT, there are 'tabs' in the corners of the console's top opening that can be easily broken.
Is it possible your plate is 'glued' to the console?
Are you getting a sense that it's 'free' at all?
Regards,
Alan
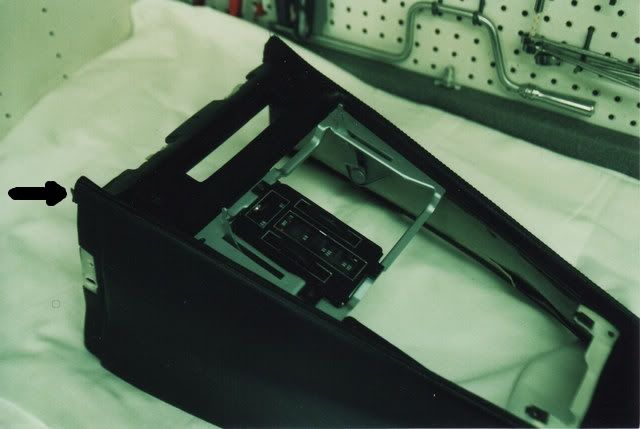
Here's the console with the top plate removed. [/QUOTE]
Alan,
It is the horizontal plate that I am struggling with, the part that is already off on your picture. Will try to get at those spots you and Mike are referring to that are holding it in. Will head out to the garage this am, fingers and eyes crossed. I have the vertical side trim out, can't imagine what else I could take off to get to it.
Hi c1n,
That's the same plate I'm referring to.
Once the 4 screws in the corners are out the plate should be free to BEGIN being lifted up so the various things that need to be disconnected can be and then the plate removed.
I asked if it was 'bonded' in place because of a problem with the mounting tabs for those 4 screws.
Regards,
Alan
The plate holding the heater controller seen in my photo remains with the console until after the top plate is removed; then it comes off.
Seriously, I can't thank you guys enough. If I could ever return the favor some day for all the assistance, I would gladly do it! If you ever need medical advise, I got your back! Perhaps I could talk ya through a vasectomy some time, just for fun! It's really pretty simple and only takes about 15 minutes. BWHAHA!!
Hi c1n,
I asked if it was 'bonded' in place because of a problem with the mounting tabs for those 4 screws.
Regards,
Alan
Yep, there was some "bonding" going on with the plate. I applied gentle pressure, from the underside of the console and it slowly let go. Now to access the other items underneath to disconnect.
2020 Corvette of the Year Finalist (performance mods)
2019 C3 of Year Winner (performance mods)
2016 C3 of Year Finalist
Originally Posted by c1nicole
Seriously, I can't thank you guys enough. If I could ever return the favor some day for all the assistance, I would gladly do it! If you ever need medical advise, I got your back! Perhaps I could talk ya through a vasectomy some time, just for fun! It's really pretty simple and only takes about 15 minutes. BWHAHA!!
Wow, you're either very helpful or very mean, haven't decide which yet, I'll be keeping an eye on you. The 2 bolts referred to seperate the horizontal shifter console from the vertical gauge console just below the radio.
Keep us updated Dr No.
Wow, you're either very helpful or very mean, haven't decide which yet, I'll be keeping an eye on you. The 2 bolts referred to seperate the horizontal shifter console from the vertical gauge console just below the radio.
Keep us updated Dr No.https://www.youtube.com/watch?time_c...&v=U1TmeBd9338
yes its Goldfinger but it fits
RR,
Perspective, if you want a vas: helpful, if not, then: the dilemma 007 found himself facing!! Love James Bond, and Clint Eastwood! Good stuff.
Alan,
If it is a cat, it is ALWAYS "fixing", they procreate like mad. No vasectomy for them, we just lop the nads off altogether.
Got the metal plate (AKA plastic I was babying) off and cleaned it up. There was a dark brown ick acting as a glue. I can only suspect a mix of soda, ashes, coffee and things we can only imagine. Getting it prepped for paint now. Will post pictures on this thread when I am done.
Getting the screws off the underside was no joke! That yoga came in handy, I need one of those 90 degree screw drivers someone mentioned. How on God's green earth can you have a garage packed full of tools and still find a need for one you DON'T have????
Nicole - here is the underside of the center console. Its easier to explain it if you can see the photo of what you are trying to remove.
More than likely, the 2 nuts that attach where I have the red circles are what is holding you up now. There are studs that hang down from the radio/gauge panel and they attach with a 3/8 head nut.
Usually to get to those, you have to remove the left and right vent cables that are attached to the console with the 2 bolts that are circled in yellow.
The green circles are for the 2 bolts that hold the fiberoptic cable to the lens and there is enough cable for the fiberoptics that you can pull the panel up and away before removing that cable.
The blue are speed nuts that hold the fiberoptic lens bezel to the shifter surround and those can stay attached until you get it out of the car.
Hope this helps, and let me know if you have more questions.
Nicole - you of course will need to unscrew the shift ball and reverse lockout button so that you can pull the whole panel up to get to the underside of the hvac controls and cables.
Removing the fiberoptic panel is not really going to do you much good if you are trying to remove the whole shift plate.
Hey Nicole - A couple more pointers from someone who just went through the same pain:
- Before you go to re-assemble the shift console to the gauge cluster (at the 2 studs/slots circled in red by Brad above), I was advised to hand start the nuts on the studs first, then they can slide over the slots in the lower, leaving you just having to snug them up from underneath, while you get the fit tweaked. I also added a larger washer on the stud before the nut, which was just wider than the slot.
- Second, to get a good fit-up of your shifter plate to the console, I used a heat gun on warm setting to soften the vinyl around the perimeter, which allowed the plate to nest nicely into the vinyl. Careful not to overheat it, or you'll bubble the vinyl. Now my console was a new one, so I'm not sure how heat will affect 45 year old vinyl, so go slow, tightening the 4 corner screws gradually as you heat the console.
Good luck and take photos as you go, and of the final results!!
Nicole - you of course will need to unscrew the shift ball and reverse lockout button so that you can pull the whole panel up to get to the underside of the hvac controls and cables.
Removing the fiberoptic panel is not really going to do you much good if you are trying to remove the whole shift plate.
bigredbrad
Brad,
That picture is UBER helpful, thank you. I already had the head of the shifter off but put it back on. Will tackle this tomorrow!!
Hey Nicole - A couple more pointers from someone who just went through the same pain:
- Before you go to re-assemble the shift console to the gauge cluster (at the 2 studs/slots circled in red by Brad above), I was advised to hand start the nuts on the studs first, then they can slide over the slots in the lower, leaving you just having to snug them up from underneath, while you get the fit tweaked. I also added a larger washer on the stud before the nut, which was just wider than the slot.
- Second, to get a good fit-up of your shifter plate to the console, I used a heat gun on warm setting to soften the vinyl around the perimeter, which allowed the plate to nest nicely into the vinyl. Careful not to overheat it, or you'll bubble the vinyl. Now my console was a new one, so I'm not sure how heat will affect 45 year old vinyl, so go slow, tightening the 4 corner screws gradually as you heat the console.
Good luck and take photos as you go, and of the final results!!
Great pointers, my original has subpar fitment, so that is a great tip! Call me crazy, but I find it rewarding to restore and keep original parts. They are not sparkly new, but brings me pleasure to know the time was taken to keep an original part that has been on the car since day one. I just refinished some more parts today (cross posted on restoration journey begins).
You all have been essential, and we don't all have to agree but we all have a passion for a great car!!
Hope this helps, and let me know if you have more questions.
bigredbrad
Even with your pictures and very detailed description, 5 hours later and I am still unable to get the heater console out. Pretty colorful language was my only successful venture today. I am really to the point of just finding someone local to pay to do this. All this just to DYE the center console???? Wishing I had just left well enough alone. Extremely frustrated at this point that all afternoon spent and no progress. No room to get a tool in there so not clear at all how anyone gets those off. I managed to break a black plastic tab off so that is the only bolt I managed to get off, and now I have to deal with a broken tab.
Hi c1n,
I'm not certain what part you're asking about?
The heater/defroster control screws to the metal frame that just sits on top of the console. The 2 forward screws on the shifter plate also hold this bracket in place.
Here you can see the 2 screws on the controller and a hole in the bracket for one of the shifter plate screws.
Regards,
Alan

 05-18-2017, 10:43 PM

 Talk me down!!


 Thanks, I "***"umed these plate parts were plastic. Even the smaller indicator plates are metal? Will try to get underneath. Since I have the carpet out and E console out what is the best approach to those nuts Easy Mike? Planned to restore, but gotta get it off first.
  This is my first experience at disassembling a classic car. The "well no sh!#" stuff to you guys, is new to me. Sorry for the seemingly simple questions but I'm getting exhausted spending hours doing things forum members say takes 20 minutes.


 I applied gentle pressure, from the underside of the console and it slowly let go. Now to access the other items underneath to disconnect.