When you click on links to various merchants on this site and make a purchase, this can result in this site earning a commission. Affiliate programs and affiliations include, but are not limited to, the eBay Partner Network.
Mine is a convertible and may be a little different than a coupe. You won't have to deal with getting the decklid hinges out of the way.
On replacing the #4 body mounts, the biggest problem I had was removing the top outer bolt out of the deck lid hinges. The inner ones I got with a 1/2" ratchet box end wrench. The outers there is no room for it. The heads of the bolts face towards the rear of the car and you can not see them, only reach up inside and feel them. I spent about an hour and a half getting the outer bolt out of the right side hinge with a curved wrench.
When I went to do the left side, I thought to heck with this, and I drilled a 1" hole from underneath through the back of the cavity the hinge is in with a hole saw. I then had my friend run a long extension with a swivel socket, that I taped to stay straight, through the hole and I guided onto the bolt from inside the car. Ten seconds later the bolt was out. I will use a 1" plastic plug to fill the hole and when together, no one will be the wiser.
To remove the #4 body mount I first ground off all the rivets from under the car with a cutoff wheel. I ground into the mount itself a ways to make removal easier.
On the back side of the #4 mount is a panel installed by the factory after the mount was installed. You can not get to the rivet holding that tab to grind it off. I first took a screwdriver and got it up between the panel and the mount tab and pried it to get any bonding agent loose from the mount. I then went back into the cabin of the car and center punched the head of the rivet on the back side. I then took a number 10 drill bit and drilled through the rivet, the mount and the panel behind it. I was then able to free the old mount from all it's rivets. I ground all the remaining rivets flush with the body. I used a punch and drove all but the 2 inside rivets out of the body. I took a 1/2" drill and opened up the back of the panel over the rear tab/rivet where the drill came through after I drilled from the inside. I then took a die grinder and carbide bur and cleaned up the hole to give me good access to the rivet when installing the new one.
The 2 rivets toward inside also have a panel install by the factory over them. I ground the bottom of the body that meets the mount bolt area flat and then put the new mount into position. I then inserted rivets into all the holes except for the 2 under the panel. I used the mount for a template and drilled up through the 2 remaining rivets and up through the panel over them.
My car is not stock in any way, so I was not worried about being NCRS correct with my rivets. I used 3/16 heavy duty rivets and a rivet gun. I first put a bottle jack and a wood block under the mounts and put pressure up against the body to make sure they were seated. I pop riveted everything in place. They are not going anywhere now. They sit square and look good without cutting any panels out of the way. There is only a 1/2" hole at the back of the one panel underneath.
I'd replace the brake and fuel hard lines while the body is off, (or whichever one is the bear to do with the body on, I can't remember which one it is). Looks like your well on your way to getting it in tip top shape though.
I'd replace the brake and fuel hard lines while the body is off, (or whichever one is the bear to do with the body on, I can't remember which one it is). Looks like your well on your way to getting it in tip top shape though.
I already had new brake lines on it that I had just put on before it went to the painter. They are a little corroded now, like everything else.
I am putting a braided stainless -8 AN feed line and a -6 AN return for the fuel. It's getting a Mallory 140 GPH electric fuel pump fed from a sump I welded on a new tank.
Check your frames guys. I found several cracks in the welds around and on the upper and lower front suspension mounts. The stock welds are not the greatest.
There is still oil and grease in the frame in that area too. It makes welding a challenge, especially for someone who hasn't welded in over twenty years.
Mike
Hey Mike....good points here.
I am about to get back on my frame prep and have looked at your thread and several others in this are.
I too have a couple of defects that need addressing before I have it sandblasted and powder coated.
Just so happens my new neighbor next door is a certified welder and has offered to help me tune up my skills with my MIG welder. Talk about luck.
Thanks for the inspiration to get back to my project.
Your welding skills are better than what GM did to my frame when it left the factory. When I did my fuel lines, I had all the stainless lines I needed from a local source and goofed. I put 5/16th line as the return not knowing that if I upgrade to fuel injection later on, would need a 3/8th return line. As the car is driving now and I was looking into that, I should of done that a bit differently at the time.
I found 2 cracks in the upper frame differential mount today and 1 in the front frame differential mount.
I am very glad I decided to pull the body off and weld up the frame.
I made my gussets for the front lower suspension mounts and put one on the frame above the sway bar mount.
Im not a welder and this oil contaminated metal has been a struggle for me. Everything is burned in good, just hard to make pretty welds when it's spitting and popping at you.
Mike - Can you help me understand where you found cracks in the frame differential mount? When I pulled the body off my 68 vert a month ago I found a cracked weld on the DS of the bracket that the rear diff crossmember bolts onto but have not found any other cracks so far. I don't have welding skills but plan on having the same thing you're doing done by a shop before putting the car back together. Thanks, Tod
Mike - Can you help me understand where you found cracks in the frame differential mount? When I pulled the body off my 68 vert a month ago I found a cracked weld on the DS of the bracket that the rear diff crossmember bolts onto but have not found any other cracks so far. I don't have welding skills but plan on having the same thing you're doing done by a shop before putting the car back together. Thanks, Tod
The spot you have circled is where I found a crack on both sides of the frame. The other crack was on the front differential mount in a weld that was barely burned in from the factory.
I made gussets for the top differential and suspension mounts today. There are gussets for the side under the frame rail too that I will weld in after i flip the frame over.
I pressed out the sombrero bushings and am going to weld in disks to raise the differential in the frame or lower the frame over the differential and rear suspension, whichever you prefer to call it.
Done with the top side. Time to turn it over and do the bottom. Not as much to do on the bottom as there was on the top, so should be putting suspension back on it this weekend.
Comparison of factory weld and my weld. Mine's not as pretty as a professional welder could do, but it is burned in good and is not going anywhere.
I finished the top and sides of the frame and flipped it over to start on it. In checking it for cracks, I found about a dozen more cracked welds. Below in just one area marked with red marker. Most of the cracks I have found so far have been in welds. A good weld should never crack.
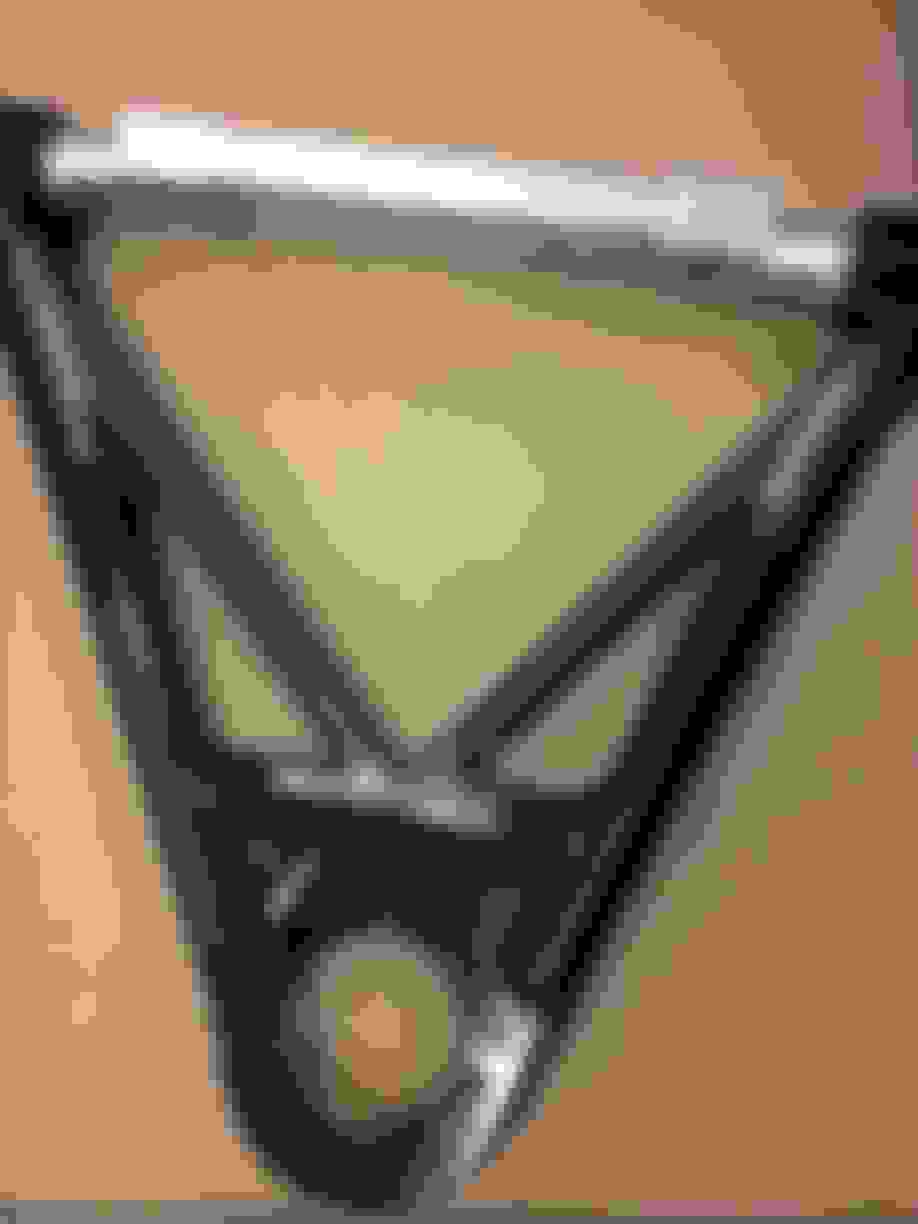
Back a few years ago I bought a set of VB&P tubular a-arms. I didn't like them when I got them because they looked like they would flex. About that time another member here posted video of them on his car flexing very badly.
I got some .059" wall chromoly tubing and made triangulated braces. There will be zero flex in them now!
Mike
Interesting mod.
What are you using for springs on the front? Stock configuration or adding in coil overs? I have Vansteel coil over upper a-arms but their stock replacement lowers. Trying to figure what to do before assembly.
Txs
Interesting mod.
What are you using for springs on the front? Stock configuration or adding in coil overs? I have Vansteel coil over upper a-arms but their stock replacement lowers. Trying to figure what to do before assembly.
Txs
I'm using VB&P 550# springs with a half coil cut off for starters, we'll see where the ride height settles out at. I have Bilstein Sport shocks all the way around. I have poly bushings in the stock lower a-arms. A 1 1/8" sway bar on front mounted in poly and poly on the end links. The steering is Steeroids rack and pinion. The frame is gusseted and fully welded. The body will be mounted with Energy Suspension poly body bushings.
In the rear I did away with the sombrero bushings and I am raising the differential in the frame and mounting it solid. I have Van Steel offset trailing arms and smart struts with heim rod ends. I have a 360# glass spring, but it is one of the funky over arched ones. I shortened it an inch and with long bolts and with the diff raised, I hope to get a good ride height. I will replace it with a VB&P later, but want to see if the 360# is what I want or if a 420 might be better. I have the Van Steel narrow 5/8" rear sway bar for wide tires.
It should be a lot stiffer and handle pretty good.
Made a new bottom piece for my front cradle/crossmember out of high grade .125" plate steel. It is way stronger than the original bottom of the cradle.
I shaped it with a press and then clamped it in place, tack welded it and then used a BFH to get it to lay properly. I welded it solid to the lower a-arm mounting brackets and to the cradle. With the other gussets to the mounts and being rewelded, they are not going anyplace now!
Photo is before I tacked it in place. I forgot to take a photo when done before I came home. You get the idea though.

 09-20-2017, 06:49 PM