
Centering 72 Vette gas tank during install
 10-07-2017, 01:07 PM
#1
Instructor

Thread Starter

Member Since: Dec 2011
Posts: 129
Likes: 0
Received 0 Likes
on
0 Posts

Has any one else had this problem ? I am installing a N.O.S. 72 Vette gas tank in a 72. Just before I tighten down the two straps which secure the tank to the cross members I get it centered so the filler neck is right in the center of the gas cap door opening. As I tighten down the straps the tank slowly moves rearward. The gas cap is then almost hitting the chrome bezel when the gas cap is removed ( no longer centered ). I even wedged the tank a little forward before I tighten it down but it still moves rearward ( too far ). Any thoughts anyone please ??
 10-07-2017, 01:43 PM
#2
Team Owner

Member Since: Sep 2006
Location: Westminster Maryland
Posts: 30,173
Likes: 0
Received 2,878 Likes
on
2,515 Posts

Hi v,
Perhaps these photos will help you see where the tank typically sits when the straps are tightened.
Regards,
Alan
Tis a 71 car.
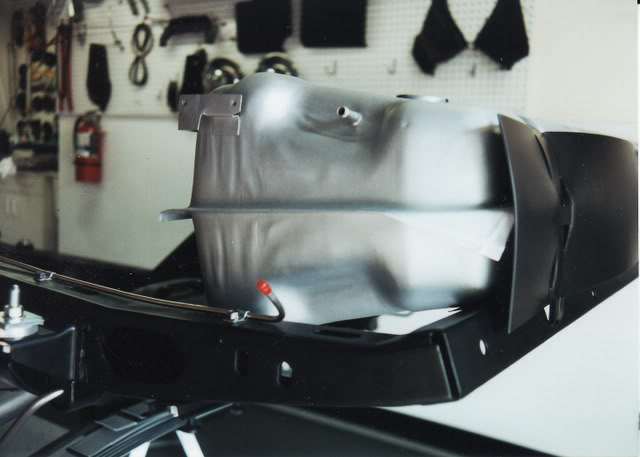
Perhaps these photos will help you see where the tank typically sits when the straps are tightened.
Regards,
Alan
Tis a 71 car.
The following users liked this post:
Z06LMB (10-09-2017)
10-07-2017, 02:38 PM
#3
Instructor
Thread Starter
Member Since: Dec 2011
Posts: 129
Likes: 0
Received 0 Likes
on
0 Posts
Mine looks quite like your pictures. Is there any way ( assuming there is not a body mounted to the frame in your pictures ) that I can get some sort of reference to compare to my frame ( body is on the frame ). For example: Could you snap a nice straight and level side view of the frame rail from the rear most end of the frame to about where the differential cross member is? I would like to compare a known undamaged one with mine. My car had a very minor rear bumper damage accident and I would like to be sure it was not a problem. I did have to straighten out the front gas tank cross member as it was bent up in the center about 1/4". It straightened out very nicely. without any difficulty.
10-07-2017, 04:55 PM
#4
Team Owner
Member Since: Sep 2006
Location: Westminster Maryland
Posts: 30,173
Likes: 0
Received 2,878 Likes
on
2,515 Posts
Hi v,
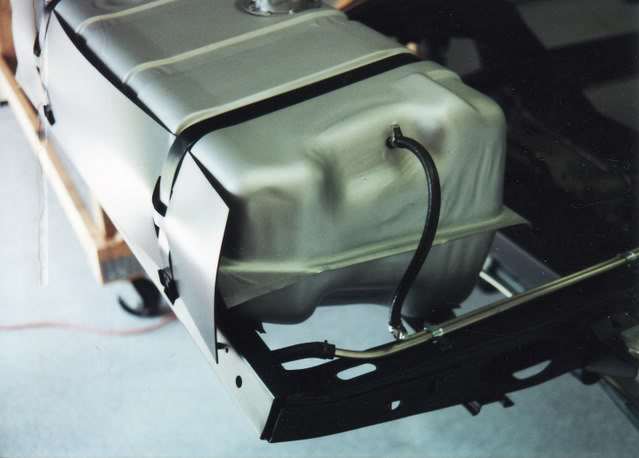
Perhaps this will help.
Notice the position of the fuel sending unit relative to the rear crossmember and the 'indented' circle's position relative to the tank support bracket.
Regards,
Alan
Perhaps this will help.
Notice the position of the fuel sending unit relative to the rear crossmember and the 'indented' circle's position relative to the tank support bracket.
Regards,
Alan
10-07-2017, 05:29 PM
#5
Instructor
Thread Starter
Member Since: Dec 2011
Posts: 129
Likes: 0
Received 0 Likes
on
0 Posts
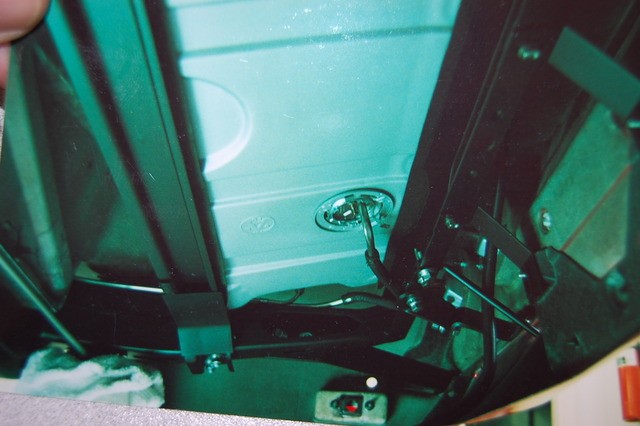
Good information. I am wondering if the strap that holds the tank in may be the problem ? My original strap ( where it hooks into the cross member ( front end of tank position ) is not as shown in the assembly manual. It actually goes horizontal first ( to hook into the slot for it ). It then bends upward ( due to the tension on it when it is tightened ). Secondly, the seam on the tank about half way up sticks out about 3/4" to 1" which would cause the strap ( when tightened ) to force the tank rearward.
I would like to know the actual measured distance from the rear frame cross member to the sending unit on the tank. I cannot tell exactly how close it is in your last picture as the felt anti rattle material makes it difficult to see the cross member distance ( both are black ).
Sorry to bother you. I understand if you are busy and unable to continue.
 10-08-2017, 01:48 PM
#7
Team Owner
Member Since: Sep 2006
Location: Westminster Maryland
Posts: 30,173
Likes: 0
Received 2,878 Likes
on
2,515 Posts
Hi v,
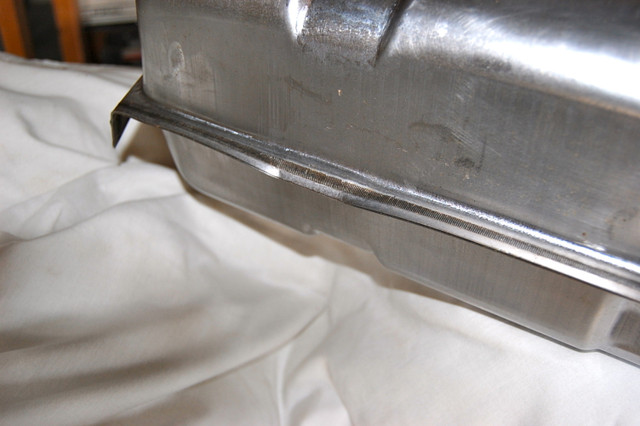
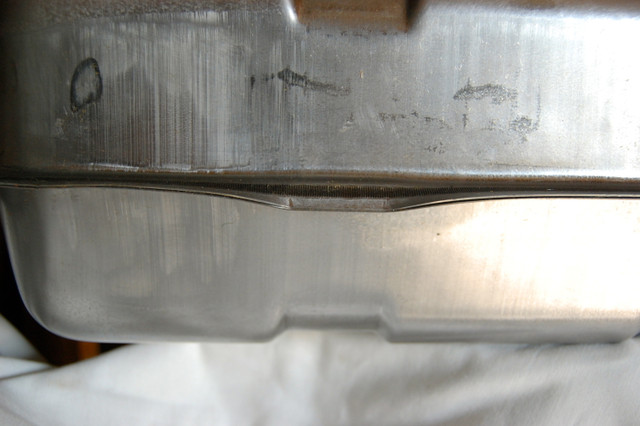
The original tanks have 4 depressed areas in the flange� 2 front and 2 back, where the straps are.
Does the tank you're installing have them?
Regards,
Alan
The original tanks have 4 depressed areas in the flange� 2 front and 2 back, where the straps are.
Does the tank you're installing have them?
Regards,
Alan
10-08-2017, 03:35 PM
#8
Instructor
Thread Starter
Member Since: Dec 2011
Posts: 129
Likes: 0
Received 0 Likes
on
0 Posts
I experimented a bit by putting a small ( 0.100" ) shim under the rear of the tank where it sets on the cross member to raise it a bit, and a (0.100" ) between the front cross member and frame where the front cross member bolts to the frame ( to lower the front of the tank. I then re-tightened the straps and the filler neck ( gas cap ) centered perfectly. Not the solution I am looking for however but it does improve appearance.
10-08-2017, 04:40 PM
#9
Team Owner
Member Since: Sep 2006
Location: Westminster Maryland
Posts: 30,173
Likes: 0
Received 2,878 Likes
on
2,515 Posts
Hi v,
I'm surprised to read you're able to get the straps tightened in place without the 4 'bends' in the tank's welded flange.
I say this because when installed properly even WITH the bends the straps are just long enough to reach from the forward tank support to the rear crossmember�. so can be pretty difficult to get in place.
?
Regards,
Alan
10-08-2017, 05:46 PM
#10
Instructor
Thread Starter
Member Since: Dec 2011
Posts: 129
Likes: 0
Received 0 Likes
on
0 Posts
Hi v,
I'm surprised to read you're able to get the straps tightened in place without the 4 'bends' in the tank's welded flange.
I say this because when installed properly even WITH the bends the straps are just long enough to reach from the forward tank support to the rear crossmember�. so can be pretty difficult to get in place.
?
Regards,
Alan
I'm surprised to read you're able to get the straps tightened in place without the 4 'bends' in the tank's welded flange.
I say this because when installed properly even WITH the bends the straps are just long enough to reach from the forward tank support to the rear crossmember�. so can be pretty difficult to get in place.
?
Regards,
Alan
10-08-2017, 05:59 PM
#11
Team Owner
Member Since: Sep 2006
Location: Westminster Maryland
Posts: 30,173
Likes: 0
Received 2,878 Likes
on
2,515 Posts
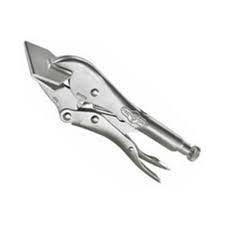
Hi,
I'd use 2 thin pieces of wood to cushion a tool like this.
Regards,
Alan
I'd use 2 thin pieces of wood to cushion a tool like this.
Regards,
Alan
10-08-2017, 07:44 PM
#12
Instructor
Thread Starter
Member Since: Dec 2011
Posts: 129
Likes: 0
Received 0 Likes
on
0 Posts
Thanks Alan. Could you please be a little more specific. Do you use the wood in the jaws of the vice grip tool ? Also do you put any kind of support up against the tank at the weld joint so the bend downwards does not go clear up against the tank beyond the welded joint. I have never done this so I do not want to stress the welded joint if possible. Thanks again, I can't wait to see how much this will help. By the way, The N.O.S. tank I bought a long time ago ( around 1980's ) directly from the Chevy dealer.
10-09-2017, 09:51 AM
#13
Team Owner
Member Since: Sep 2006
Location: Westminster Maryland
Posts: 30,173
Likes: 0
Received 2,878 Likes
on
2,515 Posts
Hiv,
I'd put the strip of wood on each side of the flange and then clamp the vice grip in place. The pieces would be 1/4"x1/4"x 1-1/2" ?
I don't think bending the flange will cause a problem since obviously it was done to original tanks� even the tank corners are severely bent through the weld area.
Also note� the bend isn't really completely distinct�. the flange is curved down on each side of the bend.
Note too how far the flange is bent down� not really all that far.
Even if you don't get the distinct bend the originals have I think 'relieving' the flange at those 4 locations may help your strap situation.
Any chance of a photo of how the straps are currently mounted at the tang support and then at the rear crossmember?
Regards,
Alan
10-09-2017, 08:08 PM
#14
Instructor
Thread Starter
Member Since: Dec 2011
Posts: 129
Likes: 0
Received 0 Likes
on
0 Posts
Hiv,
I'd put the strip of wood on each side of the flange and then clamp the vice grip in place. The pieces would be 1/4"x1/4"x 1-1/2" ?
I don't think bending the flange will cause a problem since obviously it was done to original tanks� even the tank corners are severely bent through the weld area.
Also note� the bend isn't really completely distinct�. the flange is curved down on each side of the bend.
Note too how far the flange is bent down� not really all that far.
Even if you don't get the distinct bend the originals have I think 'relieving' the flange at those 4 locations may help your strap situation.
Any chance of a photo of how the straps are currently mounted at the tang support and then at the rear crossmember?
Regards,
Alan
I'd put the strip of wood on each side of the flange and then clamp the vice grip in place. The pieces would be 1/4"x1/4"x 1-1/2" ?
I don't think bending the flange will cause a problem since obviously it was done to original tanks� even the tank corners are severely bent through the weld area.
Also note� the bend isn't really completely distinct�. the flange is curved down on each side of the bend.
Note too how far the flange is bent down� not really all that far.
Even if you don't get the distinct bend the originals have I think 'relieving' the flange at those 4 locations may help your strap situation.
Any chance of a photo of how the straps are currently mounted at the tang support and then at the rear crossmember?
Regards,
Alan
10-10-2017, 09:38 AM
#15
Team Owner
Member Since: Sep 2006
Location: Westminster Maryland
Posts: 30,173
Likes: 0
Received 2,878 Likes
on
2,515 Posts
Hi v,
Sounds like you're doing better!
I found the positioning of the plastic shield to be quite difficult, AND, to have an effect on what position the tank ends up in.
I was unable to position the shield in the location shown in the AIM!
Regards,
Alan
Sounds like you're doing better!
I found the positioning of the plastic shield to be quite difficult, AND, to have an effect on what position the tank ends up in.
I was unable to position the shield in the location shown in the AIM!
Regards,
Alan
10-10-2017, 09:45 AM
#16
Instructor
Thread Starter
Member Since: Dec 2011
Posts: 129
Likes: 0
Received 0 Likes
on
0 Posts
Thanks A. I agree, I also was not able to position the shield as depicted in the AIM. I will be trying to finish up tightening the tank down today. I'll post my results when I get more information.
10-10-2017, 06:42 PM
#17
Instructor
Thread Starter
Member Since: Dec 2011
Posts: 129
Likes: 0
Received 0 Likes
on
0 Posts
Finished installing tank today. Seems as though the correct placement of the rear plastic shield behind the tank makes the difference. Gas filler neck is now almost perfectly centered. This car is an every day driver so it won't be judged ( except by me ). As many of these things I have worked on it amazes me how I keep learning something new all the time. Now, on to adjusting the rear bumpers to get them nice and level.
10-10-2017, 07:16 PM
#18
Melting Slicks


Somewhere I saw a video of how they weld that seam on the gas tanks. The electric welder has two knurled wheels that squeeze the two pieces together and the operator guides the tank pieces around the outside. This is kind of like a continuous spot weld to seal the seam up. Lou.