
My RX8 seat project.
 10-24-2017, 10:02 PM
#1
Burning Brakes

Thread Starter
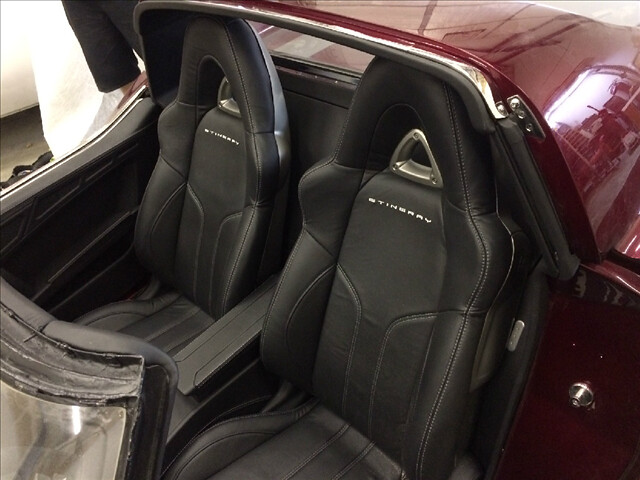
I picked up a set of RX8 seats after seeing these pictures from the Heartlands 2015 C3 project. I knew right then that these were the seats that I wanted for my restomod project, partially because they look amazing and partially because they are different.

My friends call me 'The Mad Scientist' because I am always tinkering, and I tend to do things my own way. I enjoy learning new things and I am not afraid to experiment so I decided that I would do my own upholstery work on these.
I picked up a set of cloth seats cheap ($80) and begun tearing them down.
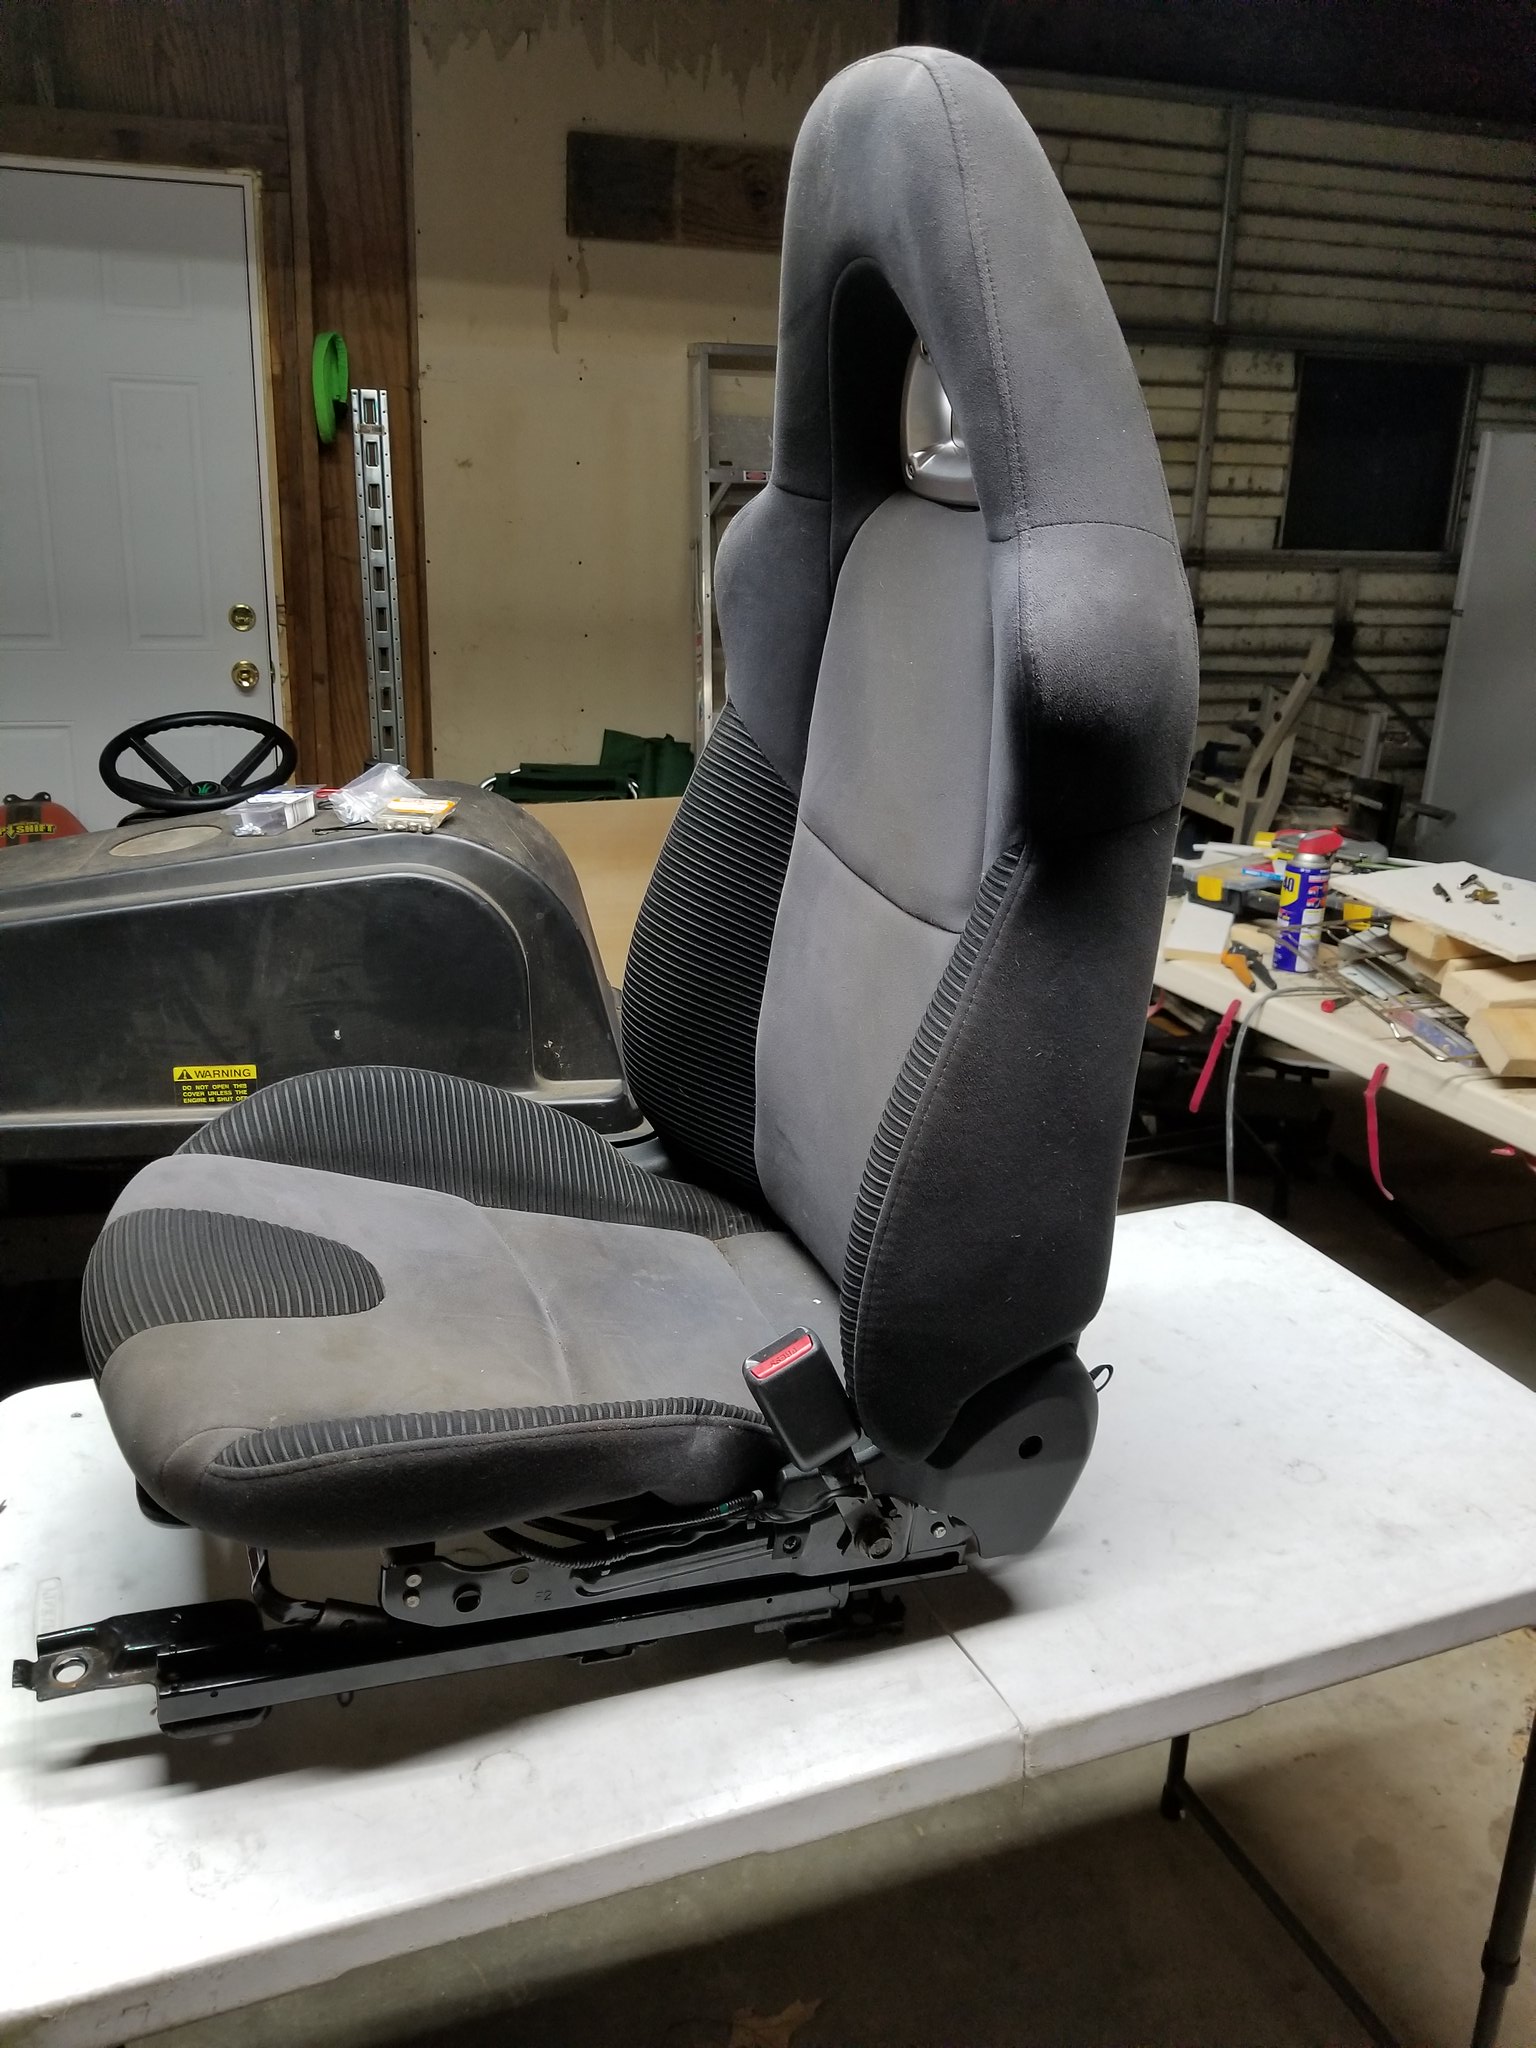
Disassembly would normally be very easy, only a handful of bolts and the seat cushions come off of the frame however I am recovering from two broken wrists and hands so things are going very slowly. It is good therapy for me to be doing the work but everything takes 6-10x as long as I expect as I have to keep stopping and I have to get help with some parts. I do not have the strength to do a lot.

Anyway, it was then just a matter of removing the hog rings and the covers came off the seat foam. I numbered everything so it would be easy to remember where everything went.


From there I raided my wifes sewing kit for a seam ripper and separated all of the pieces. The seat sure doesn't look like much when you have it in a pile.

I am making these out of a very high quality faux leather (the same stuff the sides of my leather seats in my TL/S are) as it is far less expensive than actual leather for my first attempt. If everything comes out nicely then I will likely re-do them in actual leather.
Some of the material has foam on the back of it so I used Super 77 adhesive to bond scrim (or sew foam) to the back of it. Then all I had to do was trace them, cut them out, and stitch them together.


This is still not attached at the bottom which will help to pull the rest of it into shape but I just couldn't do any more with my hands today.

Just the passenger seat bottom done so far...as I said it takes me a long time to do anything right now...but the passenger back is next. Stay tuned!
My friends call me 'The Mad Scientist' because I am always tinkering, and I tend to do things my own way. I enjoy learning new things and I am not afraid to experiment so I decided that I would do my own upholstery work on these.
I picked up a set of cloth seats cheap ($80) and begun tearing them down.
Disassembly would normally be very easy, only a handful of bolts and the seat cushions come off of the frame however I am recovering from two broken wrists and hands so things are going very slowly. It is good therapy for me to be doing the work but everything takes 6-10x as long as I expect as I have to keep stopping and I have to get help with some parts. I do not have the strength to do a lot.
Anyway, it was then just a matter of removing the hog rings and the covers came off the seat foam. I numbered everything so it would be easy to remember where everything went.
From there I raided my wifes sewing kit for a seam ripper and separated all of the pieces. The seat sure doesn't look like much when you have it in a pile.
I am making these out of a very high quality faux leather (the same stuff the sides of my leather seats in my TL/S are) as it is far less expensive than actual leather for my first attempt. If everything comes out nicely then I will likely re-do them in actual leather.
Some of the material has foam on the back of it so I used Super 77 adhesive to bond scrim (or sew foam) to the back of it. Then all I had to do was trace them, cut them out, and stitch them together.
This is still not attached at the bottom which will help to pull the rest of it into shape but I just couldn't do any more with my hands today.
Just the passenger seat bottom done so far...as I said it takes me a long time to do anything right now...but the passenger back is next. Stay tuned!
 10-24-2017, 11:18 PM
#3
Le Mans Master

Member Since: May 2003
Location: Fernandina Beach FL
Posts: 8,472
Received 3,216 Likes
on
1,729 Posts
2023 Restomod of the Year finalist
2020 C3 of the Year Winner - Modified

NICE work-
I am new to upholstery and have just dabbled doing some leather wrapping- did buy a sewing machine and experimenting....
While you are resting your wrists (ouch!!!) take a look at this guy's youtube videos
https://www.youtube.com/channel/UCw_...vjSq3p1lYouXzQ
Richard
I am new to upholstery and have just dabbled doing some leather wrapping- did buy a sewing machine and experimenting....
While you are resting your wrists (ouch!!!) take a look at this guy's youtube videos
https://www.youtube.com/channel/UCw_...vjSq3p1lYouXzQ
Richard
The following users liked this post:
PainfullySlow (10-25-2017)


 10-25-2017, 05:16 AM
#5
Melting Slicks

Wow to say the least. If you did that with 2 bad wrists, imagine when you are all healed up. We do a fair amount of marine upholstery in our shop and that was as good as I have seen in a long time. People come in to the shop sometimes and complain about the cost, especially when all they see is a pile of scraps, like you have. Then my job is to explain the whole process to them. Then they are OK. Please follow up with the rest of the installation when you are up to it. Great work.
The following users liked this post:
PainfullySlow (10-25-2017)
10-25-2017, 07:16 AM
#6
Dementer sole survivor


Member Since: Oct 2015
Location: YUPPY HELL Westford MASS
Posts: 16,380
Received 6,243 Likes
on
3,897 Posts
2020 C3 of the Year Finalist - Modified
2020 Corvette of the Year Finalist (performance mods)
2019 C3 of Year Winner (performance mods)
2016 C3 of Year Finalist
wow..... thanks for the post. I'm subscribed
 10-25-2017, 07:44 AM
#7
Burning Brakes
Thread Starter
Thank you all! This is certainly a fun (and challenging) project for me. Fortunately my wife has a really good sewing machine (Singer 9960 if anyone cares) that makes this very easy. If you have a sewing machine and can get over the 'macho' stigma of doing your own sewing work (it's upholstery, it's manly!) then you can really experiment with this quite inexpensively.
All I have purchased so far to make this project happen was the seats ($80), the faux leather ($60), one specialty needle for the double stitching down the seat base ($5), and the scrim foam ($20) so I am into the whole project for $165. Not too shabby if the seats are actually decent when done
The only thing I am a little bummed about is the accent color stitching. It shows as a sort of golden color but it is supposed to be orange as my exterior color will be orange. I think it still looks good but I guess I was hoping for a little more dramatic difference.
This is the actual thread used

I stumbled across his videos a week or so ago when I began contemplating this project and have watched everything that he has made. That is a great resource for anyone who wants to try their hand at doing their own upholstery work. Very 'real world' and he teaches in a way that everyone should be able to understand. His 'staple' trick literally saved me hours of work.
How is your wrapping going? If my seats turn out well I will likely continue on to do the door panels, console, dash, and steering wheel just so everything matches but I do not want to get too far ahead of myself.
All I have purchased so far to make this project happen was the seats ($80), the faux leather ($60), one specialty needle for the double stitching down the seat base ($5), and the scrim foam ($20) so I am into the whole project for $165. Not too shabby if the seats are actually decent when done
The only thing I am a little bummed about is the accent color stitching. It shows as a sort of golden color but it is supposed to be orange as my exterior color will be orange. I think it still looks good but I guess I was hoping for a little more dramatic difference.
This is the actual thread used
NICE work-
I am new to upholstery and have just dabbled doing some leather wrapping- did buy a sewing machine and experimenting....
While you are resting your wrists (ouch!!!) take a look at this guy's youtube videos
https://www.youtube.com/channel/UCw_...vjSq3p1lYouXzQ
Richard
I am new to upholstery and have just dabbled doing some leather wrapping- did buy a sewing machine and experimenting....
While you are resting your wrists (ouch!!!) take a look at this guy's youtube videos
https://www.youtube.com/channel/UCw_...vjSq3p1lYouXzQ
Richard
How is your wrapping going? If my seats turn out well I will likely continue on to do the door panels, console, dash, and steering wheel just so everything matches but I do not want to get too far ahead of myself.
10-25-2017, 08:33 AM
#8
Le Mans Master
Member Since: May 2003
Location: Fernandina Beach FL
Posts: 8,472
Received 3,216 Likes
on
1,729 Posts
2023 Restomod of the Year finalist
2020 C3 of the Year Winner - Modified
Thank you all! This is certainly a fun (and challenging) project for me. Fortunately my wife has a really good sewing machine (Singer 9960 if anyone cares) that makes this very easy. If you have a sewing machine and can get over the 'macho' stigma of doing your own sewing work (it's upholstery, it's manly!) then you can really experiment with this quite inexpensively.
All I have purchased so far to make this project happen was the seats ($80), the faux leather ($60), one specialty needle for the double stitching down the seat base ($5), and the scrim foam ($20) so I am into the whole project for $165. Not too shabby if the seats are actually decent when done
The only thing I am a little bummed about is the accent color stitching. It shows as a sort of golden color but it is supposed to be orange as my exterior color will be orange. I think it still looks good but I guess I was hoping for a little more dramatic difference.
This is the actual thread used
I stumbled across his videos a week or so ago when I began contemplating this project and have watched everything that he has made. That is a great resource for anyone who wants to try their hand at doing their own upholstery work. Very 'real world' and he teaches in a way that everyone should be able to understand. His 'staple' trick literally saved me hours of work.
How is your wrapping going? If my seats turn out well I will likely continue on to do the door panels, console, dash, and steering wheel just so everything matches but I do not want to get too far ahead of myself.
All I have purchased so far to make this project happen was the seats ($80), the faux leather ($60), one specialty needle for the double stitching down the seat base ($5), and the scrim foam ($20) so I am into the whole project for $165. Not too shabby if the seats are actually decent when done
The only thing I am a little bummed about is the accent color stitching. It shows as a sort of golden color but it is supposed to be orange as my exterior color will be orange. I think it still looks good but I guess I was hoping for a little more dramatic difference.
This is the actual thread used
I stumbled across his videos a week or so ago when I began contemplating this project and have watched everything that he has made. That is a great resource for anyone who wants to try their hand at doing their own upholstery work. Very 'real world' and he teaches in a way that everyone should be able to understand. His 'staple' trick literally saved me hours of work.
How is your wrapping going? If my seats turn out well I will likely continue on to do the door panels, console, dash, and steering wheel just so everything matches but I do not want to get too far ahead of myself.
I used his 'formula' for the leather-
Dash pod-

mock up

The following users liked this post:
PainfullySlow (10-25-2017)
10-25-2017, 09:42 AM
#9
Burning Brakes
Thread Starter
That looks great! nice work!
10-25-2017, 08:30 PM
#10
Burning Brakes
Thread Starter
Started on the passenger seat back. It really is hard to believe that this will end up being a seat cover...

10-26-2017, 05:06 AM
#11
Melting Slicks
 One tip that we do, and I am not sure if you have done it, is to put hash markks across the seams before you pull it all apart. Then transfer them to the new fabric. It makes it easy to put back together, especially going around curves etc. as some people have a tendency to PULL the fabric through the machine. But it appears you have the touch. And I really laughed at the MANLY comment. It is so true. My son and I refer to ourselves as FABRICATORS. Now that is MANLY!!!
10-26-2017, 06:40 AM
One tip that we do, and I am not sure if you have done it, is to put hash markks across the seams before you pull it all apart. Then transfer them to the new fabric. It makes it easy to put back together, especially going around curves etc. as some people have a tendency to PULL the fabric through the machine. But it appears you have the touch. And I really laughed at the MANLY comment. It is so true. My son and I refer to ourselves as FABRICATORS. Now that is MANLY!!!
10-26-2017, 06:40 AM
#12
Burning Brakes
Thread Starter
One tip that we do, and I am not sure if you have done it, is to put hash markks across the seams before you pull it all apart. Then transfer them to the new fabric. It makes it easy to put back together, especially going around curves etc. as some people have a tendency to PULL the fabric through the machine. But it appears you have the touch. And I really laughed at the MANLY comment. It is so true. My son and I refer to ourselves as FABRICATORS. Now that is MANLY!!!Good call on the hash marks. It really would be the safest bet for sure, maybe I have just gotten lucky so far with everything lining up.
Also if I have to go around any kind of curve I staple the two pieces together into the proper form on the inside of the seam. This keeps it out of sight but ensures that everything lines up where it is supposed to be. For a novice like me it really helps to keep things where they are supposed to be when stitching. It is a simple matter to remove the staples when done.

 11-07-2017, 12:55 PM
#14
Burning Brakes
Thread Starter
Finally had a little bit to get back to this project and managed to get the passenger seat done. For a first run, I am pretty happy and it allowed me to see just where I will need to make adjustments in both my pattern as well as the technique that I am using. Now that one side is complete I am confident that I can improve the next one.
I will go to work on doing the drivers side just the same as this one and once that is done, if I am confident enough that I have everything nailed down I will make a set out of leather.
This will likely be a 'duh, no kidding' moment for those who have done this kind of work before but here are some things to note if anyone is going to be trying upholstery work themselves:
1) Patterns are important. The closer you make the pattern to the original piece the better it will come out. It is also important to note that you can take this too far. The original fabric stretches and if you follow every single contour exactly you will end up with a mess. Almost all patterns are made up of swooping curves and straight lines. If you end up with a jagged curve you are almost always ok to smooth that out.
2) If you are using faux leather, it does not stretch and conform the way that natural leather does so it is actually easier to make something out of genuine leather.
3) Be precise when sewing. If you make a mistake you cannot simply tear out the thread and do it again. The needle perforates the faux leather and doing it more than once makes it prone to tearing.
3a) be precise when sewing. Not only are you making a mechanical attachment, you are also defining the shape of the piece. If you are sewing a curve and make a sudden change with the needle it will show in the seam of the final piece.
So, enough of that for now. I finally finished the back piece

All that remained was to install it. You basically put it on like a slip cover however there are sewn in metal rods that serve as anchor points for the hog rings so you have to attach them as you go. This helps the cover conform to the shape of the seat.

It took me many, many hours to do this with the current state of my hands but I would guess that an average person could likely do this themselves in under 4 hours per seat, and that is including beer time =)
Here is the finished product. Not bad but some flaws and some changes are necessary for the next run.
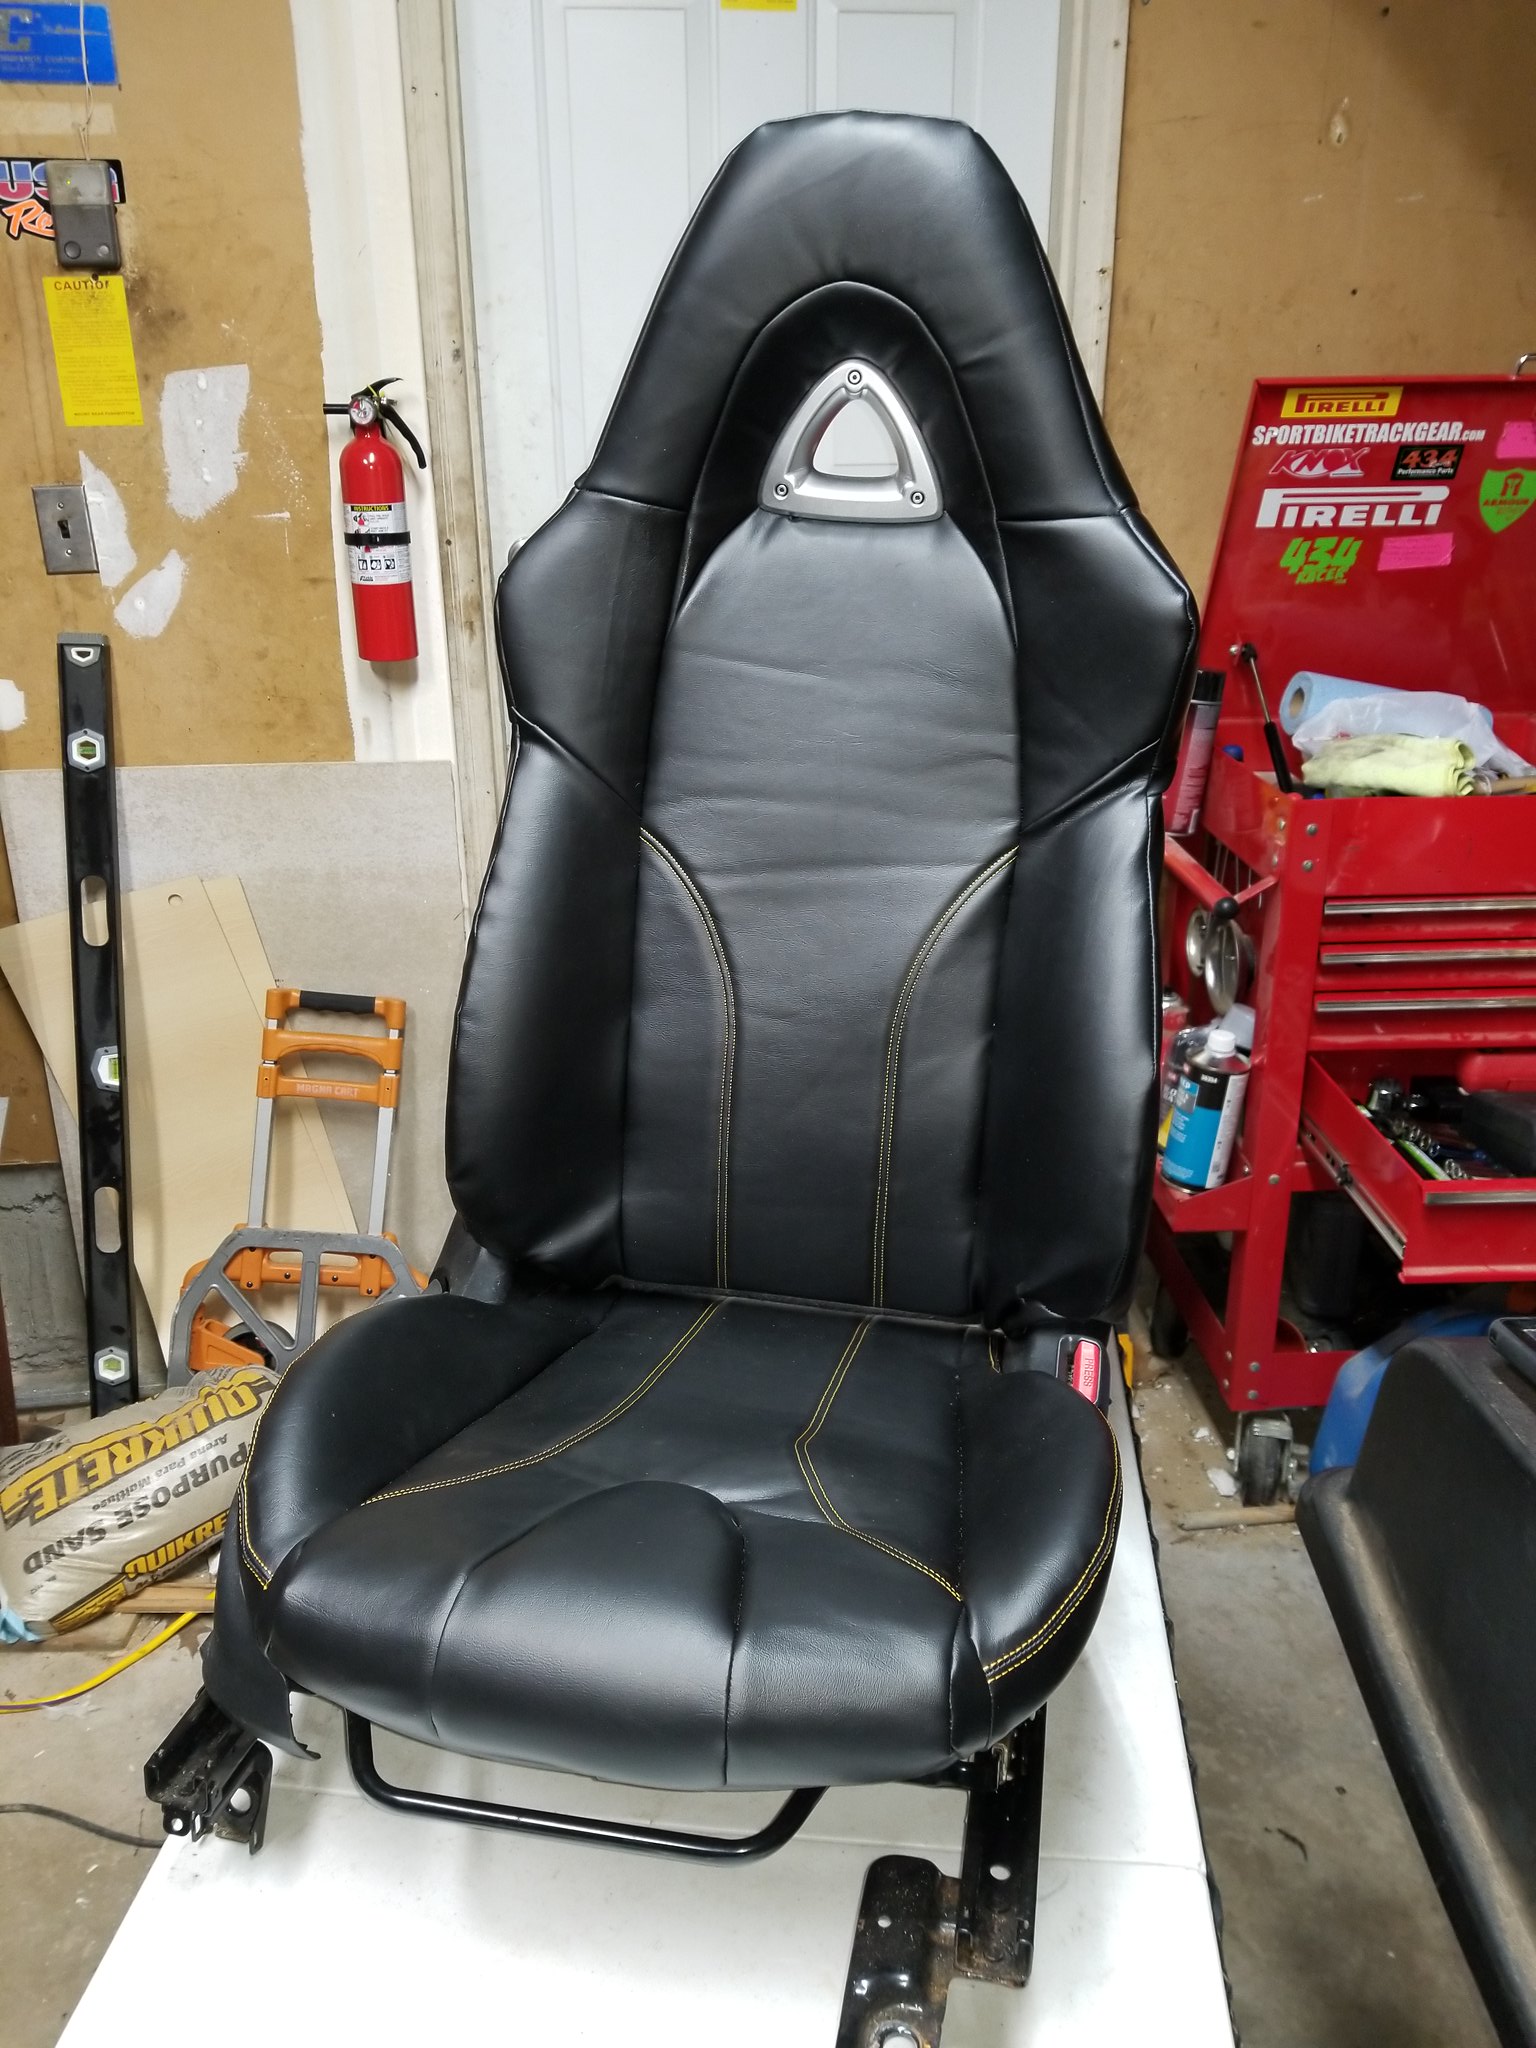


I will give my hands a little bit to recover and then start on the driver's seat...
I will go to work on doing the drivers side just the same as this one and once that is done, if I am confident enough that I have everything nailed down I will make a set out of leather.
This will likely be a 'duh, no kidding' moment for those who have done this kind of work before but here are some things to note if anyone is going to be trying upholstery work themselves:
1) Patterns are important. The closer you make the pattern to the original piece the better it will come out. It is also important to note that you can take this too far. The original fabric stretches and if you follow every single contour exactly you will end up with a mess. Almost all patterns are made up of swooping curves and straight lines. If you end up with a jagged curve you are almost always ok to smooth that out.
2) If you are using faux leather, it does not stretch and conform the way that natural leather does so it is actually easier to make something out of genuine leather.
3) Be precise when sewing. If you make a mistake you cannot simply tear out the thread and do it again. The needle perforates the faux leather and doing it more than once makes it prone to tearing.
3a) be precise when sewing. Not only are you making a mechanical attachment, you are also defining the shape of the piece. If you are sewing a curve and make a sudden change with the needle it will show in the seam of the final piece.
So, enough of that for now. I finally finished the back piece
All that remained was to install it. You basically put it on like a slip cover however there are sewn in metal rods that serve as anchor points for the hog rings so you have to attach them as you go. This helps the cover conform to the shape of the seat.
It took me many, many hours to do this with the current state of my hands but I would guess that an average person could likely do this themselves in under 4 hours per seat, and that is including beer time =)
Here is the finished product. Not bad but some flaws and some changes are necessary for the next run.
I will give my hands a little bit to recover and then start on the driver's seat...


 11-07-2017, 04:59 PM
#18
Melting Slicks
Great job. Sometimes the fabric will get creases in it from being folded up or something like that. A hair dryer gently applied will get rid of some of the lines in the seat. The sew foam makes it even more obvious. So will leaving it out in the sun for awhile. The heat will relax the fabric. The other issue that we have is where the seams go over a curve the fabric might go from over the foam to along side the foam. Not sure if I can explain that better, but in the process of pulling on the fabric it had a tendency to twist. The trick is to get it all the same way, on the side or on top of, not important, but it should go the same direction. Just some things that I have learned over the years. Not sure what you do for a living, but upholstery is a nice way to make a living. And ther's never a slow period. But the best part will be when someone asks who did your seats, you can say "I DID". Thanks for sharing this.
The following users liked this post:
PainfullySlow (11-09-2017)
11-07-2017, 06:40 PM
#20
Race Director


I did a boat interior from scratch. my first attempt at upholstery work. decent, but not near as good as this. step-daughter sees the work and says "all right, you are officially gay!" why the un-manly stigma attached to sewing is beyond me. you gonna start doing seats for us?
The following users liked this post:
PainfullySlow (11-09-2017)

