When you click on links to various merchants on this site and make a purchase, this can result in this site earning a commission. Affiliate programs and affiliations include, but are not limited to, the eBay Partner Network.
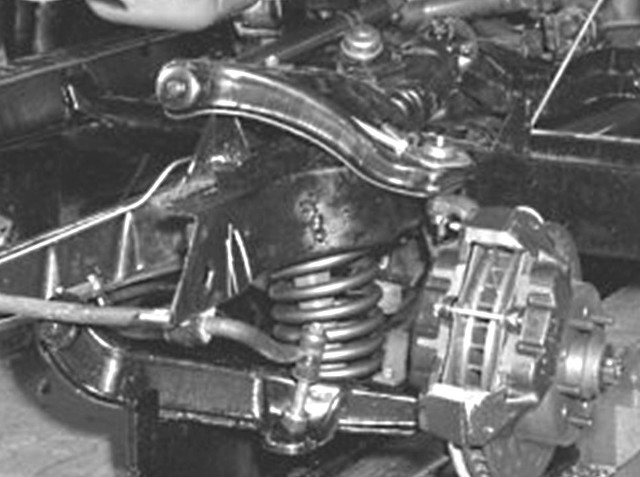
The front-end on my '71 is sitting high. The car was body-off restored 10 years ago and only has 230 miles on it since restoration. You can see from the pics that the front-end sits 2" high (at least). I contacted the guy who restored the car and he thinks that he put the correct small block springs in the car. I can tell that they are new. Thoughts? Should I just buy new small block springs and install them? I can really use your advice. Thanks in advance for your help!!
Nice 71 vert. Definitely sitting too high in front. Only way to know for sure what you have is to replace them. Thinking someone installed Big Block springs. Alot of work to swap, but worth it to get your stance right.
Hi JB,
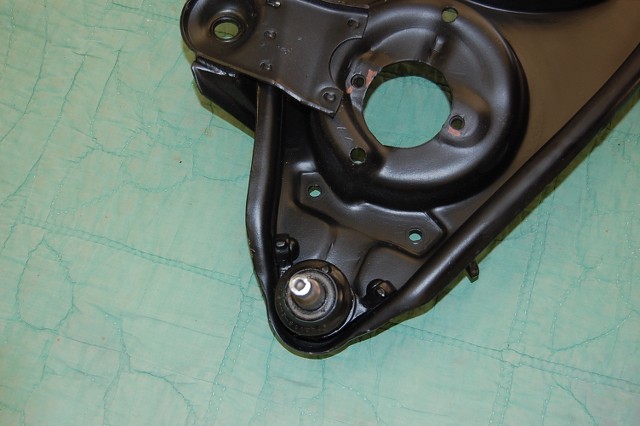
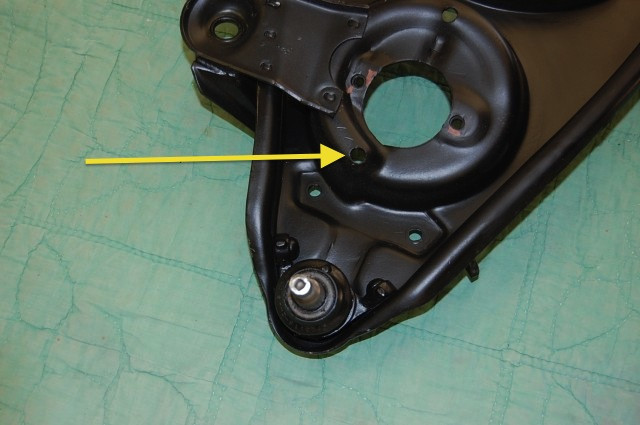
Original front coil springs have a 'top' and 'bottom'.
There are 4 coils that are closer together than the rest, and that end of the spring is intended to go UP into the frame pocket.
The frame pocket where the coil seats is 'shaped' with a 'valley' that the last coil should 'seat'. There's a particular point in that valley were the end of the spring should be.
The lower a-arm also has a valley in it where the bottom of the spring should seat and the end of the spring needs to be at a certain location.
Have you taken a look to see how the springs are seated in your 71?
Regards,
Alan
When the spring is installed properly in the chassis it actually has a slight arc to it.
Note the close coils go up into the frame pocket.
Spring valley in frame pocket.
Valley for spring in lower a-arm. This is the UNDER side because it's easier to see.
What size are your tires first. The stock height tires are believe 27". Next have you driven the car much it takes time for the suspension to settle.
I'll check the tire size. If not exact, they are very close to the original F70-15's. Certainly not 2" off in height. Could explain a little of it though.
Curious what the measurement is from the floor to the center of the fender lip.
I went through the joy of changing the springs on my 77 not to long ago to actually get more height because of the extra weight of a BB. Only to be disappointed that the height didn't change at all with the new springs.
I'd cut half a turn off your existing springs and reinstall. Will only cost you some labor. Cut another half turn if not low enough. Make sure you recheck your camber, it will change.
WOW. Thanks, Alan!! This is fantastic info. I am going to crawl under her right when I get home to check all of this out. Stay tuned for a report!
OK. I tried to get a couple of good pics. Not sure they are of much value. I�m installing a lift in a few weeks. May need to wait until then to get a good look.
If you do the job when you take down the control arm, take it down from the frame side not the ball joint. It is easier and safer and you won't ruin the boot on the joint. Also use a spring compressor that goes up thru the shock hole. Go to you tube and they tell you how to make one. Makes spring removal easier and safer. Not a hard job.
Hi JB,
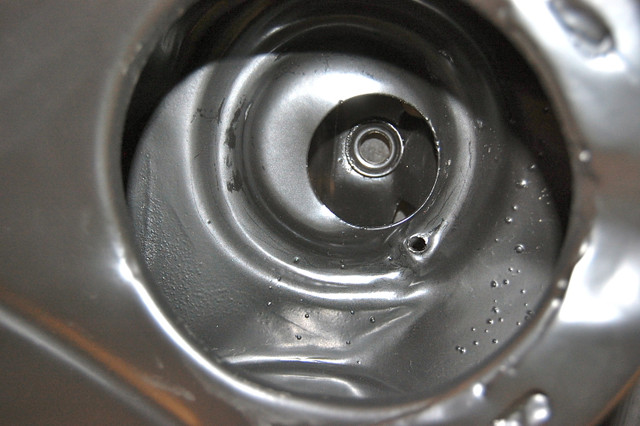
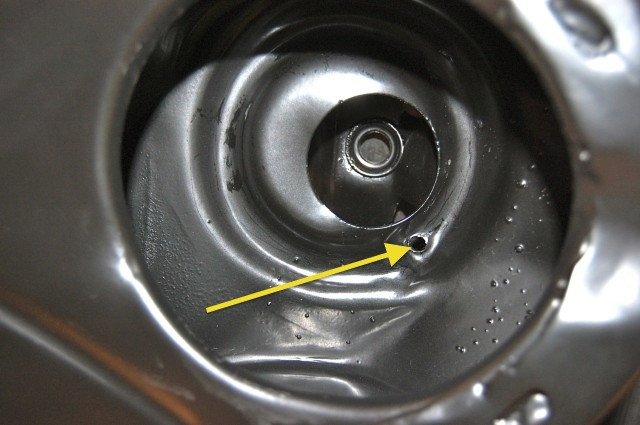
When using original springs the 'cut end' of the coil should be visible through these holes.
This is also an indication that the spring is seated in the 'valleys' correctly.
Regards,
Alan
If you do the job when you take down the control arm, take it down from the frame side not the ball joint. It is easier and safer and you won't ruin the boot on the joint. Also use a spring compressor that goes up thru the shock hole. Go to you tube and they tell you how to make one. Makes spring removal easier and safer. Not a hard job.
If the suspension fasteners were tightened with no load, that is the full weight of the vehicle riding on the suspension, it will cause the vehicle to set higher than it should. It also causes premature wear of the rubber bushings in the suspension but since your vehicle has only a few hundred miles since the restoration this would not be evident. You may be able to correct this problem by placing the full weight of the vehicle on the suspension loosen the fasteners then bounce the body up & down several times to try and get the bushings to settle in the correct position and then torque the fasteners to the correct torque while the suspension is still carrying the vehicle weight. Don't ask me how I know this.
2020 Corvette of the Year Finalist (performance mods)
2019 C3 of Year Winner (performance mods)
2016 C3 of Year Finalist
how about you take the number off the ssticker and look online to see what they are. I did that and discovered my front springs were part of an after market handling package
how about you take the number off the ssticker and look online to see what they are. I did that and discovered my front springs were part of an after market handling package
If you blow up the pics they show 3931823 HS which should be a spring for small block cars and correct for 1971. I would check the Install/index before anything else.
Curious what the measurement is from the floor to the center of the fender lip.
I went through the joy of changing the springs on my 77 not to long ago to actually get more height because of the extra weight of a BB. Only to be disappointed that the height didn't change at all with the new springs.
But yeah, it does look a little high.
Sorry for the delay, John. From the ground to the fender lip measures 28-3/4". What is the stock measurement?
I am worried about having the same problem as you (front end not dropping after new, correct springs installed). I am leaning toward cutting a full coil off. It seems like it's the only way that I can be sure that the front-end will drop 2". Thoughts?
If you blow up the pics they show 3931823 HS which should be a spring for small block cars and correct for 1971. I would check the Install/index before anything else.
Good eye, Joe! I noticed that too and looked it up. You are correct, that is the correct spring number. My concern is around whether the restorer simple purchased and stuck that sticker on the spring. Those stickers are purchasable, correct? (I am really new to this restoration stuff. OMG, is there a lot to learn). :-)
If the suspension fasteners were tightened with no load, that is the full weight of the vehicle riding on the suspension, it will cause the vehicle to set higher than it should. It also causes premature wear of the rubber bushings in the suspension but since your vehicle has only a few hundred miles since the restoration this would not be evident. You may be able to correct this problem by placing the full weight of the vehicle on the suspension loosen the fasteners then bounce the body up & down several times to try and get the bushings to settle in the correct position and then torque the fasteners to the correct torque while the suspension is still carrying the vehicle weight. Don't ask me how I know this.
Fantastic tip, Marty. Thank you! I don't know how you know that, but I am glad that you do....and that you shared your knowledge with me. :-)

 11-10-2017, 12:31 PM