When you click on links to various merchants on this site and make a purchase, this can result in this site earning a commission. Affiliate programs and affiliations include, but are not limited to, the eBay Partner Network.
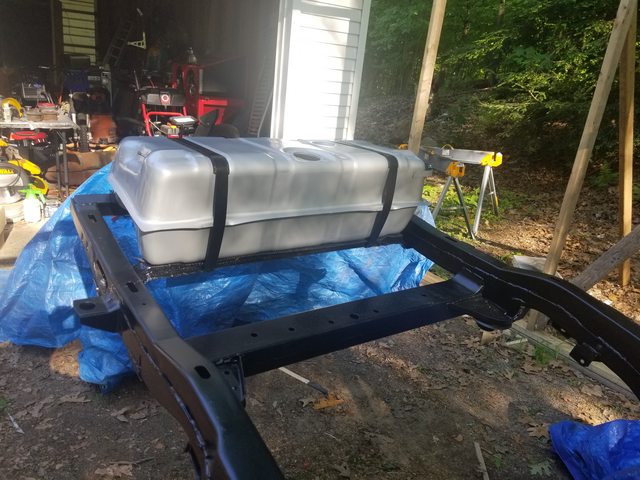
Well I had grandiose plans for today however whomever designed the fuel tank strap system on these cars is a sadist so it took me three damn hours to get the tank strapped in. I clear coated it just to add an extra layer of rust protection and then finally got it in the chassis. I also installed a new fuel sender while I was there...no sense having it leak or read incorrectly so I figured it was cheap insurance.
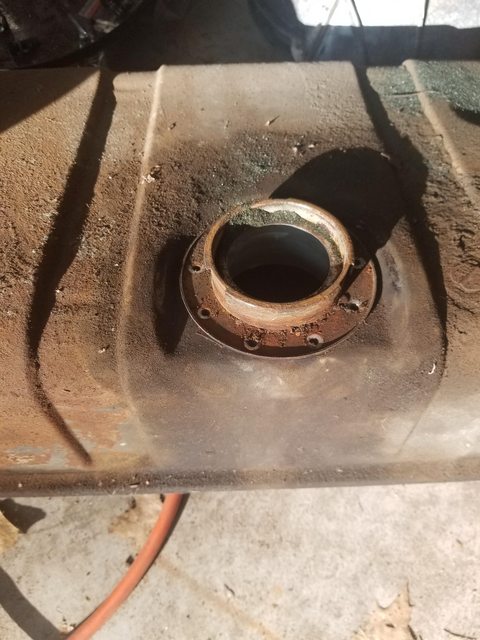
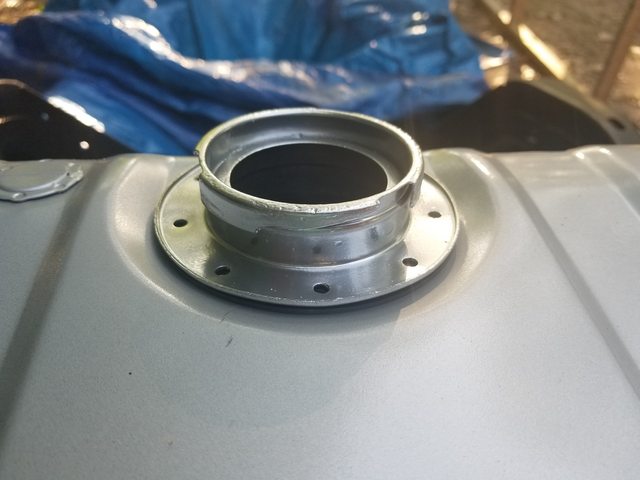
The new tank did not come with a filler neck (none of them do apparently, I just didn't pay attention when ordering it) but thankfully the original wasn't in too bad of shape so I did my usual powdercoating process.
Presto Changeo!
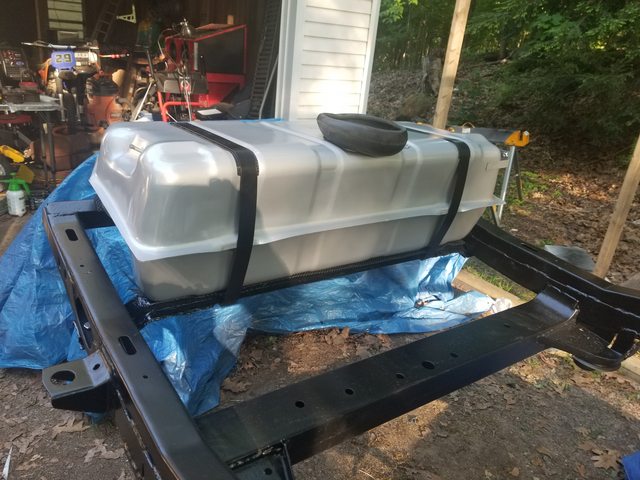
New gasket installed and sealed and then installed the filler boot thingie.
So what was supposed to be a fairly quick process ended up taking all of the energy that I could muster today so I had to call it quits.
Tomorrow I will route the stainless steel fuel lines, install the front rotor shims and confirm that my runout is within spec, and after that...who knows?
Last edited by PainfullySlow; 05-27-2019 at 07:00 PM.
Well I had grandiose plans for today however whomever designed the fuel tank strap system on these cars is a sadist so it took me three damn hours to get the tank strapped in.
So what was supposed to be a fairly quick process ended up taking all of the energy that I could muster today so I had to call it quits.
Try messing with the straps with the body on!!!
I found some strap liner/isolator rubber from Summit Racing- glued it to the strap w/ some 3M spray adhesive- worked better than the original roofing felt!
Stainless steel brake lines tomorrow....that's almost as much fun!!!
I found some strap liner/isolator rubber from Summit Racing- glued it to the strap w/ some 3M spray adhesive- worked better than the original roofing felt!
Stainless steel brake lines tomorrow....that's almost as much fun!!!
Really looking good!!!
Richard
Hey Richard,
I did the same thing with some rubber that I had here except that I used contact cement because I was out of spray adhesive :-p
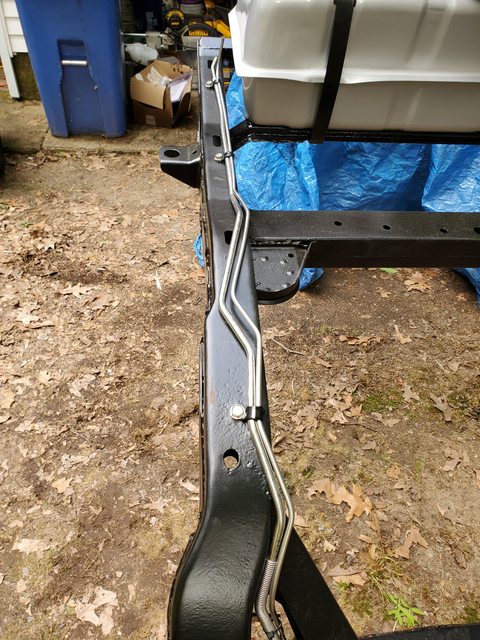
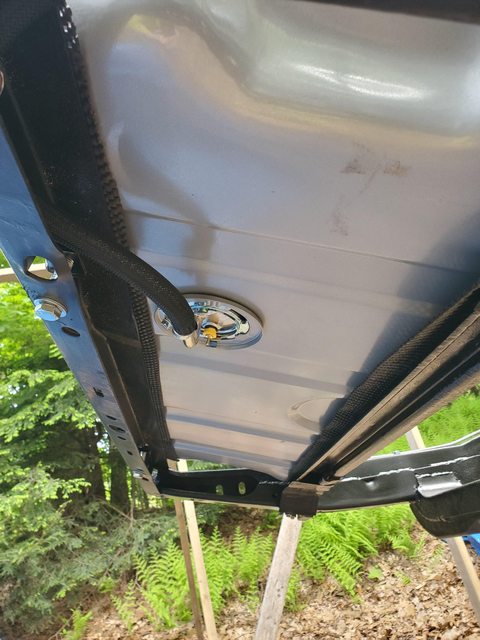
I managed to get the feed line on the left and the vapor return line on the right in place before it started raining...the rest will have to wait it seems.
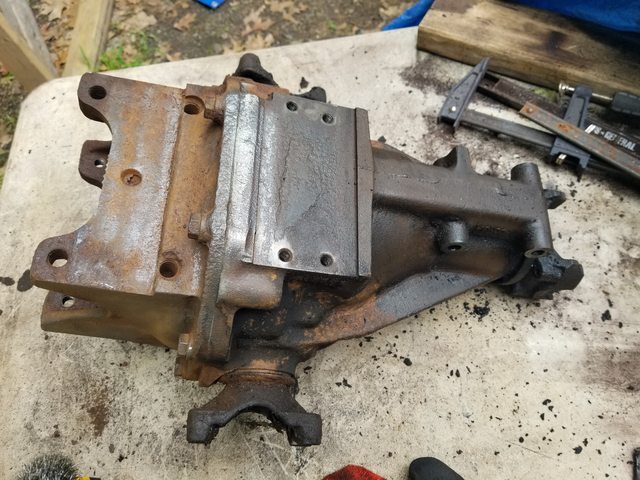
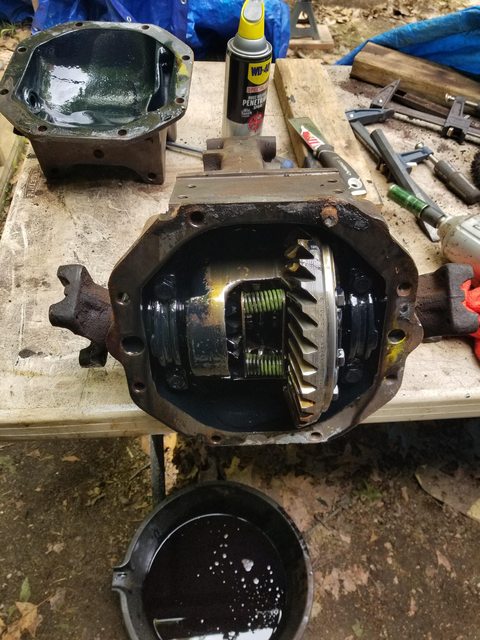
Well, waiting on parts for the rest of the fuel lines so A.D.D. strikes again and I started in on the rear differential.
I ordered up a set of 4.11 gears from Toms as well as some new ARP ring gear bolts and the rest of the goodies needed to rebuild the diff. I am picking up a set of clutches and some miscellaneous items (magnetic drain plug, cross shaft, etc) from Gary (GTR1999) in the next day or two.
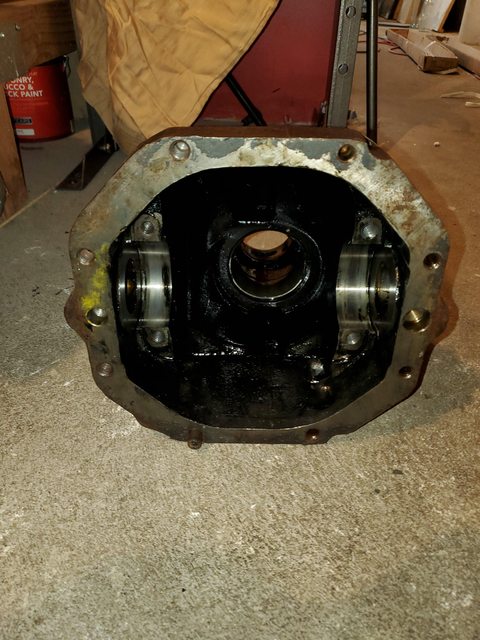
With that it was time to begin the break down.
First I removed the crossmember and got the unit up on a table with the help of my wife. Yeah. I need help lifting that much weight. Pathetic, isn't it?
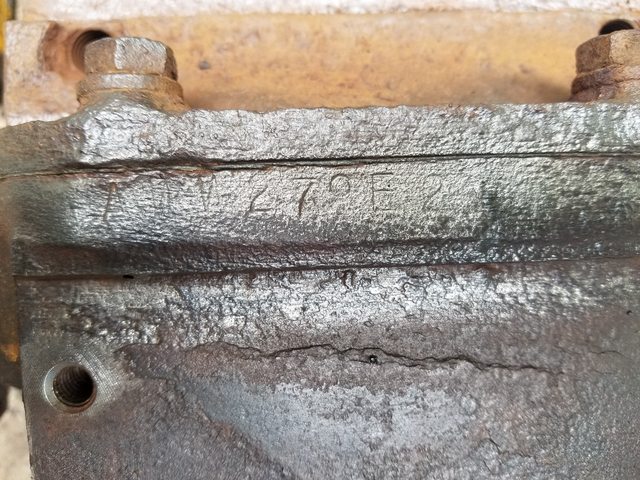
It was really grungy with some surface rust and the rest covered in caked on gunk so I spent some time cleaning it with a putty knife and then a wire brush to get rid of the bulk of it.
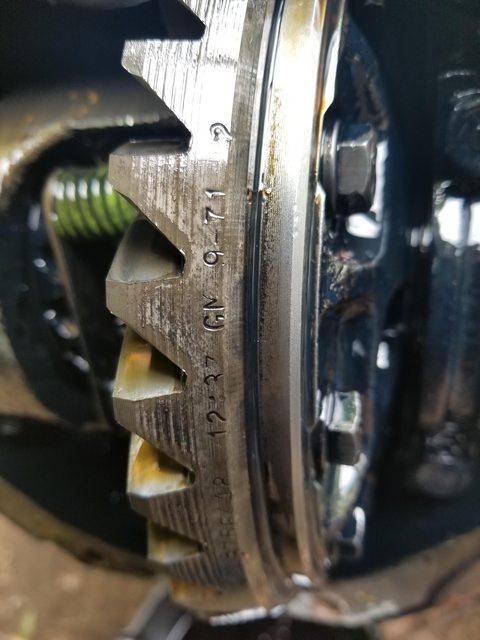
This allowed me to clean up the pad where the info is stamped. It is almost unreadable but I was able to make out "AWW27?E2". I am not sure what the little 'o' following the 7 is.
At least this is in line with my thoughts that this was a 3.08 ratio which is interesting since the black book does not show this axle code for 1972.
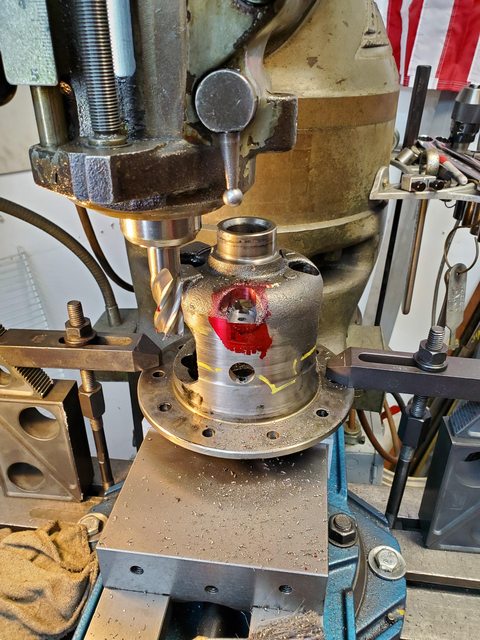
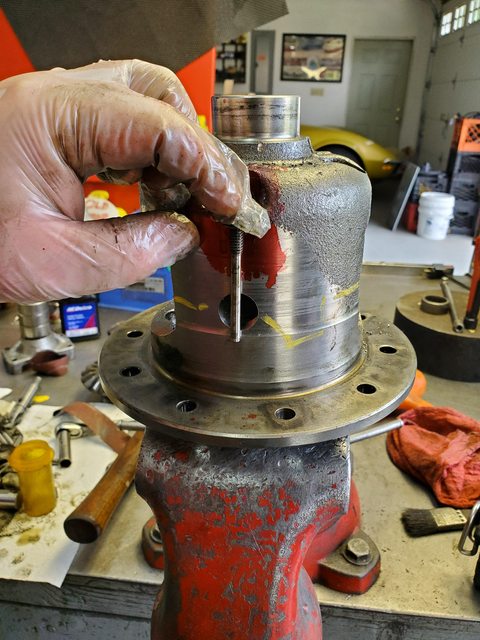
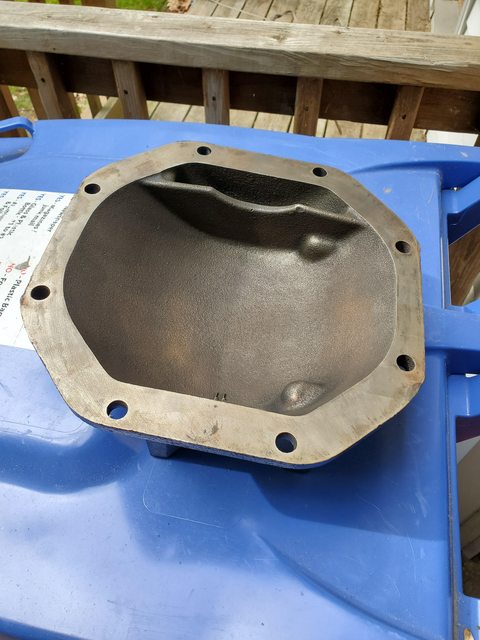
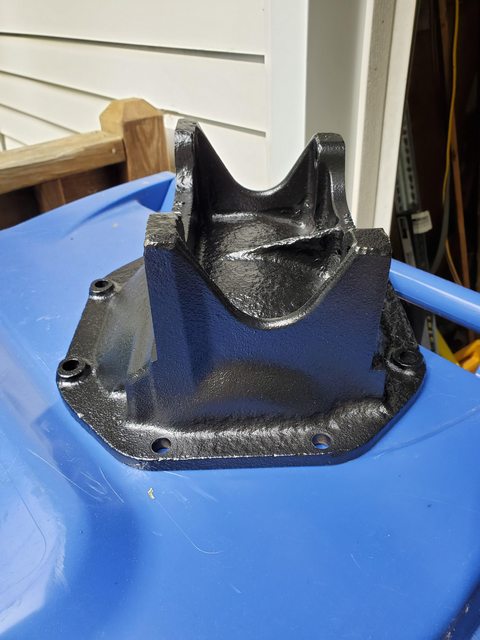
Anyway, a little more cleaning then I started on removing the rear cover. All went well except for one bolt that snapped the head clean off as soon as I put a wrench on it. It took some doing but I was able to remove the cover with the stud left in place. Once I disassemble the entire case and degrease it I will remove the broken bolt.
But I was able to persevere and get the cover off.
The part number and stampings on the ring gear confirm that this is indeed a 3.08 built in 09/71 which makes sense since my car has a prod date of 10/71 so I am going to call this original to the car. The wear looks in line with what I would expect for the 50k miles that the odometer shows.
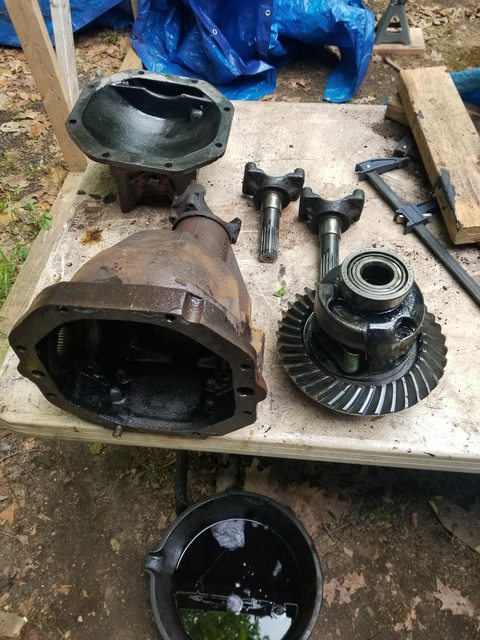
The ring and pinion are in surprisingly good shape and I was able to get the entire differential disassembled with the exception of the pinion gear before my hands started hurting too much to continue. More tomorrow when I can finish the disassembly and get everything cleaned up.
Thanks! As we all know, taking things apart is easy...the hard part comes in putting it back together properly =)
Originally Posted by doorgunner
Good job. How did the snap rings and grooves look in the side yolk (output shafts) ?
I had to re-cut the grooves...they weren't deep enough.
Not as deep as I expected them to be honestly, however it was sufficient to keep the snap rings in place for the past 50k miles. I will look into it more once I get them cleaned up and can do some measuring. There is a slight bit of wear on the end of one of the axle shafts and I am told that 1972+ had issues with soft axles so I am hoping that this is not an indicator.
Originally Posted by bmans vette
Hi Michael are you going to do a tuned posi and eliminate the springs inside the posi? Good luck getting it all done. Dennis
Hi Dennis,
Yes, the plan is to build a tuned posi unit. I am ONLY tackling this myself specifically because this forum is incredibly fortunate to have a resource like Gary (GTR1999) available to us. I found some how-to posts of his on another forum and have been going over them with a fine toothed comb. Those plus some youtube videos put out by Toms a while back should, in theory, make this an easy process.
I will not lie, it is a little bit daunting to attempt this but I am confident between all of these resources that I will be able to be successful. If I were not specifically attempting to do as much of this build on my own as hand therapy, I would be more than confident sending the entire mess off to Gary knowing that his level of attention to detail is at least equal to my own...and that is saying something. The main reason why I always built my own engines in my race bikes is because I did not trust that someone other than me would be able to do a job that I would be confident in. I would be confident that I would get a differential back that would be better than I could do myself.
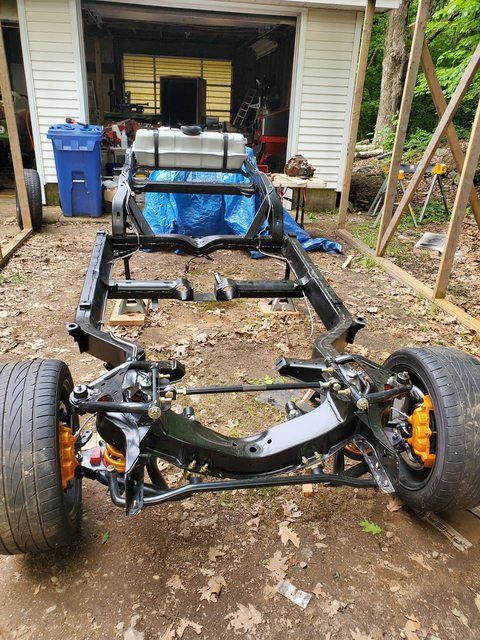
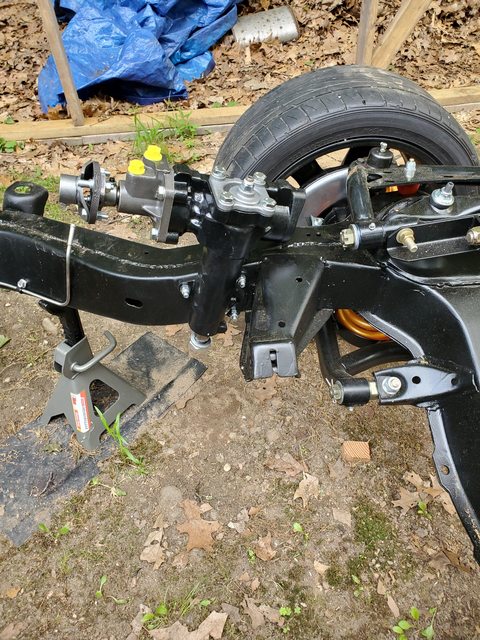
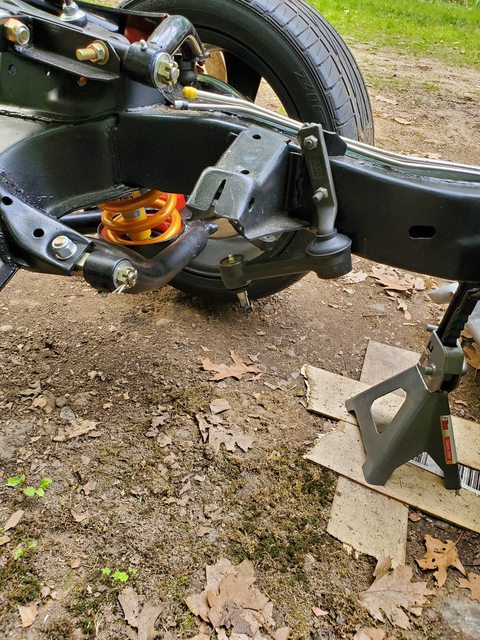
The only other thing that I accomplished was finally getting the Heli-coils in the stripped brake caliper so today's plan, if it dries up, is to get the runout dialed in (my shims arrived as well), the calipers bolted back on, and get the front of the car riding on its own suspension again.
Anyway, still resting the hands. I will take some ibuprofen (I call it vitamin "I" for as much as I take) and try to get back out to the garage in a bit to continue the work. Lots to do, lots to do...
Well I took it a bit easy yesterday. The weather was poor and my wrists were killing me so I did not get a lot done.
What I did manage to get completed was finishing up the differential case by removing the pinion and pressed out all of the bearings and races. I used a puller first to take off the driveshaft yolk and then my shop press for the rest of the work which made everything a lot easier. I know there are videos and people out there who say that you can do it without a press but honestly I cannot imagine doing it that way. Investing in a press is a very worthwhile endeavor!
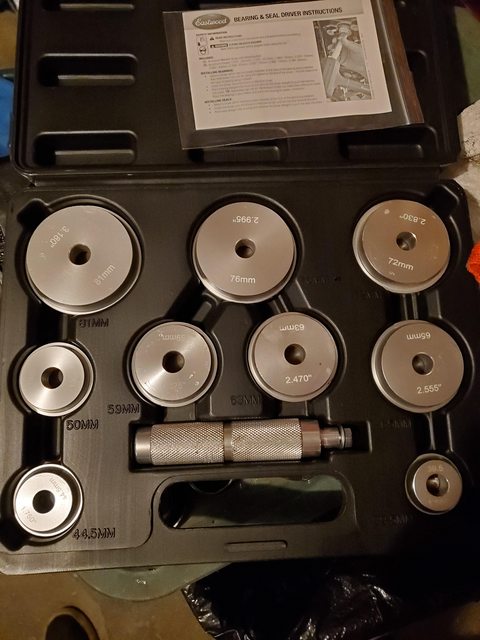
While we are on the subject of the right tools for the job, along with a press it really helps to have a quality bearing and seal driver set.
The two tools together made this relatively painless
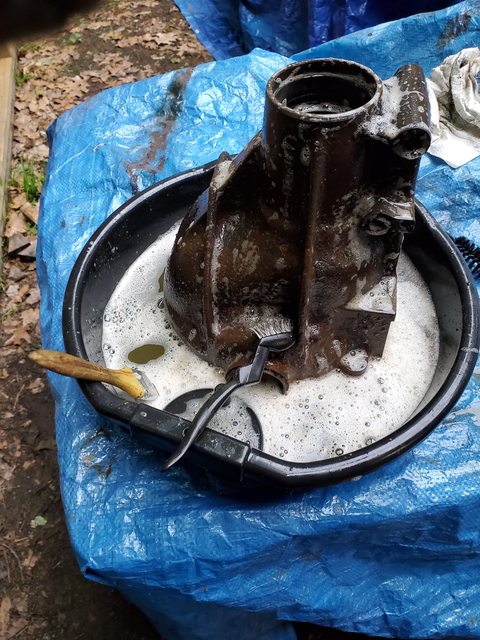
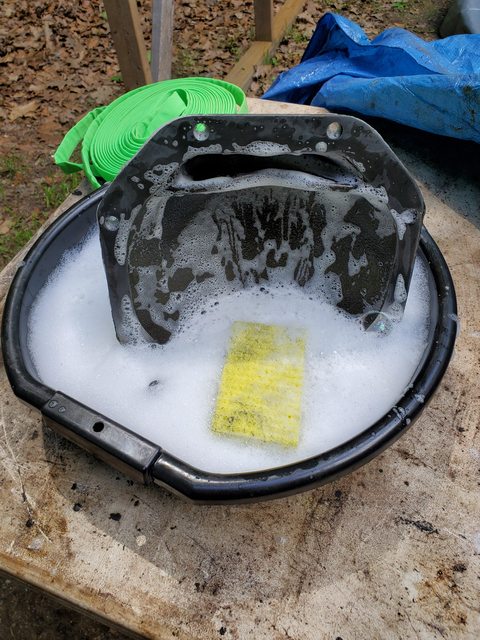
Finally, I spent the bulk of my time cleaning. The differential case and cover were absolutely caked with gunk and took about two hours to get clean. For some reason, this kind of work absolutely kills my hands and they were quickly cramping but the cleaning was accomplished with putty knives to rid of most of the thick stuff, various wire and nylon brushes, and finally a bath in degreaser with more brushes and eventually a soaked rag. I did not get any pictures of it when clean as my hands were absolutely filthy and I did not want to touch my phone but here is my highly sophisticated setup.
I do not want grease floating around in my blast cabinet...it means replacing all of the media if it happens so it is good to spend the extra time here to ensure that the case is as clean as possible before blasting.
Today's plan: I have a lot of running around to do. I need to pick up a different bearing puller to remove the posi case bearings, hopefully visit Gary at his shop (if he is available today) to pick up some parts, and then I will be able to get the case and cover blasted, prepped, and powder coated.
I also still have to get the front rotors checked for proper runout, get the calipers back on, and get the wheels where they belong. Finally, the parts that I needed to finish running the fuel lines arrived so I would like to get that done as well.
I guess we will see how far I am able to get today...
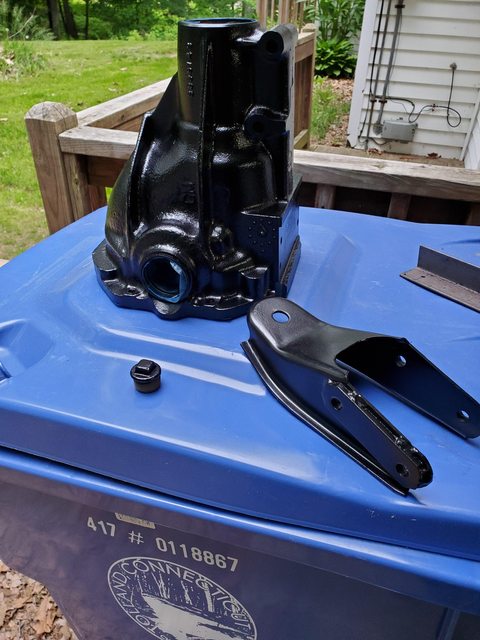
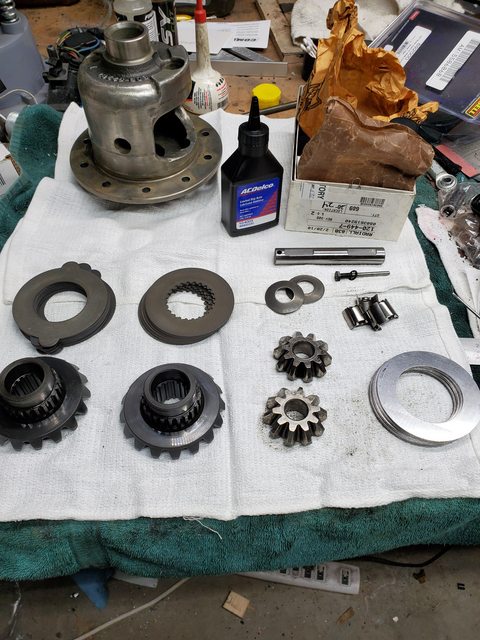
To start I finished removing the bearings from the posi case so all that remains there is to remove the spider gears and clutches.
Next I dialed in the runout on the front rotors (got it to .002 on both sides), mounted up the calipers, and reinstalled the wheels.
I also installed the stainless steel braided brake hoses while I was there. This is by far one of the best upgrades that you can make as far as brake feel goes plus they look fantastic
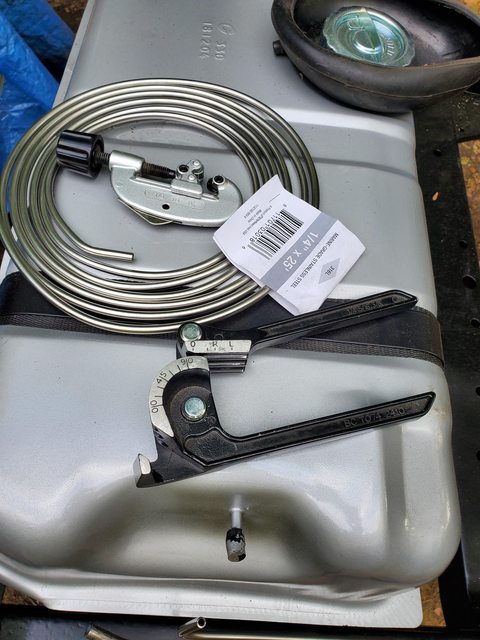
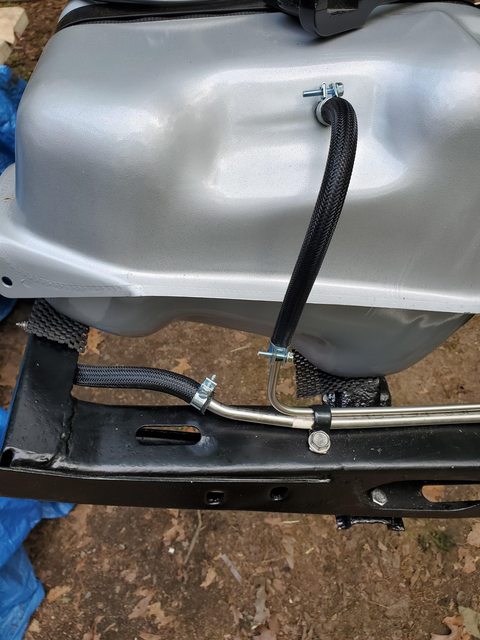
After that it was back onto getting the fuel lines bent and installed on the frame. I had a stainless steel feed like but needed the 1/4" return line. Rather than purchase a ready-made one I decided to bend my own with some stainless steel tubing. It took a while but it came out great!
Not bad for an amateur
Finally I had some quality fuel hose lying around and topped it off with a protective nylon sheath for some added peace of mind as well as fuel injection quality stainless steel clamps.
Not a bad days work but there is still much to do!
I started off by taking a trip down to see our very own GTR1999 at his shop to pick up some parts since I am fortunate and he lives about an hour away from me. He carries a lot of the harder to find parts such as full compliment needle bearings for the axles (what I have were caged), solid clutch packs, etc. so I picked those up but not before he spent at least two hours of his own time educating me and helping me with my own differential. He really went out of his way and I cannot say enough great things about this man. Not only did I learn a lot, he did some machine work on my posi case while I was there.
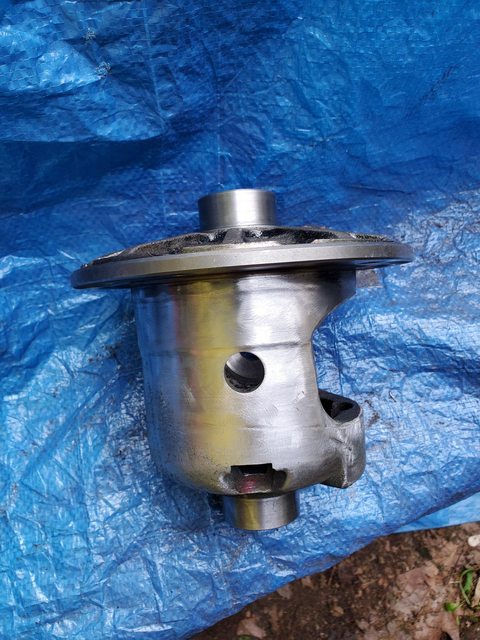
After thoroughly checking everything out and giving me a reasonably clean bill of health on things, he ended up milling down the pad where the cross shaft retaining pin goes. In its original form, the retaining pin only protrudes through the cross shaft by about 1/8" which puts a tremendous load there. By lowering the pad height and sinking the pin recess deeper he changed that to about 3/8" protrusion which gives it a lot more 'meat' to bite into. Interestingly enough, I worked for a Chevy dealership parts department back in the 80's and we sold those retaining pins by the dozen. They were always being replaced. 35 years later and I now know why.
You can easily see here how much further the pin now extends past the cross shaft. It is this kind of attention to detail that makes Gary so damn good at what he does. Oh, also note the rough casting of the posi case...
So, after Gary spending way too much of his free time with me, I took my parts and ran home and managed to get another hour or two working on things before my hands gave up the ghost.
First thing I did was to get all the rear differential case parts into the blast cabinet. Even after the hours of degreasing I did on these things they were still a mess from rust and corrosion so it took me another hour or so to get them cleaned up. As with all ferrous metals that I blast, I immediately coated them with afterblast for the phosphate coating to prevent any more rust from forming. The rust in the back of the car was pretty extreme and there is some evidence of pitting on the rear cover but not so bad as to make the part unusable and it finally cleaned up nicely. Sadly these are still not complete as they need a bath in warm, soapy water with brushes to ensure that no blast media remains inside the case. We do not want any of that stuff floating around in our bearings or gears after all the trouble we are going through.
I was running out of time to use my hands and knew that I would not get the parts cleaned so instead I started in on the posi case. Any engineer can tell you that sharp edges are no bueno. Not only are they unfriendly to hands but also they can promote cracking which these cases are already famous for so it is worth the time to polish the case and radius all of the sharp edges to make for a more solid unit. I did not have a lot of time so this is far from complete but you can already see the huge difference between this picture and the one above. I also cleaned up the bearing surfaces.
I have a lot going on today so I am unsure if I will get much time in the shop however next steps are the bath for the rear diff and to continue polishing the posi case before reassembly. I am still waiting on the R&P kit from Tom's which should be the last thing that I need to put this all back together (assuming I can get it tuned properly).
Last edited by PainfullySlow; 06-02-2019 at 10:10 AM.
Been a busy few days without a lot of shop time so this is really the past two days of work.
Now that the rear diff case had been blasted it was time to give them all a nice, soapy bath with brushes and a rag to ensure that no blast media would be left behind.
After that it was a rinse with the hose, blown dry with compressed air, and then off to the oven for a pre-bake. When powdercoating parts that have been exceptionally greasy it is always a good idea to bake them first. The heat causes the metal 'pores' to expand and the grease becomes liquid. In short, it forces any hidden or remaining impurities to the surface where they can then be cleaned up.
Cleanliness is next to godliness...at least as far as parts are concerned
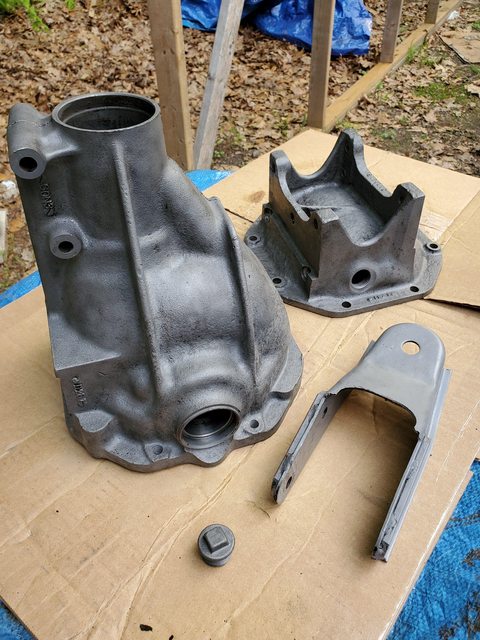
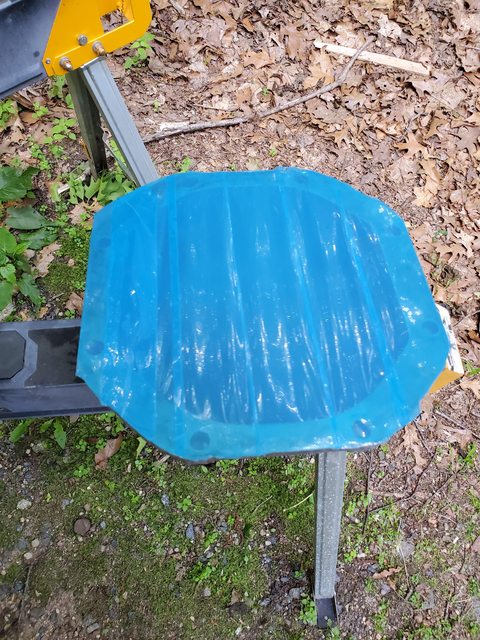
So, they baked for a little bit at 350 and then got another bath of acetone followed by afterblast. Once that was dry it was time for powder coating. I began by using the special high-temperature tape used for masking when powder coating to ensure that no powder got to where it did not belong.
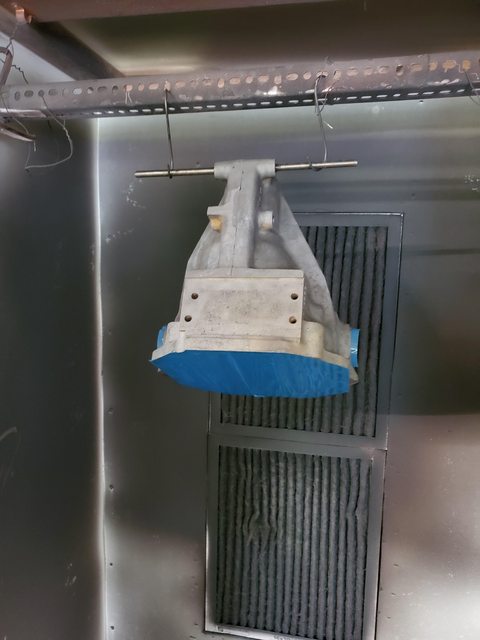
Once everything was masked off (all mating and bearing surfaces) then it was off to the spray booth. Sometimes you have to get a little creative with how you hang this stuff...
I popped all of the coated parts into the oven and set about finishing the polishing job on the posi carrier while things were curing. The case was polished inside and outside and the rough openings had all of the sharp edges and corners removed. Everything was nicely radiused when I was finished. Not quite as good as Gary but hopefully passable.
Ding! Fries are done...
I removed all of the masking material and set them aside for now. My hands were complaining but I pushed on just a bit longer. It was time to start tuning the posi unit.
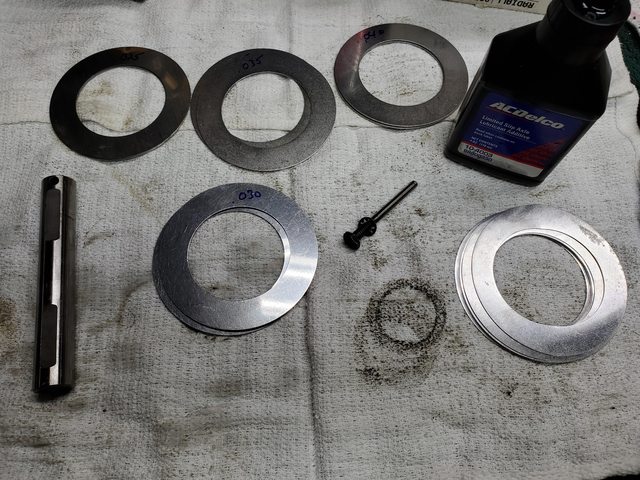
I began by measuring all the shim thicknesses with a micrometer and marking them for easy identification. After that I assembled the first clutch packs starting with the .030 shims which is where Gary suggested. It was way loose but I needed to bed in the clutches anyway.
I had started the posi tuning process but did not get very far as I needed something to help me spin the case to bed in the clutches so I grabbed some scrap pipe and spent 2 minutes at my welder making this contraption. Nowhere near as nice as the machines that the pro's use to spin these but it sure beats trying to spin this thing 100x in each direction by hand.
I went 100x in each direction and that is where I currently am sitting. Tomorrow a.m. I will begin the actual tuning process and see how close I can get.
Last edited by PainfullySlow; 06-05-2019 at 09:14 PM.
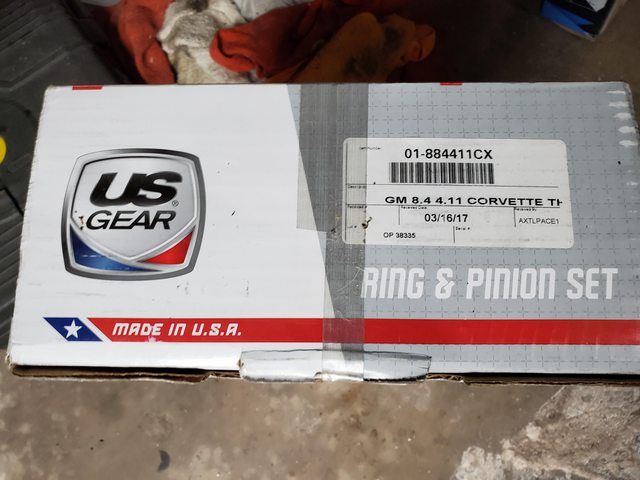
Well nothing got done yesterday but I did get a few visits from my delivery men.
My R&P from Tom's showed up...
As did the Borgensen steering box upgrade from my friends at Jegs. I was going back and forth forever on whether or not I wanted to spend the $ for this as I was certain that I could get the OEM steering box to be tight however in the end, the significantly tighter ratio of the Borgensen unit coupled with the fact that I was eliminating a potentially leaky power valve from the PS system were the deciding factors...
Well, I am stalled a bit on the posi unit as I am waiting for in-between sized shims to get everything right so rather than waste a perfect day I got outside and got to work.
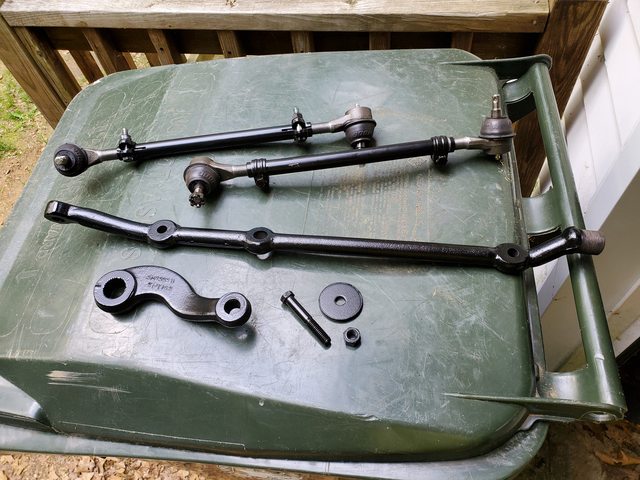
All of the steering linkage (box, etc) are still on the original frame so I had a bunch of disassembly to do to get the relay rod and pitman arm which is all that I am using from the original setup. Lots of swearing, 5lb sledging with pickle forks, and one lacerated forearm later, I had everything apart.
Once that was done I set about removing the mountains of grease from both pieces and while they were soaking in degreaser I installed the Borgensen box and the new Moog idler arm.
After that was done it was lots of elbow grease to remove 48 years of crud from these parts which really wiped me out but I got it done. Scraping, acetone bath with a rag, soaking in degreaser then a wire brush to remove most of the gunk. After that it was a rinse with the hose, blow dry with compressed air then off to the blast cabinet. Whew!
Afterblast and then powder coating was next and while things were in the oven curing I set about getting the new Moog tie rods assembled. I measured the old rod lengths to give me a starting point and went from there.
Whew, I am wiped. I think tonight is going to be a BBQ and Bourbon night...


 05-27-2019, 06:56 PM