When you click on links to various merchants on this site and make a purchase, this can result in this site earning a commission. Affiliate programs and affiliations include, but are not limited to, the eBay Partner Network.
How to make a DIY air dryer for your shop compressor
While I was using the die grinder the other day I noticed that I was getting a lot of water in the air line. I have a desiccant dryer in-line that I just changed the day before however with the air being so cold and the compressor heating up so much while in use it was causing a ton of water to be in the line. This is bad for my air tools but would be disastrous when it comes time to paint. Obviously the system that I used for drying on my smaller compressor was not up to the task with my new 60 gallon.
Being a giant physics and science geek occasionally has its advantages so I set about to making my own air line dryer system. I can't take complete credit for this as the idea has been passed around for quite some time but it was fun to put it to practical use.
I had a bunch of black iron pipe and various fittings hanging around from past projects so I thought that I would put it to use.
What I am making is a 'drip leg' loop which will be finished by a large filter filled with reusable desiccant pellets.
In the manufacturing facilities that I have built we would usually put a commercial chiller in place...basically a refrigerator that the pipes pass through and forces the air to cool rapidly. Cool air doesn't hold much water, you see.
The problem is that these are expensive and use a lot of power. I am already taxing the 100A service in my garage so I did not want to add to that electrical load so we will let physics work for us.
I whipped up this quick diagram as a blueprint for what I am doing.
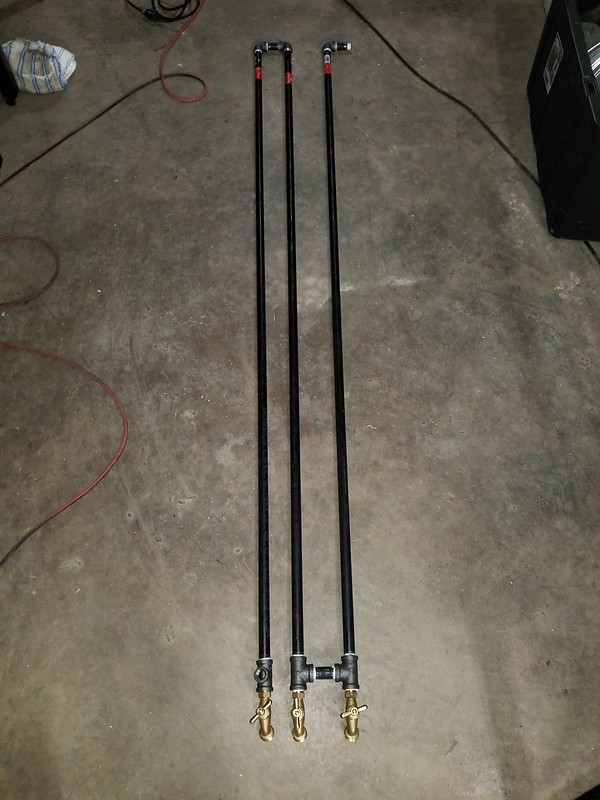
It is constructed of 1/2" Black Iron Pipe for the drip legs and the desiccant filter is made from 2" pipe.
The short version is that the hot air coming out of the compressor contains a lot of water in suspension. The air travels through the black iron pipe and transfers a lot of the heat to it through conduction as iron is a great thermal conductor. As the air cools it loses its ability to hold as much water and that is how we get moisture in our lines. Now in this design the water falls out of suspension and is collected at the bottom of the legs which is then removed through the valves at the bottom.
In many cases this would be sufficient to provide dry air but I wanted to be absolutely certain so I added a desiccant filter to the end of the line. This is nothing more than a 2" section of pipe with screens at either end to prevent the desiccant pellets from entering the air line. I added two 45 degree tee's to the design which will make changing out the desiccant easy when the time comes. Simply shut off the air, open the lower tee and the desiccant falls out into a bucket. Replace the cap on the lower tee and then use the upper tee to re-fill the tube with fresh desiccant. Cap it back off, turn on the air and you are good to go.
Total cost would likely be around $100 if you had to buy everything needed but I had a lot of this around the house. The only thing that I needed to buy was the desiccant and a few of the 2" fittings so my out of pocket should be around $40.
Build List:
Qty 3: 1/2" Black Iron Pipe - 6' long
Qty 2: 1/2" x 1/2" x 1/2" Black Iron Tee
Qty 2: 1/2" x 3/8" x 1/2" Black Iron Tee (the 3/8 is what connects to my compressor and air line)
Qty 4: Black Iron 90 Degree Elbow
Qty 3: 1/2" Black Iron Pipe - 2.5" long
Qty 1: 1/2" Black Iron Pipe - 12" long
Qty 1: 2" Black Iron Pipe - 4' long
Qty 2: 2" x 2" x 2" Black Iron 90 Degree Tee
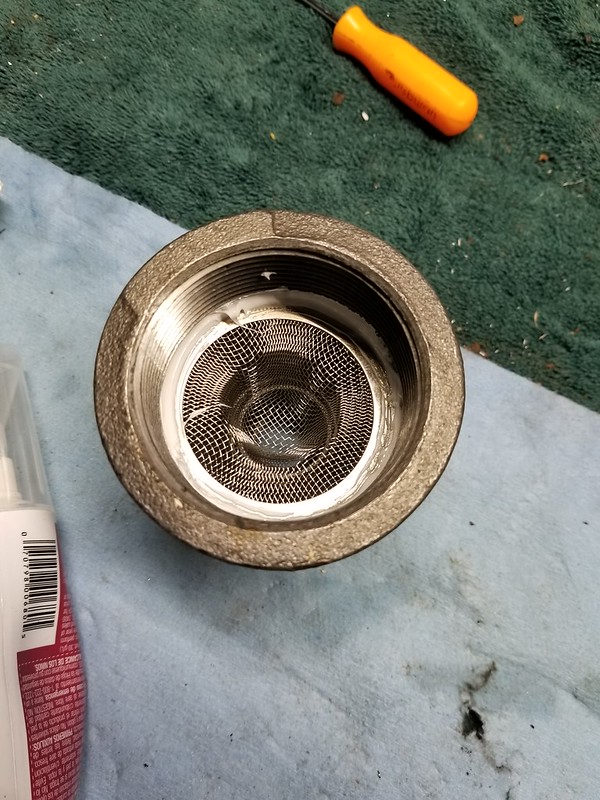
Qty 2: 2" to 1/2" Reducer Cap
Qty 2: 2" End Cap
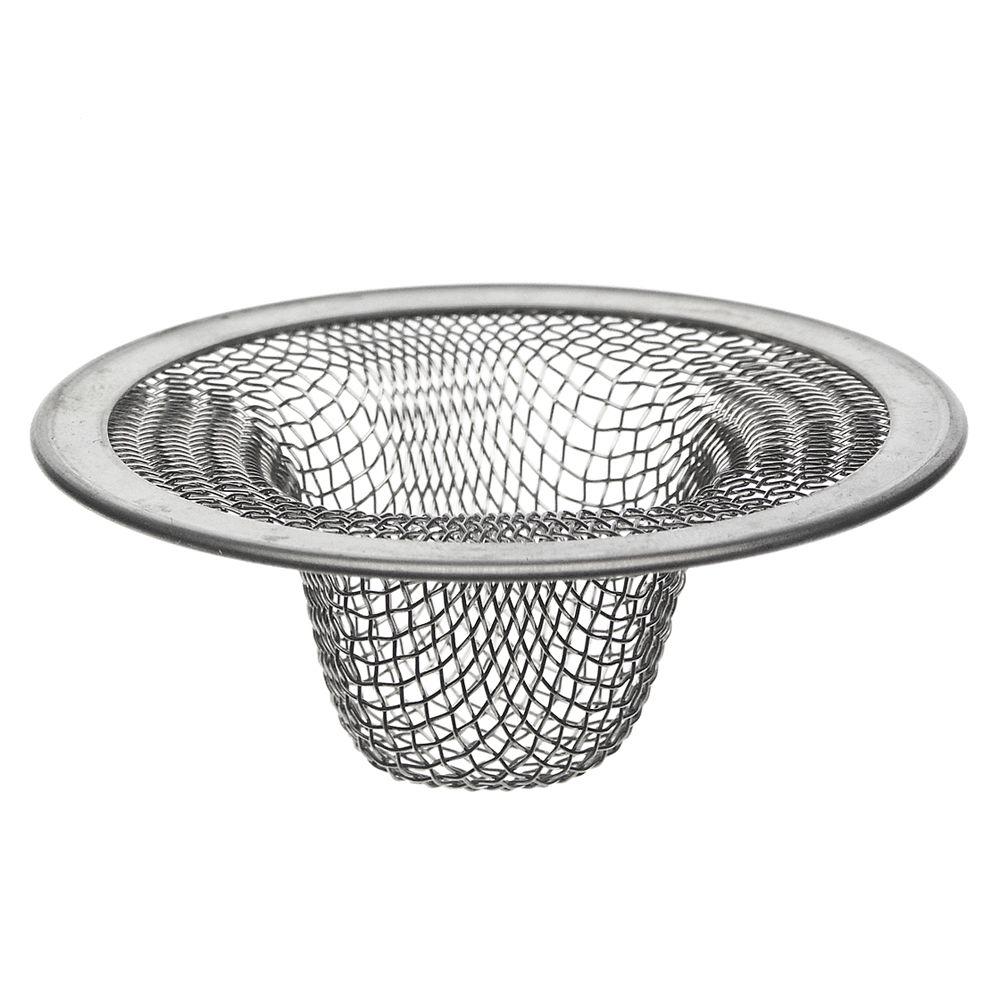
Qty 2: Some kind of screen. I used some perforated metal that I had lying around.
Qty 4: 1/2" Ball Valve. I actually had hose bibs so I used those.
Qty 1: Black Iron Pipe Sealant: use the paste, it works far better than tape.
Qty 1: 5lbs. Silicon Desiccant Beads (see link below). Use the orange stuff as it is manufactured without carcinogens. The best part about using this stuff is that it can be dried out and reused. Simply spread it out on a cookie sheet and put it in the oven for a bit. It will change from green (saturated) to orange (ready to absorb more water) then you are good to put it back into use.
And finally, this is what I have so far. I am waiting on the 2" 90 degree tees then I will be able to fully assemble the unit.
**EDIT**
I should add that this system is expandable. The longer the pipe run that you have, the more cooling takes place and the more water is removed from your air. I chose 6' pipe sections because I have a 9' ceiling height. If you have the ability to run longer pipe, please feel free to do so and your system will be more efficient. Likewise I stopped at 3 loops but there is no reason why you could not continue to add as many loops as you found necessary.
It should also add that in the warmer weather you can increase the efficiency of this design by adding a simple fan blowing on the pipes.
Next step is to add a screen to the desiccant section so that the beads stay put and do not get sucked into the air lines. For this I used a standard stainless steel plumbing strainer which can be found at most home improvement stores.
I used silicone to secure the strainers in the 2" to 1/2" reducers as shown below.
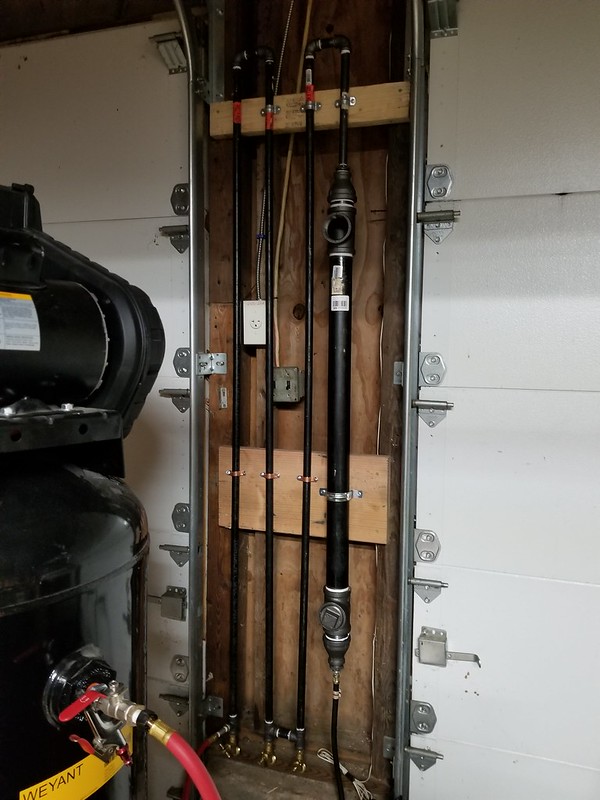
All that remains is to assemble the unit and put it into use. Here it is installed in my garage. Once you have it in place, install the lower cap in the desiccant filter and use the top tee to fill up the unit. That 4' section of 2: pipe will hold just about the entire 5lbs of desiccant.
Once it is full, install the upper cap and you are ready to put it into use.
I have now been using this system for several weeks and am VERY pleased with the way it performs. I drain the system after every use and get a substantial amount of water from all three legs in the system. I have seen no sign of any water in my air supply at this point.
I have also installed a small desiccant filter in the line just after the one that I made. It only holds a small amount of desiccant but it serves only as a monitor. I know that when the desiccant in this small filter changes color that it is time to replace the media in the main filter.
I added a cooler between compressor and tank substantially reducing temp of air before it hits the tank. I Plan on adding your style when I need to paint.
Air temp drop on a hot humid NC day is 20 to 30 degrees or more after cooler. Almost no cost as its a condensor off a Cadillac.
Painfully Slow thanks for posting this. I don't hang out here in C3 I found this via a Google search. I will be building mine next week thanks to your plans.
Suggest you put a box fan in front of the coil to increase cooling.
Question please, instead of drain valves, you could simply have a 1/16 or 1/32" or 1/64" orifice or hole in the bottom of the drain leg to let the condensed moisture out. Yes, you lose some air flow, but you do not have to worry about opening the drain valve. Or is there a float valve similar to a steam trap that would periodically open and let the condensate out?
Yes Harbor freight has an auto drain for air compressors.
FWIW - you should always pull your air from the top of the apparatus, Force your air up wards through the dessicant and pull off the top. LESS LIKELY TO HAVE condensate drain back into your lines, although chilling the air really drops the moisture out of it QUICK.
I also RUN a screw on 3M filter at the gun, I worry about moisture, dirt, and oils as I paint outside panels a good bit.
Last edited by firstgenaddict; 11-12-2018 at 01:15 PM.
Painfully Slow, how's this setup holding up? Thinking of doing this in my garage. Anything you would change now that you've been running it for a couple years? Thanks!
Painfully Slow, how's this setup holding up? Thinking of doing this in my garage. Anything you would change now that you've been running it for a couple years? Thanks!
My experience, and I can not speak for Painfully Slow, but my similar design works great!
I fabbed up something similar last fall and mine works great! I used 1" pipe instead of 1/2". No 45 deg fittings on the 2", I just piped up the desiccant without load in or take out's. Also added pipe nipples on the drain valves to act as catch sumps. I also installed mine in an open frame box of 2x4's so it gets plenty of air flow.
I usually get condensation off the first drain valve and almost never off the second drain valve. I have not checked the desiccant yet for color change.
I did this about 5-6 years ago when i got the new air compressor for painting the car.
I also noticed the air was rather warm just going 20-30 feet to the regulator/filter.
Since i had some left over copper from the water line redo project i came up with this.

 02-28-2018, 08:00 AM