


Cheap fuel filter = fire... please help
Thread Starter
Intermediate

Joined: Jan 2006
Posts: 46
Likes: 0
From: Augusta Maine
I own a 79 vette that I have been working on for the past two years. I have posted to these very forums several times, always with the best responses and most valued opinions.
I am really bummed right now. I just finished installing all new brake lines, calipers, flex lines, and parking brake cables. When I finished bleeding the brakes, I was excited to take it for a trip down the road to see the effectiveness of the brakes. Well, I didn't even make it out of the driveway.
I fired up the vette, and smelled some fuel. The hood was open, so I looked up, and saw fuel spraying out of the engine! Needless to say, I killed the engine immediately, but not before the raw fuel ignited on the now hot headers. I immediately saw flames 10' high out of my engine compartment! I ran into my house and grabbed the closest fire extinguisher and was able to put it out within a minute or two.
Needless to say, I am sad to see the damage that resulted from this short duration.
This whole story brings me to one question to ask everyone... What is the recommended fuel filter (if any) setup on the C3 vettes? I HAD a solid line going from my pump to a 90... then flex line to an inline fuel filter (from trans-dep, which caused the fire) then back to a flex line and finally entering the carb from a fitting. It is an Edelbrock carb, so I was thinking about getting the solid elbow from the carb, then having a fuel filter (HIGH QUALITY) directly screwed into that line. Then if possible, one solid line from that to the fuel pump.
I have to be honest, this scared the crap outta me. I want to make sure this doesn't ever happen again.
Also, does anyone have any suggestions on what to check or any common problems after an engine fire?
Thank you all in advance for your advice.
Race Director


Joined: May 2005
Posts: 10,674
Likes: 122
From: Millington Illinois
St. Jude Donor '08-'09
That sucks! I posted awhile back on this. Do not under any circumstances EVER use rubber fuel lines past the pressure side of the pump. Solid steel with flair fittings (prefered), AN fittings and braided, or Stainless steel with compression fittings. Your car has 30+ year old rubber lines. There is a rubber line at the frame to pump connection, the tank to frame and the return line if used. These should be checked and replaced with a Fuel injection rated hose. They are much stronger. Use high quality clamps also. Had a 3 year old Stainless steel worm clamp fail on my wife's van and fuel was pouring out onto the rear exhaust pipe. Same thing could have happened but fortunatly didn't. I am also looking for a nice looking, High quality filter that will full flow 3/8 line with threaded connectors. They are hard to find. I hope your wiring and vacumn lines survived and no paint or body damage as a result of your fire.
Last edited by 63mako; Sep 16, 2006 at 11:56 PM.
Melting Slicks

Joined: Oct 2001
Posts: 2,064
Likes: 1,382
From: Halifax, Nova Scotia, Canada
I installed a new hard fuel line a few years ago. This is an excellent setup, from Lars. I was hearing similar stories and decided to upgrade as well.
It uses the Delco filter and looks quite stock.
I forget where this information is posted, sorry can't provide the link.
However I had it saved. (Pasted Below)
Barry
.................................... From Lars
Parts and Fabrication
Okay - here's the info for the line:
GM part number 22527595 (Group 3.163) is a straight piece of 3/8" steel fuel line with a correct "O-Ring" fitting with a rubber O-Ring on both ends. The line is about 8 feet long or-so. The fittings and O-Rings on this line will screw right into the '85 Corvette High Flow High Pressure fuel injection fuel filter. This line also has 2 pieces of the spiral-wrapped "armour" on it that you can utilize as you see fit when you fabricate your custom line. I did not have cost info, but I seem to remember that it was somewhere in the range between $10 -$20.
You'll need a 3/8" Tube Bender (Snap-On and Blue Point both sell a nice hand-bender that will bend 3 sizes of tube up to 3/8". Eastwood also carries them) and a double flare tool for 3/8 tube (there are some nice double-flare kits out there that will flare multiple sizes of tube) as well as a tube cutter. Armed with these tools, a grease pencil, an X-Acto Knife and a small half-round swiss file, you can bend up any fuel line you want utilizing the good '85 Vette filter.
Cut the 22527595 line in half, and bend up a line from the filter to the fuel pump and another line from the filter to the carb. If you buy a 42" long piece of 3/8" brake line from NAPA, it will have 2 inverted flare fittings on it. Cut the end off this NAPA line and take the fittings. Then use the rest of the NAPA line to trial-bend your two tube sections before you try it on the nice GM line. Use the inverted flare fittings on your new bent up custom line at the fuel pump interface and at the carb interface. Your new lines will thus have O-Ring fittings on one end that will screw into the filter, and inverted 45-degree double-flare fittings (that you will flare with your flaring tool) on the other end for screwing into the fuel pump and carb. This produces a neat-looking and highly reliable fuel line for your Vette engine, and it has a very stock-looking appearance even though it's not stock. With a little practice, you'll be able to use the bending tool very quickly to make accurate, good-looking bends. I use a grease pencil to mark the line for bends as I fit the line to the engine one bend at a time. It works well.
Before you flare the cut ends of your tube sections with the flaring tool, it is imperative that you de-burr the ends of the cut tube extremely well. I use an X-Acto knife, and run the knife around the inner diameter of the tube to cut out the sharp ridge that the tube cutting tool leaves. Then, I use a small half-round Swiss file to file the inner diameter of the tube to eliminate every trace of the ridge. Once the tube-end prep is perfect, you can then slip the inverted flare fitting into the tube and use your double-flare tool to fabricate a great-looking flared end that will seal up well.
Once your lines are fabricated, you can put a little polishing compound on a rag and rub your lines through the rag. This will polish the plating on the lines (usually zinc) and make your lines look almost chrome. Pretty cool.
If anyone has questions on this process, or wants any specific information, please feel free to contact me.
Location
This type of line makes a great setup in a custom engine compartment if you're not worried about a 100% correct setup, yet a very reliable high performance system is required. It really works well, and people who aren't "into" Vettes can't tell that it's not stock since the filter and the hard lines look very factory-like.
Exact placement of the filter is not critical, and depends more on personal preference, engine compartment aesthetics, and location of accessory components (a/c compressor). I like to mount my filters vertical to keep them as air-free as possible, but this is not critical at all. Usually, I will bend up my lower line to come out of the fuel pump and tuck back in towards the front face of the block. I will hug the block as close as possible without actually touching the block, and then bend the line to follow the 45-degree parting line at the cylinder head gasket. It's in this area that I usually like to locate the filter and terminate the lower line. This provides an easily accessible filter, yet keeps the filter away from the top of the intake manifold (I think it looks cluttered when the filter is positioned over the intake). Also, it is very easy to find a bolt hole in the front of the cylinder head in this area, so you can fabricate a nice-looking fuel filter strap, run the strap around the filter, and bolt it into the head for additional support if desired (although really not required). Then run your upper line out of the top of the filter, 90 degrees straight back over the intake, and then up to mate up with the carb inlet fitting wherever it may be located (depending on carb type).
I've been bending up fuel lines for quite a few years, so I can whip them out pretty quickly and accurately. But I still find it useful to bend up a test-piece first, since I always seem to figure out a nicer routing after I have the first piece bent up and installed. 20/20 hindsight, you know.... You can use plain ol' inverted flare fittings on the test-piece line to screw the line ends temporarily into the O-Ring Filter fittings without flaring the tube ends just to test-fit the trial pieces into position. you can thus develop a very nice, well-fitting system by sacrificing some cheap 3/8 brake line rather than screwing up the expensive GM O-Ring'ed line.
_______
Lars in Denver
Chief Eng., Gold Crew
'85 Coupe, no MAF screen, K&N, Energy Suspension, Bilstein, glass top.
'71 GTO Judge 455 H.O. 4-spd (12.6 on slicks at sea level)
'68 GTO Convert 4-spd
'74 Ram Air Formula 455
'80 Ford Pinto (with factory 2-tone paint it's a collector!)
Le Mans Master

Joined: Mar 2004
Posts: 7,470
Likes: 1,490
From: Little Rock AR
Those "hot rod" glass inline filters with removable elements should be banned.
We have tried to warn as many people as possible about those blister pack time bombs but every time this comes up we have people that say have not heard of it.
-Mark.
We have tried to warn as many people as possible about those blister pack time bombs but every time this comes up we have people that say have not heard of it.
-Mark.
Thread Starter
Intermediate
Joined: Jan 2006
Posts: 46
Likes: 0
From: Augusta Maine
Originally Posted by 63mako
That sucks! I posted awhile back on this. Do not under any circumstances EVER use rubber fuel lines past the pressure side of the pump. Solid steel with flair fittings (prefered), AN fittings and braided, or Stainless steel with compression fittings. Your car has 30+ year old rubber lines. There is a rubber line at the frame to pump connection, the tank to frame and the return line if used. These should be checked and replaced with a Fuel injection rated hose. They are much stronger. Use high quality clamps also. Had a 3 year old Stainless steel worm clamp fail on my wife's van and fuel was pouring out onto the rear exhaust pipe. Same thing could have happened but fortunatly didn't. I am also looking for a nice looking, High quality filter that will full flow 3/8 line with threaded connectors. They are hard to find. I hope your wiring and vacumn lines survived and no paint or body damage as a result of your fire.
To replace the rubber lines, I was thinking about this...
http://store.summitracing.com/partde...5&autoview=sku
and...
http://store.summitracing.com/partde...5&autoview=sku
I know the last part isn't steel... but it seems like a high quality "racing" application from Edelbrock. Should I just try to get the solid ones made instead?
Thread Starter
Intermediate
Joined: Jan 2006
Posts: 46
Likes: 0
From: Augusta Maine
Originally Posted by stingr69
Those "hot rod" glass inline filters with removable elements should be banned.
We have tried to warn as many people as possible about those blister pack time bombs but every time this comes up we have people that say have not heard of it.
-Mark.
We have tried to warn as many people as possible about those blister pack time bombs but every time this comes up we have people that say have not heard of it.
-Mark.
P.S. I hadn't heard of it before.

Melting Slicks
Joined: Mar 2006
Posts: 3,342
Likes: 7
From: Connecticut
Originally Posted by cswhelan
http://store.summitracing.com/partde...5&autoview=sku
I know the last part isn't steel... but it seems like a high quality "racing" application from Edelbrock. Should I just try to get the solid ones made instead?
I know the last part isn't steel... but it seems like a high quality "racing" application from Edelbrock. Should I just try to get the solid ones made instead?
Rubber inside of braided stainless sleeve
Corvette Stories
The Best of Corvette for Corvette Enthusiasts

Top 10 Most Explosive Corvettes Ever Made: Power-to-Weight Ratio Ranked!
Joe Kucinski
150 hp to 1,250 hp: Every Corvette Generation Compared by the Specs That Matter
Joe Kucinski
8 Coolest Corvette Pace Cars (and Replicas) of All Time
Verdad Gallardo
Top 10 Corvette Engines RANKED by Peak Torque (70+ Years of Muscle!)
Joe Kucinski
Corvette ZR1X Will Be Pacing the Indy 500, And Could Probably Race, Too!
Verdad Gallardo
Top 10 Corvettes Coming to Mecum Indy 2026!
Brett Foote
Top 10 C9 Corvette MUST-HAVES to Fix These C8 Generation Flaws!
Michael S. Palmer
10 Revolutionary 'Corvette Firsts' Most People Don't Know
Joe Kucinski
5 Reasons to Upgrade to an LS6-Powered Corvette; 5 Reasons to Stay LT2
Michael S. Palmer

Melting Slicks
Joined: Mar 2006
Posts: 3,342
Likes: 7
From: Connecticut
Originally Posted by paul67
I'll have to disagree with Bob. The Edelbrock/Russell setup has worked fine on my car.
No headers and a nice neat setup which is far from any high heat source
I realize some early C3's had the steel G3 type filters, not sure about the C2 era
But I would still revert to the stock steel line though
GM diddnt put it there for looks

I also diddnt see any mention of the Russell Filter which looks very sturdy from the pics you posted.
I still say any rubber fuel line, no matter how it is covered is dangerous in an engine compartment. to each his own.
Last edited by Bob Onit; Sep 17, 2006 at 08:11 AM.


Team Owner


Joined: Aug 1999
Posts: 30,995
Likes: 98
From: Ontario
Bob,
I had plans to revert back to a hard line this summer. Not that I believe there is a safety issue but I simply don't like the braided look. I got hung up on the correct way to fabricate a line with an AN fitting to connect to that Russell filter. As the Edelbrock does not have an internal filter it is essential. In any case, it became one of those round-to-its and has not been done.
I had plans to revert back to a hard line this summer. Not that I believe there is a safety issue but I simply don't like the braided look. I got hung up on the correct way to fabricate a line with an AN fitting to connect to that Russell filter. As the Edelbrock does not have an internal filter it is essential. In any case, it became one of those round-to-its and has not been done.


Drifting

Joined: Sep 2006
Posts: 1,259
Likes: 2
From: MS
Sorry about your incident, CS. I want to try and make a steel line with fittings on it that I can bolt a stock style metal filter onto it down low by the fuel pump. This would probably be the safest setup and would look somewhat OEM.

Team Owner
Joined: Jul 1999
Posts: 26,545
Likes: 46
From: Huntersville NC
What type of inline fuel filter were you using and how did it fail?
I used lars' instructions and bent my own hardline which uses a Delco screw-in filter, like this one:
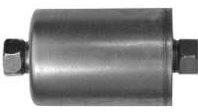
Unfortunately, I believe the GM fuel line part that I used to make the fuel line has been discontinued, but there has to be something we can use to replace that; maybe one of those parts store fuel line repair kits that has the o-ring fittings.
important: You need the proper O-ring fittings in order to use the fuel filter shown above. You cannot just use a standard brakeline fitting (I don't know the exact size) that will fit the threads, but will not seat (and seal) properly.
I used lars' instructions and bent my own hardline which uses a Delco screw-in filter, like this one:
Unfortunately, I believe the GM fuel line part that I used to make the fuel line has been discontinued, but there has to be something we can use to replace that; maybe one of those parts store fuel line repair kits that has the o-ring fittings.
important: You need the proper O-ring fittings in order to use the fuel filter shown above. You cannot just use a standard brakeline fitting (I don't know the exact size) that will fit the threads, but will not seat (and seal) properly.
Last edited by PRNDL; Sep 17, 2006 at 10:46 AM.
Team Owner
Joined: Aug 1999
Posts: 30,995
Likes: 98
From: Ontario
Bob,
It was a Holley 4160. Leaky and tempermental as heck. Lars rebuilt it for me but the Edelbrock is so trouble-free I just leave it on. So the Holley and various components are packed away in the basement.

It was a Holley 4160. Leaky and tempermental as heck. Lars rebuilt it for me but the Edelbrock is so trouble-free I just leave it on. So the Holley and various components are packed away in the basement.
Melting Slicks
Joined: Dec 2000
Posts: 2,130
Likes: 1
From: mesa,az
I'm in the process off setting up a fuel line for my new engine build. Two problems I have run into .
The double flair. My cheap flair tool isn't doing such a good job.
The short peice of line from the filter to the edelbrock carb. I have managed to kink three of them so far.

I am using a 90* fitting coming out of my pump and a 90* on the front off the filter to minimize the number of tight bends i must create.
The double flair. My cheap flair tool isn't doing such a good job.
The short peice of line from the filter to the edelbrock carb. I have managed to kink three of them so far.
I am using a 90* fitting coming out of my pump and a 90* on the front off the filter to minimize the number of tight bends i must create.
Safety Car

Joined: Oct 2004
Posts: 3,725
Likes: 5
From: Minnesota
My guess is that you got a filter for 5/16 rubber line instead of 3/8. It's pretty hard to tell the difference just looking at them. I'm still running rubber line myself but I change it every couple of years and make sure there are no abrasion points. Why doesn't someone here put some hard line kits together to save a few old cars?

Instructor

Joined: Aug 2006
Posts: 151
Likes: 0
Ok, this thread has me ready to swap my rubber line setup to steel. I looked on the ecklers site and found a pre bent fuel line. I have a 72 with nom 350 equiped with a quadrajet. will this line fit my car without modifications? Don