
'63-'79 Pinion Seal Replacement Pictures!!!
 12-18-2006, 07:54 PM
#1
Tech Contributor
Thread Starter

OK I know you guys wait for these posts like you used to wait for the next issue of Jack Kirby's Fantastic Four or the next episode of the "Willd,Wild, West"! Ah the good old days!
Since there have been a few posts lately on replacing the pinion seal in the differential I figured I would post some pictures for those of you wanting to do this job!!! Doing it on the car just plain sucks unless you have a lift. I prefer to have the differential out to check it out anyway. Since some of you like to replace the side yokes then this is also a good time to replace the pinion seal too.
I have a differential in from another forum buddy for a check and to replace the yoke seals and bearings. So it is not going to look real fancy here like when I blueprint a differential but I think you'll get the point. Besides, I don't see anyone else in the business writing these posts!! LOL
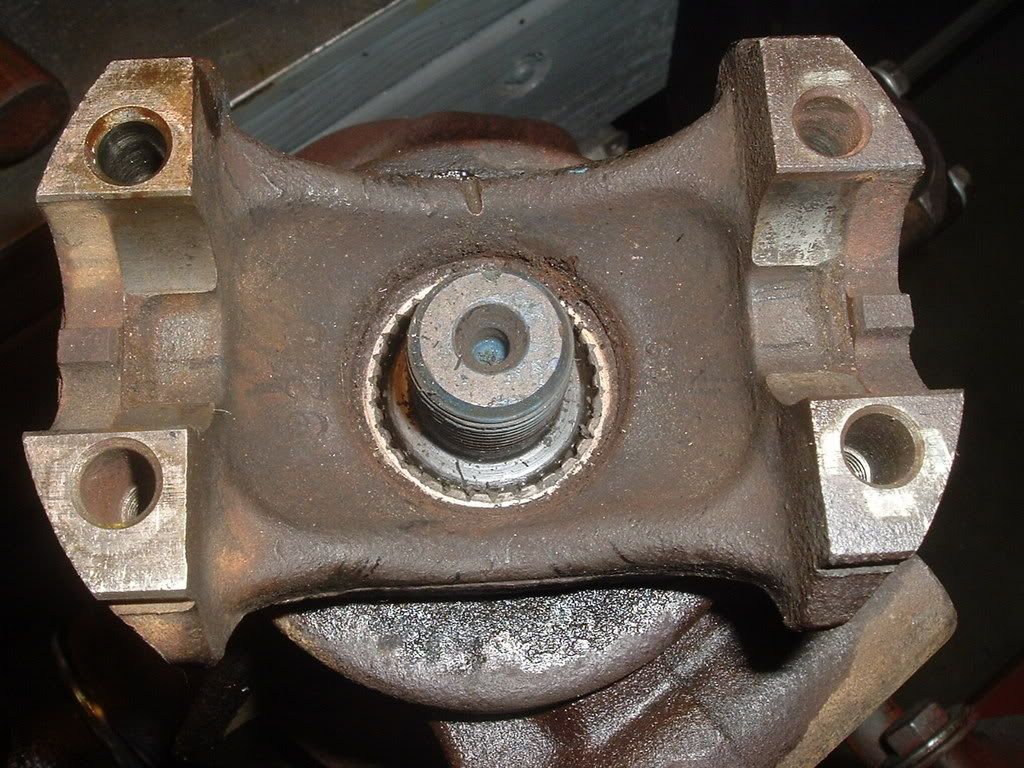
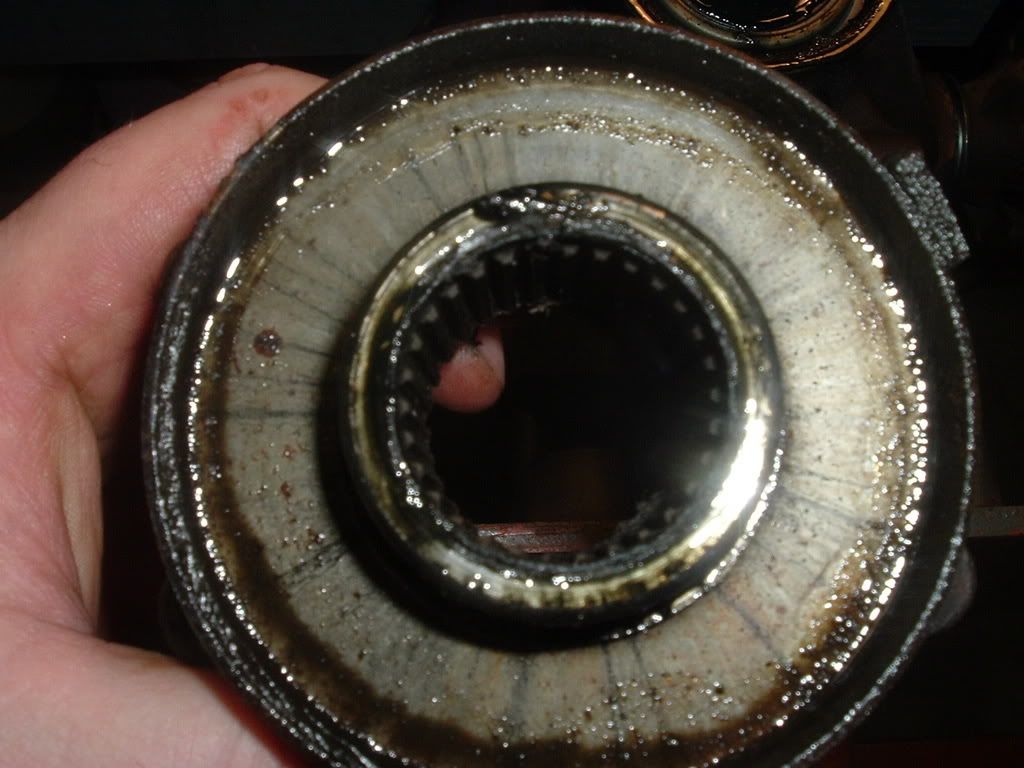
Ok, here we have a rather typical differential in good shape and no noise complaints. I installed the yokes and seals then tested it by leaving it on the stand pointing down with oil in it. After a couple of hours it looked good and since there was no complaint on the pin seal I added all the oil and buttoned it up. 8 Hours later I found it was leaking.

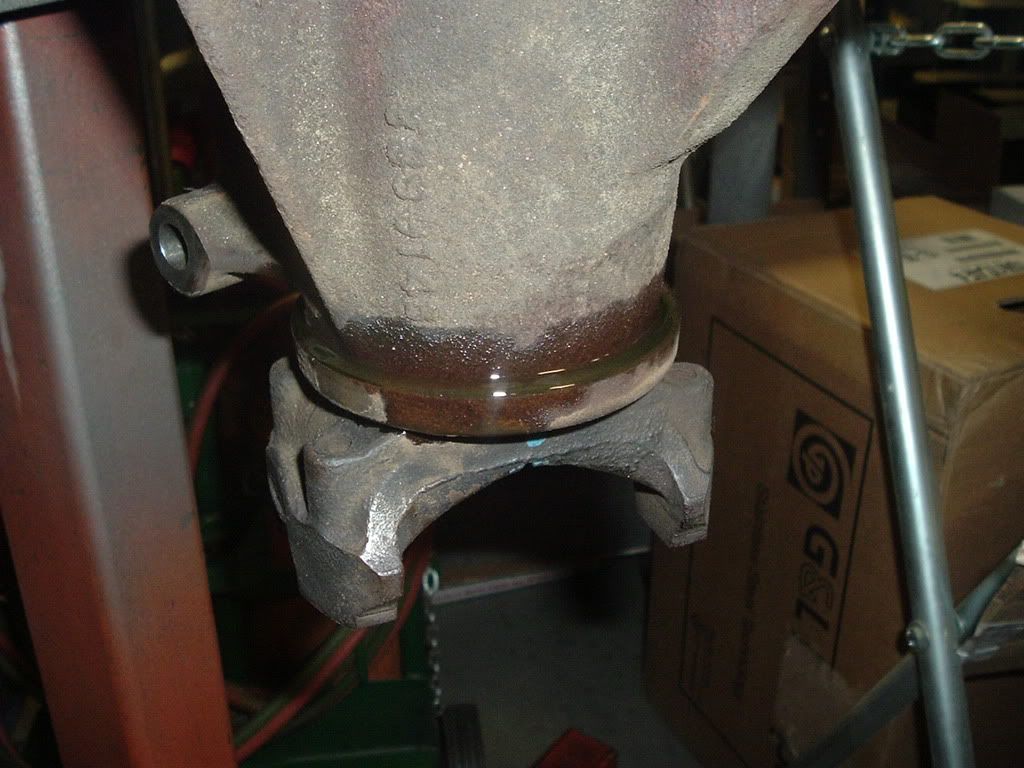
Ok so first I saw someone was in here before! They did witness mark the diff with a grinder. That's ok as it isn't going to fade away!
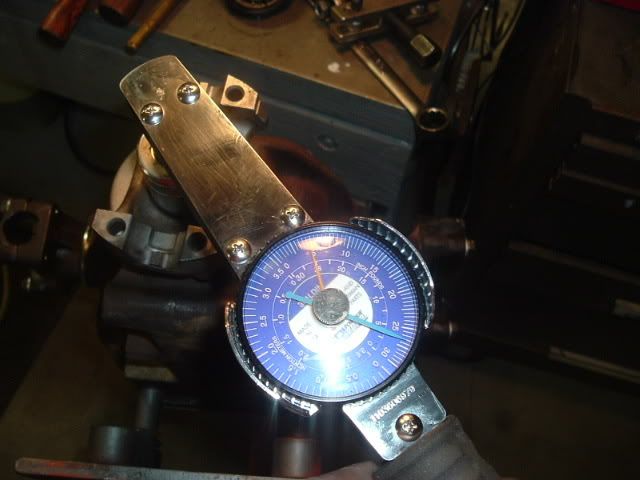
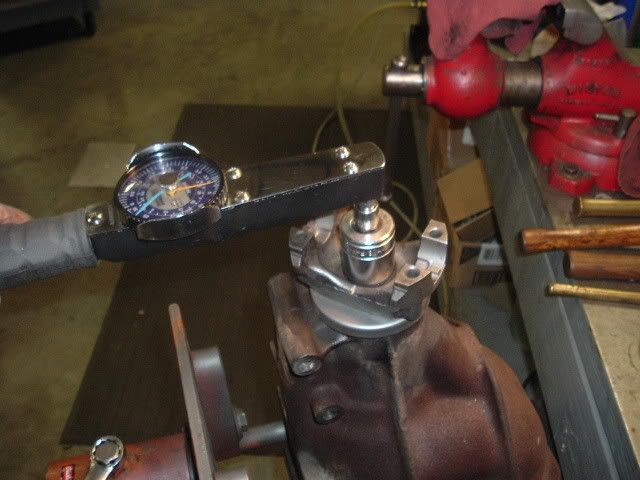
Before breaking it down I checked the rotational torque. This is the only reference point I have. The witness marks are good but I wanted to know exactly what was going on here.
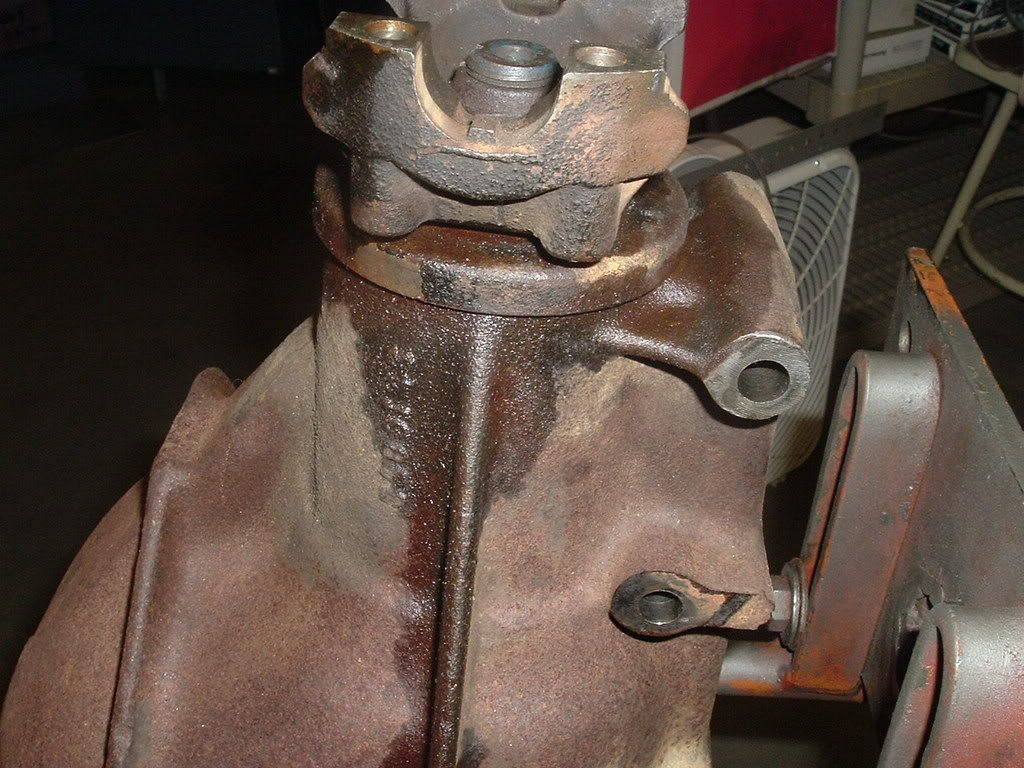
Pulled the nut & washer and didn't see any sign of sealant.
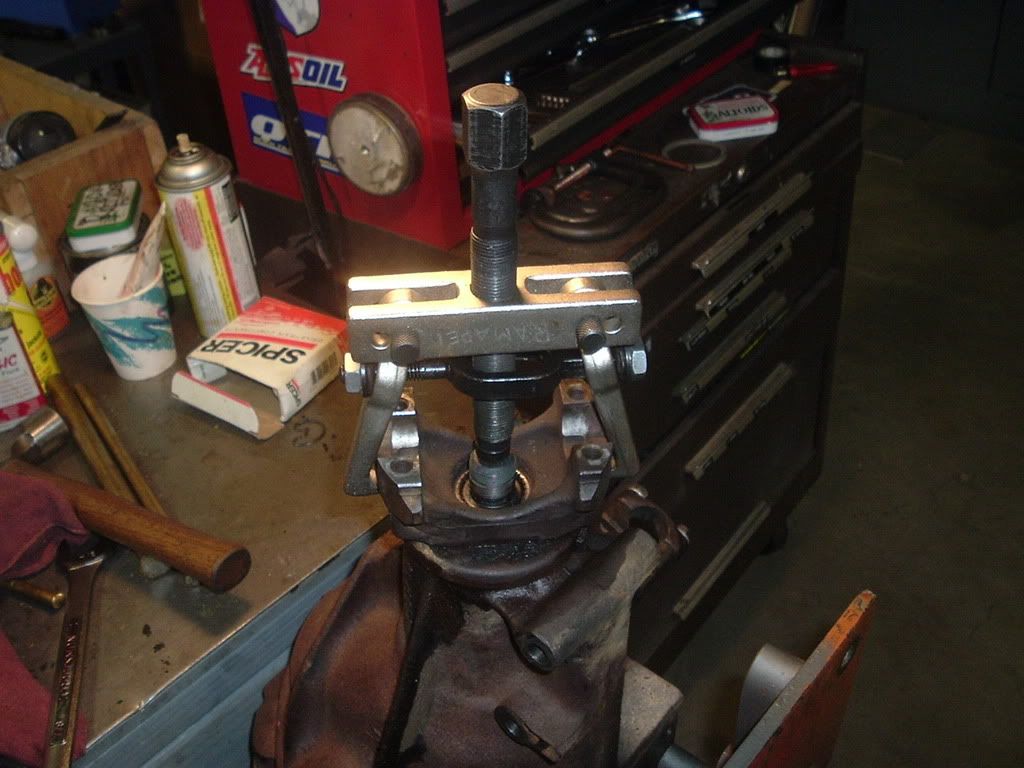
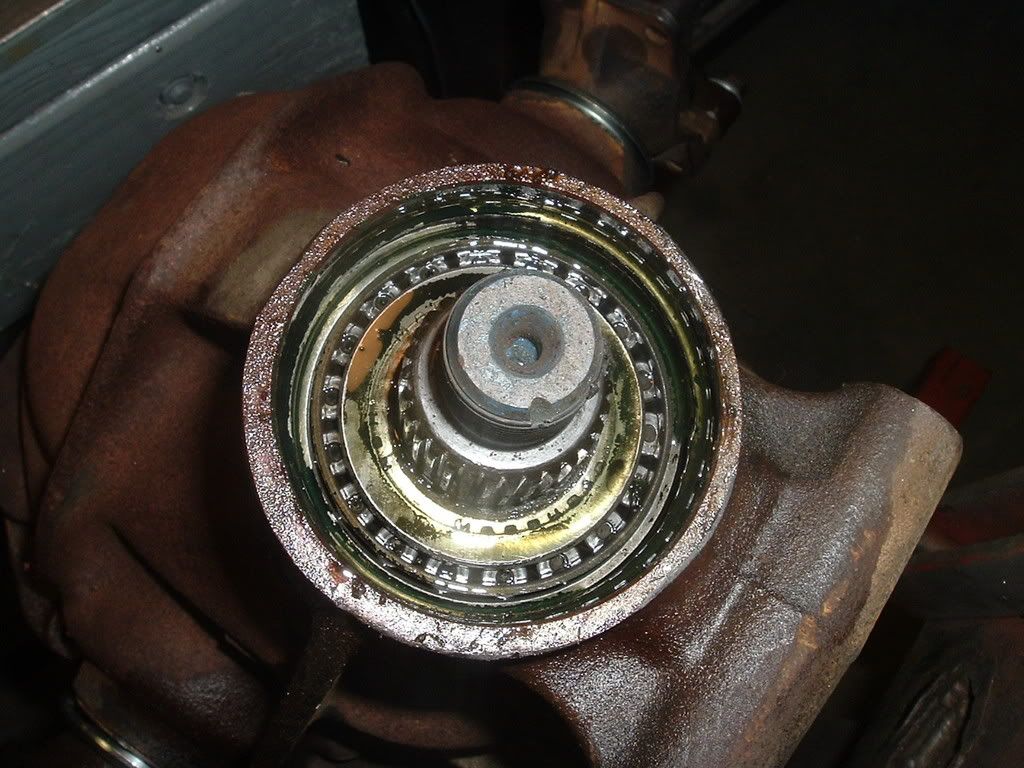
Pulled the yoke and found a rolled seal,no sealant on the splines but otherwise not too bad. The seal was hitting the pinion deflector though.

Next post - Install
Stay tuned!
Since there have been a few posts lately on replacing the pinion seal in the differential I figured I would post some pictures for those of you wanting to do this job!!! Doing it on the car just plain sucks unless you have a lift. I prefer to have the differential out to check it out anyway. Since some of you like to replace the side yokes then this is also a good time to replace the pinion seal too.
I have a differential in from another forum buddy for a check and to replace the yoke seals and bearings. So it is not going to look real fancy here like when I blueprint a differential but I think you'll get the point. Besides, I don't see anyone else in the business writing these posts!! LOL
Ok, here we have a rather typical differential in good shape and no noise complaints. I installed the yokes and seals then tested it by leaving it on the stand pointing down with oil in it. After a couple of hours it looked good and since there was no complaint on the pin seal I added all the oil and buttoned it up. 8 Hours later I found it was leaking.
Ok so first I saw someone was in here before! They did witness mark the diff with a grinder. That's ok as it isn't going to fade away!
Before breaking it down I checked the rotational torque. This is the only reference point I have. The witness marks are good but I wanted to know exactly what was going on here.
Pulled the nut & washer and didn't see any sign of sealant.
Pulled the yoke and found a rolled seal,no sealant on the splines but otherwise not too bad. The seal was hitting the pinion deflector though.
Next post - Install
Stay tuned!
Last edited by GTR1999; 12-18-2006 at 07:59 PM.
 12-18-2006, 08:10 PM
#2
Tech Contributor
Thread Starter
Install Time
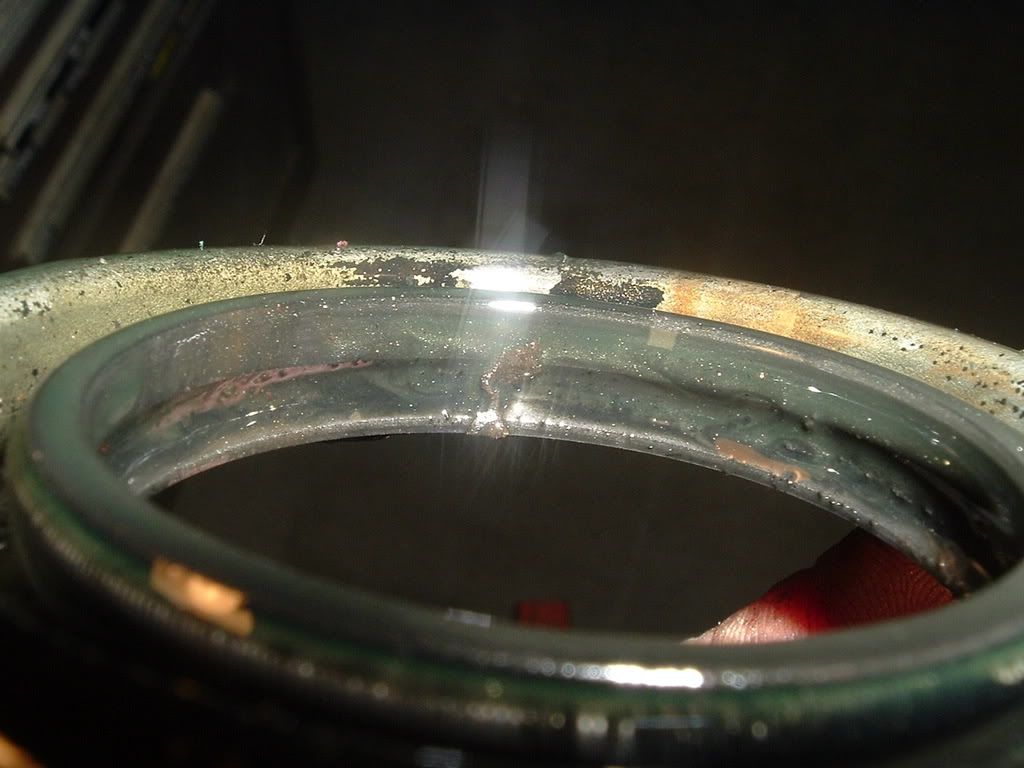
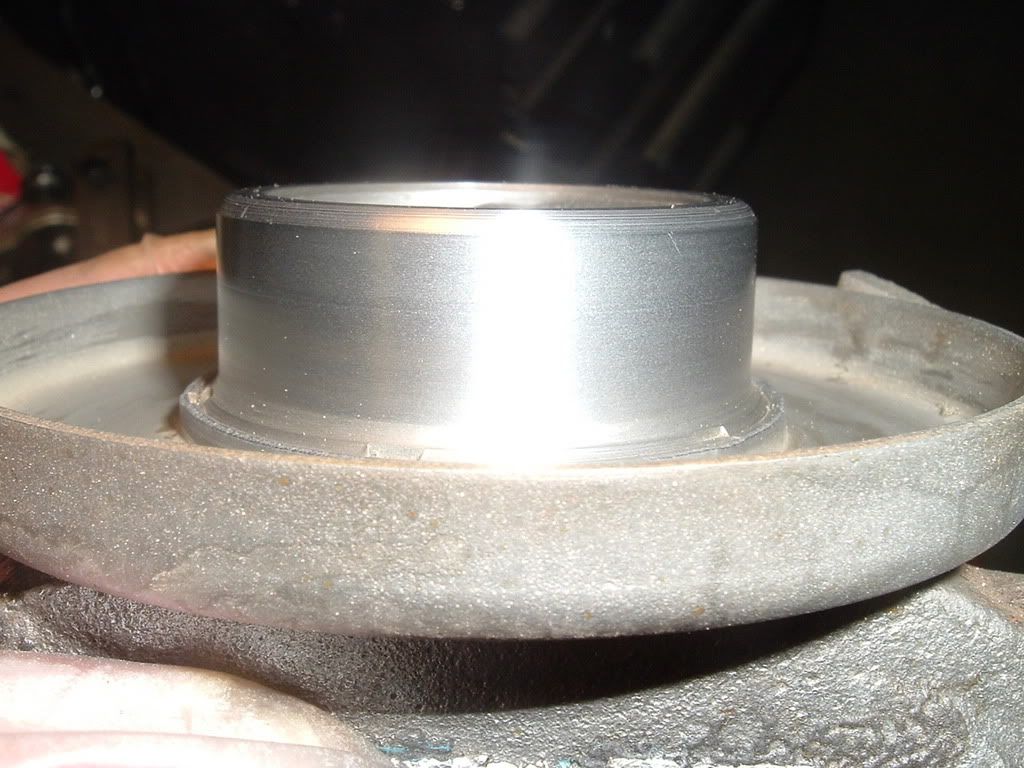
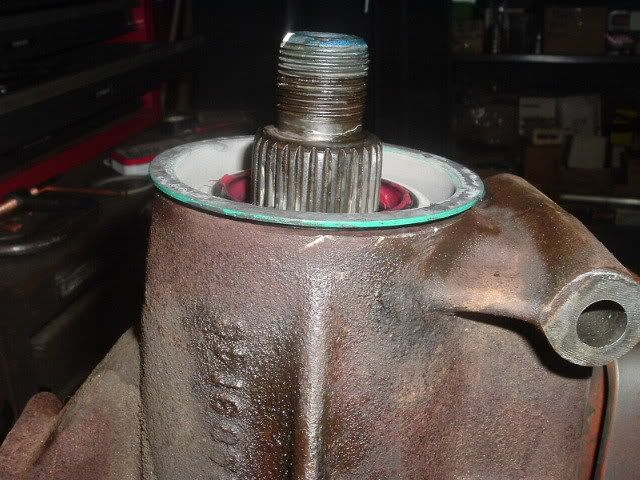
Blasted the yoke, cleaned it, then polished the OD. It still looks ok otherwise I would have added a special speedy sleeve.

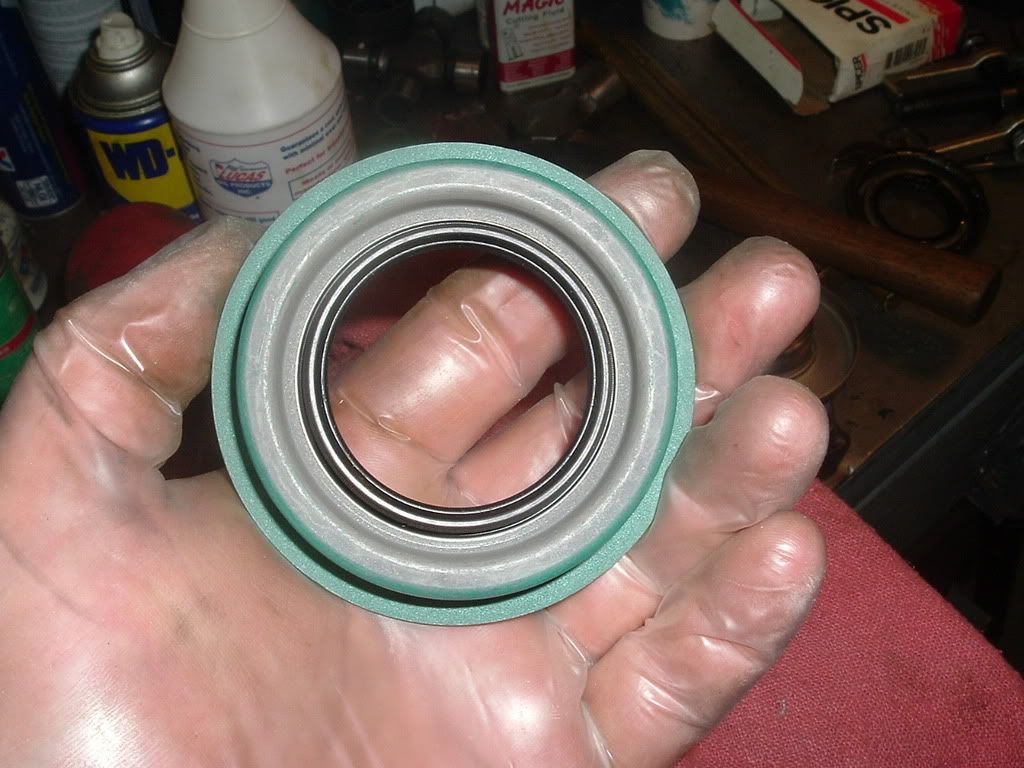
Here is the new seal, use a good one guys. I've seen some cheap ones being sold. If you need a good one let me know I have the good stuff LOL!!
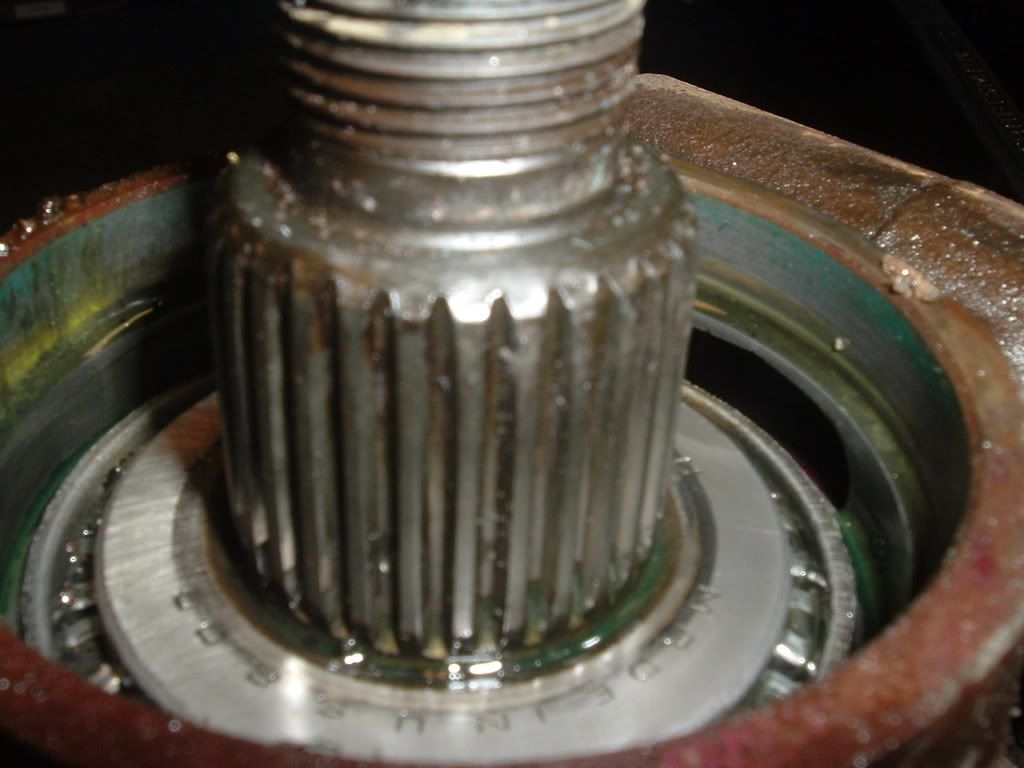
Grease the spring and seal ID
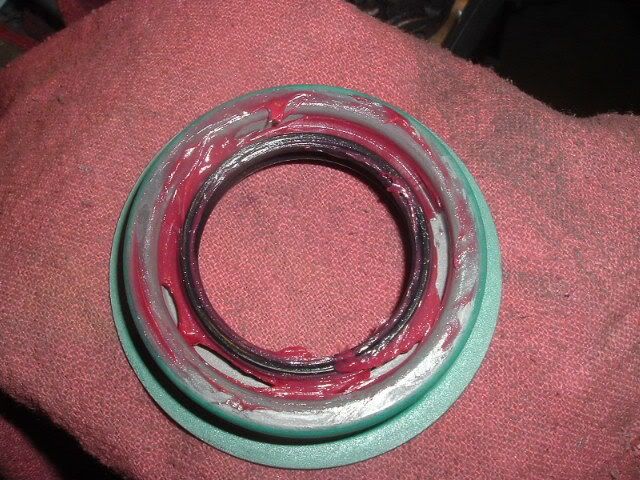
Install, this one had a gap of about .080" This will vary a bit so check the depth of the counterbore and seal.
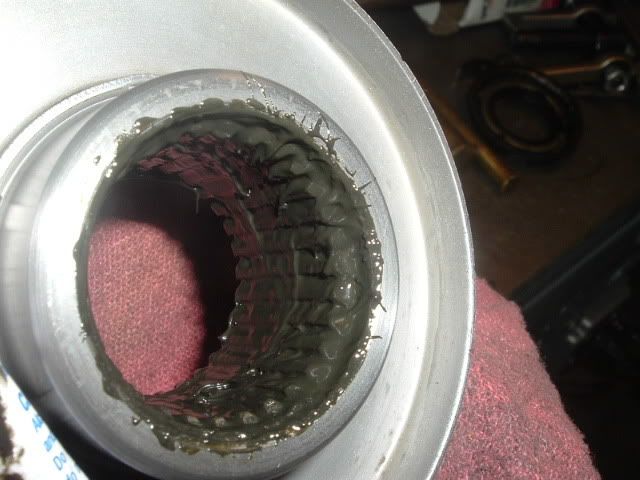
Slap some old school #2 on the ID
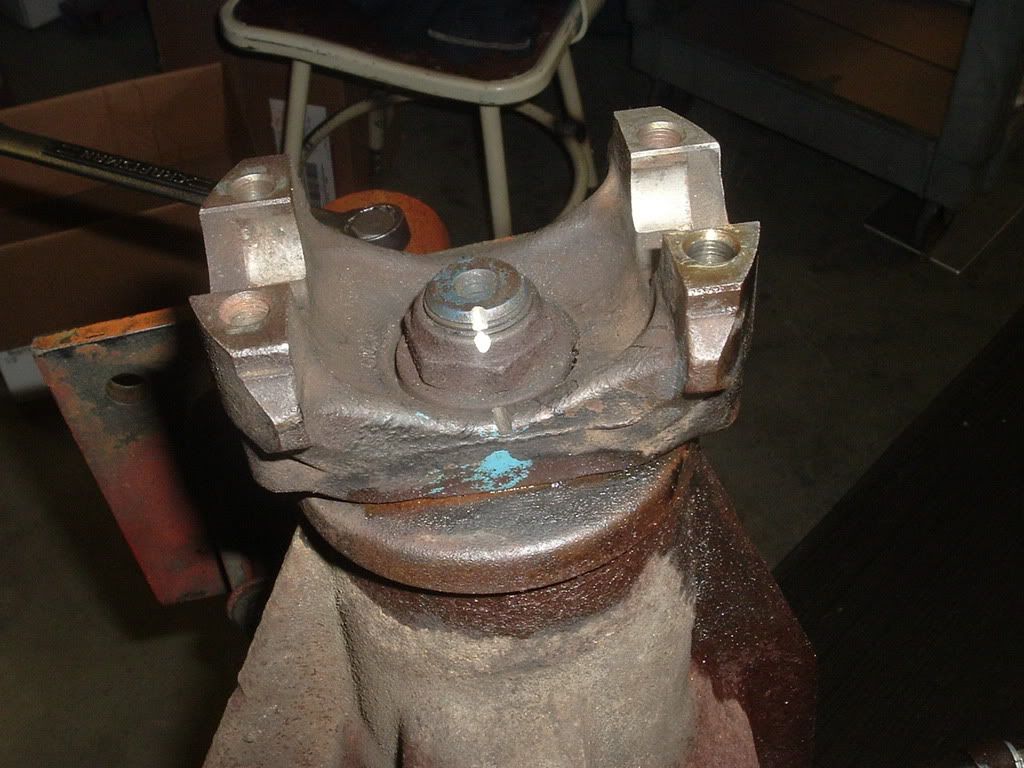
Install the yoke,washer, nut and use #271 on the cleaned pinion threads! Bring to the witness marks, in this case I was shooting for the torque more then the marks. I got to 10-11 in/lbs and the marks were off. I slowly brough up the marks and the torque was up to 15in/lbs too high for used bearings. So I backed it off and brought it back to the 10-11. The nut was tight, I didn't feel any endplay and there was no more noise when I spun the yokes/pinion. I'll leave it up overnight to let the RTV setup on the seal OD and then oil test it again. This is as good as it gets. If the drag was way off then the crush sleeve would have to come out and then you get more involved then you might want to!
Blasted the yoke, cleaned it, then polished the OD. It still looks ok otherwise I would have added a special speedy sleeve.
Here is the new seal, use a good one guys. I've seen some cheap ones being sold. If you need a good one let me know I have the good stuff LOL!!
Grease the spring and seal ID
Install, this one had a gap of about .080" This will vary a bit so check the depth of the counterbore and seal.
Slap some old school #2 on the ID
Install the yoke,washer, nut and use #271 on the cleaned pinion threads! Bring to the witness marks, in this case I was shooting for the torque more then the marks. I got to 10-11 in/lbs and the marks were off. I slowly brough up the marks and the torque was up to 15in/lbs too high for used bearings. So I backed it off and brought it back to the 10-11. The nut was tight, I didn't feel any endplay and there was no more noise when I spun the yokes/pinion. I'll leave it up overnight to let the RTV setup on the seal OD and then oil test it again. This is as good as it gets. If the drag was way off then the crush sleeve would have to come out and then you get more involved then you might want to!
The following users liked this post:
gjhinc (10-20-2019)
12-18-2006, 08:56 PM
#3


Gary, I used this method and I believe it was you who suggested doing the pinion seal replacement this way. I did mine in the car, taking my time. Hasn't leaked a drop in 1.5 years and counting.
Thanks for your time on the pics.
Thanks for your time on the pics.
 12-22-2006, 10:54 AM
#5
Tech Contributor
Thread Starter
Follow up, no leaks after 72 hours full of oil.

12-23-2006, 02:40 AM
#6
Melting Slicks

Member Since: Oct 2005
Location: upstate N.Y.
Posts: 2,114
Likes: 0
Received 0 Likes
on
0 Posts

Install Time
Blasted the yoke, cleaned it, then polished the OD. It still looks ok otherwise I would have added a special speedy sleeve.
Here is the new seal, use a good one guys. I've seen some cheap ones being sold. If you need a good one let me know I have the good stuff LOL!!
Grease the spring and seal ID
Install, this one had a gap of about .080" This will vary a bit so check the depth of the counterbore and seal.
Slap some old school #2 on the ID
Install the yoke,washer, nut and use #271 on the cleaned pinion threads! Bring to the witness marks, in this case I was shooting for the torque more then the marks. I got to 10-11 in/lbs and the marks were off. I slowly brough up the marks and the torque was up to 15in/lbs too high for used bearings. So I backed it off and brought it back to the 10-11. The nut was tight, I didn't feel any endplay and there was no more noise when I spun the yokes/pinion. I'll leave it up overnight to let the RTV setup on the seal OD and then oil test it again. This is as good as it gets. If the drag was way off then the crush sleeve would have to come out and then you get more involved then you might want to!
12-23-2006, 08:44 AM
#7
Tech Contributor
Thread Starter
271 is Loctite thread locker avail just about anywhere.

 12-23-2006, 12:47 PM
#9
Melting Slicks
Install the yoke,washer, nut and use #271 on the cleaned pinion threads! Bring to the witness marks, in this case I was shooting for the torque more then the marks. I got to 10-11 in/lbs and the marks were off. I slowly brough up the marks and the torque was up to 15in/lbs too high for used bearings. So I backed it off and brought it back to the 10-11. The nut was tight, I didn't feel any endplay and there was no more noise when I spun the yokes/pinion.
So you want to just slightly preload the bearing. Glad i saw this as i was under the impression you needed to retorque it to spec. I also thought that the pinion nut is a locking nut requiring considerable force to spin it. Learning good stuff here.
Have you torn into the 3.08 diff i traded you?


The following users liked this post:
BV85 (04-22-2016)
12-23-2006, 01:28 PM
#12
Tech Contributor
Thread Starter
12-23-2006, 01:46 PM
#13
Tech Contributor
Thread Starter
So you want to just slightly preload the bearing. Glad i saw this as i was under the impression you needed to retorque it to spec. I also thought that the pinion nut is a locking nut requiring considerable force to spin it. Learning good stuff here.
Have you torn into the 3.08 diff i traded you?
Have you torn into the 3.08 diff i traded you?
When replacing just the seal you want to get everything bad to where is was- hopefully there was no noise from overloaded bearings! This was worked on before and it must have been leaking but my buddy cleaned it up pretty good before bringing it in. Who ever installed the seal left is up as it was hitting the dust shield too. The seal itself was rolled I'm gussing it was cocked by a hammer when installed along with no sealant.
The pinion nut is a locking nut and usually it is replaced when the diff is overhauled but since this was a repair and the preload needed to be as close to where it was the nut was reused. The 271 is the same Red I use on ring gear bolts so it should be ok. I use their primer as well. Clean everything first with brake cleaner.
AS for torquing it, I check it prior to removal and then reset it to that point with the inch/pound wrench regardless of where the witness marks were. In this case they were very close but I kept the torque at 10-11 in/lbs as it was.
12-23-2006, 02:14 PM
#14
Melting Slicks
I would guess that it would take more than 10in/lbs just to get that nut to move.
12-23-2006, 02:15 PM
#15
 12-23-2006, 03:13 PM
#16
Tech Contributor
Thread Starter
12-23-2006, 03:15 PM
#17
Tech Contributor
Thread Starter
I hold the yoke by hand and bring the nut down till it bottoms on the washer. I don't overtighen it but it shoudl be close to the marks. Then I check the drag and usually will tweek it a bit after that.
04-20-2016, 02:34 AM
#18

Install Time
Blasted the yoke, cleaned it, then polished the OD. It still looks ok otherwise I would have added a special speedy sleeve.
Here is the new seal, use a good one guys. I've seen some cheap ones being sold. If you need a good one let me know I have the good stuff LOL!!
Grease the spring and seal ID
Install, this one had a gap of about .080" This will vary a bit so check the depth of the counterbore and seal.
Slap some old school #2 on the ID
Install the yoke,washer, nut and use #271 on the cleaned pinion threads! Bring to the witness marks, in this case I was shooting for the torque more then the marks. I got to 10-11 in/lbs and the marks were off. I slowly brough up the marks and the torque was up to 15in/lbs too high for used bearings. So I backed it off and brought it back to the 10-11. The nut was tight, I didn't feel any endplay and there was no more noise when I spun the yokes/pinion. I'll leave it up overnight to let the RTV setup on the seal OD and then oil test it again. This is as good as it gets. If the drag was way off then the crush sleeve would have to come out and then you get more involved then you might want to!
Blasted the yoke, cleaned it, then polished the OD. It still looks ok otherwise I would have added a special speedy sleeve.
Here is the new seal, use a good one guys. I've seen some cheap ones being sold. If you need a good one let me know I have the good stuff LOL!!
Grease the spring and seal ID
Install, this one had a gap of about .080" This will vary a bit so check the depth of the counterbore and seal.
Slap some old school #2 on the ID
Install the yoke,washer, nut and use #271 on the cleaned pinion threads! Bring to the witness marks, in this case I was shooting for the torque more then the marks. I got to 10-11 in/lbs and the marks were off. I slowly brough up the marks and the torque was up to 15in/lbs too high for used bearings. So I backed it off and brought it back to the 10-11. The nut was tight, I didn't feel any endplay and there was no more noise when I spun the yokes/pinion. I'll leave it up overnight to let the RTV setup on the seal OD and then oil test it again. This is as good as it gets. If the drag was way off then the crush sleeve would have to come out and then you get more involved then you might want to!
and what is number 2 that you mention above on the inside ID? is that on the splines. Good thread.
04-22-2016, 04:19 PM
#19
Le Mans Master

Good luck... GUSTO