Astro Vent Door Help
 06-15-2008, 10:12 AM
#1
Advanced

Thread Starter
Member Since: Jul 2007
Location: Naperville Illinois
Posts: 71
Likes: 0
Received 0 Likes
on
0 Posts
My rear deck astro vent door on my (no a/c) '69 convertible isn't functioning. It remains in the open position, despite what I do with the heater controls. I have checked the rubber and steel line from the heater control back to the door -the line is solid with no leaks, and if I apply vacuum to the line below the heater control, the door will close and stay closed. I'm not sure where to go next to find the vacuum leak. I'm told this is a common problem. Would appreciate any help on where to look next or how to fix this.
Thanks to all.
Thanks to all.
 06-16-2008, 01:19 PM
#2
Advanced

I was ankle-deep this this on my '69 this past weekend, so maybe I can help. The heat/vent controls on our vettes should close the rear vent door when the temp (right) thumbwheel moves the dial about 1/3 of the way toward "hot". The vacuum "switch" that enables this is mounted on the right side of the climate-control assembly, and gets its vacuum supply from a "T" tap on the vacuum supply to the left side of the climate-control assembly. The vacuum-supply hose to the left side is the only vacuum line that has a "T". The "T" should be located just about under the radio; I can't tell exactly as my console is all apart. I would disconnect the vacuum-supply line to the right-side "switch" at the "T" and apply vacuum to it. If moving the dial doesn't make the vent move you've got a bad "switch". If it does you've probably got no vacuum to the entire climate-control assembly, or a serious leak in the left side "switch", hoses, or actuators. Let us know, will you?
In my case nothing worked; I found over the weekend that the vacuum supply lines comes through a nearly-hidden line through the firewall. This line was disconnected, so nothing got vacuum. I'm still working on the heat/defrost actuator; I think its supposed to be able to move to three possible positions (all floor, mixed, and all defrost). Mine only has two positions. Does anyone know?
In my case nothing worked; I found over the weekend that the vacuum supply lines comes through a nearly-hidden line through the firewall. This line was disconnected, so nothing got vacuum. I'm still working on the heat/defrost actuator; I think its supposed to be able to move to three possible positions (all floor, mixed, and all defrost). Mine only has two positions. Does anyone know?
06-16-2008, 05:04 PM
#3
Pro


Member Since: May 2007
Location: Warrenville IL
Posts: 593
Likes: 0
Received 0 Likes
on
0 Posts

So I'm watching this thread and if I understand correctly, when the left dial is on air or vent and the right dial is all the way cold the rear deck vents should open. Mine definately don't open in that arrangement. Am I missing something?
06-16-2008, 06:27 PM
#4
Advanced
I can only speak of the 69, as my '73 heat/vent system just worked. I can assure you that unless my non-a/c '69 has been "bubba"'d (and I don't think it was in this area) my description above is accurate. Certainly, the position of the left-hand thumb-wheel (the damper selector) on my car has no effect on the rear vent; only the temperature setting. Since the vacuum supply is very restricted (by design), any leak on the damper side would leave little vacuum to operate the rear-deck vents. As I mentioned, all of mine seem to be working properly, except that the air/defog/deice damper seems to only have two positions when the setup calls for three...
06-16-2008, 08:54 PM
#5
Advanced
Thread Starter
Member Since: Jul 2007
Location: Naperville Illinois
Posts: 71
Likes: 0
Received 0 Likes
on
0 Posts
Thanks for the responses. I think bvanpelt is right. When the temp control is moved towards heat settings the vent door is supposed to close. Mine isn't, so either I'm not getting vacuum from the source or the switch. I'll check them. I haven't seen any map of the vacuum system to the rear vent door. Have you seen one that would help us to trace the lines?
06-17-2008, 08:16 AM
#6
Advanced
I haven't been able to find any documentation, so I'll describe the vacuum path as I see it on my '69 no-ac. Climate-control vacuum is picked up at a tap in a large black-with-yellow-stripe line (part of the headlight/wiper door system - I won't get into details as you can find docs on this on the internet) on the engine side of the firewall, just about underneath the wiper motor. This black hose comes through the firewall with its own grommet, passes down past the rear of the air plenum and toward the left, joining up with the three plenum actuator hoses (no-stripe, red-stripe, blue-stripe), which jointly arrive at the vacuum control valve at the left thumb-wheel (controls the dampers).
Just before the black supply line arrives at the damper control valve it T's, with the base leg of the T going to a hose which connects to the rear vent damper control valve. The other side of this valve goes to a hose that turns to a steel pipe near the gear shift, and this heads toward the rear-vent actuator.
If you have any doubts about any of the pieces I'd buy one of those hand-pump/gauge combinations - you'll be able to find leaks easily...
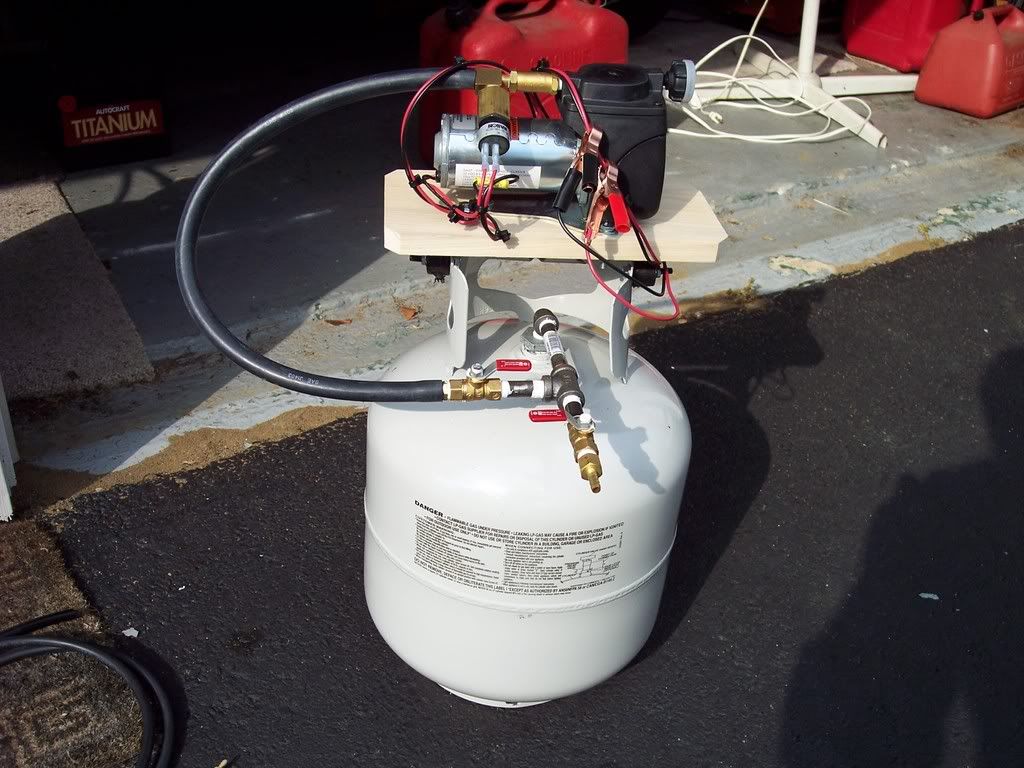
I constructed a vacuum supply from a (brand new) propane tank, a electric power-brake booster pump, a bunch of plumbing and a couple of valves. This, while ridiculous, is making debugging this stuff easier.
Just before the black supply line arrives at the damper control valve it T's, with the base leg of the T going to a hose which connects to the rear vent damper control valve. The other side of this valve goes to a hose that turns to a steel pipe near the gear shift, and this heads toward the rear-vent actuator.
If you have any doubts about any of the pieces I'd buy one of those hand-pump/gauge combinations - you'll be able to find leaks easily...
I constructed a vacuum supply from a (brand new) propane tank, a electric power-brake booster pump, a bunch of plumbing and a couple of valves. This, while ridiculous, is making debugging this stuff easier.
06-17-2008, 08:23 AM
#7
Drifting


I finally got so mad at the system in mine that I got a coded new replacement tubing kit and put it in. (this tube #9 goes here and mates with this one with the sticker #9 on it ......)
I had a couple of areas that were bad so in the end it was worth it
I had a couple of areas that were bad so in the end it was worth it
06-17-2008, 08:21 PM
#8
Advanced
Thread Starter
Member Since: Jul 2007
Location: Naperville Illinois
Posts: 71
Likes: 0
Received 0 Likes
on
0 Posts
Thanks again. This is a great description. I thought I would use a Mity Vac for the vacuum source tester. I can't imagine how you hooked a brake booster to a propane tank! You must be some engineer!