
Making the manual crossmember removable
 02-20-2009, 06:12 PM
#1
Pro

Thread Starter
Member Since: Jun 2007
Location: Hastings MN
Posts: 634
Likes: 0
Received 0 Likes
on
0 Posts
So a few questions...
How thick is the crossmember? What did you use to cut it out? I have access to a 110V plasma cutter, but I don't know if that will cut through or not.
How thick of plates did you weld on for bolting it back in? Will a 110V welder be strong enough?
Any suggestions, pics, etc would be appreciated!
How thick is the crossmember? What did you use to cut it out? I have access to a 110V plasma cutter, but I don't know if that will cut through or not.
How thick of plates did you weld on for bolting it back in? Will a 110V welder be strong enough?
Any suggestions, pics, etc would be appreciated!
 02-20-2009, 06:21 PM
#2
Race Director

Cut mine with a sawzall. Of course I work for Lenox saw blades so I have blades at my disposal. One blade cut through in no time at all. Be careful near the floor though. Easy to punch through the floor.
02-20-2009, 06:29 PM
#3
Pro
Thread Starter
Member Since: Jun 2007
Location: Hastings MN
Posts: 634
Likes: 0
Received 0 Likes
on
0 Posts
What about the plates? How thick did you use?
02-20-2009, 06:59 PM
#4
Race Director
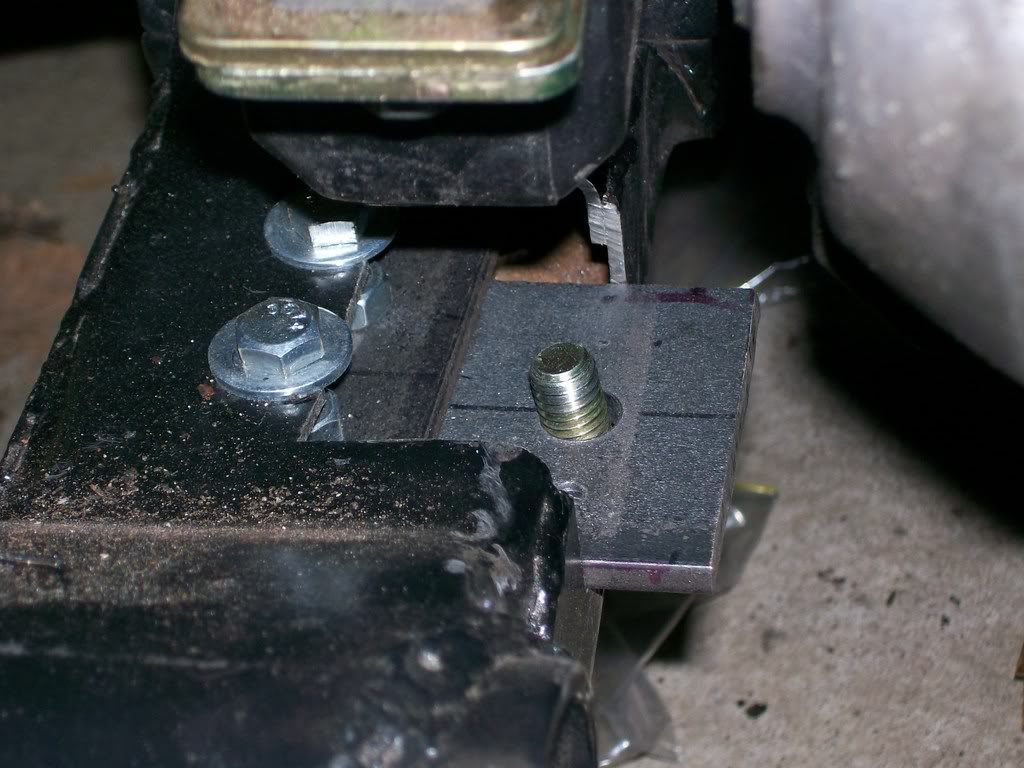
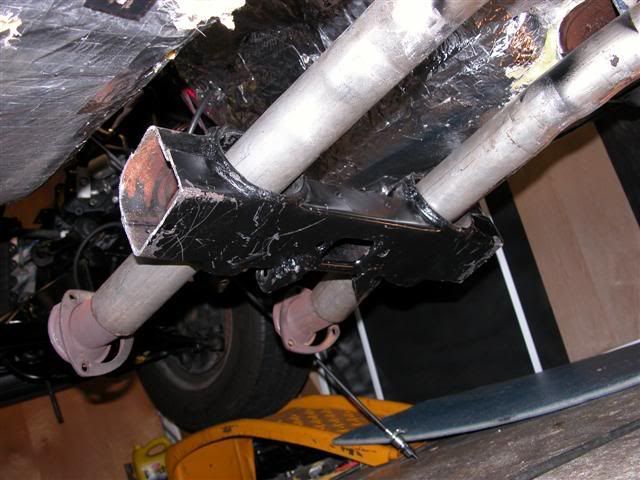
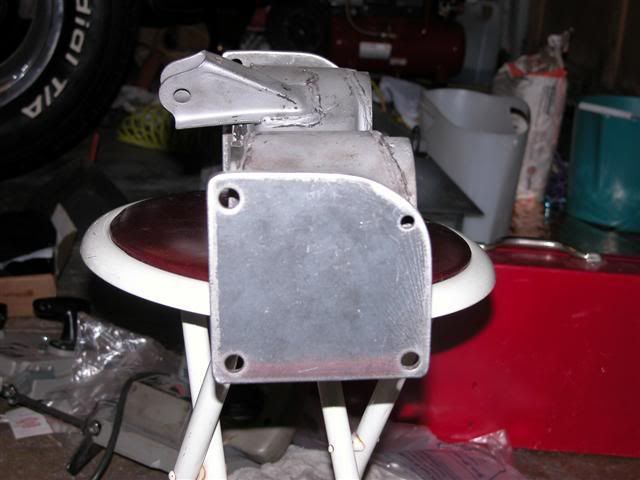
I went a different way than the plates. I still had to weld some brackets on but I did not use the plates as seen here on the forum. Here is my setup. Not the prettiest but it works. I made the bracket for the back side and welded it on. On the front is a plate. In the frame I made some sleeves so when I tighten it down it will not crush the frame. The frame is quite thin and easily crushed. Cost me nothing to do this. I had the steel and got afriend to do the minor welding.
Last edited by Gordonm; 02-20-2009 at 07:05 PM.
02-20-2009, 07:49 PM
#5
Terrorizing Orange Cones


I went a different way than the plates. I still had to weld some brackets on but I did not use the plates as seen here on the forum. Here is my setup. Not the prettiest but it works. I made the bracket for the back side and welded it on. On the front is a plate. In the frame I made some sleeves so when I tighten it down it will not crush the frame. The frame is quite thin and easily crushed. Cost me nothing to do this. I had the steel and got afriend to do the minor welding.
I've been contemplating doing this project. I have a TKO600 to slide in and the thought of wrestling it into position on the fixed trans mount doesn't sound appealing while lying on my back [w/longer tailshaft than Muncie]. I bought the kit from Keisler and I know they engineered it to work with a fixed x-member; this way just has to make it easier.
Plus, I'm considering future clutch maintenance where I would not want to yank the motor.
Thanks for the picture Gordon. I've seen another design (may be the one you mentioned) that has flanges welded on tunnel-side ends of x-member "stubs" as well as the removable section. Then they're bolted together. It's strong but can't see how to get weld 360 degrees with body on. Or is 270 degrees (sides-bottom) enough?
My concern lies with doing the work body on; you expressed caution during cutting w/sawzall. What about welder heat transfer (rising) onto a non-steel floor? How did you control or not really an issue? I haven't crawled under my car to check and wonder if some type of barrier can be slid between x-member and floor to protect?
I like how Gordons work resulted in a stable platform; cheap is great too. I saw Shafi Keisler has a slick new x-member kit offered too but like others, disposable $ is becoming more of an problem lately. Ugh.
My sbc doesn't have tree-stump-pulling torque and with the sleeves you built into your design, I imagine it's plenty stout. I'd like to plan how and appreciate
yel76low

Thx!
02-20-2009, 07:50 PM
#6
Pro
Thread Starter
Member Since: Jun 2007
Location: Hastings MN
Posts: 634
Likes: 0
Received 0 Likes
on
0 Posts
Any particular reason you chose to do it that way? I wouldn't even have thought of that.
Your sawzall cuts look very clean. How thick do you think the crossmember is? 1/8"?
Your sawzall cuts look very clean. How thick do you think the crossmember is? 1/8"?
02-20-2009, 08:21 PM
#7


If I were to do it again, I make the cuts further inboard.
As far cutting, just use a sawzall or a circular saw. I used a rope saw to cut mine, but there's no need to be that accurate.
All stitch welds completed and painted this gray that I really like.
Last edited by carriljc; 02-22-2009 at 01:17 PM.
02-20-2009, 09:04 PM
#8
Safety Car

Member Since: Aug 2001
Location: North Easton Mass
Posts: 4,883
Likes: 0
Received 8 Likes
on
8 Posts


Rick B.
 02-20-2009, 09:44 PM
#9
Pro
Thread Starter
Member Since: Jun 2007
Location: Hastings MN
Posts: 634
Likes: 0
Received 0 Likes
on
0 Posts
Thanks for all the pictures everyone.
So the consensus seems to just use a sawzall, and be careful by the floor... Now what about welding onto the stubs? Like was said before, we're aweful close to the body...
carriljc, I like the tabs that don't go any lower than the crossmember. Do you have any pictures closer up from a different angle on the end of the crossmember?
02-20-2009, 10:17 PM
#10

A sawzall works very well and makes a nice cut. Here a couple of pictures of my removable cross member. I don't like to weld on stuff with the car body so close, so I drill 2 holes on each side through the left over cross member and the channel iron I welded to the removable part of the cross member.
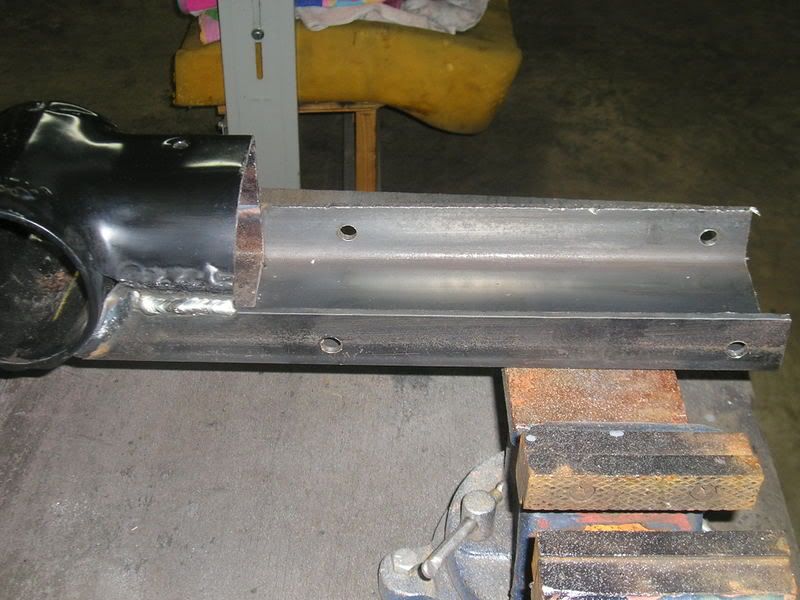
When it is bolted in you don't really notice it is home brewed.
Jeff
When it is bolted in you don't really notice it is home brewed.
Jeff
02-20-2009, 11:20 PM
#12
Instructor

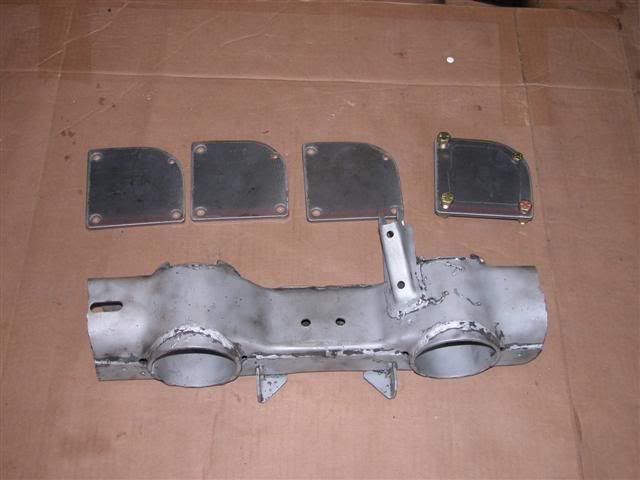
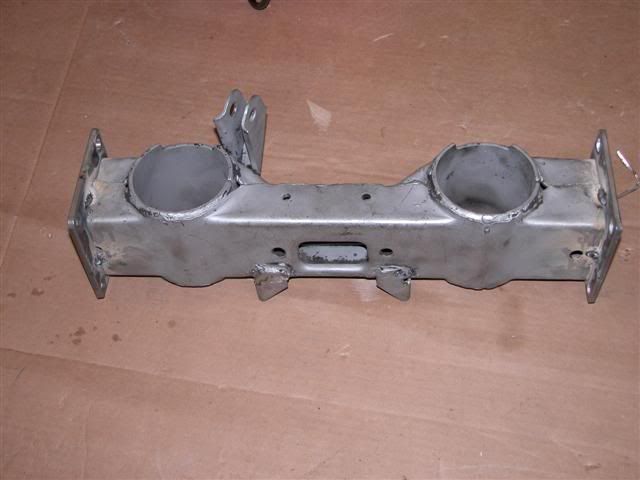
If you have the body off the frame you can grind back the welds on the ends where the crossmember meet the frame and then separate the cross member from the frame, add to ears to the part under the frame and drill 4 holes two on the top side and two from the bottom. (see Pics) then weld in tee nuts and bolt it back together


 02-21-2009, 07:20 AM
#14
Race Director
I did no welding on the frame on the car. My bracket is welded to the removeable part of the X member. I only had to drill the frame on the car. My trans is out at the moment. I can take a picture of it later today to show you exactly how it was done. Like Isaid it is not pretty but it works just fine. It stands up to 500HP so far with no problems.
02-21-2009, 10:22 AM
#15
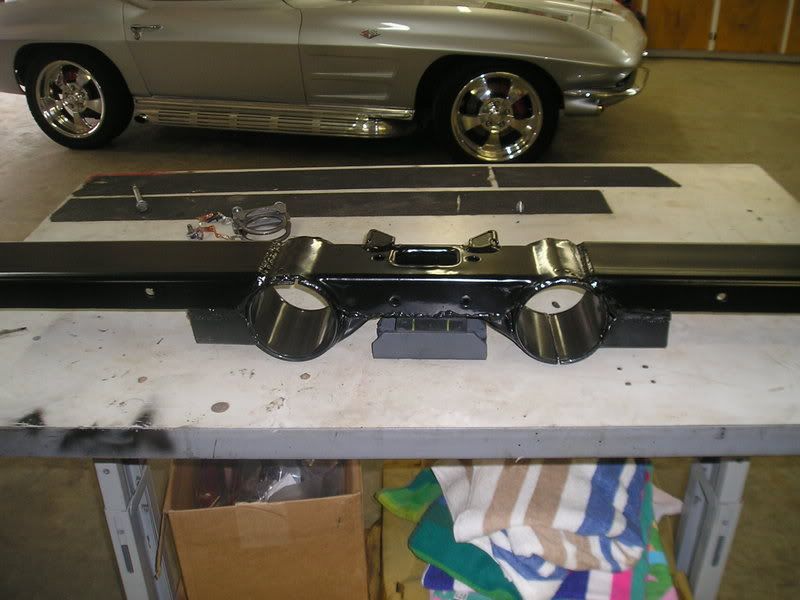
Pretty much straightforward though...cut the crossmember, used some 1/4" plate, ensured the width by grinding away after the cut. For the stub left on the vehicle I just welded the top of plate to the top edge of the stub (while making sure that the fiberglass floor was shielded)...after I made sure I had a good weld then ground it so it was flat.
The remaining 3 sides are welded at the 90� angle so it's quite solid. I initially had a "lip" over the vehicle stub, but I ground it off; not necessary and I used Grade 8 bolts.
The remaining 3 sides are welded at the 90� angle so it's quite solid. I initially had a "lip" over the vehicle stub, but I ground it off; not necessary and I used Grade 8 bolts.
02-21-2009, 10:44 AM
#16
Jeff
02-21-2009, 11:55 AM
#17
Safety Car
Member Since: Nov 2007
Location: bottom of the sea
Posts: 3,570
Likes: 0
Received 0 Likes
on
0 Posts
i see a few mentions of cuts NOT needing to be accurate. this is gravely wrong. the guys who are doing the side plates are probably ok, but those of us who are welding end plates need to be VERY accurate. if you dont get the mount back in the right location from left to right, your driveshaft will hit the floor/tunnel. especially under load. also you must make certain that you angle is correct. meaning the trans mount on the crossmember must return to the same angle/plane as it was before the cuts were made.
and i dont think strength is as big an issue as it is being made out here. you dont need to weld all the way around. if you cant put some scrap sheet metal in between the floor and the top side of the mount, just dont weld it. our crossmembers are enourmous and incredibly strong, even for performance engines.
this mod has been one of the best things ive ever done to my vette, especially after i got the tko 600.
02-21-2009, 01:45 PM
#18


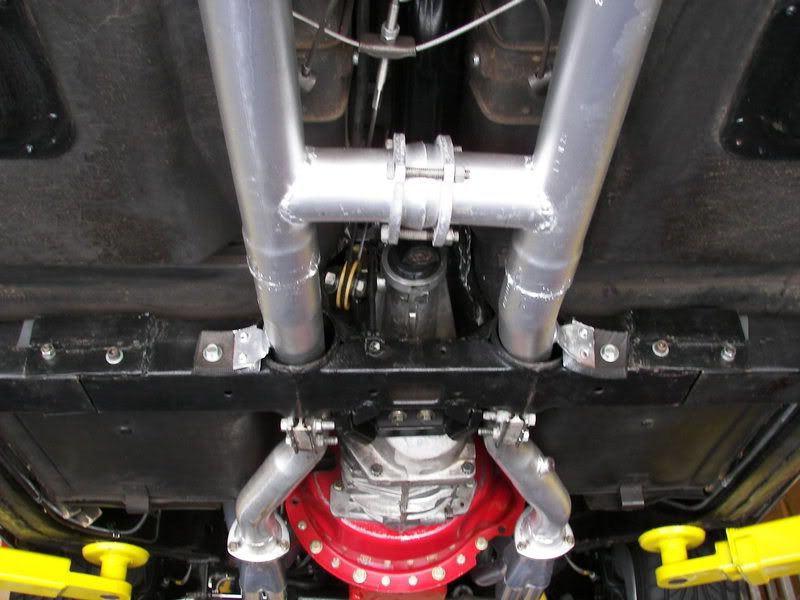
Nothing hangs lower than the original crossmember.
Last edited by carriljc; 02-21-2009 at 04:43 PM.
02-21-2009, 03:00 PM
#19
Burning Brakes

Member Since: Feb 2007
Location: San Bruno California
Posts: 779
Likes: 0
Received 0 Likes
on
0 Posts
With the encouragement from Gordon I bit the bullet and made my crossmember removable. I copied Bullsharks design, but rather than making the flange open in the center, I just had a full flat plate welded. In cutting the crossmember, I used a square to scribe a line and use tape to tape where the line is so I could try to keep the cut straight. The bottom was easy to cut but the top was alittle harder. After using a 6 inch blade and smashing my finger, I switched to a 9 inch blade. Cut in an angle. With the 6 inch blade, it was too short and would come off the top of the crossmember causing the blade to kick back which kickback the gun. In welding the plate to the crossmember on the car, I got some copper sheets, damp rags on top of it to protect the floor. I had a coworker help me weld it. Before you cut the crossmember, make sure you take some measurement of the trans mount bracket to the frame toward the door.The distance from the drivers side and the passenger side are different. When I had to trim off some metal from the crossmember on and of the car, I forgot to take the measurement. So I didn't know where to weld it. Gordon help me get back on track. You dont want your trans to be off.
 ]
]
]
]]
02-21-2009, 07:04 PM
#20
Safety Car
Member Since: Nov 2007
Location: bottom of the sea
Posts: 3,570
Likes: 0
Received 0 Likes
on
0 Posts
With the encouragement from Gordon I bit the bullet and made my crossmember removable. I copied Bullsharks design, but rather than making the flange open in the center, I just had a full flat plate welded. In cutting the crossmember, I used a square to scribe a line and use tape to tape where the line is so I could try to keep the cut straight. The bottom was easy to cut but the top was alittle harder. After using a 6 inch blade and smashing my finger, I switched to a 9 inch blade. Cut in an angle. With the 6 inch blade, it was too short and would come off the top of the crossmember causing the blade to kick back which kickback the gun. In welding the plate to the crossmember on the car, I got some copper sheets, damp rags on top of it to protect the floor. I had a coworker help me weld it. Before you cut the crossmember, make sure you take some measurement of the trans mount bracket to the frame toward the door.The distance from the drivers side and the passenger side are different. When I had to trim off some metal from the crossmember on and of the car, I forgot to take the measurement. So I didn't know where to weld it. Gordon help me get back on track. You dont want your trans to be off.
]
]
]]
that is exactly what i did!

but whats with the ground straps? please dont say to ground the cut section of crossmember, as the new plates are touching AND it has 8 bolts holding it together!