
Info assist from anyone that has pulled a C3 steering column
 09-06-2010, 04:05 PM
#1
Burning Brakes

Thread Starter

Member Since: Dec 2007
Posts: 889
Likes: 0
Received 0 Likes
on
0 Posts
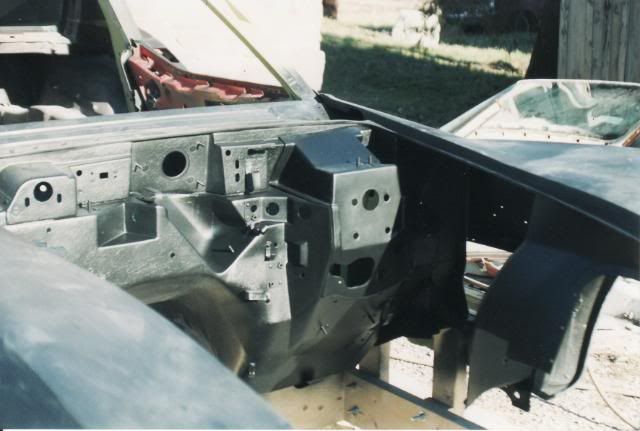
I want to swap my 74' straight column for a tilt/tele unit. I have the new column and am in the middle of removing the old column and can't figure out how it is going to pull thru the firewall with that 'bracket-thing' sticking out of it. It's the little flat bracket with the wire attached to it sort of under the dip stick tube in the photo. I have loosened the rag joint nuts and bolts and the two nuts on the other side of the firewall, but have not removed them yet. Seems pretty straight forward until this point. Any advice???
 09-06-2010, 04:17 PM
#3


I am glad you brought this up as I will be changing one out sometime soon also.
Did you buy a rebuilt one ready to go in ?
Did you buy a rebuilt one ready to go in ?
09-06-2010, 04:17 PM
#4
Drifting

Member Since: Jul 2004
Location: Kissimmee fl
Posts: 1,650
Received 51 Likes
on
31 Posts
Finalist 2021 C3 of the Year - Modified
2017 C3 of Year Finalist
Cruise-In VIII Veteran
St. Jude Donor '07

IIRC, there are two nuts on the firewall holding that bracket on. One is a carrage bolt and one is a stud welded to the bracket. Once they are removed, you will be able to remove the bracket and the column will come out.
Also, when you go to hook up the wiring harness to the column, the position from the standard column to the TT will flip flop. You will figure it out I'm sure.
Also, when you go to hook up the wiring harness to the column, the position from the standard column to the TT will flip flop. You will figure it out I'm sure.
09-06-2010, 04:19 PM
#5
09-06-2010, 04:27 PM
#6
Burning Brakes
Thread Starter
Member Since: Dec 2007
Posts: 889
Likes: 0
Received 0 Likes
on
0 Posts
Can I leave the pinch bolt on the splined end of the shaft and pull the big rag joint connector thru the firewall hole?
BTW: I sourced a rebuilt unit already painted black. I'll post a photo of it later.
BTW: I sourced a rebuilt unit already painted black. I'll post a photo of it later.
09-06-2010, 04:31 PM
#7
Team Owner

Member Since: Sep 2006
Location: Westminster Maryland
Posts: 30,173
Likes: 0
Received 2,878 Likes
on
2,515 Posts
Hi,
The bracket that Roger indicates is the one that needs to come off. Two nuts on the interior side of the firewall to remove. You're then left with an opening in the firewall that the end of the column can pass through.
Regards,
Alan
Look at the shape of the cut-out below the circle for the m/c .
The bracket that Roger indicates is the one that needs to come off. Two nuts on the interior side of the firewall to remove. You're then left with an opening in the firewall that the end of the column can pass through.
Regards,
Alan
Look at the shape of the cut-out below the circle for the m/c .
09-06-2010, 04:39 PM
#9
Thanks Alan clears it up for me also.
Sorry Roger didnt think you were looking at the right bracket,my mistake
Sorry Roger didnt think you were looking at the right bracket,my mistake


 09-06-2010, 06:00 PM
#12
Burning Brakes
Thread Starter
Member Since: Dec 2007
Posts: 889
Likes: 0
Received 0 Likes
on
0 Posts
Ooooops - I shoulda' indicated orientation in my initial posting. Now I gotta wait until my wife gets back to hep me.  She can hold up on the steering wheel while I finagle it from the engine side
She can hold up on the steering wheel while I finagle it from the engine side
09-06-2010, 07:49 PM
#13
Burning Brakes
Thread Starter
Member Since: Dec 2007
Posts: 889
Likes: 0
Received 0 Likes
on
0 Posts
Roger - the cable bracket does not come off. I took the two nuts off from the cockpit side, removed the two big bolts holding the steering column in the cockpit and have removed the rag joint bolts entirely. The 'bracket' is preventing the column from being pulled into the cockpit. That little arm that has the wire attached to it is hitting on the cable bracket. I am at a loss now?!! (New photo attached.)
Unless...the two nuts I took off from the bracket section are actually 'bolts' that pass thru the bracket....
Suggestions???
Unless...the two nuts I took off from the bracket section are actually 'bolts' that pass thru the bracket....
Suggestions???
09-06-2010, 07:56 PM
#14
Race Director

Turn the key to on, cut that piece of wire off, push the lever down ,,,,or up,, (I'm getting nauseous looking at this pic upside down),then pull the bracket out and off which will expose the hole as in Alans pic.
09-06-2010, 07:57 PM
#15
Instructor


Rotate the little reverse link arm down that is on the steering column. It is blocking the removal of the bolt that holds the bracket to the firewall. Once that bolt is out, then you should be able to maneuver the bracket out of the way.
The other side of the bracket has that pressed in stud.
The other side of the bracket has that pressed in stud.
 09-06-2010, 09:26 PM
#17
Burning Brakes
Thread Starter
Member Since: Dec 2007
Posts: 889
Likes: 0
Received 0 Likes
on
0 Posts
Got it out - what a pain. But now that I know how to get it out...hopefully I can get the new one in as well or better. The new column still needs a few items where the wheel mounts to the column, but I can inventory what it needs later. Thanks to everyone for all the help!!!
In the second photo I noticed that my new column does not have the spring in the bitter end of the column area. Is that a bad thing???
BTW: I'm guessing that the piece of wire I cut off was somehow related to the horn ground. Any thoughts on that?
Now the real hassle looks like getting the drivers side dash pad unhooked!
The new column still needs a few items where the wheel mounts to the column, but I can inventory what it needs later. Thanks to everyone for all the help!!!In the second photo I noticed that my new column does not have the spring in the bitter end of the column area. Is that a bad thing???
BTW: I'm guessing that the piece of wire I cut off was somehow related to the horn ground. Any thoughts on that?
Now the real hassle looks like getting the drivers side dash pad unhooked!
Last edited by mar; 09-06-2010 at 09:29 PM.
09-06-2010, 09:39 PM
#18
Race Director
The horn grounds through the column shaft, over the rag joint ,then the steering gear.
Did the ignition switch on the new column come with it or did you transfer it from the old one ? ( they are diff )
Did the ignition switch on the new column come with it or did you transfer it from the old one ? ( they are diff )
09-06-2010, 09:48 PM
#19
Burning Brakes
Thread Starter
Member Since: Dec 2007
Posts: 889
Likes: 0
Received 0 Likes
on
0 Posts
It came with a new one, but the edge of the chrome lock piece broke of in shipping and the key was actually bent, but did not break off. I was going to take both a locksmith and have him transfer my old key set into the new column. Is that possible???
Also the very bitter end (last 5 or 6 inches) of the new column with the rag joint connector on it is about 1/2" longer than the old one. I was told by a guy selling columns at Carlisle the new column must be adjusted with a slide hammer to make it the same length as the old one. What a terrific piece of information. Is that true???
Also the very bitter end (last 5 or 6 inches) of the new column with the rag joint connector on it is about 1/2" longer than the old one. I was told by a guy selling columns at Carlisle the new column must be adjusted with a slide hammer to make it the same length as the old one. What a terrific piece of information. Is that true???
Rotate the little reverse link arm down that is on the steering column. It is blocking the removal of the bolt that holds the bracket to the firewall. Once that bolt is out, then you should be able to maneuver the bracket out of the way.
The other side of the bracket has that pressed in stud.
The other side of the bracket has that pressed in stud.
09-06-2010, 09:54 PM
#20
Le Mans Master


Member Since: Jul 2000
Location: Saginaw Michigan
Posts: 6,001
Likes: 0
Received 98 Likes
on
81 Posts
Only the standard steering column has a spring at the lower end. The T&T column does not have a spring. Sorry I didn't check in sooner. A lot of your problem areas are covered in my Disassembly & Repair papers.
http://jimshea.corvettefaq.com/wp-co...ev09ja2010.pdf
http://jimshea.corvettefaq.com/wp-co...ev13my2010.pdf
Jim
http://jimshea.corvettefaq.com/wp-co...ev09ja2010.pdf
http://jimshea.corvettefaq.com/wp-co...ev13my2010.pdf
Jim