
73/72 to 72
 09-27-2010, 07:36 PM
#1
Advanced

Thread Starter

Member Since: Sep 2001
Posts: 63
Likes: 0
Received 0 Likes
on
0 Posts

Hey all,
I recently purchased a 72 vette that had been converted to a 73 (why would anyone do that???)
Anyway, I'm going to try and convert it back to a 72 and thought I would share pics of the progress in this thread.
I have started building a body dolly, and hope to pull the body next weekend.
If anyone has any tips/tricks/suggestions I'm all ears.
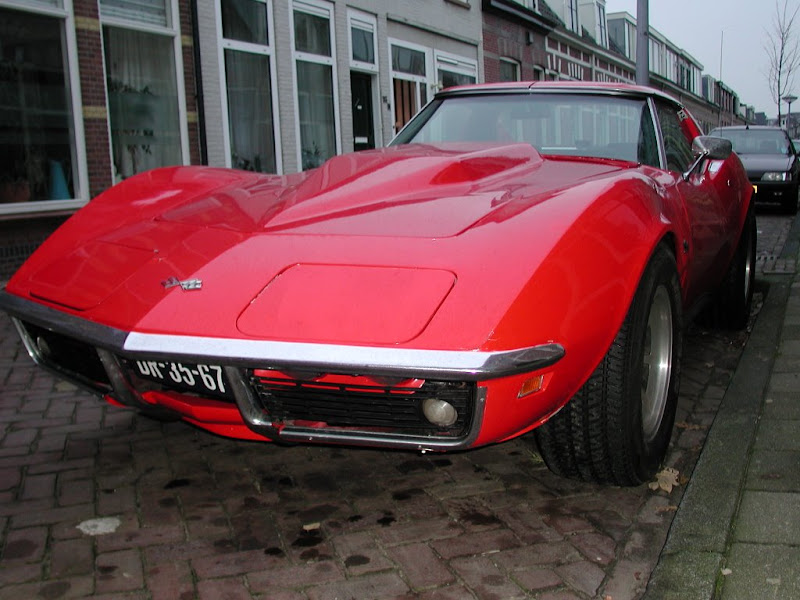
Here it is the day I bought it

One of the previous owners tried to repair the windshield frame with bondo


I recently purchased a 72 vette that had been converted to a 73 (why would anyone do that???)
Anyway, I'm going to try and convert it back to a 72 and thought I would share pics of the progress in this thread.
I have started building a body dolly, and hope to pull the body next weekend.
If anyone has any tips/tricks/suggestions I'm all ears.
Here it is the day I bought it
One of the previous owners tried to repair the windshield frame with bondo
Last edited by sittnlo; 05-30-2015 at 09:59 PM.
 09-27-2010, 08:09 PM
#2
Race Director

You have your work cutout for yourself. Really like the house setup. Nice house with a seperate garage and nice scenery and backup to a lake. Great setup. May I ask where you are located?
09-28-2010, 04:04 AM
#4
Melting Slicks

You stated that this vehicle is a 72 converted to a 72. Do you mean a 72 converted to a 73? Interesting thread. If you are converting the 73 back to 72 are you going to buy a 72 end to end front clip or the individual panels? As you may already know, the fender panels are different and you will have to find the vacuum door, the brackets, braces and the chrome bumper itself along with the grille and grill trim, turn signal lamps, etc (for whatever I may have left out. There is a form member who goes by the name of Patience bought a 73 and was attempting to convert it to a chrome bumper front. Do not know how it turned out. I was thinking of trying to convert a rubber bumper to a chrome bumper car but I don't have the money to do it. Keep up with the great pics. As for your question why would someone convert a 72 to 73? who knows. If I had the money to covert a rubber bumper to a chrome bumper I would start with a 73 which would be the easiest, the 74 would be my next choice due to the frame being similair to the 68-72.
Last edited by Oldguard 7; 09-28-2010 at 04:09 AM.
09-28-2010, 08:03 AM
#5
Burning Brakes

Goodluck on the conversion!
I have a 72 converted to a 69 and I converted it back. Only to things I did no change back, flares at the end of the front wheel wells and front side markers.
When I bought it!
Work in progress

I was looking for a front clip, but transport to the Netherlands was too expensive for my budget. How ever I have written an RSS news stream to find new front clip offerings on ebay. Here is the link if you want to use it just use a RSS reader and get notified when a new clip is offered.
I have a 72 converted to a 69 and I converted it back. Only to things I did no change back, flares at the end of the front wheel wells and front side markers.
When I bought it!
Work in progress
I was looking for a front clip, but transport to the Netherlands was too expensive for my budget. How ever I have written an RSS news stream to find new front clip offerings on ebay. Here is the link if you want to use it just use a RSS reader and get notified when a new clip is offered.
Last edited by cajos; 09-28-2010 at 08:11 AM.
09-28-2010, 01:22 PM
#7
Advanced
Thread Starter
Member Since: Sep 2001
Posts: 63
Likes: 0
Received 0 Likes
on
0 Posts
Thanks for the rss feed, I'll probably use that when the time comes.
You have a link to any more pictures of your project?
Wonder why they converted it to a 69? After looking at the price of the egg creates, and replacement front grills, wondering if that played a roll in it?
The PO of my car was guessing that the car had been in a front end collision shortly after it was purchased. He found a receipt for the body work (done in canada) stashed away in one of the doors.
09-28-2010, 02:47 PM
#8
Burning Brakes
Yes I do think price was an issue. It also had a poor paint job.
I have several links.
http://forums.corvetteforum.com/pain...-progress.html
http://picasaweb.google.com/cajos196...eat=directlink
I have several links.
http://forums.corvetteforum.com/pain...-progress.html
http://picasaweb.google.com/cajos196...eat=directlink
09-28-2010, 03:29 PM
#9
Team Owner


Member Since: Jun 2000
Location: Southbound
Posts: 38,928
Likes: 0
Received 1,468 Likes
on
1,247 Posts
Cruise-In II Veteran
 09-28-2010, 03:38 PM
#10
Team Owner
Member Since: Sep 2006
Location: Westminster Maryland
Posts: 30,173
Likes: 0
Received 2,878 Likes
on
2,515 Posts

Hi Chris,
Thanks very much for all the pictures. It's always interesting to see what people are working on.
It looks like you have a good bit of work in front of you, but it should be worth it since 72s are very nice cars to have!
I'll be watching for updates!
Regards,
Alan
Thanks very much for all the pictures. It's always interesting to see what people are working on.
It looks like you have a good bit of work in front of you, but it should be worth it since 72s are very nice cars to have!
I'll be watching for updates!
Regards,
Alan
09-28-2010, 06:26 PM
#11
Advanced
Thread Starter
Member Since: Sep 2001
Posts: 63
Likes: 0
Received 0 Likes
on
0 Posts
Thanks for the kind words guys.
Cajos, OMG your car looks great! Can't wait for mine to get to that point!
Hopefully I'll be able to post some more progress pictures next weekend.
Cajos, OMG your car looks great! Can't wait for mine to get to that point!
Hopefully I'll be able to post some more progress pictures next weekend.
10-04-2010, 07:32 PM
#12
Advanced
Thread Starter
Member Since: Sep 2001
Posts: 63
Likes: 0
Received 0 Likes
on
0 Posts
Lifted the body this weekend.
Next will be removing all the fiberglass from the birdcage so I can properly repair/paint that.


-Chris
Next will be removing all the fiberglass from the birdcage so I can properly repair/paint that.
-Chris
Last edited by sittnlo; 05-30-2015 at 10:00 PM.
 10-05-2010, 03:30 AM
#14
Burning Brakes
10-10-2010, 07:58 PM
#15
Advanced
Thread Starter
Member Since: Sep 2001
Posts: 63
Likes: 0
Received 0 Likes
on
0 Posts
Here is the progress Pics for this weekend
I got the firewall off, and removed the rear access panels. Not much left holding the rear of the car on
Hopefully we are able to fix this.


Probably won't have any updates next weekend, but hopefully the weekend after.
-Chris
I got the firewall off, and removed the rear access panels. Not much left holding the rear of the car on
Hopefully we are able to fix this.
Probably won't have any updates next weekend, but hopefully the weekend after.
-Chris
Last edited by sittnlo; 05-30-2015 at 10:00 PM.
10-11-2010, 03:25 PM
#17
Team Owner
Member Since: Sep 2006
Location: Westminster Maryland
Posts: 30,173
Likes: 0
Received 2,878 Likes
on
2,515 Posts
Hi Chris,
I'd say you're getting to know this car VERY intimately!
In the fourth from the last picture in your next to the last post the front clip is sitting on/in a wheelbarrow... is that one of the 'special tools' list in the GM Chassis Service Manual?
Continued good luck!
Regards,
Alan
I'd say you're getting to know this car VERY intimately!
In the fourth from the last picture in your next to the last post the front clip is sitting on/in a wheelbarrow... is that one of the 'special tools' list in the GM Chassis Service Manual?
Continued good luck!
Regards,
Alan
10-11-2010, 03:48 PM
#18
Race Director
I just looked closely at your pictures again. Very detailed by the way  I don't think any of the individual repairs needed are insurmountable. Some sections will probably even clean up fairly well. What's daunting is the work in aggregate. I agree with Gordon, you really have your work cut out for you. It'll be great when it's done though!
I don't think any of the individual repairs needed are insurmountable. Some sections will probably even clean up fairly well. What's daunting is the work in aggregate. I agree with Gordon, you really have your work cut out for you. It'll be great when it's done though!
 03-24-2011, 08:46 PM
#19
Advanced
Thread Starter
Member Since: Sep 2001
Posts: 63
Likes: 0
Received 0 Likes
on
0 Posts
Haven't had much time to update, but here is the progress so far.
We removed both of the rocker channels (one at a time of course)

Nice repair of the #3 body mount hu?


We cut out a bunch of the rusted metal


Did some quick painting of the fiberglass where the new channels will be going.

Primed the new rocker channels

Welded/primed/painted the new rocker channels to prepare for fitting


Cut some new material to take the place of all the rusted metal we cut out

More test fitting

Temporarily installed the new firewall to make sure the front mounts lineup
(We also did a LOT of measuring using the frame.)

And everything welded in (Please be kind, dad is teaching me how to weld, learning slowly)


Now for a lot of grinding/painting, then we will be tackling the upper windshield.
More to come….
-Chris
We removed both of the rocker channels (one at a time of course)
Nice repair of the #3 body mount hu?
We cut out a bunch of the rusted metal
Did some quick painting of the fiberglass where the new channels will be going.
Primed the new rocker channels
Welded/primed/painted the new rocker channels to prepare for fitting
Cut some new material to take the place of all the rusted metal we cut out
More test fitting
Temporarily installed the new firewall to make sure the front mounts lineup
(We also did a LOT of measuring using the frame.)
And everything welded in (Please be kind, dad is teaching me how to weld, learning slowly)
Now for a lot of grinding/painting, then we will be tackling the upper windshield.
More to come….
-Chris
Last edited by sittnlo; 05-30-2015 at 10:01 PM.
03-25-2011, 09:07 AM
#20
Drifting

Hey I think it's looking great! Very cool how you and your Dad are working on this car together and he's teaching you welding skills. You're going to have one special car when it's done. Great job and keep the progress pics/updates coming!