
Power lock install on early C3 (pics)
 12-16-2010, 10:24 PM
#1
Race Director

Thread Starter
I've had some requests of pictures on how to install power locks on an early C3. GM offered power locks starting in '78, but by then the door had been redesigned so you can't install them the way the factory did on an early car.
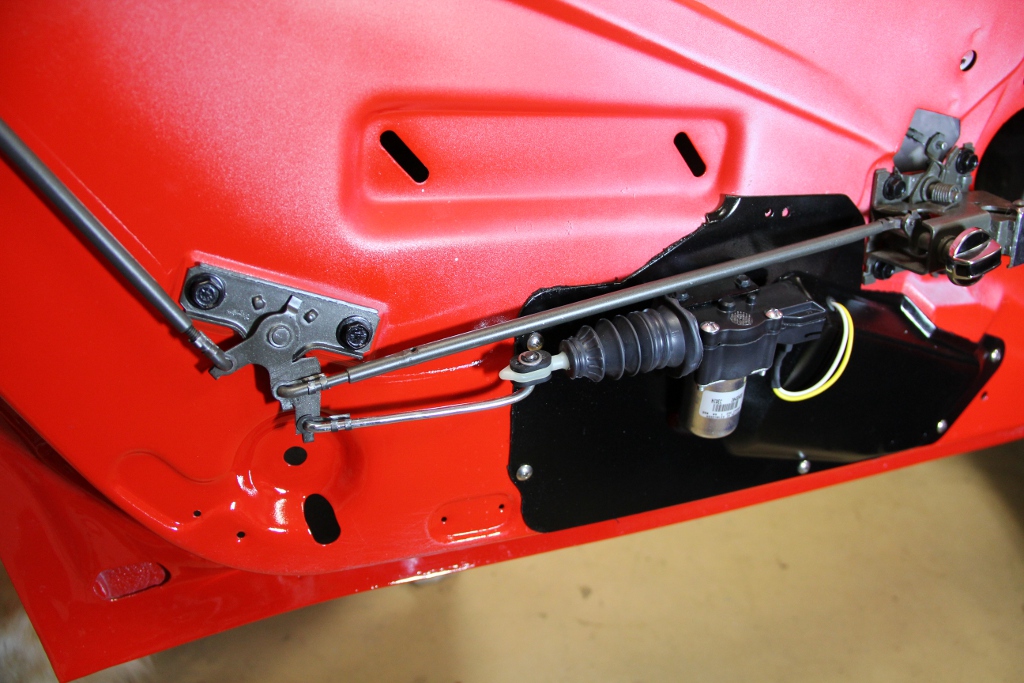
I used 78-82 Delco actuators. The first pictures shows the overall install. The actuator is mounted on a L-shaped aluminum bracket that is riveted to the factory black cover plate. I made the rod from a regular hardware store 3/16" nickel plated steel rod. On the actuator end I cut a groove and used an E-clip to secure it.
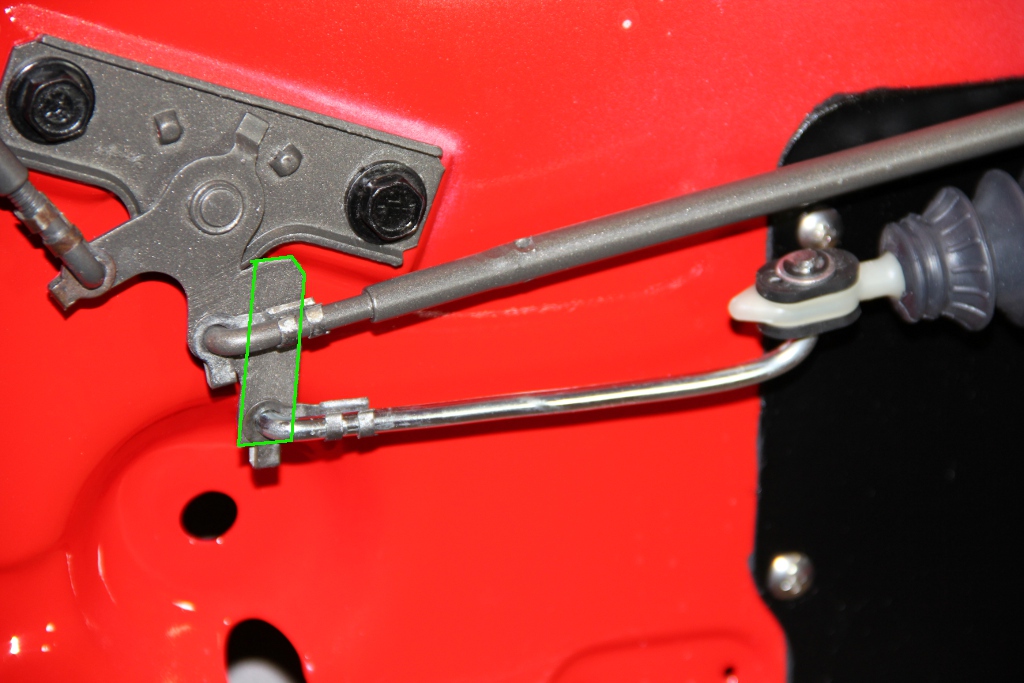
The next picture shows how the actuator rod attaches to the factory linkage. I welded on an extension to the stock bracket. This not only gives me an attachment point, but it also allows the actuator to go through its full range of travel. The green box shows the part I added.
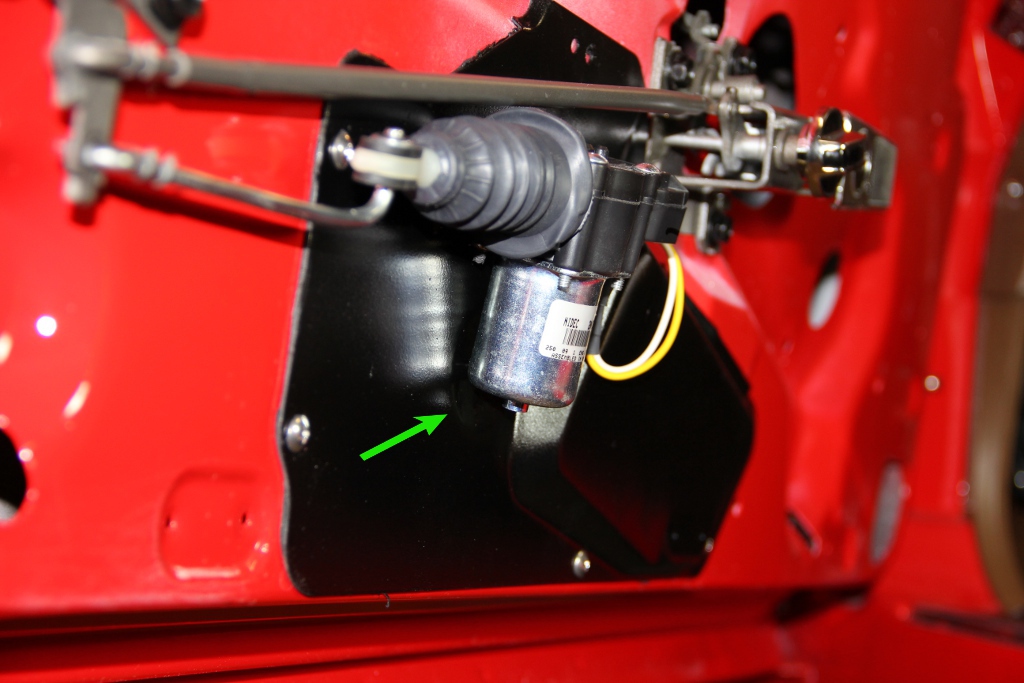
Finally, as the Delco actuator is fairly large, I had to angle the bottom part (motor) inwards to clear the door panel. I made an indention in the cover that allowed the actuator to tilt inwards another 3/8". The indention was made by placing the plate on a large socket and tap it with a round-head hammer. Arrow points to the indention.
With the door panel installed everything is hidden. I have it hooked up to a keyless entry controller from partsexpress.com.
I used 78-82 Delco actuators. The first pictures shows the overall install. The actuator is mounted on a L-shaped aluminum bracket that is riveted to the factory black cover plate. I made the rod from a regular hardware store 3/16" nickel plated steel rod. On the actuator end I cut a groove and used an E-clip to secure it.
The next picture shows how the actuator rod attaches to the factory linkage. I welded on an extension to the stock bracket. This not only gives me an attachment point, but it also allows the actuator to go through its full range of travel. The green box shows the part I added.
Finally, as the Delco actuator is fairly large, I had to angle the bottom part (motor) inwards to clear the door panel. I made an indention in the cover that allowed the actuator to tilt inwards another 3/8". The indention was made by placing the plate on a large socket and tap it with a round-head hammer. Arrow points to the indention.
With the door panel installed everything is hidden. I have it hooked up to a keyless entry controller from partsexpress.com.
Last edited by zwede; 09-19-2012 at 06:43 PM.
 12-16-2010, 10:47 PM
#2
Le Mans Master

WOW Super nice clean installation you did there, thanks for sharing it. 


 12-17-2010, 01:37 AM
#5
Melting Slicks


May we see a pic of the controller and or a vid of you the unlocking of your vehicle? A wiring diagram would be nice also. Damn, I'm asking a lot ain't I?
12-17-2010, 03:26 AM
#6
Melting Slicks

Member Since: Jan 2003
Location: Doha
Posts: 2,876
Likes: 0
Received 13 Likes
on
6 Posts
St. Jude Donor '08

Good job! , very nice and clean setup. Where did you mount the switch? ..
One more question, what made you feel that you need a power locks in your car? (seriously, though).
One more question, what made you feel that you need a power locks in your car? (seriously, though).
12-17-2010, 08:26 AM
#7
Race Director
Thread Starter
http://www.parts-express.com/pe/show...%20%20%20&FTR=
Edit: The controller comes with a wiring diagram. I think the controller in the link does not need releays. Mine did, so I also used 2 Bosch-style relays. The relays (if you need them) are available from partsexpress for about $3/ea.
Last edited by zwede; 12-17-2010 at 09:41 AM.
12-17-2010, 08:28 AM
#8
Race Director
Thread Starter
12-17-2010, 09:17 AM
#9
Pro

Markus,
Thanks for the post. I bought a kit and bent the universal brackets to fit. I was going to try to form the inspection cover over the actuator but I like your solution much better. My install depends on a clamp on the rod -- I'm sure they'll loosen as soon as the door panel goes on. I like your rod attachment much better and now that I have a cheapie welder, I'm going to follow (steal) your design.
The only change I plan is the rod attachment. I'm going to use a threaded rod attachment so I can adjust the travel (my actuators have to be synched to work properly).
I put a power lock switch in the console under the e-brake handle. My wife likes to lock the car when she gets in (on the passenger side).
12-28-2010, 05:19 PM
#11
 12-28-2010, 05:46 PM
#12
Race Director
Thread Starter
I actually used to have the aftermarket actuators from parts express. They work just fine and the smaller size means you don't have to do the indention in the cover. What I didn't like was that they had a distinct "clacking" sound when they locked/unlocked. It just didn't have the factory feel to it.