


intake manifold restoration
Drifting


Joined: Jul 2008
Posts: 1,873
Likes: 27
From: Sonora CA


These are before and after pics. I had no reason to take the motor apart as it was running fine. I did have to install a new raditor, timing chain, etc. So, while I was in there ...
The after pic was taken about half way through the "make-over" No matter how you do it, it's a lot of work. If you want a "show quality" as you put it, then I personally pull the engine and start from stratch.
Last edited by imariver; Sep 29, 2011 at 08:27 AM. Reason: add info
Drifting
Joined: Mar 2011
Posts: 1,271
Likes: 1
From: PA

Melting Slicks

Joined: Aug 2008
Posts: 2,200
Likes: 3
From: Lehigh county Pennsylvania
If it was me and I was inclined to remove that heavy, cast iron, boat anchor of an intake manifold just for cleaning purposes, I WOULDN'T DO IT. I'd throw that OEM intake into the scrap heap and replace with an aluminum one. But that's just me. If you intend to keep it, just clean it in place.
Here's 2 tips to remember if you do decide to pull the intake for whatever purpose: pull the distributor cap to one side (or remove it and the plug wires entirely) and engage the starter to have the distributor rotor pointing right at the carb...doing so will insure that installing the distributor afterwards gets it back where it belongs; not exact, mind you, but close...you'll still need to check your timing because lining it up by eyeball won't be exact. The rotor doesn't HAVE to be pointed front, it can be pointing in any arbitrary direction that makes it easy for you to remember how it needs to go back together to get it close to refire the engine.
The second thing is to remember to coat the threads of the intake bolts with a sealer like Permatex #2 to prevent oil and coolant leaks as they don't go into blind holes in the cylinder heads. Clean off all the old gunk if re-using the OEM bolts.
Like billla, I've done these tasks so many times over the years that it's become second nature. It's hard to remember how daunting a task this can be to someone who's never done it before. At least you have interweb forums to ask for help. It was trial by error when I got started.

BTW, I had 4 years of engine wrenching under my belt by the time this snapshot was taken.
Here's 2 tips to remember if you do decide to pull the intake for whatever purpose: pull the distributor cap to one side (or remove it and the plug wires entirely) and engage the starter to have the distributor rotor pointing right at the carb...doing so will insure that installing the distributor afterwards gets it back where it belongs; not exact, mind you, but close...you'll still need to check your timing because lining it up by eyeball won't be exact. The rotor doesn't HAVE to be pointed front, it can be pointing in any arbitrary direction that makes it easy for you to remember how it needs to go back together to get it close to refire the engine.
The second thing is to remember to coat the threads of the intake bolts with a sealer like Permatex #2 to prevent oil and coolant leaks as they don't go into blind holes in the cylinder heads. Clean off all the old gunk if re-using the OEM bolts.
Like billla, I've done these tasks so many times over the years that it's become second nature. It's hard to remember how daunting a task this can be to someone who's never done it before. At least you have interweb forums to ask for help. It was trial by error when I got started.
BTW, I had 4 years of engine wrenching under my belt by the time this snapshot was taken.
Thread Starter
Burning Brakes


Joined: Feb 2011
Posts: 850
Likes: 12
From: Shakopee MN
Ok, so I tested a few bolts and feel better that I don't think any of them are going to snap off. Trying to find similar black bolts on the AdvancedAuto, O'Reilly pages but haven't seen much.
So now the question becomes, after I have it glass beaded (blasted is my term), what paint do I want to use and are there any paint preparation steps I need to make? Or is just it just ok after the blasting to immediately apply a spray on paint such as this Duplicolor Engine Enamel with Ceramic�, Chevrolet Orange, 12 oz. Aerosol?
So now the question becomes, after I have it glass beaded (blasted is my term), what paint do I want to use and are there any paint preparation steps I need to make? Or is just it just ok after the blasting to immediately apply a spray on paint such as this Duplicolor Engine Enamel with Ceramic�, Chevrolet Orange, 12 oz. Aerosol?
Thread Starter
Burning Brakes
Joined: Feb 2011
Posts: 850
Likes: 12
From: Shakopee MN
Most intake manifolds I've looked at don't look like mine where the qjet sits. I'd imagine there must be an adapter. I've also been told that my qjet might sit higher and have hood clearance issues with some.
Can you give me an exact EP # I can lookup?

Le Mans Master


Joined: Jun 2004
Posts: 6,231
Likes: 65
From: Seattle WA
St. Jude Donor '14
The bolts are nothing fancy; 3/8-16 bolts, 1-1/2" long. Any Grade 5 bolt is fine; if you want a restoration-type factory original bolt they're available from the restoration parts places. I like a washer under mine, even on an iron manifold, but that's just me.
Iron paint prep is fairly simple - it will come out of bead blast dirty so step one is to wash it with a dilute laundy detergent, giving it a good scrub, the air dry and spray right away with a good primer - DupliColor is good stuff and I've used it; just apply the primer first. Be sure to mask off the head side of the manifold. It's also a good idea to put a light spray of WD-40 in the plenum and up the runners to avoid any surface corrosion.
"While you're in there" it's worth getting the thermostat housing blasted and painted - or replaced - and replace or refurbish any plugs or fittings. Do it once, do it right
Thread Starter
Burning Brakes
Joined: Feb 2011
Posts: 850
Likes: 12
From: Shakopee MN
The bolts are nothing fancy; 3/8-16 bolts, 1-1/2" long. Any Grade 5 bolt is fine; if you want a restoration-type factory original bolt they're available from the restoration parts places. I like a washer under mine, even on an iron manifold, but that's just me.
Iron paint prep is fairly simple - it will come out of bead blast dirty so step one is to wash it with a dilute laundy detergent, giving it a good scrub, the air dry and spray right away with a good primer - DupliColor is good stuff and I've used it; just apply the primer first. Be sure to mask off the head side of the manifold. It's also a good idea to put a light spray of WD-40 in the plenum and up the runners to avoid any surface corrosion.
"While you're in there" it's worth getting the thermostat housing blasted and painted - or replaced - and replace or refurbish any plugs or fittings. Do it once, do it right
Iron paint prep is fairly simple - it will come out of bead blast dirty so step one is to wash it with a dilute laundy detergent, giving it a good scrub, the air dry and spray right away with a good primer - DupliColor is good stuff and I've used it; just apply the primer first. Be sure to mask off the head side of the manifold. It's also a good idea to put a light spray of WD-40 in the plenum and up the runners to avoid any surface corrosion.
"While you're in there" it's worth getting the thermostat housing blasted and painted - or replaced - and replace or refurbish any plugs or fittings. Do it once, do it right
Yes I planned on redoing the thermostat housing as well. I've also looked at getting a new choke coil and housing.
Corvette Stories
The Best of Corvette for Corvette Enthusiasts

Every 2027 Corvette Engine Explained
Joe Kucinski
Designer Imagines A Corvette That Looks More Like a Corvette Than the Corvette
Verdad Gallardo
10 Ugly Corvettes That We Still Kinda Love
Joe Kucinski
Top 10 Most Expensive Corvettes Ever Sold on Bring A Trailer
Brett Foote
10 Things Every Corvette Owner Needs (2026 Edition)
Michael S. Palmer
8 Most "Only Corvette Owners Understand" Quirks and Problems
Pouria Savadkouei
10 Reasons the C6 Z06 is Still A Performance Benchmark After 20 Years
Joe Kucinski
How Much Horsepower Every Corvette Engine "LOST" in 1972
Joe Kucinski
Top 10 DOs and DON'Ts for Protecting Your Convertible Top!
Michael S. Palmer
Thread Starter
Burning Brakes
Joined: Feb 2011
Posts: 850
Likes: 12
From: Shakopee MN
So I've been looking at some other threads about people dumping their stock intake for an aftermarket aluminum version. It looks to me like most would require converting my choke to electric, I'm open to doing that. Other threads I've read people have replaced their intake for more HP only to be disappointed that the 5-10 HP gain is unnoticable. So the main and only reason to replace it is weight savings?
I'd like all suggestions for a replacement intake.
Also, one other fellow in another thread said to NOT use the rubber front and rear gaskets and just use (RTV or Permatex #2?) a silicone sealant. Is that really the best thing to do?
Le Mans Master
Joined: Jun 2004
Posts: 6,231
Likes: 65
From: Seattle WA
St. Jude Donor '14
Folks have lots of reasons for switching to an aftermarket intake - and it will make more power if you've got an engine that can use it. I would personally not make the swap in your case, but maybe take a look at it later as part of a cam swap or top.
The weight savings thing is a rationalization IMHO - true that less weight with the same power the car will be "faster"...but it's not a good reason to make the swap on it's own.
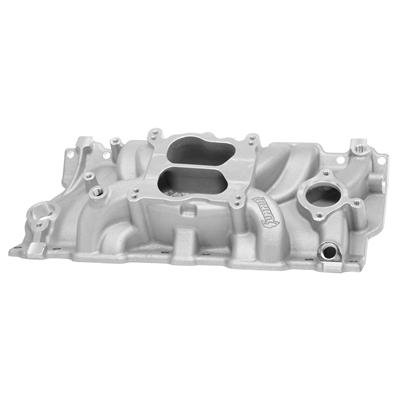
If you want to do a swap the Performer is a good pick and I believe will fit under the stock hood with a drop-base cleaner. You will need to move to an integrated choke - if your carb is out for overhaul you better make that phone call right now to see if it can be done. I have not seen great quality on the Summit-branded stuff - I had a buddy buy a set of heads that were complete junk, and I have seen one of these Summit intakes that were a bad casting...but still got machined and sold.
Correct - the front/rear valley gaskets are *never* used on a GEN I SBC, period. No Permatex, but a bead of RTV.
The weight savings thing is a rationalization IMHO - true that less weight with the same power the car will be "faster"...but it's not a good reason to make the swap on it's own.
If you want to do a swap the Performer is a good pick and I believe will fit under the stock hood with a drop-base cleaner. You will need to move to an integrated choke - if your carb is out for overhaul you better make that phone call right now to see if it can be done. I have not seen great quality on the Summit-branded stuff - I had a buddy buy a set of heads that were complete junk, and I have seen one of these Summit intakes that were a bad casting...but still got machined and sold.
Correct - the front/rear valley gaskets are *never* used on a GEN I SBC, period. No Permatex, but a bead of RTV.
Thread Starter
Burning Brakes
Joined: Feb 2011
Posts: 850
Likes: 12
From: Shakopee MN
Folks have lots of reasons for switching to an aftermarket intake - and it will make more power if you've got an engine that can use it. I would personally not make the swap in your case, but maybe take a look at it later as part of a cam swap or top.
The weight savings thing is a rationalization IMHO - true that less weight with the same power the car will be "faster"...but it's not a good reason to make the swap on it's own.
If you want to do a swap the Performer is a good pick and I believe will fit under the stock hood with a drop-base cleaner. You will need to move to an integrated choke - if your carb is out for overhaul you better make that phone call right now to see if it can be done. I have not seen great quality on the Summit-branded stuff - I had a buddy buy a set of heads that were complete junk, and I have seen one of these Summit intakes that were a bad casting...but still got machined and sold.
Correct - the front/rear valley gaskets are *never* used on a GEN I SBC, period. No Permatex, but a bead of RTV.
I've also been looking at the, I believe, L82 aluminum intakes casting #14057053 from the later years vettes. With all of these decisions and options, makes me want to just stay stock for now.
I have grand visions years down the road of having the 350 engine rebuilt into a 383 with fuel injection and a 5 or 6 speed manual transmission.
And yes some may think it's silly to just pull the intake to redo it and do nothing with the rest of the engine. However I don't really ever see much else of the engine when I open the hood. I just always see that nasty looking manifold, so that was reason for pulling it. I figured a glass beaded manifold would hold the new paint better than just some brushing the old stuff off would do.
Le Mans Master
Joined: Jun 2004
Posts: 6,231
Likes: 65
From: Seattle WA
St. Jude Donor '14
No worries; I've been thinking about doing an intake manifold YouTube video along with a few others for the basic stuff...
I wouldn't invest in the L82 manifold myself; it's essentially an aluminum copy of the same iron intake you have - so no power to be made, although it is lighter.
Doing a little detailing work under the hood always pays off. We all like a little acknowledgement when we lift the hood I'm not a big fan of "bling" - but doing some basic clean-up is always nice and worth the effort...and if done very well as you're doing it means that it will last and fit in well as you do other work on the engine and engine compartment.
I wouldn't invest in the L82 manifold myself; it's essentially an aluminum copy of the same iron intake you have - so no power to be made, although it is lighter.
Doing a little detailing work under the hood always pays off. We all like a little acknowledgement when we lift the hood
I'm not a big fan of "bling" - but doing some basic clean-up is always nice and worth the effort...and if done very well as you're doing it means that it will last and fit in well as you do other work on the engine and engine compartment.
Melting Slicks
Joined: Apr 2002
Posts: 2,337
Likes: 14
From: Norfolk VA
Thanks, I was wondering if it needed a primer or not, looks like this may fit the bill: Duplicolor Engine Enamel with Ceramic - Grey Engine Primer.
Yes I planned on redoing the thermostat housing as well. I've also looked at getting a new choke coil and housing.
Yes I planned on redoing the thermostat housing as well. I've also looked at getting a new choke coil and housing.
Last edited by Oldguard 7; Sep 30, 2011 at 11:30 PM.
Drifting
Joined: Mar 2011
Posts: 1,271
Likes: 1
From: PA

Thread Starter
Burning Brakes
Joined: Feb 2011
Posts: 850
Likes: 12
From: Shakopee MN
So I've been thinking about this for a couple days now. I did find an EDELBROCK 2101 locally for about $85, not sure if that's a worthwhile change or not. And how does the choke hook up from the 2101 to the qjet? Any pictures?
Another more noob question that really shows I've never been inside an engine. That center valley under the manifold, that isn't filled with water is it? It's just an open space for oil to drip down? That the only place water is seen is inside the intake near the front left and right sides until it goes out the thermostat housing?
Another more noob question that really shows I've never been inside an engine. That center valley under the manifold, that isn't filled with water is it? It's just an open space for oil to drip down? That the only place water is seen is inside the intake near the front left and right sides until it goes out the thermostat housing?
Thread Starter
Burning Brakes
Joined: Feb 2011
Posts: 850
Likes: 12
From: Shakopee MN
And then I see in this link in that the lower RPM range which is more in-line with a cruiser, I wouldn't see much different in HP.
I think for now there really isn't a benefit other than some 35lbs weight savings that the 2101 will give me over the stock intake.
I think for now there really isn't a benefit other than some 35lbs weight savings that the 2101 will give me over the stock intake.
Thread Starter
Burning Brakes
Joined: Feb 2011
Posts: 850
Likes: 12
From: Shakopee MN
There was also some talk about cleaning out the oil splash cover to remove "gunk" buildup. However, if I'm only driving my car during the warmer months and the exhaust heat riser valve on the RH pipes has been disabled, would I really need to try to clean it out?
I've seen some recent post talking about filling that area with aluminum foil or plaster of some sort.
I've seen some recent post talking about filling that area with aluminum foil or plaster of some sort.
Melting Slicks
Joined: Apr 2002
Posts: 2,337
Likes: 14
From: Norfolk VA
You read between the lines.... perceptive. I cleaned the manifold with a degreaser and rinsed thouroughly with water and blew dried with an air wand. After ensuring the manifold was completely dry. I used duplicolor (gray) primer after I allowed the primer to dry according to the instructions. I used duplicolor aluminum color paint. Did not drive the vehicle for some time. But when I did drive the car within the week it started to flake off. As we know the engine compartment gets pretty hot and the paint did not hold up to the heat and this was one year before I put on headers. No I will not use duplicolor.
Last edited by Oldguard 7; Oct 3, 2011 at 09:18 PM.