When you click on links to various merchants on this site and make a purchase, this can result in this site earning a commission. Affiliate programs and affiliations include, but are not limited to, the eBay Partner Network.
Good morning,
My name is Jim Jay and I read your blog on replacing a front clip, which I thought was very helpful. I have a 1970 Corvette and I am about to replace my front clip. My question is which brand did you go with? Eckler's has 2 versions, one is 4000.00 and the other one is 1500.00 and ACI is about the same, 1500.00. Is it one of those things that you get what you pay for, better quality and so on? I look forward to your advice.
Thanks Jim
Jim -
Welcome and thanks for digging up this great post! It is something I will be dealing with in the future and was totally unaware of this great thread you found! Sometimes going through old posts doesn't yield too much and so I get sloppy and don't bother checking. You saved me some work, so thank you! Be sure and start a thread on your project and post lots of pictures! There are a lot of really knowledgeable guys on here that can offer all sorts of tips and very useful information! Glad to have you around!
Hi Jim,
Welcome!
First post!!
I believe you'll find that the 2 different priced clips are quite different from each other.
The lower priced clip is one large fiberglass piece.
The higher priced clip is assembled (jig built) from about 6 smaller fiberglass pieces. This is the way the original front clip on your car was made.
Some people feel having the one piece clip on a car may affect it's value. This really only affects cars which are being touted as original type restorations.
The difference and it's effect is really is something you should understand and consider carefully before you make your decision as to which one you should buy.
If you would describe your car and your plans for it in the future, folks may be able to offer some advice.
Again, welcome!
Regards,
Alan
Thanks Alan for your reply. My car was involved in a wreck and the front clip was badly damaged. My plan for the car is to make it a mild restomod. It's going to be a wide body car with updated breaks, suspension, motor and transmission. I'm in the middle of redoing all of the suspension and breaks now, but the new front clip will be later this summer, I just wanted to buy the best product out there and really didn't understand the wide margin of pricing. Thank you for your time and I appreciate all your input.
The expensive one's are press molded like the factory process. The cheaper one is hand laid fiberglass or chopper-gun applied. Quality restorations use the press molded, be it either the bonded individual pieces or the full one piece model. Not sure if you want to pay for that in a resto-mod. From the outside you cannot tell the difference, and the strength may be stronger in the cheaper process, but that is up yo you.
Good morning,
My name is Jim Jay and I read your blog on replacing a front clip, which I thought was very helpful. I have a 1970 Corvette and I am about to replace my front clip. My question is which brand did you go with? Eckler's has 2 versions, one is 4000.00 and the other one is 1500.00 and ACI is about the same, 1500.00. Is it one of those things that you get what you pay for, better quality and so on? I look forward to your advice.
Thanks Jim
You may find the answers you're looking for, possibly get a faster response if you go to this fellow's web site. He has been documenting this project for quite some time, has his own forum.
I have a 69 project car that the project has yet to commence. Its a custom car that I intend to restore to original. The upper surround is currently hand layed glass and I have a NOS press molded one to replace it. I have since found that I will probably replace one Fender as well. It looks as though I will only end up with one Fender left at one point. If I had the option, and I'm not say I will, would You remove the remaining Fender and have the whole set up bonded in a Jig, and then install on the car ??? Or would You just leave the one Fender, fit the Hood and Bumpers, and line up the Upper Surround and the new Fender ?
This is such an old thread the information may be no longer available.
If you are needing to install a front or rear clip...start your own thread in the 'paint and body' section which is in the 'general corvette topics' section of the forum or post it where you feel like.
Old thread or not its a same that link on corvette restoration is dead,
That was by far the most well written, to the point , no bs no postuering tech savvy write up ever on installing a front clip on a chromie c3,
Shame its gone.
Old thread or not its a same that link on corvette restoration is dead,
That was by far the most well written, to the point , no bs no postuering tech savvy write up ever on installing a front clip on a chromie c3,
Shame its gone.
That stuff was priceless, nothing holds a candle to it...
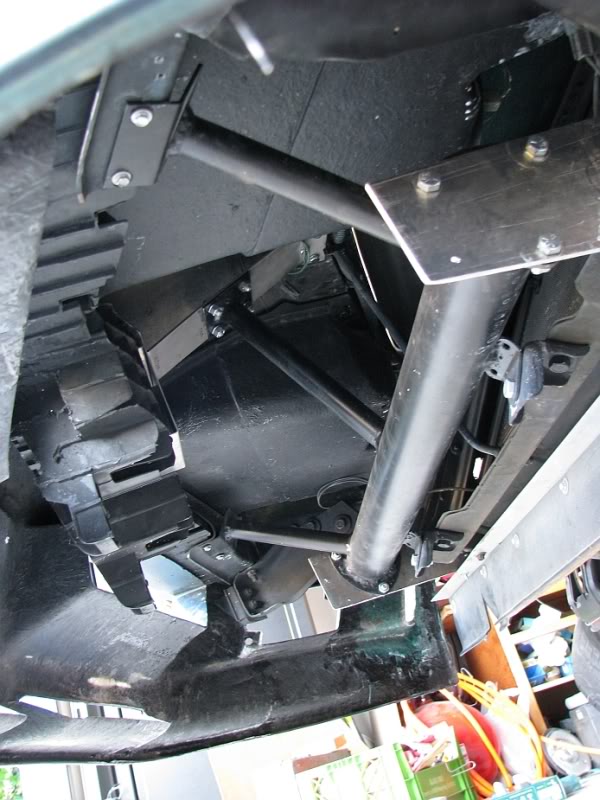
who ever did this front clip was really a master craftsman. I on the other hand over lots of beer and discussion on how to do it in the shortest period of time. Because I was paying hourly wages to all my friends We probably saved 40 to 60 plus man hours by not separating the front clip from the fire wall. The time to heat gun separate and then the trimming and test fitting the front clip one piece.
So what takes days to separate can be done in an hour with a Sawsall. After careful measurements and Sharpe marking, we sawsalled and skill saw straight down the fenders about 8 inches or so in front of the fire wall and the same to the new front clip. Then putting the whole front end back together and painting. I am just thankful for working around such knowledgeable people during my years at race car shops
time is a lot of money when you are paying a shop to do it
There is with anything ways to cut corners, for cutting time to not spend as much, doesnt make it best or even better in the long run
Just like you wouldnt reuse rings i wouldnt have hacked a front end repair that way but thats just me im very OCD ,
If it worked and you are happy thats all that matters but i will stand by the way is was done on that corvette restoration site is best.
Ps,
Ive never taken days to remove a front clip without damage,
Heck the 81 came off in hours all by myself
That guy is great! I wish that I had 1/2 his knowledge, but working on fiberglass is a nasty life. My 79 was really heavily glued on and painted a nice black. We also talked to some guy at a fiber glass shop and he told us the cons of trying to remove it. Mine had front end damage from being hit while parked in the head light area. I was a lot younger and dumber in the mid 90's. What also took a bunch if time was figuring out how to support a 81 twin turbo light weight front end on a 79 nose. I ended up installing all the 81 plastic honey comb up in the nose with pipes and aluminum plates. the main goal was to take weight off the front end and get a more aerodynamic Vette.
Hopefully those who read the write up understand that SO MANY CRITICAL things were not even mentioned...and that using it as a HOW-TO should not be done....and look at it more like a guide to kind of get you there.
I know WHY his fender grille did not fit 'just right'..and that is because he did not even mention critical steps that can avoid this problem.
NO mention of attaching the lower valance and park grilles. which is CRITICAL area and that can get all screwed up.
No mention of making sure any of the bumper extensions when attached to the frame ACTUALLY work and will line up...and with washers beign used to shim the front gussets to the headlight support beam..that is telling me that with him gluing the rubber seal to the front and back areas of the inner skirts.,..they we not being properly angled so they would lay down and not push up on the top hood surround area so much where he then needed to force it back down.
Trust me..... I can keep going on this...such as ...would it not really suck if when the headlight assemblies were being bolted in place that the headlight support beam was not properly set but you could not see it UNTIL you went to put the headlight actuator supports and get the headlight doors to fit. That is why I do that BEFORE I put the front clip on. Clearly he had his way that worked for him...but it is not how I do it....which is what it is.
One thing that I can say is I do not agree with... in any shape or form is supporting the car on jack stands and not having it sit on the ground on the cars suspension with tires aired up the same and all suspension as it would be for you to drive it on the road.... like it will be for the rest of its life. Having the engine and transmission in it is optional. But having the car assembled as much as possible...will allow you to actually check to make sure your tires turn and your tire to fender clearance is correct.
Timed as a certain movie came out...dont say the "B" word.
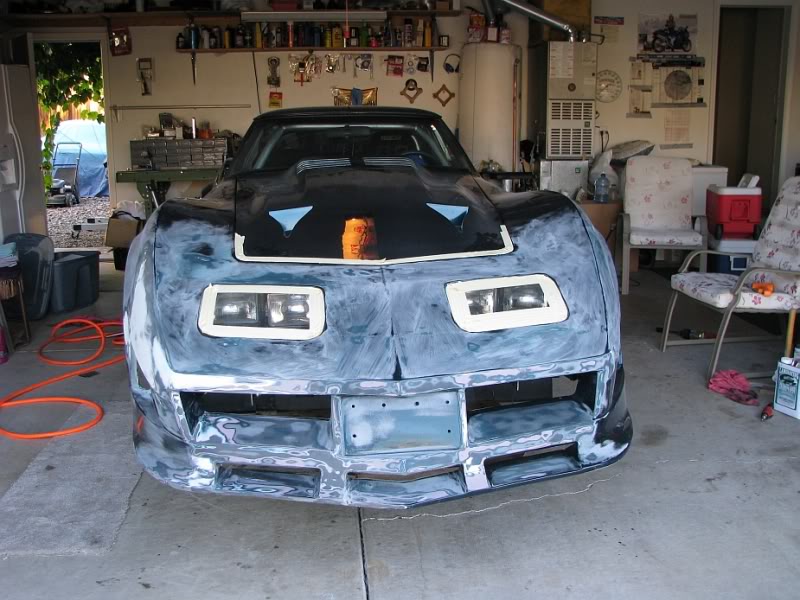
I went daytona hood, nose, vents tail on turbo panels, one of a kind, thank goodness, lol.
No turbos just radical sb....
Good looking car 'bats'. I still have fondness for the Daytona wide body or Can-Am kits due to a CamAm wide body kit Corvette was the first Corvette I did when I opened my shop.
Good looking car 'bats'. I still have fondness for the Daytona wide body or Can-Am kits due to a CamAm wide body kit Corvette was the first Corvette I did when I opened my shop.
DUB
Thanks but after the car was finished i lost interest, it was weird i actually cared what happened to the mile deep lacquer paint, sold it to a LEO friend who worked for me, then he sold it to rogers and it went overseas.
I will assume you did an ecklers ca 2 thats my favorite of all wide bodies mine was the turbo style mixed with daytona parts,
I still keep my eye open for the ca 2 panels for my 69 but i kind of doubt they will pop up so its L88 flares this time,
1989? Back to the Future Part II? I don't know what a black, widebody, ground effected C3 has to do with a time machine made out of a DeLorean.
Great scott marty, are you kidding, a fiberglass bodied car would never support the dispersal of the flux capacitor
That is, unless you had it hover-converted, and you'd have to be Bruce Wayne to afford a mod like that.
Very good
I didnt plan it,
89...burtons batman came out, and car was done and everytime someone started to say bat...wihich was a lot the movie was an epic hit i interupted with my best beetlejuice voice ..."dont say the "B" word" as a play on it since keaton was in both beetlejuice 88 and batman 89...it always got great laughs...

 05-01-2016, 12:22 AM


 It is a shame that website is dead!