
1981 Auto to Richmond 5 speed swap thread


 03-16-2012, 10:21 PM
#22
Le Mans Master

Thread Starter
 03-17-2012, 04:18 PM
#24
Race Director

03-17-2012, 08:40 PM
#25
Le Mans Master
Thread Starter
I ordered a Stock GM bronze bushing from work today


 03-18-2012, 08:48 AM
#27
Le Mans Master

Member Since: Jun 2007
Location: Where it's always hot as Hell-South Louisiana.
Posts: 7,666
Likes: 0
Received 1 Like
on
1 Post
St. Jude Donor '07-'08-'09-'10-'11-'12-'13
qwank- you knew i was suppose to have been started on my swap by now, but other family issues have forced me to postpone mine. I am gaining a lot here on this thread. Thank you for the postings, especially the pictures.
question- do you think it is really necessary to remove the speedo/tach cluster from the instrument panel ?
I was told it wasnt necessary.
Removing the steering column is already causing much anxiety here.
Thanks for the info man, i really appreciate it.

question- do you think it is really necessary to remove the speedo/tach cluster from the instrument panel ?
I was told it wasnt necessary.
Removing the steering column is already causing much anxiety here.
Thanks for the info man, i really appreciate it.
03-18-2012, 09:48 AM
#28
Le Mans Master
Thread Starter
Mike, you're welcome. I hope everything is ok so you start soon.
I think you can do it without removing the gauges, I just like to give myself as much room as possible to work with. And once the steering column is out, the gauges come out without a problem.
Don't stress out about the column. I was worried about mine too, but it actually came out with ease. I was afraid the shaft was going to be frozen into the rag joint, but it wasn't. Its just 4 fasteners in the car and the one on the joint. And a bunch of electrical connectors.
03-19-2012, 10:55 PM
#29
Le Mans Master
Thread Starter
So yesterday and today I fought with the clutch master cylinder trying to get it installed. I can't really say I like American Powertrain's adjustable bracket set up. The bolts they give you to mount it to the firewall are too short so I had to buy some new ones (I don't think they take into account the 1/4" thick fiberglass wall on the Corvette). I had a hard time lining it up and drilling the holes. I was off a little the first time and the pushrod was rubbing on the bracket because it was slightly of center. I had to take everything apart and redrill the holes. the second time I got it perfect, but it still sounds like its rubbing on the bracket a little. I'll investigate more tomorrow. I was sick of dealing with it after two days.
Also, there's no way to seal the hole that the rod goes through, so hopefully I don't get any water running into the cab from it. Keisler's bracket setup looks a lot better.
At this point I'm going to say I wish I went with a mechanical linkage. Hopefully this hydraulic setup feels as nice as everyone says it does.
so anyways, here's the pictures:
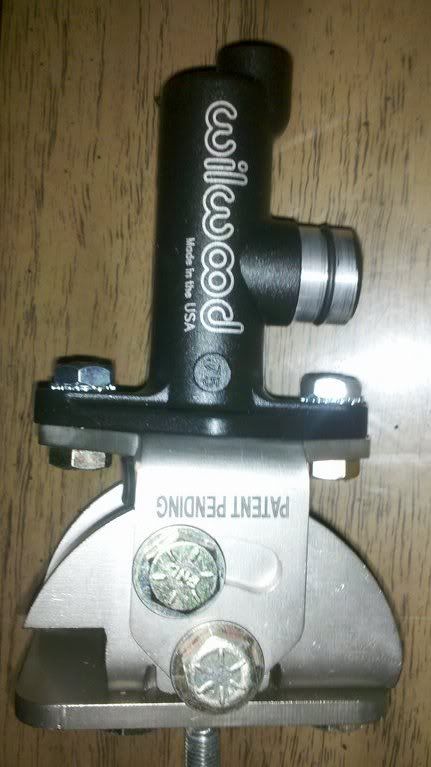
American Powertrain's kit includes a Wilwood cylinder
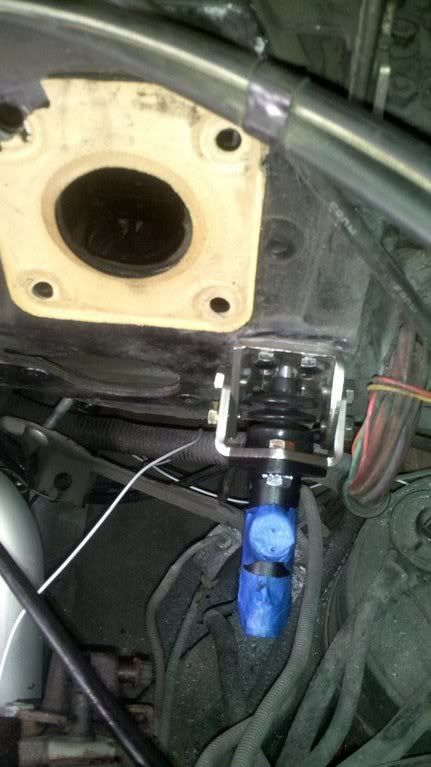
Here it is mounted on the firewall:
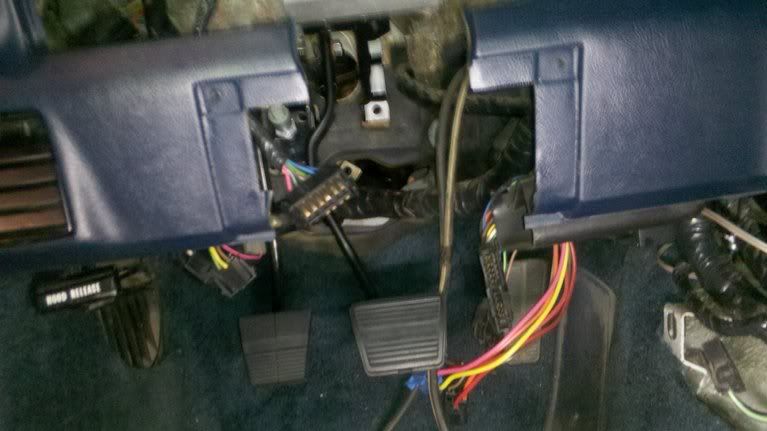
pedals in:
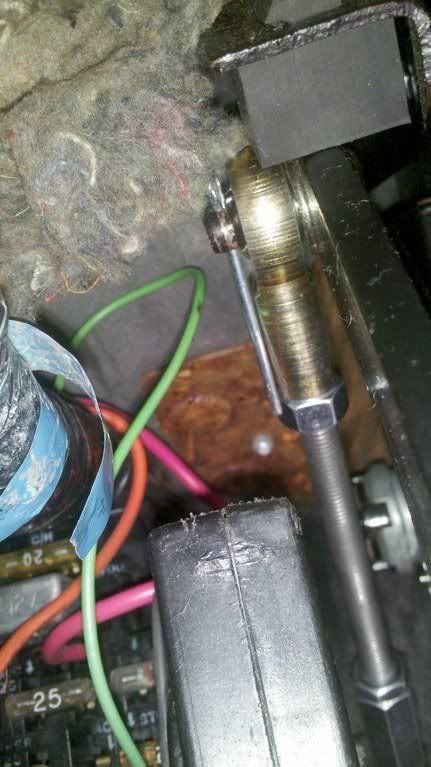
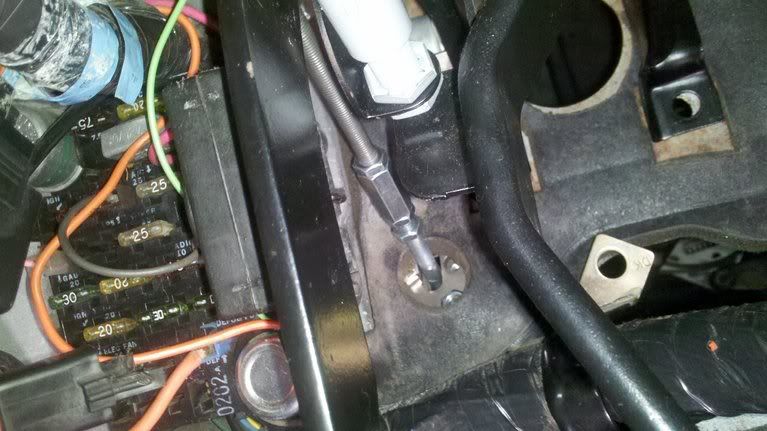
and some under dash shots of the rod:
Also, there's no way to seal the hole that the rod goes through, so hopefully I don't get any water running into the cab from it. Keisler's bracket setup looks a lot better.
At this point I'm going to say I wish I went with a mechanical linkage. Hopefully this hydraulic setup feels as nice as everyone says it does.
so anyways, here's the pictures:
American Powertrain's kit includes a Wilwood cylinder
Here it is mounted on the firewall:
pedals in:
and some under dash shots of the rod:
 03-20-2012, 06:35 PM
#31
Burning Brakes

Went with the solid pilot bushing from Autogear,heard they had the best bushing out there.Don't know if it made a difference but I soaked it in oil a week before I was ready to install it.They make these bushings in house,it fits perfectly.Put it in the freezer overnight then tapped it in the crankshaft no problems.Double check the fit of all your parts before you install them.Example the pilot bushing on the trans shaft.Sometimes things don't fit right or they send you the wrong part.Decided not to use the roller bearing,TKO trans must use them,just my preference.
Was talking about the flywheel to crankshaft bolts AP sent were to long and hit the rear of the block.The pressure plate to flywheel bolts are special shoulder type bolts,watch that to.
Almost went hydraulic clutch but didn't want to deal with a leaky throwout bearing sometime in the future and the related plumbing .The pedal pressure with the manual linkage is not that hard at all.I'm really happy with the Science Friction clutch & pressure plate,good feel no slipping or vibration.
Had to use a high strength allen bolt for the drivers lower trans mount.Couldn't get a wrench on the hex head to tighten it up.
[IMG]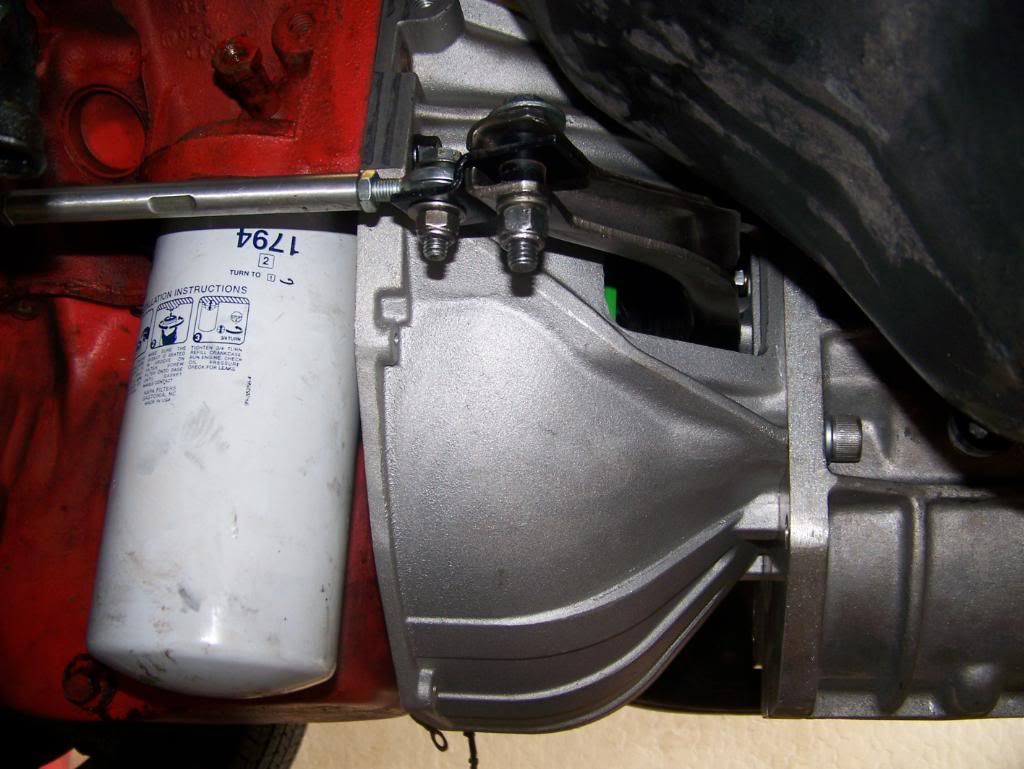 [/IMG]
Your going to have to fab up a trans mount for that Richmond,they have a diagram on the instruction sheet.I went a different path and used a Bowtie crossmember, but had to modify it to make it work.Would not recommend you go that route to much hassles.
Looks like your moving right along! Hope all goes well for you.
When it's all done and running great it's a blast......
Was talking about the flywheel to crankshaft bolts AP sent were to long and hit the rear of the block.The pressure plate to flywheel bolts are special shoulder type bolts,watch that to.
Almost went hydraulic clutch but didn't want to deal with a leaky throwout bearing sometime in the future and the related plumbing .The pedal pressure with the manual linkage is not that hard at all.I'm really happy with the Science Friction clutch & pressure plate,good feel no slipping or vibration.
Had to use a high strength allen bolt for the drivers lower trans mount.Couldn't get a wrench on the hex head to tighten it up.
[IMG]
[/IMG]Your going to have to fab up a trans mount for that Richmond,they have a diagram on the instruction sheet.I went a different path and used a Bowtie crossmember, but had to modify it to make it work.Would not recommend you go that route to much hassles.
Looks like your moving right along! Hope all goes well for you.
When it's all done and running great it's a blast......
Last edited by iokepakai; 03-20-2012 at 06:53 PM.
03-20-2012, 10:36 PM
#32
Le Mans Master
Thread Starter
No, I don't think there's anything they could do about it anyways, besides putting longer bolts in the kit maybe?
There's a few companies that make crossmembers, and some of them say they do custom setups. I might call around tomorrow and see if anyone can just make a crossmember. The Richmond 5 speed mount is 2.25" back from where a stock 4 speed mount is, so it shouldn't be too hard to make something work. I'll know for sure when I get the transmission in and compare the stock mount to the Richmond.
I can see where you thought the bowtie crossmember would work, I think the 6 speed mount is close to where a 700R4 mounts.
I was planning on pulling the TH350 out today, but I had a crappy day at work (Northstar engine rear main seal, not fun) so I didn't feel like looking at my car when I got home. LOL
03-20-2012, 11:00 PM
#33
Le Mans Master
Thread Starter
I think this crossmember will work. it's made for a stock TH350/Muncie the mount tab seems long enough where I can drill the new mount holes 2.25" back and cut off the front to fit. And I can run true duals down the middle instead of one side like I have now.
http://www.crossmembers.com/shop/pro...roducts_id=111
http://www.crossmembers.com/shop/pro...roducts_id=111
03-21-2012, 01:41 PM
#34
Le Mans Master
Thread Starter
Does anyone know if it's necessary to change the PROM in the ECU to a manual transmission Prom?
03-21-2012, 02:53 PM
#36
Le Mans Master
Thread Starter


 03-21-2012, 04:20 PM
#38
Le Mans Master
Thread Starter
I bought my transmission off of a forum member here and he included one of those mounts. Unfortunately, it doesn't work with an '81 crossmember, since they are completely different then 63-79.
03-21-2012, 05:18 PM
#39
Burning Brakes
Since the TH350 and Richmond Trans are close in length and can use the same driveshaft.I took several measurements to be sure the driveshaft would be at the same angle with the new crossmember,trans mount.All was good no changes from the TH350 location.I did not have to lower or raise the trans mount.
After looking at that Gforce crossmember it states for all years for a C3.Isn't the 80-81 crossmember different? Best to check with them to be sure it is the correct crossmember for your year car.
If you didn't get your yoke yet,the one from Denny's Driveshaft worked perfectly for me ...[IMG]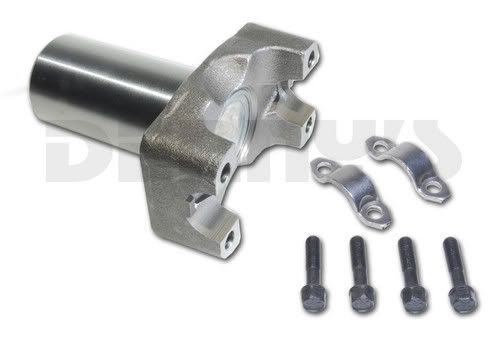 [/IMG]
After looking at that Gforce crossmember it states for all years for a C3.Isn't the 80-81 crossmember different? Best to check with them to be sure it is the correct crossmember for your year car.
If you didn't get your yoke yet,the one from Denny's Driveshaft worked perfectly for me ...[IMG]
03-21-2012, 10:26 PM
#40
Le Mans Master
Thread Starter
good eye with the crossmember years. For some reason I thought it said "80-'81 only. YOu said Bowtie OD sent you a crossmember for '80-'81, what was different about it? I thought I saw somewhere someone saying that the mounts for the frame were actually different. It's too bad, because I could just use an older crossmember with the mount I already have.
I have a driveshaft with the conversion U joint and the yoke already.
So today's Job was to remove the TH350.
first I carefully got the car up on 4 jackstands then
removed the exhaust
disconnect the shift cable
removed the drive shaft
removed the e-brake pulley
remove the TC inspection cover
remove the starter
remove the TC to flywheel bolts
remove the dipstick so it doesn't catch any wires on the way down
Remove the trans cooler lines. (I just cut mine)
support the transmission with a jack
remove the crossmember
carefully tilt the drivetrain down
disconnect the speedo cable
on my '81, I had to unplug the TC lockup connector
remove the 6 bolts holding the trans to the block
carefully separate the transmission and lower it down (mine literally fell out)
Make sure the car is jacked up high enough to slide the trans out from under it.
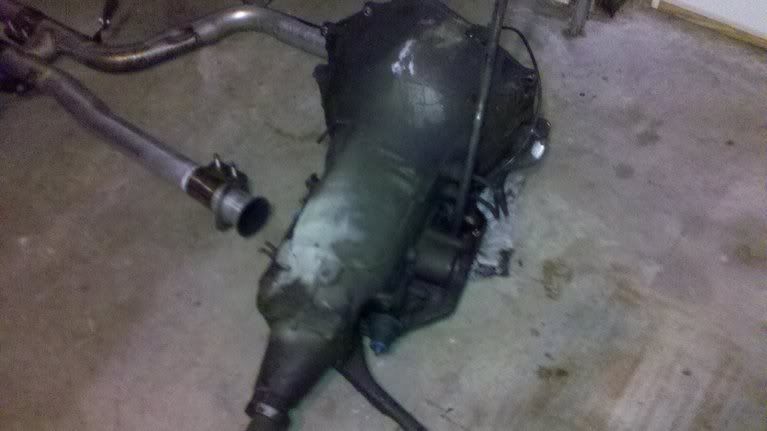
So that's it. Pretty easy on an old car. There's no turning back now. Only one picture today of my disgusting TH350C on the floor. I'm going to have to clean 30 years of oil from the under carriage while the trans is out. The rear main seal looks ok. The oil pan is leaking pretty good though. I may reseal it while the trans is out. The rear pion seal is also leaking. I think I'll save that job for a day I can do it at work on a lift and with air tools. I am going to replace the snubber bushing though with a poly one while the driveshaft is out.
I have a driveshaft with the conversion U joint and the yoke already.
So today's Job was to remove the TH350.
first I carefully got the car up on 4 jackstands then
removed the exhaust
disconnect the shift cable
removed the drive shaft
removed the e-brake pulley
remove the TC inspection cover
remove the starter
remove the TC to flywheel bolts
remove the dipstick so it doesn't catch any wires on the way down
Remove the trans cooler lines. (I just cut mine)
support the transmission with a jack
remove the crossmember
carefully tilt the drivetrain down
disconnect the speedo cable
on my '81, I had to unplug the TC lockup connector
remove the 6 bolts holding the trans to the block
carefully separate the transmission and lower it down (mine literally fell out)
Make sure the car is jacked up high enough to slide the trans out from under it.
So that's it. Pretty easy on an old car. There's no turning back now. Only one picture today of my disgusting TH350C on the floor. I'm going to have to clean 30 years of oil from the under carriage while the trans is out. The rear main seal looks ok. The oil pan is leaking pretty good though. I may reseal it while the trans is out. The rear pion seal is also leaking. I think I'll save that job for a day I can do it at work on a lift and with air tools. I am going to replace the snubber bushing though with a poly one while the driveshaft is out.
Last edited by qwank; 03-21-2012 at 11:27 PM.