
Ashtray Delete = Room For Gauges??
 02-23-2013, 04:41 PM
#1
Pro

Thread Starter

So last night I got this idea to modify the center console in my 80 to accommodate gauges instead of the ashtray and cig lighter. I figure I can fit three 2 1/16" gauges there if I do it right. I don't want this to look like an afterthought, so the idea is to sink them as deep as possible into the console and angle them toward the driver position. My initial thought is to use a gauge pod from Auto Meter or another mfg as a starting point, with the idea that it would provide the basic form needed to support the gauges. Any pod's I've looked at would require extensive modification to work, which will involve glass, resin and copious amounts of hand work.
Has anyone else done something similar with the ashtray space? Does anyone actually use the ashtray in their Vette anyway?? If I were to figure this out and make a pattern that could be replicated, would there be interested in this Mod? Think I'll talk to Pauldana about what it took him to produce his sweet CAI units as this would be similar albeit on a much smaller part.
Basic ideal here but it would be recessed almost flush with the console and not quite that extreme of an angle.
Last edited by gbarmore; 03-09-2013 at 09:51 PM. Reason: added pic
 02-23-2013, 08:14 PM
#3
Pro
Thread Starter
I've been thinking about a few items that could make a decent substitute for a mold, or at a minimum make the foundation for one. Toilet paper and paper towel rolls came to mind. Slit them longitudinally and massage a bit, and you can make any diameter you need, within reason. I am also thinking about a couple of 'bolt on' billet plates for the console that, IMO will elevate the interior a bit. 68-82 vette interiors were very 'functional', but not very 'stirring'. Don't get me wrong, the "muscle car dash', along with the body lines are the two reasons why I fell in love with them 30+ years ago, and why I have one today. I'm just interested in taking it to the next level without taking away from the classic looks.
My plan is to incorporate billet aluminum and custom fiberglass to create a new look for the interior. I also FINALLY found someone interested in working up a custom interior for my Vette. You wouldn't think that it would be that hard..... until you try. The internet damn near met it's match this time...... WTH???
My plan is to incorporate billet aluminum and custom fiberglass to create a new look for the interior. I also FINALLY found someone interested in working up a custom interior for my Vette. You wouldn't think that it would be that hard..... until you try. The internet damn near met it's match this time...... WTH???
02-23-2013, 08:59 PM
#4
Le Mans Master

on another car i put switches under the door driving lights , fuel pump ,ignition kill , driving lights. and an alarm switch , al went in different directions so if the car was messed with they would undoubtably hit the alarm switch if someone played with it


 02-24-2013, 08:50 AM
#6
Pro
Thread Starter
I had considered putting a few switches under there as well. Depending on how challenging the Gauge mod turns out to be, that may end up being the route I go.
For now I will try MrForce's suggestion of working with PVC tubing and see what I can work up.
For now I will try MrForce's suggestion of working with PVC tubing and see what I can work up.
02-25-2013, 07:41 PM
#7
Racer

I guess we think alike, the paint is coming off the ashtray lid and I was thinking about adding some gauges, the most logical space (and best looking) would be where the radio sits, second bests is the ashtray. I'll leave pillar stuff out. I was thinking that a nice Ignition+Start switches could go where the ashtray sits as well. Angling them and later making it look good would be the biggest problem IMO. Best of luck
02-26-2013, 12:59 AM
#8
Pro
Thread Starter
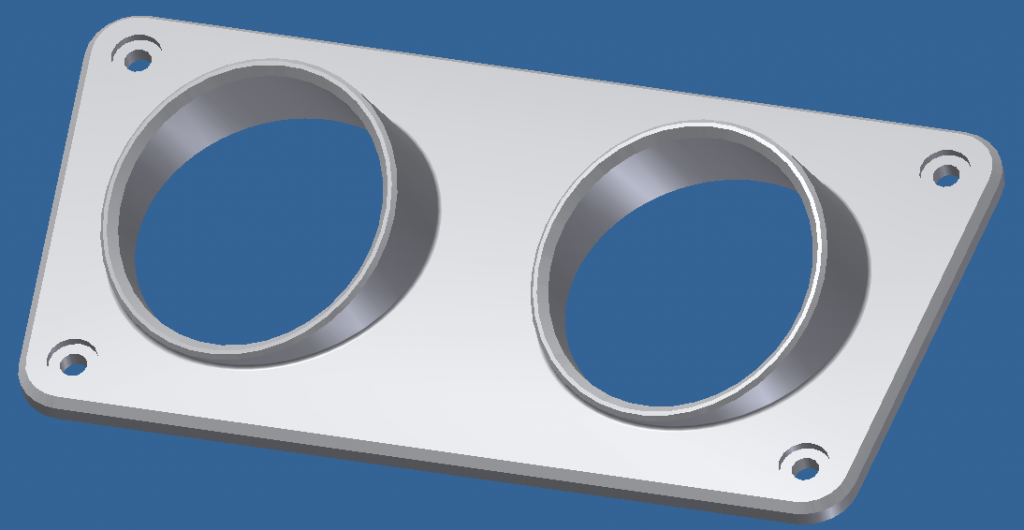
I sell engineering software so I have access to some really smart application engineers and I had one of them draw up what you see below in CAD. This is based on a mock up I built over the weekend out of cardboard and PVC Pipe (thanks for that idea MrForce!) By the way I found out that a 2" PVC pipe fits a 2 1/16" gauge perfectly (those plumbers must use "new Math"). I also have access to 3D Printers and will be printing a prototype tomorrow and post pics of what that looks like and how it fits. If it looks good I have already found a shop that does low volume CNC work for reasonable prices, and the plan is to have this part milled out of billet aluminum along with a couple other simple flat pieces for the console. I'm thinking I'll will mount it all with some fairly meaty Stainless Socket head cap screws for a muscle car kinda look. I might also spread out the two gauges and drop in an aircraft style switch like I have seen on some other cars here. Anyone interested in a piece like if I can pull this off?? What would you be willing to pay? I would sell them at or close to my cost.

Greg
Greg
Last edited by gbarmore; 03-09-2013 at 09:49 PM. Reason: somehow deleted the images.

 02-26-2013, 10:06 AM
#11
Le Mans Master
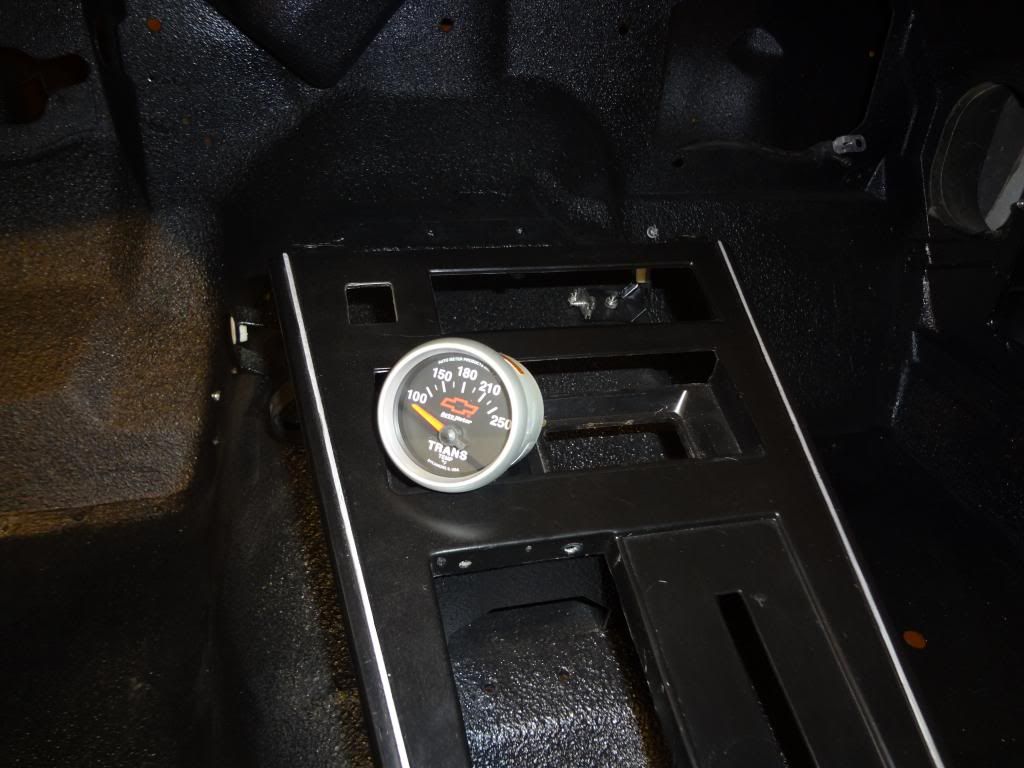
I like that idea as well. I replaced the clock in my 78 in the late 80's with an engine oil temp gauge from an 81/82 C3-factory gauge! I had to relocate the oil pressure sending unit from the side of the block to behind the distributor but other than that, you would never know that it was not stock looking at the gauge cluster. I wouldn't mind putting a trans temp gauge for my 4 speed, not an automatic, an air fuel ratio gauge or a vacuum gauge in the ashtray area. Let us know how it comes out
 02-26-2013, 11:45 PM
#13
Pro
Thread Starter
It's coming along guys, the 3D prototype I was hoping to have today didn't make it, but I should have it by the end of the week. I made a couple of mods to the original view I showed you from above, all just based on a gut feel. I made the cutouts for the fasteners smaller because I felt like they were a little bit big for the piece. I also adjusted the view angle to 25 degrees from 20 and rotated it a bit more toward the driver position. Oh, and i added a 'surprise' that I think everyone will like. I'll show you that when I get the prototype. There is a very real chance that this printed plastic model could actually be installed "as is" in your car, skipping the Billet milling process. We have some really high end equipment at work and the finishes are amazing. What I've also found out from our printing guru's is that this material can be dyed or painted to match whatever color you want, which adds limitless creative possibilities. I'm pretty psyched to see the 3D print and test fit it. Does anyone know what year vette's had that same console ashtray as the 1980? I'll keep the posts coming but please add any suggestions and feedback!
02-27-2013, 12:56 AM
#14


Mine was broken in two or 3 places, so I cut the top of it out and made a replacement from 1/8 alum. plate.I'll post a pic. if you don't mind.
Gimpy
02-27-2013, 07:58 AM
#15
Pro
Thread Starter
Please do Gimpy, would love to see what others have done!
02-27-2013, 08:58 AM
#16
Here is a pic.I've been working on this for a week or so, so your thread is very timely.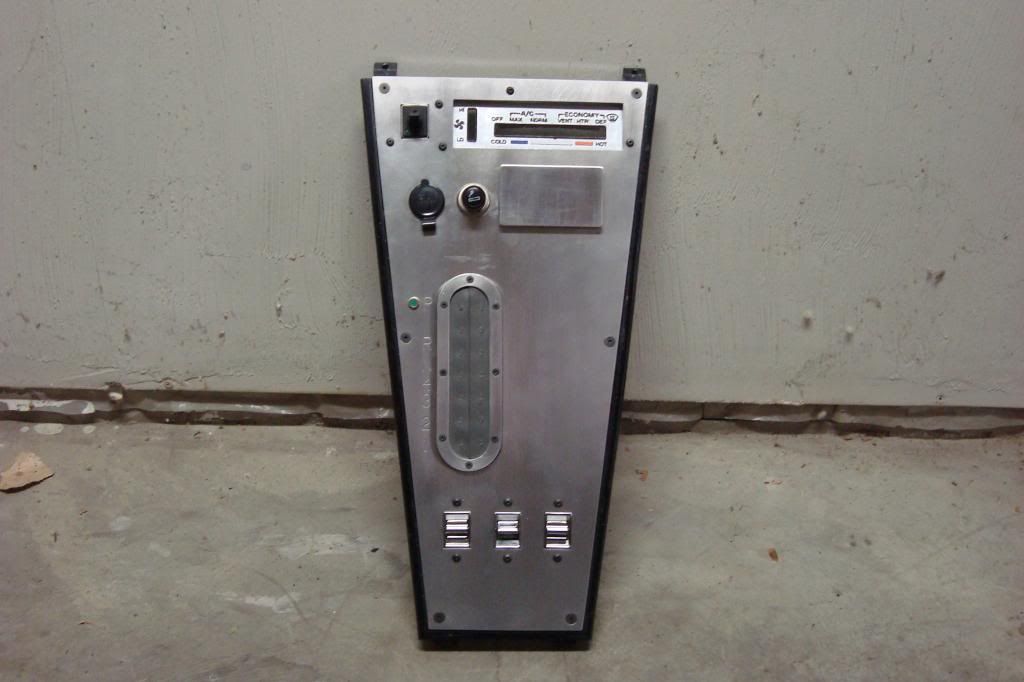
I always thought that the ash tray took up way to much space for no larger than it actually was,so I made a hole to fit the OE tray with a little door to cover it.My shifter boot was always full of dust and again larger than needed so I added this slit type of boot.Also added a "window" switch to operate power locks,a 12V power outlet for phone chargers,or GPS.
I'm not sure about the finish though,have thought about powder coat but not sure I want to deal with coating thickness in the openings.
Gimpy
02-27-2013, 09:34 AM
#17
Le Mans Master
I would like it better if you could put the HVAC control where the ashtray is, and put the gauges in the HVAC control spot. It seems weird that you have to reach over the gauges to adjust the heat
02-27-2013, 10:14 AM
#18
Pro
Thread Starter
Here is a pic.I've been working on this for a week or so, so your thread is very timely.
I always thought that the ash tray took up way to much space for no larger than it actually was,so I made a hole to fit the OE tray with a little door to cover it.My shifter boot was always full of dust and again larger than needed so I added this slit type of boot.Also added a "window" switch to operate power locks,a 12V power outlet for phone chargers,or GPS.
I'm not sure about the finish though,have thought about powder coat but not sure I want to deal with coating thickness in the openings.
Gimpy
I always thought that the ash tray took up way to much space for no larger than it actually was,so I made a hole to fit the OE tray with a little door to cover it.My shifter boot was always full of dust and again larger than needed so I added this slit type of boot.Also added a "window" switch to operate power locks,a 12V power outlet for phone chargers,or GPS.
I'm not sure about the finish though,have thought about powder coat but not sure I want to deal with coating thickness in the openings.
Gimpy
Greg
02-27-2013, 11:36 AM
#19
1//8 alum. ,both main plate & the oval ,a "rubber" boot from an old floor mat.I used a band saw to get the main plate to rough size,4in. belt sander to finish size.I've access to a CNC mill, cut the oval on that,engraved the PNR4321 on that & roughed in the switch openings also. Then hand files to size and sharpen inside corners.
Took some time, but it is Feb. ,10 in of snow

Gimpy
02-27-2013, 06:52 PM
#20
Le Mans Master
Here is a pic.I've been working on this for a week or so, so your thread is very timely.
I always thought that the ash tray took up way to much space for no larger than it actually was,so I made a hole to fit the OE tray with a little door to cover it.My shifter boot was always full of dust and again larger than needed so I added this slit type of boot.Also added a "window" switch to operate power locks,a 12V power outlet for phone chargers,or GPS.
I'm not sure about the finish though,have thought about powder coat but not sure I want to deal with coating thickness in the openings.
Gimpy
I always thought that the ash tray took up way to much space for no larger than it actually was,so I made a hole to fit the OE tray with a little door to cover it.My shifter boot was always full of dust and again larger than needed so I added this slit type of boot.Also added a "window" switch to operate power locks,a 12V power outlet for phone chargers,or GPS.
I'm not sure about the finish though,have thought about powder coat but not sure I want to deal with coating thickness in the openings.
Gimpy