
Swap a 06 GTO LS2 and T56 into my 1980
 12-24-2013, 06:51 AM
#81
Racer

Thread Starter

I am also looking for a place to buy these pigtail connectors so I don't have to cut and splice into the engine harness. Any ideas on where to find pigtails and a DBW harness that would work on the 06 GTO (LS2 with the 24x reluctor)?
 12-27-2013, 12:31 PM
#82
Burning Brakes

I saw that. I even found a guide for what all the connectors on the harness look like. I am trying to find where the ends/connectors for the DBW, fans and fuel pump are without having to unwrap the harness to follow wires from the pins locations you indicated.
I am also looking for a place to buy these pigtail connectors so I don't have to cut and splice into the engine harness. Any ideas on where to find pigtails and a DBW harness that would work on the 06 GTO (LS2 with the 24x reluctor)?
I am also looking for a place to buy these pigtail connectors so I don't have to cut and splice into the engine harness. Any ideas on where to find pigtails and a DBW harness that would work on the 06 GTO (LS2 with the 24x reluctor)?

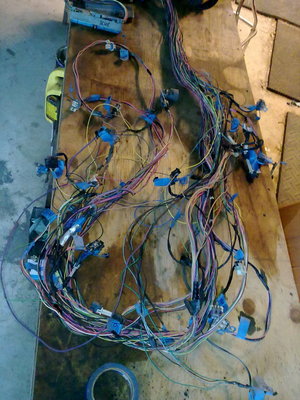
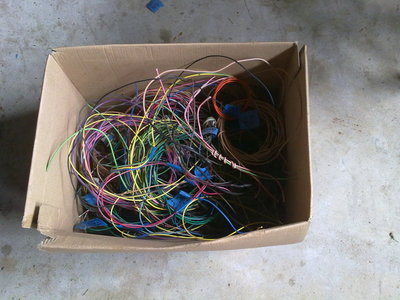
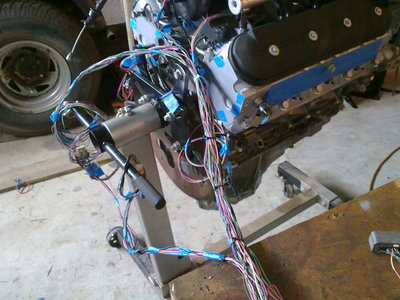
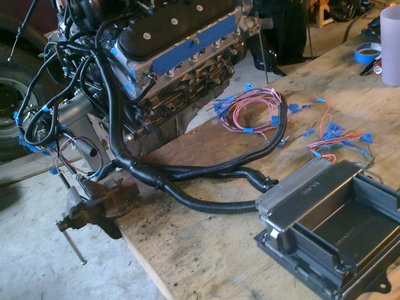
I pulled the extra wires I was not using out of my factory harness and made a much cleaner piece. All you need to do is find the pin you are looking for in the connector that plugs to the ECM (it is numbered). Look at the wire color (body and stripe), and find the other end connector with the same color wire (use the guide). Use a meter to check continuity.
Here are the wires I removed.
Connectors
http://www.eficonnection.com/eficonn...ngineType.aspx
http://www.repairconnector.com/
http://whiteproducts.com/catalog/Whi...ctsCatalog.pdf
http://www.mouser.com/Connectors/Aut...ors/_/N-1ehb5/
http://www.currentperformance.com/Co...onnectors.html
http://www.nookandtranny.com/mm5/mer...egory_Code=WIR
Last edited by 74modified; 12-27-2013 at 12:41 PM. Reason: Connector supply
12-27-2013, 06:47 PM
#83
Racer
Thread Starter
What -its only a couple of wires
I pulled the extra wires I was not using out of my factory harness and made a much cleaner piece. All you need to do is find the pin you are looking for in the connector that plugs to the ECM (it is numbered). Look at the wire color (body and stripe), and find the other end connector with the same color wire (use the guide). Use a meter to check continuity.
Here are the wires I removed.
Connectors
http://www.eficonnection.com/eficonn...ngineType.aspx
http://www.repairconnector.com/
http://whiteproducts.com/catalog/Whi...ctsCatalog.pdf
http://www.mouser.com/Connectors/Aut...ors/_/N-1ehb5/
http://www.currentperformance.com/Co...onnectors.html
http://www.nookandtranny.com/mm5/mer...egory_Code=WIR
I am also to that point where I need to figure out who to send the ECU to for reprogramming. Anyone have suggestions of guys they have used?
12-27-2013, 09:47 PM
#84
Burning Brakes
Thank you very much for the links! Have you used any of them? Seeing your pic of how much extra wire can be shed almost has me convinced to tear into the harness and thin what isn't needed.
I am also to that point where I need to figure out who to send the ECU to for reprogramming. Anyone have suggestions of guys they have used?
I am also to that point where I need to figure out who to send the ECU to for reprogramming. Anyone have suggestions of guys they have used?
http://www.bmotorsports.com/shop/
Re-working the harness looks harder than it really is, but if you are not comfortable/experienced with wiring you may want to pass it to someone who is. It is a bit intimidating at first, but my second one was really easy. There are several mail order programers that will remove vats and do a basic tune with your provided tire diameter, rear gear, ect. If you find a local guy who can dyno tune, he can remove vats for you then put it on the dyno and get a perfect tune.
 12-28-2013, 11:45 AM
#85
Racer
Thread Starter
One more link I have used
http://www.bmotorsports.com/shop/
Re-working the harness looks harder than it really is, but if you are not comfortable/experienced with wiring you may want to pass it to someone who is. It is a bit intimidating at first, but my second one was really easy. There are several mail order programers that will remove vats and do a basic tune with your provided tire diameter, rear gear, ect. If you find a local guy who can dyno tune, he can remove vats for you then put it on the dyno and get a perfect tune.
The problem with getting a dyno tune up front is hauling the car 300 miles to the nearest place to get this done. I much prefer getting the car running and driving it to get a dyno tune.
12-28-2013, 12:48 PM
#86
Burning Brakes
I have to buy the J1 (blue) connector for the E40 ECU with the DLC and pedal harness. I can get the part for $145. I have a fuse block and relays I was planning to wire in myself. I haven't done a harness before but the point of this project was to do as much of it myself as possible.
The problem with getting a dyno tune up front is hauling the car 300 miles to the nearest place to get this done. I much prefer getting the car running and driving it to get a dyno tune.
The problem with getting a dyno tune up front is hauling the car 300 miles to the nearest place to get this done. I much prefer getting the car running and driving it to get a dyno tune.
12-28-2013, 06:50 PM
#87
Racer
Thread Starter
I meant taking the ECU to the local guy for VATs then driving, but sounds like you would be better with mail order. I don't have anyone to recommend, but it usually costs from $100 to $200. If your connector http://www.eficonnection.com/eficonn...spx?ItemId=319 is broken and needs replacing that is easy. If it is cut and you need pins installed on the wires you will need a Delphi crimping tool. http://www.amazon.com/Delphi-Packard.../dp/B003MWJ6SA
12-28-2013, 07:12 PM
#88
Racer
Thread Starter
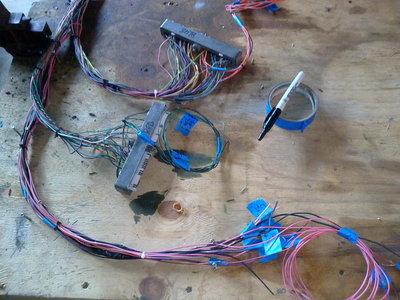
Also, I am trying to figure out where this connector goes? 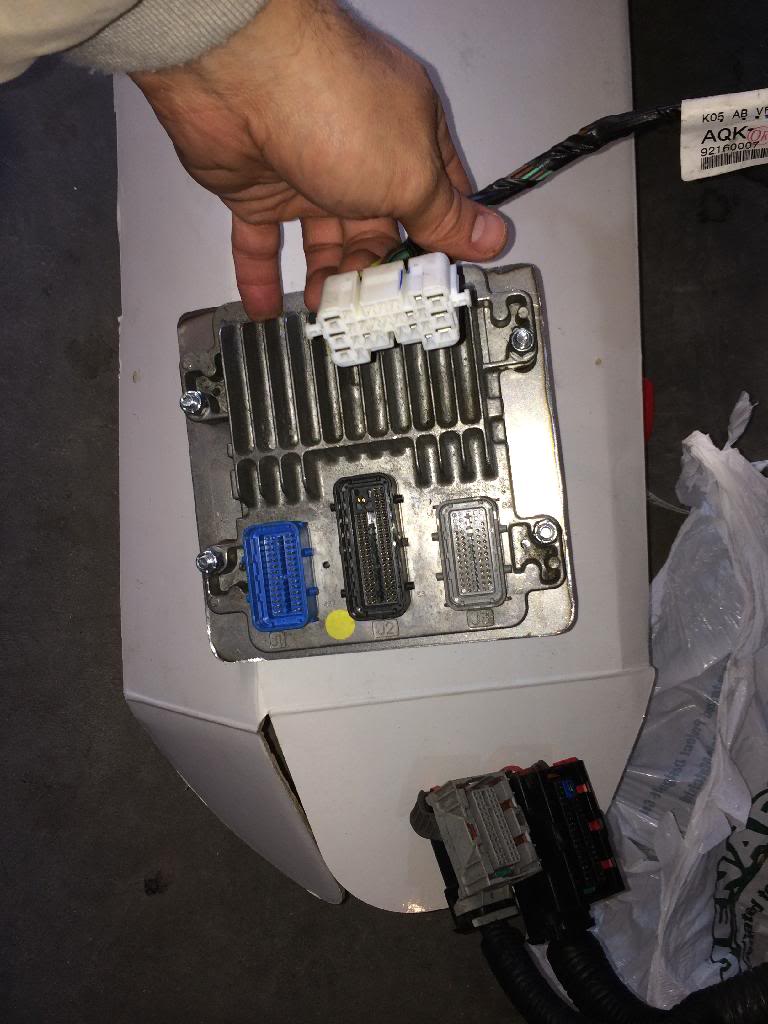 You can see the two connectors I received with the included harness. It is down by the rest of the ECU connectors. I found out that part of the confusion I was having is that the connector images I was given are for the 2005 GTO. They are slightly different but I can't find a comparable connector that should come with a LS2/T56 harness.
You can see the two connectors I received with the included harness. It is down by the rest of the ECU connectors. I found out that part of the confusion I was having is that the connector images I was given are for the 2005 GTO. They are slightly different but I can't find a comparable connector that should come with a LS2/T56 harness.
12-28-2013, 08:08 PM
#89
Burning Brakes
Also, I am trying to figure out where this connector goes? You can see the two connectors I received with the included harness. It is down by the rest of the ECU connectors. I found out that part of the confusion I was having is that the connector images I was given are for the 2005 GTO. They are slightly different but I can't find a comparable connector that should come with a LS2/T56 harness.
http://www.ls2.com/forums/showthread...ess-connectors
 12-30-2013, 10:35 PM
#90
Racer
Thread Starter
I am no expert on the GTO. This may help.
http://www.ls2.com/forums/showthread...ess-connectors
http://www.ls2.com/forums/showthread...ess-connectors
While I am waiting on the C1 connector I have gone back to the accessories. I have decided to convert the A/C to 134a and have ordered the Sanden compressor and respective Holley bracket.
While I was looking over things I took another look at the PS pulley. I haven't found a good 6 groove pulley that fits on the Corvette PS pump and clears the A-arm. The Dorman 300-201 that Donnie used will fit but doesn't fit the Corvette (too loose) or GTO (too tight to fit on) PS pump. Donnie made a bushing for the Corvette pump but I am hoping to find a direct fit solution as my attempts at a bushing leave the pulley alignment sloppy. Any ideas?
Last edited by myko; 12-30-2013 at 10:48 PM.
12-30-2013, 11:02 PM
#91
Burning Brakes
That does help a great deal. Thank you. The link does describe it as coming off the blue C1 connector that is missing on my harness, though. Mine comes off the harness where the black and grey C2 and C3 converge. I am sure it is the same connector as in the picure in your link so I hope to find a pigtail for the back of the cluster so I can use the pinouts in that thread.
While I am waiting on the C1 connector I have gone back to the accessories. I have decided to convert the A/C to 134a and have ordered the Sanden compressor and respective Holley bracket.
While I was looking over things I took another look at the PS pulley. I haven't found a good 6 groove pulley that fits on the Corvette PS pump and clears the A-arm. The Dorman 300-201 that Donnie used will fit but doesn't fit the Corvette (too loose) or GTO (too tight to fit on) PS pump. Donnie made a bushing for the Corvette pump but I am hoping to find a direct fit solution as my attempts at a bushing leave the pulley alignment sloppy. Any ideas?
I used a .75 pump and went to the U-Pull-it and got 3 smaller pulleys (with windows). I think the smallest (I used) was from a Cadillac and the S10 was next and then a V6 Fbody.
12-31-2013, 06:22 PM
#93
Racer
Thread Starter
Thank you. It is really a testament to this forum and all wealth of information available here. BTW, how do you like the fixed headlights?
01-01-2014, 07:20 PM
#94
Burning Brakes

That does help a great deal. Thank you. The link does describe it as coming off the blue C1 connector that is missing on my harness, though. Mine comes off the harness where the black and grey C2 and C3 converge. I am sure it is the same connector as in the picure in your link so I hope to find a pigtail for the back of the cluster so I can use the pinouts in that thread.
While I am waiting on the C1 connector I have gone back to the accessories. I have decided to convert the A/C to 134a and have ordered the Sanden compressor and respective Holley bracket.
While I was looking over things I took another look at the PS pulley. I haven't found a good 6 groove pulley that fits on the Corvette PS pump and clears the A-arm. The Dorman 300-201 that Donnie used will fit but doesn't fit the Corvette (too loose) or GTO (too tight to fit on) PS pump. Donnie made a bushing for the Corvette pump but I am hoping to find a direct fit solution as my attempts at a bushing leave the pulley alignment sloppy. Any ideas?
While I am waiting on the C1 connector I have gone back to the accessories. I have decided to convert the A/C to 134a and have ordered the Sanden compressor and respective Holley bracket.
While I was looking over things I took another look at the PS pulley. I haven't found a good 6 groove pulley that fits on the Corvette PS pump and clears the A-arm. The Dorman 300-201 that Donnie used will fit but doesn't fit the Corvette (too loose) or GTO (too tight to fit on) PS pump. Donnie made a bushing for the Corvette pump but I am hoping to find a direct fit solution as my attempts at a bushing leave the pulley alignment sloppy. Any ideas?
Have a machine shop make the bronze bushing for you. Once its pulled on the shaft I used a bolt and washer to make sure it didn't come off. Haven't had a problem.
01-01-2014, 07:42 PM
#95
Burning Brakes
They get rid of about 100 lbs of weight, the vacuum can and all the horrible vacuum lines under the hood and dash.
I found the buckets on flea bay for 150. I built the covers and frames myself.
It is really nice to pull the switch and have light consistently.
01-02-2014, 06:43 AM
#96
Racer
Thread Starter
I love the fixed lights.
They get rid of about 100 lbs of weight, the vacuum can and all the horrible vacuum lines under the hood and dash.
I found the buckets on flea bay for 150. I built the covers and frames myself.
It is really nice to pull the switch and have light consistently.
They get rid of about 100 lbs of weight, the vacuum can and all the horrible vacuum lines under the hood and dash.
I found the buckets on flea bay for 150. I built the covers and frames myself.
It is really nice to pull the switch and have light consistently.
02-19-2014, 08:12 PM
#97
Advanced
Nice thread--lots of great links!
I'm doing my 78--and I'm not sure you got your AC thoughts finished in the earlier parts of your post, or I didn't see it in the thread. I was initially going to buy a Vintage Air kit--but they don't have kits past 76 or 77--we have new cars! I read what they do, and apart from a cleaner cab install, they really seem to do two main things up front. They go to a bigger parallel flow condenser--which I bought ( the vintage air spec for their 76 kit,) and the Sanden compressor (real Sanden btw, not copy)--it is much more efficient than our originals. I looked at the Sanden S5 versus the S7 and decided the S7 was a little more powerful/efficient--in Florida you can't have too much AC. The hoses for 134 must be new (refrigerant leaks thru R12 hoses.) I bought the stock evaporator and can/ orifice tube. It hasn't been cranked up yet. If you are interested in part numbers, let me know. If you see a problem with my plan--I'd like to know that too!
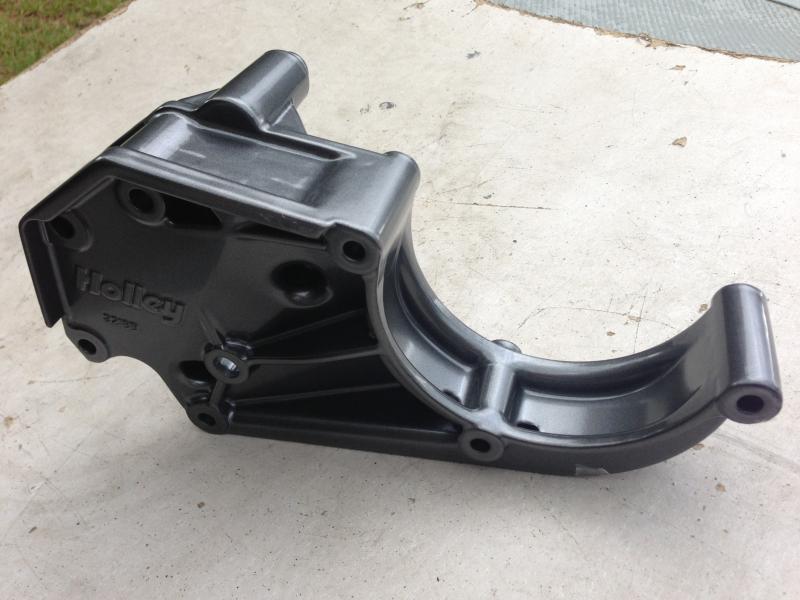 . This is the Holley Sanden holder after I cleaned it up and powdered it.
I'm doing my 78--and I'm not sure you got your AC thoughts finished in the earlier parts of your post, or I didn't see it in the thread. I was initially going to buy a Vintage Air kit--but they don't have kits past 76 or 77--we have new cars! I read what they do, and apart from a cleaner cab install, they really seem to do two main things up front. They go to a bigger parallel flow condenser--which I bought ( the vintage air spec for their 76 kit,) and the Sanden compressor (real Sanden btw, not copy)--it is much more efficient than our originals. I looked at the Sanden S5 versus the S7 and decided the S7 was a little more powerful/efficient--in Florida you can't have too much AC. The hoses for 134 must be new (refrigerant leaks thru R12 hoses.) I bought the stock evaporator and can/ orifice tube. It hasn't been cranked up yet. If you are interested in part numbers, let me know. If you see a problem with my plan--I'd like to know that too!
. This is the Holley Sanden holder after I cleaned it up and powdered it.
02-23-2014, 07:18 AM
#98
Racer
Thread Starter
Nice thread--lots of great links!
I'm doing my 78--and I'm not sure you got your AC thoughts finished in the earlier parts of your post, or I didn't see it in the thread. I was initially going to buy a Vintage Air kit--but they don't have kits past 76 or 77--we have new cars! I read what they do, and apart from a cleaner cab install, they really seem to do two main things up front. They go to a bigger parallel flow condenser--which I bought ( the vintage air spec for their 76 kit,) and the Sanden compressor (real Sanden btw, not copy)--it is much more efficient than our originals. I looked at the Sanden S5 versus the S7 and decided the S7 was a little more powerful/efficient--in Florida you can't have too much AC. The hoses for 134 must be new (refrigerant leaks thru R12 hoses.) I bought the stock evaporator and can/ orifice tube. It hasn't been cranked up yet. If you are interested in part numbers, let me know. If you see a problem with my plan--I'd like to know that too!
This is the Holley Sanden holder after I cleaned it up and powdered it.
As you can see, my progress has been slow {ie none} this winter. I have the "SD7-style" compressor and the Holley bracket. I do like the powdered look! I am looking for parallel flow condenser that fits as well as the '80 OEM. With the stock evaporator and new hoses I will be at the same place you are at. I would appreciate part numbers on the condenser and hoses. 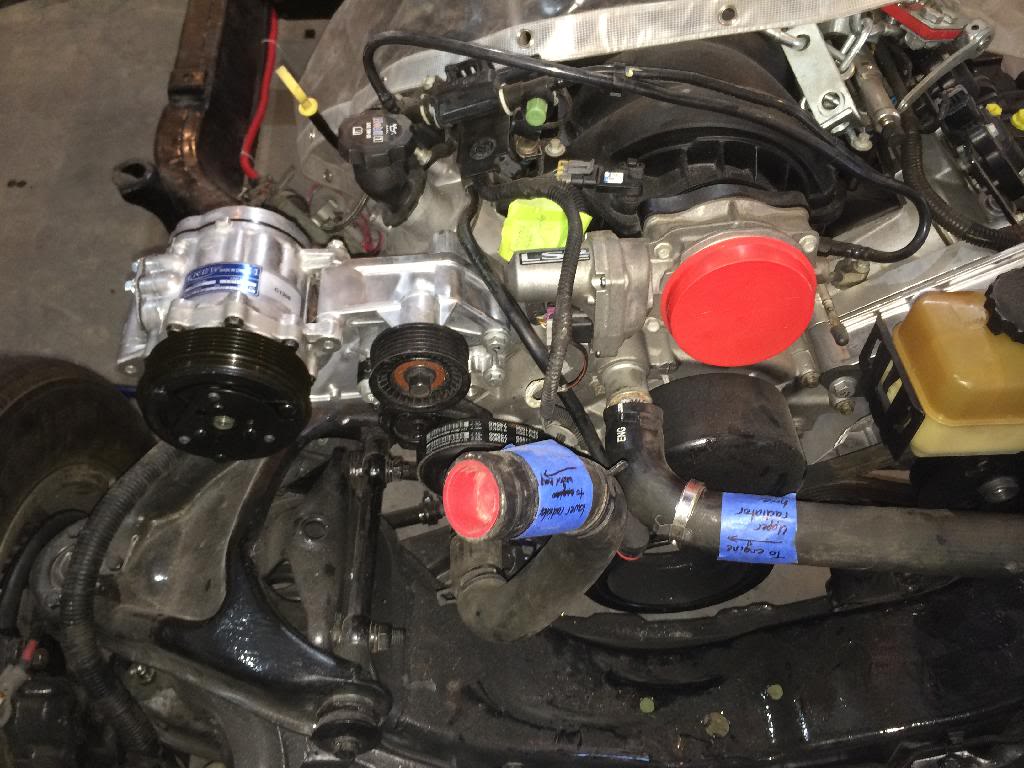
I was interested in getting rid of the blower box in the engine bay but it seems like the aftermarket AC products just move the box inside the cab. From another thread discussing deleting the heater box:
I installed a universal AC kit from Classic Auto Air in my LSx Olds. It's very similar to their early C3 kit. Since the heat and door controls are cable operated, it would be easy to adapt to your console controls.
It's less sophisticated than the Vintage Air kit I put in my 68 LSx vette, but when adapting universal parts, simple is good. The Classic unit is a bit smaller than the VA and fits entirely under the dash.
Btw, Classic Auto offers the Kwik LS compressor bracket at about 1/2 price with their kits.
It's less sophisticated than the Vintage Air kit I put in my 68 LSx vette, but when adapting universal parts, simple is good. The Classic unit is a bit smaller than the VA and fits entirely under the dash.
Btw, Classic Auto offers the Kwik LS compressor bracket at about 1/2 price with their kits.
02-23-2014, 10:36 AM
#99
Burning Brakes

Member Since: Sep 2012
Location: coon rapids mn
Posts: 818
Likes: 0
Received 0 Likes
on
0 Posts
increadable build .have you consider doing some welding on the frame to strengthen it ?.there was a good thread recently about gussets for strengthening the front cross member .for mail order tuning Frost on the ls1tech forum is a great tuner .
02-24-2014, 06:18 AM
#100
Racer
Thread Starter
Thanks for the lead on Frost. Every other site I have tried has been a dead end. I'll head back to ls1tech and look him up today.
Mike