
C3 LS1 swap questions that arent usually answered
 08-03-2014, 12:17 PM
#1
Advanced

Thread Starter


This thread is to go over common issues that arent covered by most threads to hopefully save future conversions a million trips to the parts store
Lets start with mounts. There are two main types, standard SBC and 1" setback. Both work, but you must take some things into consideration
Standard SBC mounts are a misnomer. They share the lower bolt hole from a SBC block with the lower hole of a LSx block. These actually move the bellhousing 1" forward. Theres a ton of room in the C3 engine bay, so 1" forward isnt going to throw anything out of whack
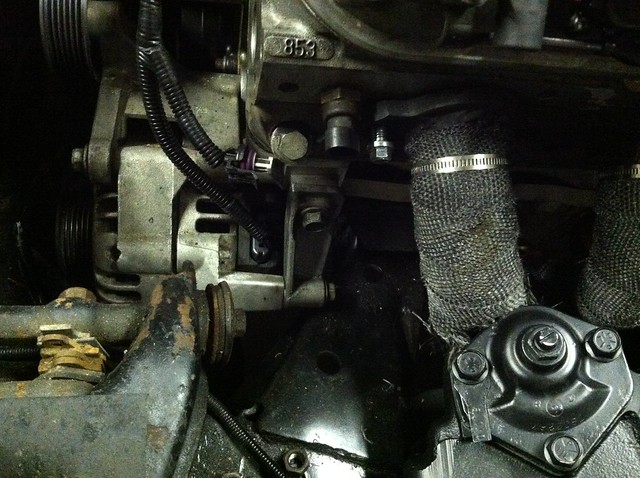
The second style is commonly called 1" setback and actually places the LSx bellhousing in the SBC position. Those reusing a stock trans/DS or want the factory Z-bar have to use this style mount. Moving the engine back gives possible clearance issues with the accessories or firewall depending on what parts are used for the build. A complete 98-02 Fbody dropout still fits this location minus AC. Those using SBC sidepipe headers on the LSx conversion will have the easiest job from this point. Heres the Fbody alt fitting snugly, but still clearing by atleast 1/4"
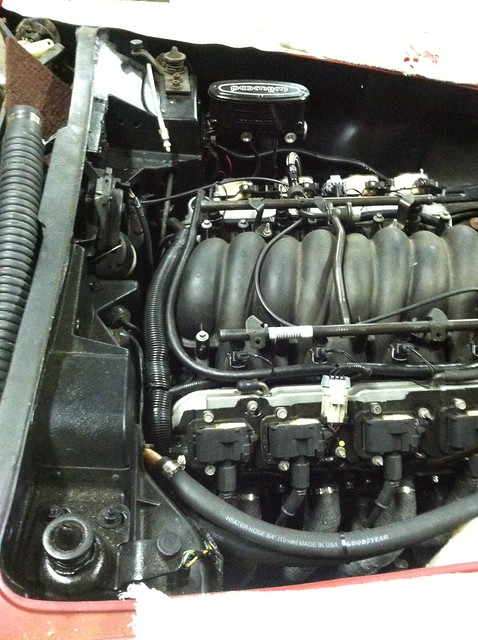
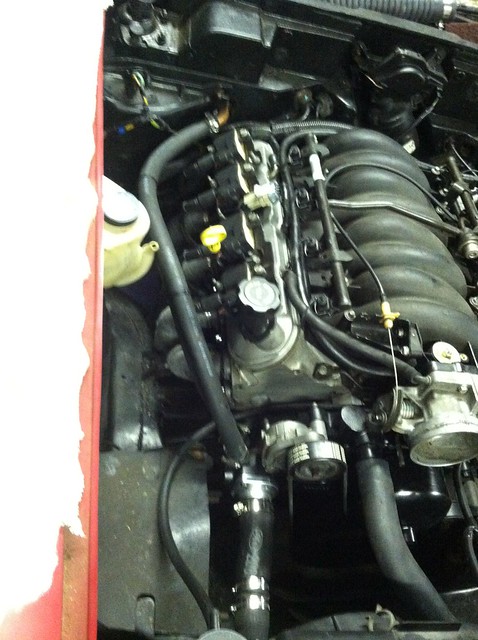
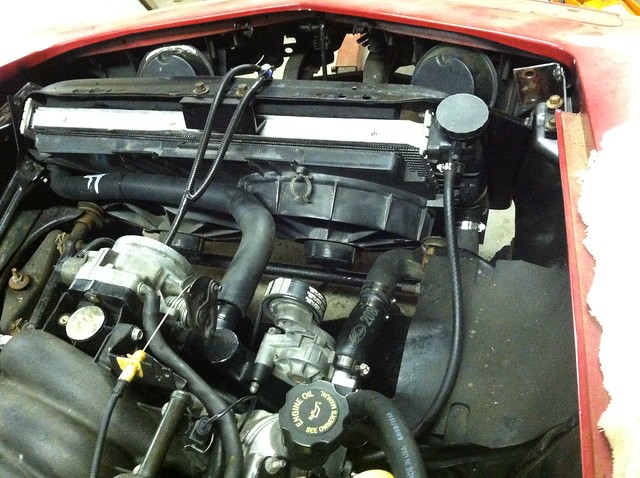
Rear of the intake clearance
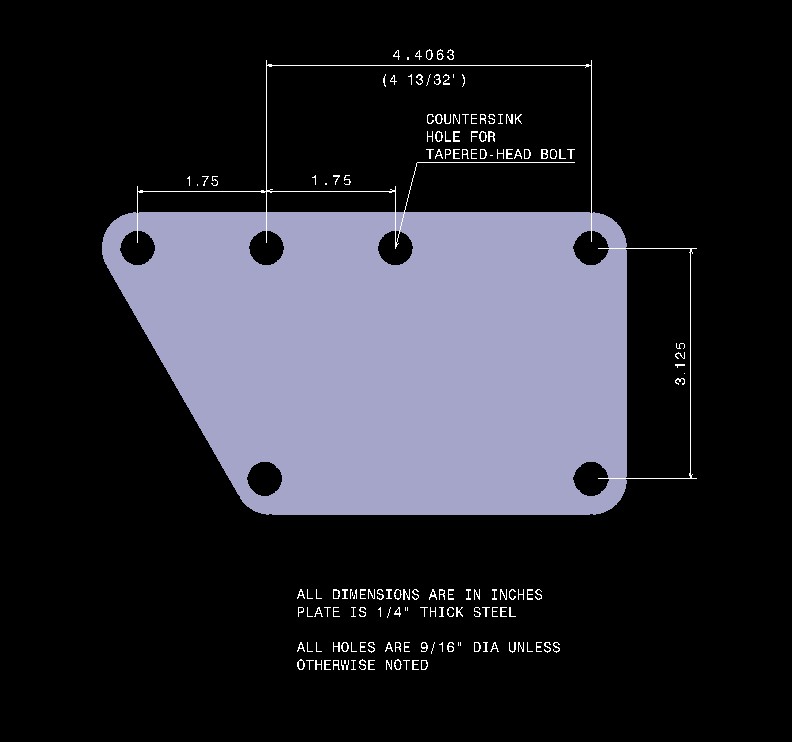
When buying mounts, look for ones to do not have the bolt holes lined up like this. The added thickness of the plate will misalign the mount to the chassis, so hole enlargement will be required. Also avoid mounts without windows because the SBC mount is not flat on the backside. Grinding will be required for these

For the trans crossmember, Im a firm supporter of build your own. Not a single one in any of the conversions Ive done, from any MFR has fit out of the box without a little help. The BTO unit we used was no different. It required some material cut off on the drivers side to clear the stock brake lines and the front of the pad needed 3/4" cut off to clear the trans case. The E-brake wheel was contacting the DS yoke. Nothing a saw and welder couldnt help, but the time spent modifying it would have been the same for modifying stock/building new from scratch, sans $200 for the defective part

Next, the DS will be too long when using a T56/4L60E in place of a 4spd/TH350/400. With a cast iron diff, T5/T56/4L60E/700R4 and 1" setback plates, the distance from diff yoke CL to tip of the output shaft is 28.5". Any competent trans/DS shop can shorten your stock DS for a decent price. A 27sp yoke with U-joint straps is also required
A T56 requires a larger shifter hole than a 4sp, so break out the saw-zall. Bear in mind the stock positive battery cable is just behind the stock opening, so move it before cutting. I discovered it the hard way
Thats it to physically get the combo into the car
The WP requires modifications as every thread about swaps will explain. The two heater core outlets need to be pulled out. A vice and pliers make short work of this. Luckily, the holes are the proper size for a 3/8 and 1/2NPT tap respectively, so plugging them is a snap. The best location I found for the new ports were just above the old location, bent about 45*. A 5/8 and 3/4 nipple from a local parts store worked just fine. For those not running a heater core, plugging the WP will cause overheating because the design constantly circulates coolant through the HC. To solve this, run a SBC t-stat as it does not seal the rear of the opening. A strait water neck is required for C3's
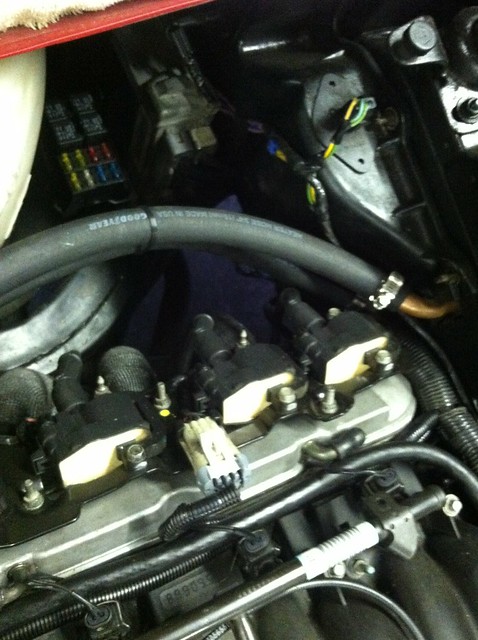
Generic heater hose, modified WP and SBC HC
With the swap, the radiator doesnt have to be removed, but why reuse 40 y/o flaky copper? This is the 90-02 Fbody radiator and stock fans. Many conversions like this one start with a Fbody donor, so why not use them?
To fit the rad, cut the lower mounts off the shroud and move them in board some to match the Fbody rad. Upper hold down is a simple fab from scrap metal. After that the fans clip onto the rad without modification
Hoses are a hot topic, so heres a final answer when using a Fbody WP and Fbody rad:
Upper 93-95 Camaro 3.4L upper. This is common on most conversions, not specifically C3
Lower 98-02 Camaro 5.7 spliced to a strait section of the C3 SBC upper
The upper hose needs a trim to clear the drivers A-arm. The lower needs the flared section cut off so its a simple Z shape. Use about 6" of the old SBC upper hose or some generic strait if you can find it. Upper WP, Rad Upper/lower are all 1.25" where the T-stat neck is 1.5"
Next, wiring
There is a member on this forum graciously sending out factory diagrams. Find the connector under the brake master and remove it. It will split into two halves, one engine, one front lights. Leave the light harness alone and focus on the engine side. For those replacing the stock gauges with electric, basically all you need are the 10ga ppl wire (starter solenoid), 10ga red (interior 12v constant) and a 12v switched any will do. For those with analog electric gauges, the LS1 oil pressure sender will drive it like stock, a 98 Fbody CTS (3 wire) has a compatible analog output for the coolant temp
Use a stand alone LS1 harness matching your combo. I built this one with 2 1/2' of PCM trunk and the fuseblock right next to it mounted low to the frame under the pass fender. There is a similar spot under the drivers fender, but the brake lines make fuse/relay access difficult. The PCM bracket is built from scrap bits of angle. No OEM PCM bracket will fit this location that Im aware of
For the clutch master, lots of people use the CK1500 unit because it mounts up nicely to the firewall and is functionally compatible to most hydraulic slaves. Now for the specifics: The rod takes 5/16" threads and a 5/16" ID female rod end work well on the clutch pedal. No parts store will carry this because hardware stores of today suck. The outlet thread is 12x1mm bubble, so order that adapter. When using the T56 HTOB, the special line has a quick connect on the end which cannot be ordered from anywhere at this time. Use the Fbody line, cut off the stock master fitting and crimp a -3 end on. There is sufficient length
Fuel system is very flexible, I prefer braided SS from tank to rail for my conversions. Using the stock tank and an inline pump with the C5 filter/regulator combo is the easiest. C3s have lots of room, so all strait fittings will work. If using the bosch 044 pump, remove the pintle valve that comes with it and replace with a union or barb. Clamping a hose directly to the barb shaped valve will burn up the pump quickly
This should save alot of headaches in the future. Feel free to add specific problems and solutions, like hose to radiator combos. One size does not fit all
Lets start with mounts. There are two main types, standard SBC and 1" setback. Both work, but you must take some things into consideration
Standard SBC mounts are a misnomer. They share the lower bolt hole from a SBC block with the lower hole of a LSx block. These actually move the bellhousing 1" forward. Theres a ton of room in the C3 engine bay, so 1" forward isnt going to throw anything out of whack
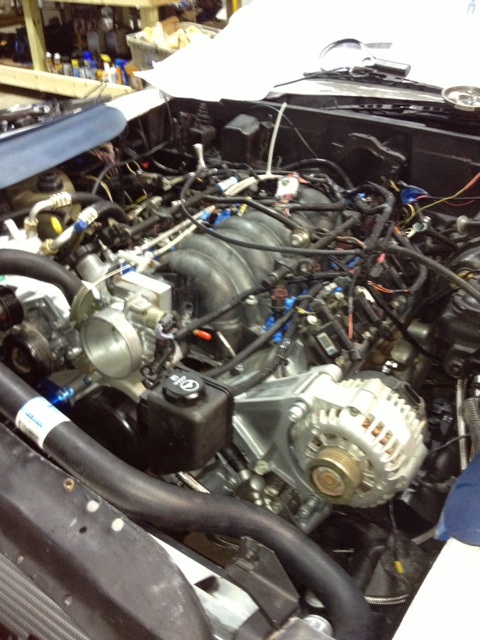
The second style is commonly called 1" setback and actually places the LSx bellhousing in the SBC position. Those reusing a stock trans/DS or want the factory Z-bar have to use this style mount. Moving the engine back gives possible clearance issues with the accessories or firewall depending on what parts are used for the build. A complete 98-02 Fbody dropout still fits this location minus AC. Those using SBC sidepipe headers on the LSx conversion will have the easiest job from this point. Heres the Fbody alt fitting snugly, but still clearing by atleast 1/4"
Rear of the intake clearance
When buying mounts, look for ones to do not have the bolt holes lined up like this. The added thickness of the plate will misalign the mount to the chassis, so hole enlargement will be required. Also avoid mounts without windows because the SBC mount is not flat on the backside. Grinding will be required for these
For the trans crossmember, Im a firm supporter of build your own. Not a single one in any of the conversions Ive done, from any MFR has fit out of the box without a little help. The BTO unit we used was no different. It required some material cut off on the drivers side to clear the stock brake lines and the front of the pad needed 3/4" cut off to clear the trans case. The E-brake wheel was contacting the DS yoke. Nothing a saw and welder couldnt help, but the time spent modifying it would have been the same for modifying stock/building new from scratch, sans $200 for the defective part
Next, the DS will be too long when using a T56/4L60E in place of a 4spd/TH350/400. With a cast iron diff, T5/T56/4L60E/700R4 and 1" setback plates, the distance from diff yoke CL to tip of the output shaft is 28.5". Any competent trans/DS shop can shorten your stock DS for a decent price. A 27sp yoke with U-joint straps is also required
A T56 requires a larger shifter hole than a 4sp, so break out the saw-zall. Bear in mind the stock positive battery cable is just behind the stock opening, so move it before cutting. I discovered it the hard way
Thats it to physically get the combo into the car
The WP requires modifications as every thread about swaps will explain. The two heater core outlets need to be pulled out. A vice and pliers make short work of this. Luckily, the holes are the proper size for a 3/8 and 1/2NPT tap respectively, so plugging them is a snap. The best location I found for the new ports were just above the old location, bent about 45*. A 5/8 and 3/4 nipple from a local parts store worked just fine. For those not running a heater core, plugging the WP will cause overheating because the design constantly circulates coolant through the HC. To solve this, run a SBC t-stat as it does not seal the rear of the opening. A strait water neck is required for C3's
Generic heater hose, modified WP and SBC HC
With the swap, the radiator doesnt have to be removed, but why reuse 40 y/o flaky copper? This is the 90-02 Fbody radiator and stock fans. Many conversions like this one start with a Fbody donor, so why not use them?
To fit the rad, cut the lower mounts off the shroud and move them in board some to match the Fbody rad. Upper hold down is a simple fab from scrap metal. After that the fans clip onto the rad without modification
Hoses are a hot topic, so heres a final answer when using a Fbody WP and Fbody rad:
Upper 93-95 Camaro 3.4L upper. This is common on most conversions, not specifically C3
Lower 98-02 Camaro 5.7 spliced to a strait section of the C3 SBC upper
The upper hose needs a trim to clear the drivers A-arm. The lower needs the flared section cut off so its a simple Z shape. Use about 6" of the old SBC upper hose or some generic strait if you can find it. Upper WP, Rad Upper/lower are all 1.25" where the T-stat neck is 1.5"
Next, wiring
There is a member on this forum graciously sending out factory diagrams. Find the connector under the brake master and remove it. It will split into two halves, one engine, one front lights. Leave the light harness alone and focus on the engine side. For those replacing the stock gauges with electric, basically all you need are the 10ga ppl wire (starter solenoid), 10ga red (interior 12v constant) and a 12v switched any will do. For those with analog electric gauges, the LS1 oil pressure sender will drive it like stock, a 98 Fbody CTS (3 wire) has a compatible analog output for the coolant temp
Use a stand alone LS1 harness matching your combo. I built this one with 2 1/2' of PCM trunk and the fuseblock right next to it mounted low to the frame under the pass fender. There is a similar spot under the drivers fender, but the brake lines make fuse/relay access difficult. The PCM bracket is built from scrap bits of angle. No OEM PCM bracket will fit this location that Im aware of
For the clutch master, lots of people use the CK1500 unit because it mounts up nicely to the firewall and is functionally compatible to most hydraulic slaves. Now for the specifics: The rod takes 5/16" threads and a 5/16" ID female rod end work well on the clutch pedal. No parts store will carry this because hardware stores of today suck. The outlet thread is 12x1mm bubble, so order that adapter. When using the T56 HTOB, the special line has a quick connect on the end which cannot be ordered from anywhere at this time. Use the Fbody line, cut off the stock master fitting and crimp a -3 end on. There is sufficient length
Fuel system is very flexible, I prefer braided SS from tank to rail for my conversions. Using the stock tank and an inline pump with the C5 filter/regulator combo is the easiest. C3s have lots of room, so all strait fittings will work. If using the bosch 044 pump, remove the pintle valve that comes with it and replace with a union or barb. Clamping a hose directly to the barb shaped valve will burn up the pump quickly
This should save alot of headaches in the future. Feel free to add specific problems and solutions, like hose to radiator combos. One size does not fit all

The following 2 users liked this post by Pocket:
Don73 (09-04-2020),
ScottEwine (02-19-2019)
08-03-2014, 12:51 PM
#2
Burning Brakes

If this is the same Pocket (and I think it is) he knows what he is talking about when it come to LS swaps. What worked for him is not the only way. He has made some great points. You can also buy adjustable adapters, but watch for thickness issues. I made my own mount brackets and put the engine exactly where I wanted it. Solid SBC motor mounts are flat on the backside, I like solid with a stock rubber trans mount. I used a late-model fuel pump module and dropped it in the stock tank. It provides extra cooling for the pump and is usually quieter, plus it has a sump to prevent fuel starvation from low tank levels or maneuvering. I used late model nylon fuel lines as it was simple, cheap, and works great on millions of late model cars. I used a factory S10 ECM bracket and mounted it behind the passenger fender well - I built the wiring harness to fit there. While we are on wiring, it is better to have an OBDII port so that you can plug in a scanner. Some purchased harnesses don't come with one. You can then get a OBDII Bluetooth adapter and view you engine pressures, temps ect. on a tablet/smartphone. I used an aftermarket clutch master cylinder, and added a pedal stop to prevent over pressuring the slave - I think it is really needed when putting together your own system from separate parts.
08-03-2014, 05:24 PM
#4
Safety Car


Member Since: May 2004
Location: los altos hills california
Posts: 3,605
Received 1,126 Likes
on
730 Posts

Looks to be a very handy thread Mr. Pocket. Here are a couple of incidentals.
spreader bar - The stock thermostat cover intersects the chassis. A straight cover is fine unless you want a spreader bar. One solution is to cut the thermostat cover very carefully and reorient and reweld it directly down, as shown.
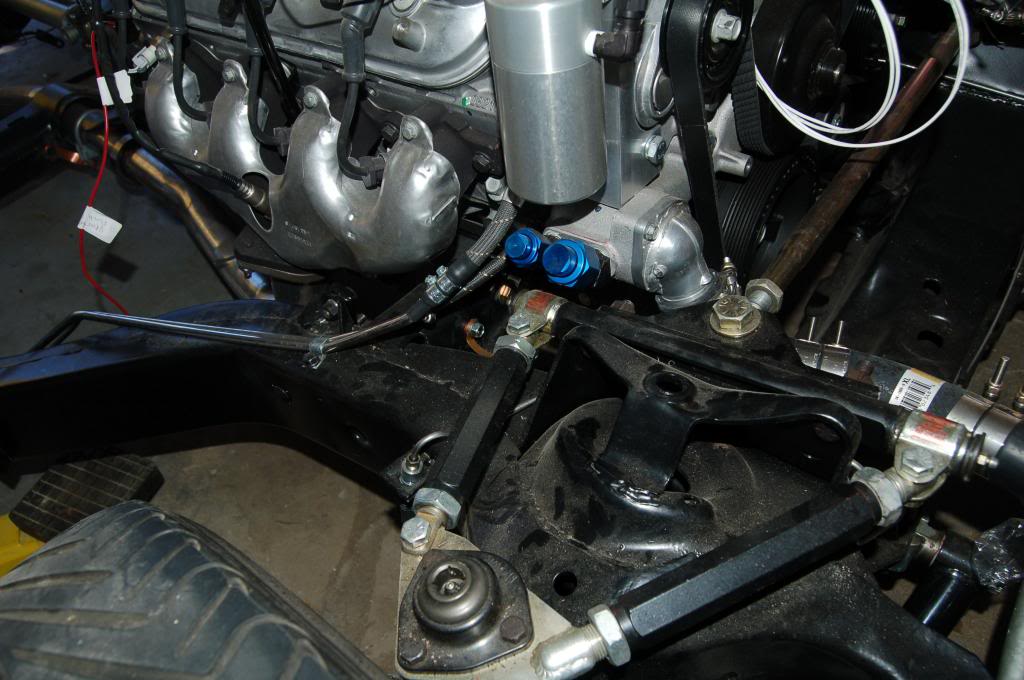
Also in the picture adjustable control arms with some judicious hacksawing and fittings give enough room to use the supplied water pump heater core outlets. Haven't seen any heating issues with these capped off for the moment.
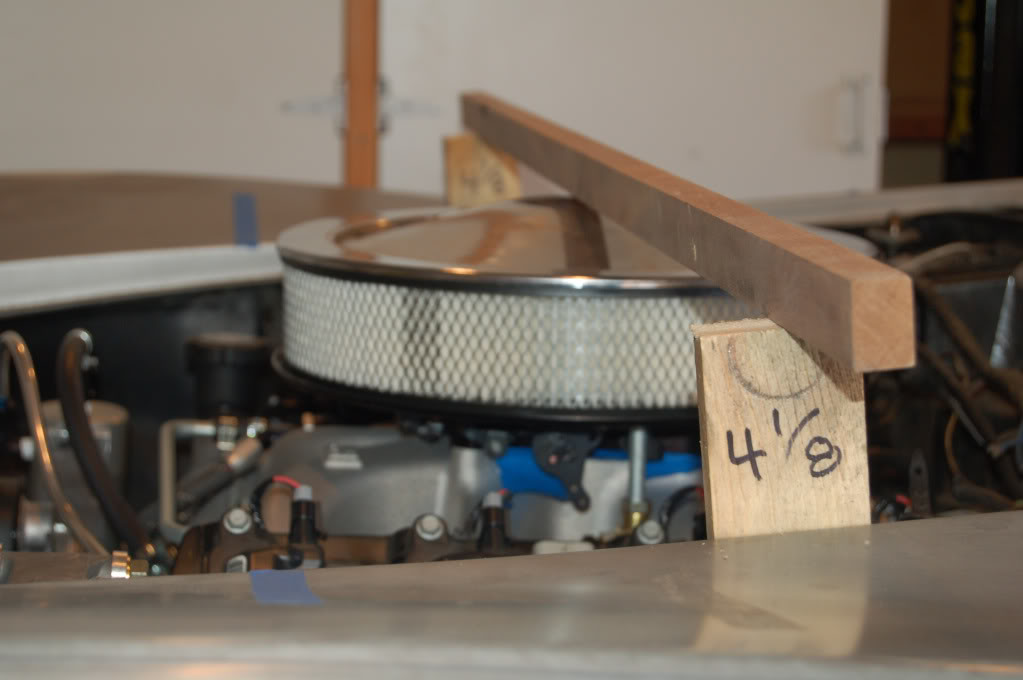
If you go carb'd, beware, you are going to need a bigger hood
I do wish somebody made an integrated mount. That would lower the motor quite a bit.
spreader bar - The stock thermostat cover intersects the chassis. A straight cover is fine unless you want a spreader bar. One solution is to cut the thermostat cover very carefully and reorient and reweld it directly down, as shown.

Also in the picture adjustable control arms with some judicious hacksawing and fittings give enough room to use the supplied water pump heater core outlets. Haven't seen any heating issues with these capped off for the moment.
If you go carb'd, beware, you are going to need a bigger hood

I do wish somebody made an integrated mount. That would lower the motor quite a bit.
 08-05-2014, 08:52 AM
#5
Burning Brakes

When it comes to the accessories brackets I used the ones made by Holley. They have a great finish and they fit very well with very minor modifications. I had to modify my water pump fittings to clear the upper arms. I stayed with my 2004R tranny so had to use a cable Throttle body for the TV cable.
I also converted my steering to the borgeson while I had the engine out. No more leaky hoses.
Currently I am looking for some engine covers to dress up the engine bay. The brake booster and my sanden AC are going to require some creative covers. Here is my current set up and I had to add an extension bar to the fuel rails to get the current C5 covers to snap in place and they sit up to tall. I installed a LQ9 and kept the truck coils in stock location.


Last edited by donnie1956; 08-05-2014 at 09:02 AM.

 03-12-2016, 04:21 PM
#8
Race Director


Which accessory orientation is best, alternator high/PS pump low, or alternator low/PS high.
Are there any front accessory setups that do NOT require a smaller pulley?
Are there any front accessory setups that do NOT require a smaller pulley?
03-13-2016, 02:21 PM
#10
Melting Slicks

This is a good thread. Heed Pockets description of the mounts and understand it. Years ago when I did my 6.0 conversion in my '65 I had my engine mounted with these incorrect mounts only to realize the BS AFTER I built my headers. To this day my headers are too close to my steering box after I got DD slider mounts and moved the engine 1 inch back to where it belongs - so my drive shaft fits and I can use my stock clutch linkage and trans mount. For the life of me I don't know why so many manufacturers call these mounts "Stock Position Mounts". I can only surmise that one company originally made them the rest copied them and still make them that way to this day. If I ever have a chance to tear in to a manufacturers rep on these mounts I take full advantage.
I don't know why so many recommend using Hyd clutch actuation when the reliable original mechanical linkage is so easily retainable with the Scoggins Dickey cross shaft bracket.
I don't know why so many recommend using Hyd clutch actuation when the reliable original mechanical linkage is so easily retainable with the Scoggins Dickey cross shaft bracket.
Last edited by 00fxd; 03-13-2016 at 02:26 PM.
03-14-2016, 11:05 AM
#12
Burning Brakes
The same could be said for putting a carb on an LS - nothing wrong with it - just many would rather have the injection.
03-14-2016, 12:43 PM
#13
Melting Slicks
Hey 74.
I think one could do the mech linkage with a 5spd. I have a muncie/mech linkage behind my 6.0L. using an adapting LS bellhousing with/oil pan bolts, and a keisler flywheel for an LS that allows me to use a conventional[less expensive] clutch. I think conventional Bellhousings and LS Bellhousings have the same depth. Some early 6.0's have a shorter crank requiring a spacer.
I think some guys have used the conventional bellhousing leaving a bolt out but I liked the idea of an LS Bell with the full circle bolts [to the pan].
Regards, Frank
Last edited by 00fxd; 03-14-2016 at 12:43 PM.
07-25-2016, 06:43 AM
#14
Instructor

[QUOTE=Pocket;1587507803]This thread is to go over common issues that arent covered by most threads to hopefully save future conversions a million trips to the parts store
Lets start with mounts. There are two main types, standard SBC and 1" setback. Both work, but you must take some things into consideration
Standard SBC mounts are a misnomer. They share the lower bolt hole from a SBC block with the lower hole of a LSx block. These actually move the bellhousing 1" forward. Theres a ton of room in the C3 engine bay, so 1" forward isnt going to throw anything out of whack
The second style is commonly called 1" setback and actually places the LSx bellhousing in the SBC position. Those reusing a stock trans/DS or want the factory Z-bar have to use this style mount. Moving the engine back gives possible clearance issues with the accessories or firewall depending on what parts are used for the build. A complete 98-02 Fbody dropout still fits this location minus AC. Those using SBC sidepipe headers on the LSx conversion will have the easiest job from this point. Heres the Fbody alt fitting snugly, but still clearing by atleast 1/4"
Rear of the intake clearance
[img]https://farm3.staticflickr.com/2906/14631640628_8573d92c73_z.jpg[/
When buying mounts, look for ones to do not have the bolt holes lined up like this. The added thickness of the plate will misalign the mount to the chassis, so hole enlargement will be required. Also avoid mounts without windows because the SBC mount is not flat on the backside. Grinding will be required for these
Thanks for a great post...I have a quick question...I am putting a 2001 Tahoe engine in a 78. I plan to use the Tahoe trans (4L60E) Do you recommend the 1" setback engine mounts or the other? I figure it's kinda easy to have the DS cut down but I wasn't sure which mount would provide for an easier installation overall.
I know this is an old thread so any comments welcome!
Thanks again!
07-25-2016, 07:07 PM
#15
Melting Slicks
1" foreword can throw a LOT of stuff out of whack. Trans mount, drive shaft length, clutch linkage - why dick around? Just put the engine where it belongs using the 1" "set back" mounts. My theory is that back then, one guy made a set of [stock position] mounts wrong, and everyone else copied them. Those guys calling them stock position need a kick in the crotch. Screwed me up good - I discovered that B.S. AFTER I made my headers. Eventually it was deemed that some 1" setback mounts were necessary and started making them.
Last edited by 00fxd; 07-25-2016 at 07:09 PM.
07-26-2016, 06:22 AM
#16
Instructor
1" foreword can throw a LOT of stuff out of whack. Trans mount, drive shaft length, clutch linkage - why dick around? Just put the engine where it belongs using the 1" "set back" mounts. My theory is that back then, one guy made a set of [stock position] mounts wrong, and everyone else copied them. Those guys calling them stock position need a kick in the crotch. Screwed me up good - I discovered that B.S. AFTER I made my headers. Eventually it was deemed that some 1" setback mounts were necessary and started making them.
07-26-2016, 09:49 AM
#17

1" foreword can throw a LOT of stuff out of whack. Trans mount, drive shaft length, clutch linkage - why dick around? Just put the engine where it belongs using the 1" "set back" mounts. My theory is that back then, one guy made a set of [stock position] mounts wrong, and everyone else copied them. Those guys calling them stock position need a kick in the crotch. Screwed me up good - I discovered that B.S. AFTER I made my headers. Eventually it was deemed that some 1" setback mounts were necessary and started making them.
If you know for sure you want a specific setback, get those, but if you are unsure, there are various places that make combo mounts that allow you to put the engine in the stock location or 1" forward all on the same mount. Lets you play with things if you need it. I'm not sure there is a "best" mount. It all depends on what you want. Steel, aluminum, how its finished, etc.
07-26-2016, 10:02 AM
#18
Melting Slicks
So call them 1" forward mounts then. Simple.
I didn't say that I though that they were a bad idea. When modifying options are good. But when they are incorrectly described .....
I didn't say that I though that they were a bad idea. When modifying options are good. But when they are incorrectly described .....
Last edited by 00fxd; 07-26-2016 at 10:51 AM.
07-26-2016, 11:00 AM
#19
Well they aren't incorrectly described either. The LS block is shorter than a SBC block (if you look at the dimensions, the rear end is shorter). The "stock" location mounts put the block in the same position. Since the block is shorter in the rear, the rear is further forward than a SBC, but still in the stock location (of the block relative to the mounts). So if you want to keep the rear of the block in the same spot, you need to move the block 1" rear.
I agree its confusing, but it is accurate.
I agree its confusing, but it is accurate.
07-26-2016, 01:27 PM
#20
Melting Slicks
IMO they are incorrectly described. The rear of the block is the bellhousing surface. These mounts move the rear of the block and all mounting surfaces 1" foreword screwing everything up as I noted in post #15. It serves no purpose calling it the stock location as you describe.