When you click on links to various merchants on this site and make a purchase, this can result in this site earning a commission. Affiliate programs and affiliations include, but are not limited to, the eBay Partner Network.
Holley 4175 or find a rebuildable qjet core to send to Lars
Thanks. I will return the Edelbrock and get a Holley 4175. Just want to make sure that is the right one to get or is there another model that will work better or easier?
I am in a holding pattern for now with this information. Probably not going with the edelbrock unless a performer intake would solve anything? More than likely a new holley carb would be a better solution solution because they work better than edelbrock or they connect to the vacuum lines better and work better with the intake/air cleaner clearance? What is the difference? A rebuilt qjet would be the best but I would probably need a new core from somewhere. This is what I am understanding. Just weighing options at this point.
The good news is, you don't have to worry about emissions in New Jersey:
Historic vehicles
General inspections are not required for historic or collector vehicles. To be classified as a "historic vehicle" it must be: At least 25 years old
Specially registered and display QQ plates
Collector vehicles
To be classified as a "collector vehicle" you need to apply when you register and make sure that the vehicle: Is not registered as a "historic vehicle" or a "street rod"
Is not driven more than 3,000 miles per year
Is insured as a limited use "collector vehicle"
You can lose all your emissions stuff easily. You can buy replacement fittings without the sensor bosses, or simply plug them.
If you want to be conservative, and save a few dollars, you could get a Holley 600 cfm from the Holley Refurb shop. They come with complete factory warranties and great prices.
Dont' get me wrong, the 4150 is great, and you may want to bump up at some point, but a stock 77 probably doesn't need more than the 600.
I ran one of these on my 383 for years with no problem, then sold it for $100.00 and moved up to a 670 Street Avenger.
http://www.ebay.com/itm/Holley-0-80457SA-600CFM-4bbl-Factory-Refurbished-ALUMINUM-Carb-Electric-Choke-/281504455168?hash=item418af91a00&vxp=mtr
If you combine the above carb with a Performer Manifold you will realize a great improvement and spend a lot less money.
The good news is, you don't have to worry about emissions in New Jersey:
Historic vehicles
General inspections are not required for historic or collector vehicles. To be classified as a "historic vehicle" it must be: At least 25 years old
Specially registered and display QQ plates
Collector vehicles
To be classified as a "collector vehicle" you need to apply when you register and make sure that the vehicle: Is not registered as a "historic vehicle" or a "street rod"
Is not driven more than 3,000 miles per year
Is insured as a limited use "collector vehicle"
You can lose all your emissions stuff easily. You can buy replacement fittings without the sensor bosses, or simply plug them.
If you want to be conservative, and save a few dollars, you could get a Holley 600 cfm from the Holley Refurb shop. They come with complete factory warranties and great prices.
Dont' get me wrong, the 4150 is great, and you may want to bump up at some point, but a stock 77 probably doesn't need more than the 600.
I ran one of these on my 383 for years with no problem, then sold it for $100.00 and moved up to a 670 Street Avenger.
Thank you for the advice, much appreciated. I am learning now. The 4160 and a performer intake is the combo I will go with. Is there anything else I will need to get it installed, like a throttle cable kit for the carb and gasket sealer for the intake?
When you say I won't have to worry about emission in NJ, where it will be registered, do I have to get a special license plate to not have to worry about emissions?
If you buy the carb from the refurb shop it will come complete with instructions and all parts you need.
You may need to purchase a vacuum take off for your headlights that screws into the manifold.
You also need to decide if you want to keep the EGR valve and emissions. As stated in an above post, these items are not needed in your car. But you will need to block them off.
A Performer intake will fit under a stock hood but you may need to purchase a drop base air filter. Also, a performer RPM will fit, but you will definitely need a drop base air filter and 2 inch element.
If you purchase the Holley Square Bore, make sure you get a manifold with a square bore and the fit will be just fine.
I had this same 4160 carb mounted on a 383 only with a Performer Air Gap. This manifold WILL NOT fit under your hood without modification.
I am also not running pop up lights. So you would have to add a manifold vacuum takeoff.
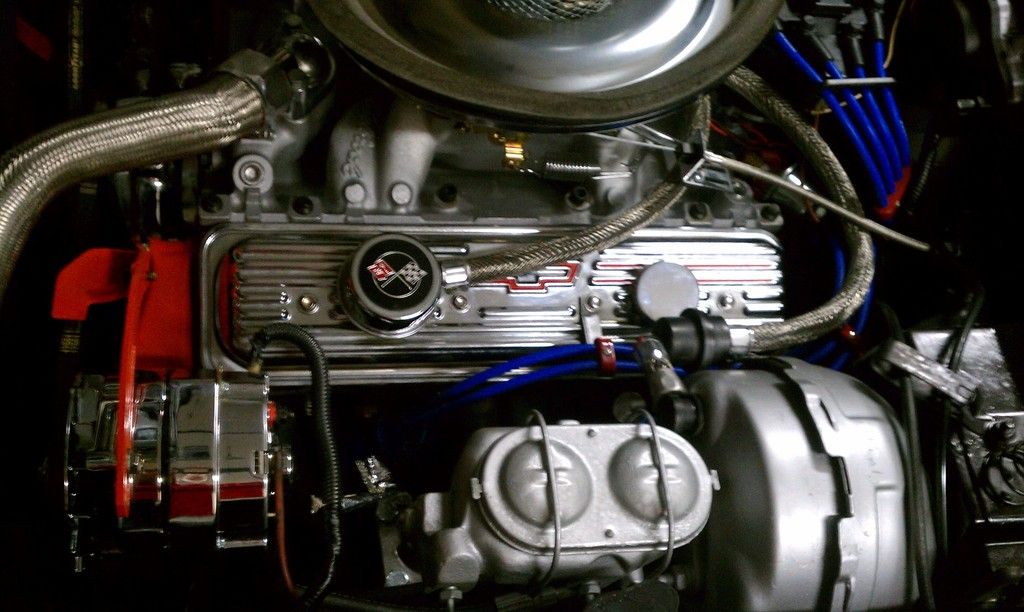
You can see the vacuum boss on the manifold behind the carb. It has the black hose for the heater vacuum controls. Behind, and on, the carb is where the PCV valve connects. There is vacuum advance line off the right side of the carb, and a power brake line on the bottom. I'm not using that one in the picture. The instructions with the carb will show you all that. The red wire is the electric choke. I connected this to the fuse box under the dash.
The pressure gauge came with the kit and is more for looks than anything else. It does show my 6-7 lbs of pressure.
Awesome engine bay commander_47!!! Thank you for the advice, on the connections especially.
I am headed to pep boys within the hour to purchase the holley 4160 and the edelbrock 2701. Is there anything else I will need, for the throttle linkage, air cleaner or manifold?
I will look for the manifold source vacuum take off. I may just have to see how things fit and then decide on the new air cleaner.
BTW Commander... I was wondering if your brake master cylinder and power brake booster are painted? Mine rusted within a year.
I went ahead and replaced my throttle cable with a universal one from Summit that I cut to length. The stock cable was too long with the new carb and I didn't like it. They are cheap and I felt better replacing it anyway.
Yes, I painted the brake booster and cylinder. You have to really clean ALL the grease off them. I used a rust proof paint. And I am diligent at keeping the motor clean.
Actually this motor went through some changes last year. It looks a little different now.
You can see the throttle bracket and springs I reference above. Also the new throttle cable. The carb on the car in this picture is a 670 Street Avenger.
Headed out now and I will look for those extra parts. Thanks again. I am on to the radiator project next after the carb which just came in the mail. Woohoo
Was wondering what transmission I have so I can determine what throttle cable bracket to get for the holley 4160. The video link above shows the correct bracket for the tranny.
It is an automatic. Would that be a th-350 or th-400 or a 700r4 transmission for a 77 or do I have to look under the car or in the engine bay somewhere?
So I got everything installed and running ok. I do have a few problems I was hoping to get some more advice on.
1) When I put the car in gear with the brake on, it wants to stall unless I double pedal it a little bit. It also seems to bang in gear. I will try to set the idle higher but it will bang in gear harder. Is this normal or bad? My tach stopped working so I am not sure exactly what it is idling at, but it sounds high to me. I can set it lower but it will stall in gear.
2) How do I get the tach working? The tachometer was working before I started this project.
3) My friend and I did a general timing on it last night, but I know that it is wrong because we used the wrong wire with the timing gun due to a mislabeling on my part so I will do that again on the 8 plug wire. The part I am concerned about is the distributer install I did which my not have been in the exact gear slot ( one tooth off) and did not seat all the way down. It seems to start up right up, except when I stall it and it stalls because I have it in gear with the brake on and the idle drops. I am not sure that anything is wrong or right for that matter. Just looking for some thoughts on the timing/distributer install.
4) My alternator belt squeals at a higher rpm and it starts getting a little jumpy. It might be fine after warming up, but it squeals and jumps. I checked the adjuster arm to tighten it and it seems that it is out of adjustment and cannot get any tighter. Probably need a shorter belt by a couple of inches or a bigger alternator pulley. Looks like an aftermarket chrome alternator was installed (looking at the previously posted pictures) with maybe a smaller pulley?
5) Another question I had was what to do about the exhaust crossover which I disabled by removing the vacuum emission devices. Do I need to wire it open?
I already posted a reply (or thought I did???) to some of the above.
The tach attaches to the Distro thusly. The brown wire from the tach filter goes to the left side of distro, then the filter must be grounded, then the white wire goes to the tach. You should have plugs on the tach wire and filter that only connect one way:
With your HEI distro it doesn't matter which wire it is timed to, as long as plug number one is where you set the timing. So being off a tooth doesn't matter.
You should have a large vacuum port at the bottom front of the carb for the PCV valve, and one in the back for the power brakes.
I'm not sure about the trans clunk.
Last edited by commander_47; 04-17-2015 at 09:00 AM.
When you say I won't have to worry about emission in NJ, where it will be registered, do I have to get a special license plate to not have to worry about emissions?
You asked this a while back. To avoid inspection entirely, register the car as "historic". You will get plates that start with QQ. I have my car registered this way. You need to provide front and side pictures of the car when you register. Must look reasonably stock - at least in the pics.
Commander_47, Here is what I am working with. I believe I just need to connect the cut wire to the tach wire to fix it.
When I set the timing, do I set it at idle with the distributor vac advance disconnected? And when I set it, do I set the zero to the bottom biggest arrow? Also there is a note under the hood to set the timing using the #8 spark plug.
The problem with historic registration is that it has restrictions, like after dark.
Wow, that looks much nicer. What a difference. So much cleaner.
Like I said above, that brown wire should come from the tach filter, to the distro. The white wire from the other side of the filter should plug into the harness to the tach. Looks like someone cut the end off of your tach filter wire. It is an easy replacement at Autozone or someplace like that.
It may work without the filter, but eventually it will bounce and flutter if you don't use it. Also, if that filter isn't attached to a grounded spot the tach will bounce.
The fan is attached to the water pump. Four bolts. It is a little hard to get to, so be careful. Fan might want to turn if you don't use another wrench to hold it.
Time it idling with the vacuum unplugged. Put it in park and aim the strobe at the crank and see where its lighting up. 8-12 is normal for a stock 350.
It is much easier and nicer if you have one of the new digital timing lights. I use the strobe and a little seat of the pants listening. Make sure it isn't knocking.
You may want to remove that air plenum across the top of the radiator. the car will want to run a little warm if air is escaping over the top of the radiator and not through it.
I used a piece of aluminum angle and cut and fit it across the top and sealed it with a piece of split a/c tubing.
You may want to remove that air plenum across the top of the radiator. the car will want to run a little warm if air is escaping over the top of the radiator and not through it.
I used a piece of aluminum angle and cut and fit it across the top and sealed it with a piece of split a/c tubing.

 03-23-2015, 07:59 PM


 ) to some of the above.
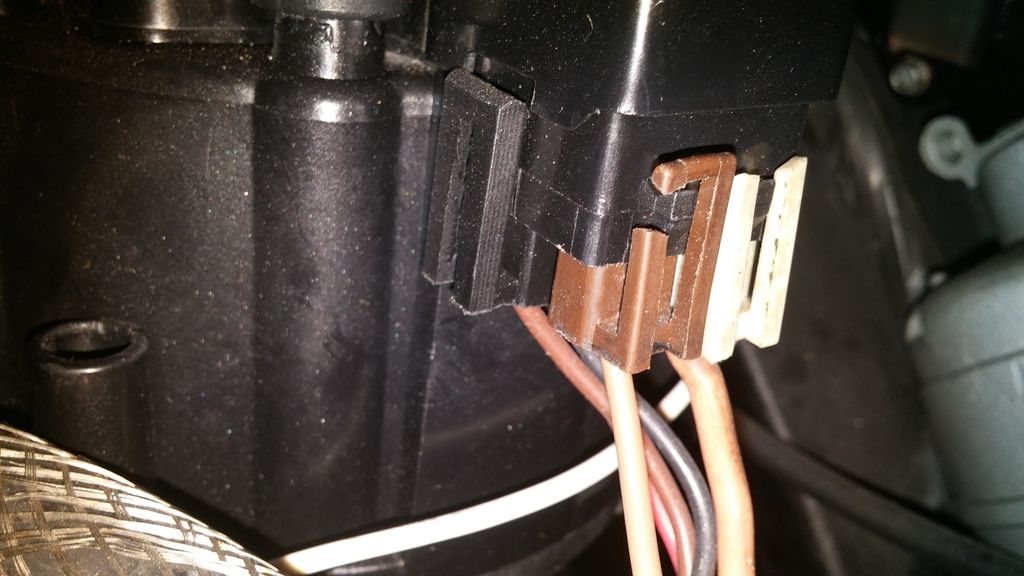


 Oh, btw, while you are there....


