
Adjustable brake proportioning valve, and our none adjustable one.
 07-10-2015, 04:41 AM
#1
Race Director


Thread Starter

Ok.... Maybe the stock proportioning valve is set up correctly with a stock set of tires and stock rotors and all that....
But it is just in no way correct for, at least my car, when it comes to equally, or that is to say better, Correctly... applying the correct amount of stopping to the rears.
The front lock up way to easy and the rears just do not do there job..
My setup is 18X8 and 19X10" rimes F/R running 14" Wilwood brakes all around. Wildwood M/C, Hydroboost assist, bradded flex lines.
I can slam on the brakes... lock up those fronts no problem... but you can just feel, the rears are not even close...
So, I want to get an adjustable proportioning valve... Those that have gone down this road, which one was best for you? We have a duel bowl M/C ,,
http://www.jegs.com/i/Heidts/164/DR-...ductId=1695914
Last edited by pauldana; 07-10-2015 at 06:10 AM.


 07-10-2015, 09:59 AM
#3
Nam Labrat


Member Since: Sep 2013
Location: New Orleans Loo-z-anna
Posts: 33,897
Received 4,174 Likes
on
2,736 Posts

Rookie here.....does your car have a prop. valve......or is it the OEM "distribution block" that you are looking at?
The distribution block is a safety device in case the front or rear system loses fluid.......the centering piston can sometimes move/get stuck "off center" inside the block and cause the rear brakes to NOT work well or at all.
The dist. block needs to be checked or cleaned out or rebuilt FIRST in order for an add-on device to work correctly....I have pics in my thread of rebuilding a faulty distribution valve on my '68 project.
07-10-2015, 11:39 AM
#4
Race Director
Thread Starter
Rookie here.....does your car have a prop. valve......or is it the OEM "distribution block" that you are looking at?
The distribution block is a safety device in case the front or rear system loses fluid.......the centering piston can sometimes move/get stuck "off center" inside the block and cause the rear brakes to NOT work well or at all.
The dist. block needs to be checked or cleaned out or rebuilt FIRST in order for an add-on device to work correctly....I have pics in my thread of rebuilding a faulty distribution valve on my '68 project.
The distribution block is a safety device in case the front or rear system loses fluid.......the centering piston can sometimes move/get stuck "off center" inside the block and cause the rear brakes to NOT work well or at all.
The dist. block needs to be checked or cleaned out or rebuilt FIRST in order for an add-on device to work correctly....I have pics in my thread of rebuilding a faulty distribution valve on my '68 project.
07-10-2015, 11:39 AM
#5
Le Mans Master

 There is no proportioning valve.
07-10-2015, 11:48 AM
There is no proportioning valve.
07-10-2015, 11:48 AM
#6
Race Director
Thread Starter
I race this car, along with 5 other vettes 4-5-6's I am fully aware of the concerns of rear wheel lock up... I am also fully aware of how it should feel out of the rear because of this experience of racing my other vettes as well... so...I am trying to get some more braking out of the back, and an adjustable unit should give me this ability and 1-2 days on the track should give me the time to tune it in correctly... so i am asking other experienced C3 racers, what they have done to get a better mix of stopping on all 4 wheels. My back tires are 3" wider then the fronts, they can do a little more work than they used to do on the stock junk size tires. I am nearly 50/50 weight ratio and just around 3000lbs.. and yes.. 79's are also a proportioning valve...
07-10-2015, 11:59 AM
#7
Le Mans Master
Yeah, Ecklers list a proportioning valve, or at least what they're calling a proportioning valve for 78-82's. Of course they're also calling the distribution block for 69's proportioning blocks, and we all know that they're not.
07-10-2015, 12:03 PM
#8
Race Director
Thread Starter
Any other racers have any experience with the adjustable blocks?
Also, on the later blocks, i.e. 79, does anyone know the proportioning value?
07-10-2015, 12:07 PM
#10
Race Director
Thread Starter
not in a million years... mine works amazing.... my 2 boys race as well, and we all 3 agree, the hydroboost gives the best peddle feel amongst all our race vettes.... Danny drives a 427 C5 Guldstarnd, Chris a highly modified C4.. then we have the more stock C5 and the C6ZO6...
07-10-2015, 12:10 PM
#11
Race Director
not in a million years... mine works amazing.... my 2 boys race as well, and we all 3 agree, the hydroboost gives the best peddle feel amongst all our race vettes.... Danny drives a 427 C5 Guldstarnd, Chris a highly modified C4.. then we have the more stock C5 and the C6ZO6...
so amazing you want to reduce pressure to the front with a proportioning valve...
07-10-2015, 12:11 PM
#12
Melting Slicks

I have used both of these style proportioning valves under race conditions ( not a corvette)
http://static.summitracing.com/globa...60-8420_ml.jpg
https://encrypted-tbn1.gstatic.com/i...WOlJxMp3EnhHlA
and I definitly prefered the adjustable **** type over the lever type. I found the finer adjustment of the **** type better to dial in your car.....plumb it so it's easily accessable.
http://static.summitracing.com/globa...60-8420_ml.jpg
https://encrypted-tbn1.gstatic.com/i...WOlJxMp3EnhHlA
and I definitly prefered the adjustable **** type over the lever type. I found the finer adjustment of the **** type better to dial in your car.....plumb it so it's easily accessable.
07-10-2015, 12:16 PM
#13
Race Director
Thread Starter
I have used both of these style proportioning valves under race conditions ( not a corvette)
http://static.summitracing.com/globa...60-8420_ml.jpg
https://encrypted-tbn1.gstatic.com/i...WOlJxMp3EnhHlA
and I definitly prefered the adjustable **** type over the lever type. I found the finer adjustment of the **** type better to dial in your car.....plumb it so it's easily accessable.
http://static.summitracing.com/globa...60-8420_ml.jpg
https://encrypted-tbn1.gstatic.com/i...WOlJxMp3EnhHlA
and I definitly prefered the adjustable **** type over the lever type. I found the finer adjustment of the **** type better to dial in your car.....plumb it so it's easily accessable.
http://www.jegs.com/i/Heidts/164/DR-...ductId=1695914
07-10-2015, 12:18 PM
#14
Race Director
Thread Starter
or this one:
Designed for dual bowl master cylinders and incorporates an adjustable proportioning valve and a distribution block into one unit. Precision machined from billet aluminum and available with a black anodize or polished finish. Each style features the distinctive JEGS logo. Features a rotary adjustment valve with directional arrows for fine incremental adjustments to reduce or increase the front to rear bias, two inlets from the master cylinder, two outlets to the front brakes and 1 outlet to the rear brakes to distribute fluid to all four wheels. Includes five stainless steel fittings for 3/16" brake line, brake light switch and wiring pigtail. Conveniently mounts in any location.
Note: Not designed as a direct replacement for factory style blocks, some line modifications may be necessary.
http://www.jegs.com/i/JEGS+Performan...63025/10002/-1
C) Switch Connections continued
2) Your brake lights should already be connected to a chassis ground. The switch supplied will be used to send power to the brake lights when pressure is applied to the brake
system.
3) Connect the orange wire of the supplied pig tail to a fused constant 12V power supply. A 15-amp circuit should be appropriate for most vehicles.
4) If your vehicle has separate circuits for the brake lights and turn signals, then the white wire of the pig tail can be extended to the back of the vehicle and used to power the brake light pig tails in the tail lights. If your vehicle uses the same circuit for brake lights and turn signals, then the white wire will be run to your turn signal switch. Refer to the wiring diagram for your specific turn signal switch for the proper connections.
D) Brake Bleeding
1) After the installation of the Prop Block is complete, it will be necessary to bleed the brake system.
2)If the master cylinder is new or went dry at any time during the installation, begin by bench bleeding the master cylinder.
3) Continue the bleeding process by gravity bleeding the caliper or wheel cylinder at each wheel until no air bubbles are seen in the escaping brake fluid. Start with the wheel farthest from the master cylinder and work your way closer bleeding each wheel. Never let the master
cylinder go dry at any time during this process.
4)With all the bleeding complete, a firm consistent pedal feel should be achieved. If the vehicle already had a functioning brake system prior to the installation of the Prop Block, there should be no significant change in the pedal feel.
5)With all bleeding complete, check all the fittings for leaks and tighten as necessary.
E) Proportioning Valve Adjustment
1) The proportioning valve in the Prop Block will be used to adjust the rear brake pressure of the vehicle. The objective is to balance the pressure of the rear brakes to the front so that under hard braking, the rear brakes do not lock up before the fronts.
2)Start with the valve in the full increase position by turning the **** all the way out in a clockwise rotation.
3) Find a safe open area such as parking lot and make several hard stops from 30 M.P.H. observing the function of the rear brakes. If the rear brakes lock up well before the front, begin to decrease the rear brake pressure by turning the **** in a counter clockwise rotation. Continue these adjustments until the proper balance is found.
4)When you have found the proper adjustment for your vehicle try the test again at 50 M.P.H. and make any further adjustments as necessary.
Last edited by pauldana; 07-10-2015 at 12:21 PM.
07-10-2015, 12:23 PM
#15
Race Director
Thread Starter
When we change the tires like this on these cars, the stock biasing is completely wrong.
A little off topic,, video of my fathers day run this year... below is a cut and past from another thread...
Here's a video I finished last night. It's all my gopro footage at 1000% speed , so I could bring the video down to 14 minutes. There's a winding part in the middle where I put it at 500% and kept the sound because it was cool.
Also I slowed it down for a certain cop pulling over a certain corvette.
10min 12sec in
A little off topic,, video of my fathers day run this year... below is a cut and past from another thread...
Here's a video I finished last night. It's all my gopro footage at 1000% speed
, so I could bring the video down to 14 minutes. There's a winding part in the middle where I put it at 500% and kept the sound because it was cool. Also I slowed it down for a certain cop pulling over a certain corvette.
10min 12sec in
Last edited by pauldana; 07-10-2015 at 12:26 PM.
07-10-2015, 12:45 PM
#16
Safety Car

Member Since: May 2004
Location: los altos hills california
Posts: 3,609
Received 1,126 Likes
on
730 Posts

I don't know if you saw my post on bleeding Wilwood rear calipers but in there I elaborated like you on the fronts doing all the work and locking up well before the rears.
https://www.corvetteforum.com/forums...ar-brakes.html
I proposed dialing down the fronts and got "OMG are you crazy?" sort of a response. I have manual brakes and measured the pressures. Only gets to about 700 psi fronts and rears pressing pretty hard while on the lift. I decided I didn't yet want to deal with all the plumbing and with being on the low end of hydraulic pressure. So prior to reducing the front pressures I would try different compounds front and rear. I have Hawk HP+ pads all around. If you look at their compound graph
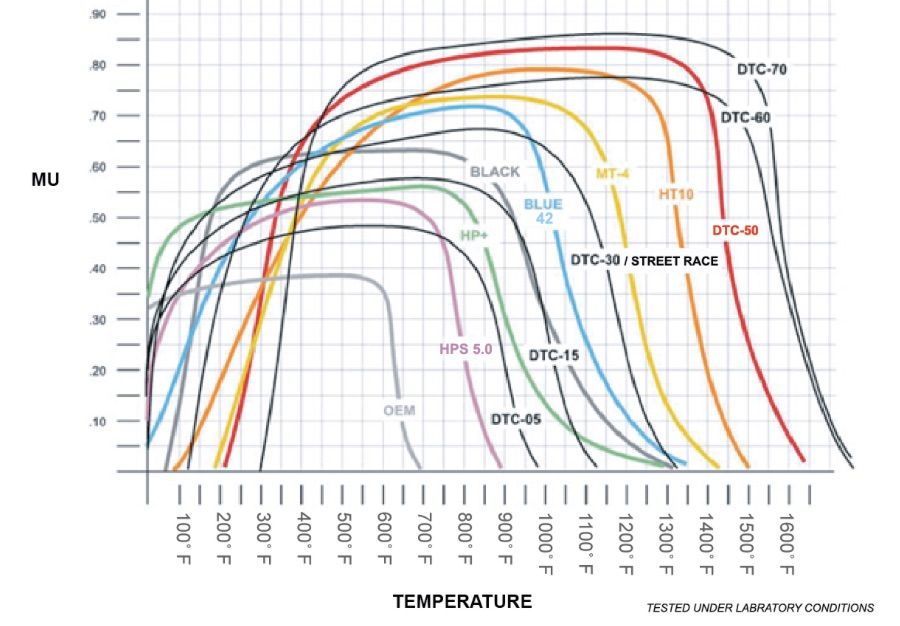
there is a friction difference between HPS 5.0 and HP+ down at the lower temps. I don't yet know what my autocross temps are but I am thinking they are not all that hot and I might be able to exploit the differences at the lower temp ranges by putting the HPS 5.0 on the fronts. We'll see, but I'll be watching your thread here. Of course the results are application dependent.
07-10-2015, 02:54 PM
#17
Tech Contributor
Member Since: Jun 2004
Location: I tend to be leery of any guy who doesn't own a chainsaw or a handgun.
Posts: 18,355
Received 768 Likes
on
550 Posts
Ok.... Maybe the stock proportioning valve is set up correctly with a stock set of tires and stock rotors and all that....
But it is just in no way correct for, at least my car, when it comes to equally, or that is to say better, Correctly... applying the correct amount of stopping to the rears.
The front lock up way to easy and the rears just do not do there job..
My setup is 18X8 and 19X10" rimes F/R running 14" Wilwood brakes all around. Wildwood M/C, Hydroboost assist, bradded flex lines.
I can slam on the brakes... lock up those fronts no problem... but you can just feel, the rears are not even close...
So, I want to get an adjustable proportioning valve... Those that have gone down this road, which one was best for you? We have a duel bowl M/C ,,
http://www.jegs.com/i/Heidts/164/DR-...ductId=1695914
But it is just in no way correct for, at least my car, when it comes to equally, or that is to say better, Correctly... applying the correct amount of stopping to the rears.
The front lock up way to easy and the rears just do not do there job..
My setup is 18X8 and 19X10" rimes F/R running 14" Wilwood brakes all around. Wildwood M/C, Hydroboost assist, bradded flex lines.
I can slam on the brakes... lock up those fronts no problem... but you can just feel, the rears are not even close...
So, I want to get an adjustable proportioning valve... Those that have gone down this road, which one was best for you? We have a duel bowl M/C ,,
http://www.jegs.com/i/Heidts/164/DR-...ductId=1695914
I put more bias on the rear by changing caliper piston sizes relative to the factory sizes. Mine slows/stops damn quick and straight.
07-10-2015, 03:06 PM
#18
Safety Car
Member Since: May 2004
Location: los altos hills california
Posts: 3,609
Received 1,126 Likes
on
730 Posts
Answer - no they are not swappable - different mount centers
Last edited by ignatz; 07-10-2015 at 03:37 PM. Reason: stock
07-10-2015, 03:30 PM
#19
Le Mans Master

I guess many don't know but, the C2/3 Vettes brake "proprtioning" is set by difference in caliper piston diameters......but, the J-56 HD brake option had an adjustable proportioning valve in 66/67/68 model years mainly to compensate for the front metallic pads difference in friction characteristics. I would do a remotely cockpit adjustable valve myself.
07-10-2015, 07:00 PM
#20
Burning Brakes


I'm sure you can accomplish your goal with a proportioning valve but for the ultimate adjustabilty a dual master conversion is the hot set-up. Not only can you play around with cylinder bore of the front independent of the rear you can do fine tuning with the bias bar. Alot more work and cost but but alot more adjustment options.