When you click on links to various merchants on this site and make a purchase, this can result in this site earning a commission. Affiliate programs and affiliations include, but are not limited to, the eBay Partner Network.
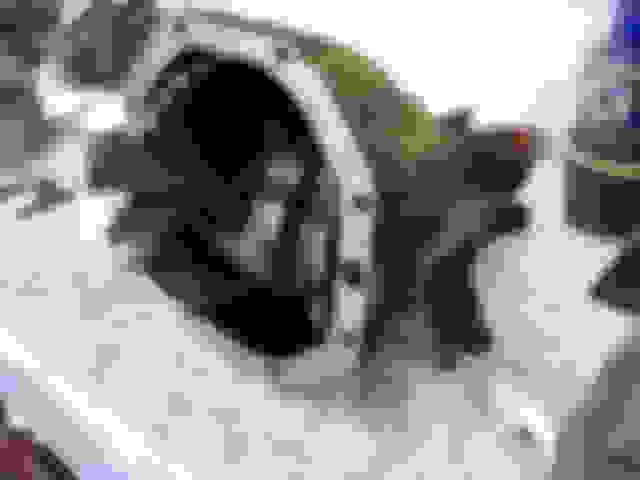
I started noticing a lot of negative camber on the driver rear tire on the 1972. Getting some grinding when car is in motion and turning also. I figured trailing arm bearings. I put the car up in the air and looked at the trailing arm bushings which appeared worn but still there. I grabbed at 3 and 9 o'clock and absolutely no play. Then grabbed at 6 and 12 o'clock and ... I assume this is a lot of play?? I was about to order new yokes, but second though was the cross pin has to be worn with this much play. What's your thoughts.
Most likely it's the yolk ends worn down excessively, and the snap ring has dropped into the bottom of the diff.
Time to dig deeper and probably spend some money.....
That's what I figured. I was planning a complete rear-end rebuild this winter (diff., trailing arms and all). The drivers trailing arm is canted to the left (looks like the TA bushing is about shot after all). :
Those yokes are worn. If the dust shield is not contacting the housing your snap rings are still in place. Your pin will likely not be worn. If the diff is operating as it should you could consider just replacing the yokes and do a couple of oil changes. I did this job last off season. I had intended to just have a quick initial disassembly session. Was going to put the car on stands, pull the wheels and remove a few bolts to start - but had the diff on the floor in under 2 hrs :-) While the diff is out tap a drain plug in the front of the case - you'll be happy you did. I stressed a bit and overthought that procedure. Felt silly after - it was fast and easy. Use lone star yokes. Don't buy your parts from Duntov in Texas.
Those yokes are worn. If the dust shield is not contacting the housing your snap rings are still in place. Your pin will likely not be worn. If the diff is operating as it should you could consider just replacing the yokes and do a couple of oil changes. I did this job last off season. I had intended to just have a quick initial disassembly session. Was going to put the car on stands, pull the wheels and remove a few bolts to start - but had the diff on the floor in under 2 hrs :-) While the diff is out tap a drain plug in the front of the case - you'll be happy you did. I stressed a bit and overthought that procedure. Felt silly after - it was fast and easy. Use lone star yokes. Don't buy your parts from Duntov in Texas.
Thanks fxd. I actually had the car in the air last week thinking about a quick replacement of the yokes. I have another week or so that I need the car together (cruising the coast care show next week). I will be starting a complete rear rebuild on the next few weeks though.
No need to pull the pumpkin but does make things a bit easier. You'll need to replace both the pin and the yokes and while at it the two seals. You need a hardened 12 point wrench to undo the center pin retain bolt. I think its a 5/16 but can't recall. with the cover off first break the bolt free then rotate the diff so you'll be able to slide the pin out jut clearing the housing. Once the pin is out do not rotate the housing or yokes or the spider gears can rotate out of place. just push the yokes to get the pins off.
If the yokes are worn bad you may need to use a hammer and chisel to open up the yoke grooves and maybe a slide hammer on the yokes to get them out.
It's not possible to remove the cover to access the yokes with the pumpkin in the car - the cover is integral to the mounting system. I am sure that the pin may have needed to be replaced by someone in the past but I have never seen that in normal circumstances. I have always used a standard construction wrench to remove the pin retainer bolt.
I did have to use a chisel and hammer to remove some materiel around the snap rings. It is a good idea to have a magnet close to the "action".
Removing any burrs on the snap ring GROOVE first will allow the yoke-shaft to be easily removed without damaging the housing bearing. The snap ring has a sharp shoulder on one side*
Last edited by doorgunner; 10-01-2016 at 10:18 AM.
As the other guys have stated above, the problem is that the ends of your stub shafts have worn out riding against the spider gear pin. It’s a common Corvette problem.
As long as the shafts have not worn so far that the snap ring groove has been consumed, you can repair the shafts by installing hardened steel caps on the ends of the shafts. You need to pull the differential out of the car to do this.
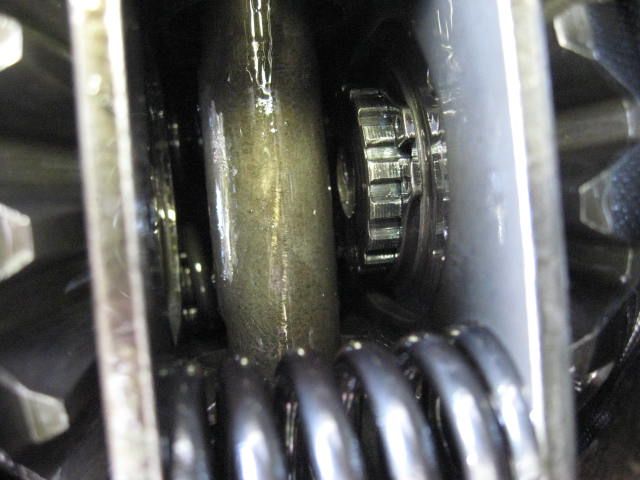
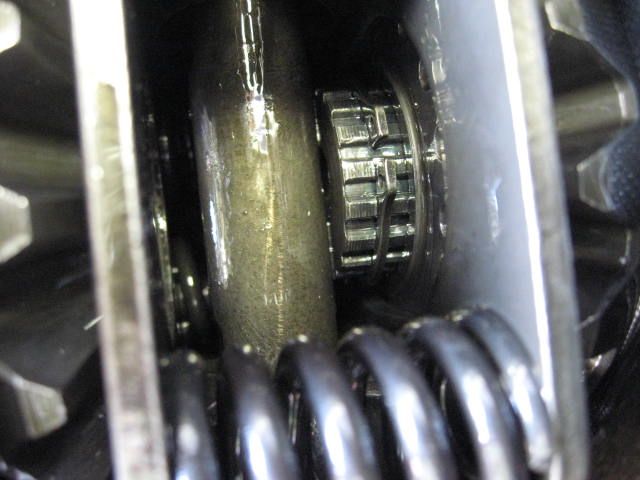
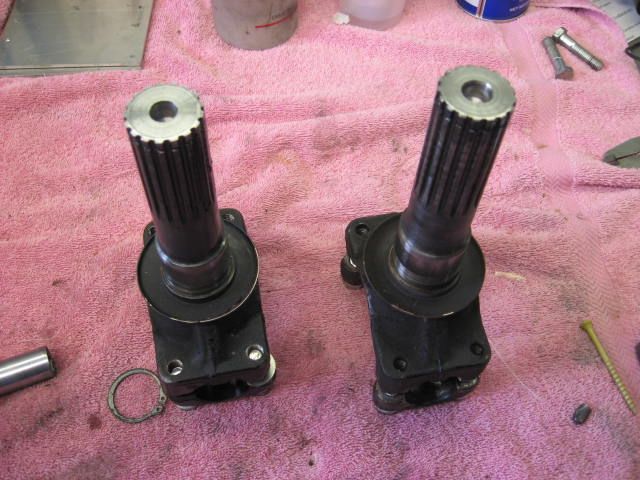
Here I’m measuring the amount of slop at the ends of the stub shafts:
Notice the amount of shaft movement from “in” position to the “out” position:
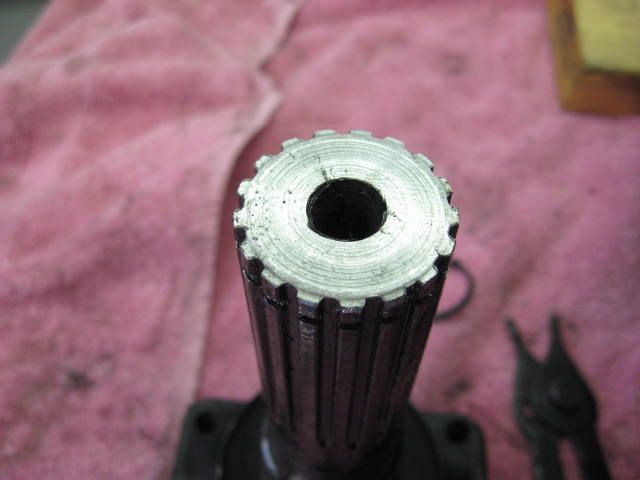
Spider gear pin pulled, snap rings removed, and shafts pulled out for repair:
Photo shows the severe wear on the end of the one stub shaft. Noting the endplay measured, we then added the amount to be machined off to create a flat surface. The factory center point was modified to create a counterbore:
Machined shaft end with counterbored center to accept a new thrust surface with press-in center nub:
A custom washer was then machined with a nub in the middle for pressing it into the counterbore created in the shaft. The thickness of the washer was determined by adding the measured shaft slop to the amount of material removed off the shaft and adding .010” for endplay clearance. The washers were then heat treated to Rockwell Rc48 and pressed onto the ends of the shafts. Machined and hardened custom thrust washers:
Completed shaft mod ready for install:
This saves the factory shafts and avoids needing to replace them with expensive and inferior aftermarket Chinese-made shafts. Many of these aftermarket shafts are not correctly heat treated, and they fail very quickly due to the soft non-heat-treated shaft ends.
As the other guys have stated above, the problem is that the ends of your stub shafts have worn out riding against the spider gear pin. It�s a common Corvette problem.
As long as the shafts have not worn so far that the snap ring groove has been consumed, you can repair the shafts by installing hardened steel caps on the ends of the shafts. You need to pull the differential out of the car to do this.
Here I�m measuring the amount of slop at the ends of the stub shafts:
Notice the amount of shaft movement from �in� position to the �out� position:
Spider gear pin pulled, snap rings removed, and shafts pulled out for repair:
Photo shows the severe wear on the end of the one stub shaft. Noting the endplay measured, we then added the amount to be machined off to create a flat surface. The factory center point was modified to create a counterbore:
Machined shaft end with counterbored center to accept a new thrust surface with press-in center nub:
A custom washer was then machined with a nub in the middle for pressing it into the counterbore created in the shaft. The thickness of the washer was determined by adding the measured shaft slop to the amount of material removed off the shaft and adding .010� for endplay clearance. The washers were then heat treated to Rockwell Rc40 and pressed onto the ends of the shafts. Machined and hardened custom thrust washers:
Completed shaft mod ready for install:
This saves the factory shafts and avoids needing to replace them with expensive and inferior aftermarket Chinese-made shafts. Many of these aftermarket shafts are not correctly heat treated, and they fail very quickly due to the soft non-heat-treated shaft ends.
Lars repair is probably the best option but many of us do not have the equipment or skill to perform such a repair. We then have to rely on our suppliers. I'm hoping Lonestars are up to snuff. I understand that they did have a bad batch some years ago. Emailing with Tom there, he implies that their units have a lifetime guarantee.
"Warranty on the reman stub axles is a lifetime warranty but service life
should be 20 or more years and the same on the new ones. Hope this helps
Ken McCormick
Lonestar Caliper Co."
I'm hoping that the ones I received from Duntov this time were in fact lonestars units.....
Clutches ..... it'll be fine. Like I said, if the dust shields on the yokes haven't contacted your housing you're good for a while ... Drive'r without fear ..... :-) If the crunching is real bad and bugs you, do a quick oil change with additive.
As the other guys have stated above, the problem is that the ends of your stub shafts have worn out riding against the spider gear pin. It�s a common Corvette problem.
This saves the factory shafts and avoids needing to replace them with expensive and inferior aftermarket Chinese-made shafts. Many of these aftermarket shafts are not correctly heat treated, and they fail very quickly due to the soft non-heat-treated shaft ends.
Lars
Nice work! What does this procedure cost? My driver's side tire is leaning in at the top as well, I imagine it's the same problem.
Obviously it needs fixing, but if I hold off, am I in danger of catastrophic failure? I don't plan to drive the car much, but I don't want to immobilize it for a few months. Is it safe to drive around town, and maybe a few 20 mile freeway trips to work?
I always verify the clutches by GM's method using a torque wrench.
I also prefer to replace the pinion shaft...and that is the shaft that the two side yokes ride against. I have so many of them floating around in my tool box because I do not want to put a nice machined surface against teh area on the pinon shaft that does have wear that you can see and feel. SO...as cheap as they are...and while I am in there...I put new ones in.
Dub, Have you often encountered measurable wear on one of those pins? I haven't dealt with many diffs but the few I have I'm always amazed on the lack of any marking at all. Hard frikin' metal.

 09-20-2016, 07:32 PM