
What to do while...
 03-31-2017, 07:24 PM
#1
Instructor

Thread Starter


...the radiator, core support, alternator, water pump, harmonic balancer pulleys, heater hoses and radiator hoses are out of the car?!?
Car is 1971 LT-1, M-21, Bridgehampton blue coupe, no tank sticker (we replaced the tank with an OAL replacement already), new stainless brake calipers, no power anything, rebuilt heads installed in the 90's, lots of miles but pretty much original but needs a lot of TLC. Car has original TI ignition, original chrome ignition shroud stuff over the plugs & etc., lots of documentation (sales receipt, and repair receipts for 20 or so years, original Owners Manual, only one key and its really worn, no spare wheel!, but has the cover, but no key to the cover lock, original t-top strap and some covers maybe its for the rear window, no jack nor handle, carpet in the back is perfect, but old, seats are shot, rubber seals are shot, window felts are shot, could use a drivers side door panel, original glass, E brake console cracked on top, will post pic later
Right now I have the radiator and support out, shop said it's not repairable. So maybe I'll get a date coded correct replacement??? Radiator core support is on order, likely reuse the original foam seals, thoughts? Having all the black metal pieces cleaned and powder coated - is that ok to have the pulleys done that way? Got a date coded original WP from Bill Mock. Ordered a new date coded fuel pump, and hard lines to carb, new tarpaper A-arm covers, will likely NOT reinstall the air pump which was pretty much doing nothing, may consider having it rebuilt and reuse later. Carb is at Chris's Carb Shop being rebuilt. Will replace thermostat - what temp should I use, 180, 160,???
What else should I tackle while the front is pretty much cleaned out? :toe tap: Thanks in advance!
Last edited by Marlon; 03-31-2017 at 10:10 PM.
 03-31-2017, 09:08 PM
#2
Team Owner

What's wrong with the radiator support? Rusted out? Replace it. Otherwise, repair it; it's just metal.
If you NEED to replace the radiator and the one you have is copper, tell them you want the old one back. You can sell it for decent scrap cost. If you don't get it back, they will sell it.
With all that stuff out, it would be a good time to do some engine/compartment detailing. But if it is in a repair shop, they likely won't let you in there to do any work.
The following users liked this post:
Marlon (03-31-2017)
03-31-2017, 10:00 PM
#3
Instructor
Thread Starter
What's wrong with the radiator support? Rusted out? Replace it. Otherwise, repair it; it's just metal.
If you NEED to replace the radiator and the one you have is copper, tell them you want the old one back. You can sell it for decent scrap cost. If you don't get it back, they will sell it.
With all that stuff out, it would be a good time to do some engine/compartment detailing. But if it is in a repair shop, they likely won't let you in there to do any work.
If you NEED to replace the radiator and the one you have is copper, tell them you want the old one back. You can sell it for decent scrap cost. If you don't get it back, they will sell it.
With all that stuff out, it would be a good time to do some engine/compartment detailing. But if it is in a repair shop, they likely won't let you in there to do any work.
04-01-2017, 07:50 AM
#4
Team Owner
Member Since: Sep 2006
Location: Westminster Maryland
Posts: 30,173
Likes: 0
Received 2,878 Likes
on
2,515 Posts

Hi M,
1971, LT-!.
Very nice!!!!
After reading over what you're doing I think I'd suggest that you might consider new radiator to core-support seals, shroud to core-support seals, and core-support to hood seals. Often the adhesive fails or the seals are damaged when they're moved from the old parts to the new.
I'd encourage you to hang on to the water-pump and fuel pump if you believe they're original to your car. People are often looking for those parts to rebuild.
If you decide not use the AIR pump be sure to save it, and ANY parts or fasteners, you may remove. AIR system parts can be difficult to find and have some $$ value.
Good Luck!
Regards,
Alan
How about a few more photos?
The following users liked this post:
Marlon (04-01-2017)
04-01-2017, 07:55 AM
#5
Instructor
Thread Starter
Here's a couple quick snaps...The door panels might actually be 'ok' to reuse - the drivers side is the worst, and both sides could use having the window felts replaced on the panels and on the door. I'd pull the panels and rebuild the window mechanism and replace the felts at that time. Also replace the rube seals at that time. What do you think?
The carpet has been removed from the drivers side footwell - too bad because the passenger side seems 'fair'. My thought is to take the seats out and have Al Knoch rebuilt them with original (like) material up at Spring Carlisle this month.
Any thoughts on sourcing carpet from them while up there? My idea is to replace the front carpet and the rear vertical carpet piece and leave the cargo compartment carpet alone - it is OLD but not worn.
04-01-2017, 08:01 AM
#6
Instructor
Thread Starter
Here she is in the garage - and one snap when I pulled the radiator and stuff off the front end of the engine.
Those floor dollies are incredible!!! The best deal going at Harbor Freight - I think they are 56 bucks per pair! I shot some thick squirty lube into the bearings before I assembled each one. Jacked the car each side with an aluminum, lightweight floor jack to get the tire into the dolly - one at a time. It's the same jack I use to jack a tranny, rear end, exhaust pipes, etc. Its very lightweight!
Those floor dollies are incredible!!! The best deal going at Harbor Freight - I think they are 56 bucks per pair! I shot some thick squirty lube into the bearings before I assembled each one. Jacked the car each side with an aluminum, lightweight floor jack to get the tire into the dolly - one at a time. It's the same jack I use to jack a tranny, rear end, exhaust pipes, etc. Its very lightweight!
The following users liked this post:
EarlyC34me (05-22-2017)
04-01-2017, 08:15 AM
#7
Instructor
Thread Starter
Here's the under hood right now. I had to use rust remover after cleaning the area where the core support rests on the bottom cross member - but it wasn't bad at all! I shot it with Krylon Dual SuperBond Paint & Primer, "Black - Flat" and it's not shiny and not loud.
Considering doing a very gently do a pass or two on top the A-Arms, being very careful to not shoot any of the attachment H/W and bushings. Just barely clean it up a bit, so it looks like it's maybe 5 or ten yrs old after gentle driving. Of course that will be covered up by new A-Arm tar paper!
Yeah - the fuel pump will be replaced with an "original" UNLESS the one in there is ORIGINAL! I have ordered factory correct hard fuel line from Quanta to replaced the hacked up fuel line you see there - as you know the LT-1 fuel filter bronze stones reside in that big fat 780 CFM Holley 4801!!!
Don't think I'm going to shoot the inner fender panels because the passenger side is cleaning up GREAT but no photo yet...
Lot's of detail, clean up and minor parts restoration to do - the windshield wiper spray motor has some broken of fittings and the washer reservoir lid and tubing is gone. But largely intact I think...
Last edited by Marlon; 04-01-2017 at 08:17 AM.
04-01-2017, 08:27 AM
#8
Instructor
Thread Starter
Hi M,
1971, LT-!.
Very nice!!!!
After reading over what you're doing I think I'd suggest that you might consider new radiator to core-support seals, shroud to core-support seals, and core-support to hood seals. Often the adhesive fails or the seals are damaged when they're moved from the old parts to the new.
I'd encourage you to hang on to the water-pump and fuel pump if you believe they're original to your car. People are often looking for those parts to rebuild.
If you decide not use the AIR pump be sure to save it, and ANY parts or fasteners, you may remove. AIR system parts can be difficult to find and have some $$ value.
Good Luck!
Regards,
Alan
How about a few more photos?
1971, LT-!.
Very nice!!!!
After reading over what you're doing I think I'd suggest that you might consider new radiator to core-support seals, shroud to core-support seals, and core-support to hood seals. Often the adhesive fails or the seals are damaged when they're moved from the old parts to the new.
I'd encourage you to hang on to the water-pump and fuel pump if you believe they're original to your car. People are often looking for those parts to rebuild.
If you decide not use the AIR pump be sure to save it, and ANY parts or fasteners, you may remove. AIR system parts can be difficult to find and have some $$ value.
Good Luck!
Regards,
Alan
How about a few more photos?
04-01-2017, 08:37 AM
#9
Instructor
Thread Starter
the one i removed is a service replacement...Bill Mock supplied the GM one.
You can see that the heads are not original - bummer. But the documentation I have shows the replacement. I had a fleeting thought to replace the heads with some Dart Iron Eagle heads and pickup a point of compression and much better performance - although this car will never be driven hard at all I don;t think. But maybe I'll have the compression and leak down tested before doing anything. With the heads off I could have that big high rise Winter manifold gently bead blasted and clean up the front of the engine while at it. The timing chain has also been replaced. I think the cam is original.
Yes - I'll replace the WP fan clutch studs and all that H/W.
You can see that the upper ball joints are original. Probably won't touch any of that stuff (for a while) and maybe replace the sway bar bushings and rear end link bushings only for now. It tracks straight and is perfectly ok for what it is right now.
My idea is to get it very presentable and maybe sell and go for something else. Maybe.
Last edited by Marlon; 04-01-2017 at 08:43 AM.
04-01-2017, 08:38 AM
#10
Team Owner
Member Since: Sep 2006
Location: Westminster Maryland
Posts: 30,173
Likes: 0
Received 2,878 Likes
on
2,515 Posts
Hi Marlon,
Interesting old LT-! in the photos.
Looks like it's been well used, but still lot's of nice old original parts on it!
You might find that when you have new seat covers and front carpet the door trim panels will look out of place� same maybe a pair of those are in your future.
You mention the AIR pump� I don't see ANY of the AIR parts. ??
Do you know about the Assembly Instruction Manual (AIM), and Chassis Service Manual? If you don't have them they'd be a help to you with this car. Certainly worth the $$.
Al Knock is a good source of interior parts and sometimes has some interesting sale prices.
Again, INTERESTING car!
Regards,
Alan
What are the heads presently on the engine?
Last edited by Alan 71; 04-01-2017 at 08:44 AM.
04-01-2017, 08:41 AM
#11
Instructor
Thread Starter
Hi Marlon,
Interesting old LT-! in the photos.
Looks like it's been well used, but still lot's of nice old original parts on it!
You might find that when you have new seat covers and front carpet the door trim panels will look out of place� same maybe a pair of those are in your future.
You mention the AIR pump� I don't see ANY of the AIR parts. ??
Do you know about the Assembly Instruction Manual (AIM), and Chassis Service Manual? If you don't have them they'd be a help to you with this car. Certainly worth the $$.
Al Knock is a good source of interior parts and sometimes has some interesting sale prices.
Again, INTERESTING car!
Regards,
Alan
I removed the AIR pump and the manifold fittings!!!
Last edited by Marlon; 04-01-2017 at 08:44 AM.
04-01-2017, 08:44 AM
#12
Team Owner

Member Since: Jun 2000
Location: Southbound
Posts: 38,928
Likes: 0
Received 1,468 Likes
on
1,247 Posts
Cruise-In II Veteran


The following users liked this post:
Marlon (04-01-2017)


The following users liked this post:
Marlon (04-01-2017)
04-01-2017, 08:51 AM
#14
Instructor
Thread Starter
Here's the AIR stuff...plus a photo of the carb before sending it to Chris's Carb Shop last week...The AIR manifold injectors came off very easy, I was surprised. Will plug the ports for now...
04-01-2017, 08:53 AM
#15
Instructor
Thread Starter
BTW: all that black metal is going to the powder coat shop...
Of course I could get new rubber bushings and take it all to a machine shop and have them press it all...replace springs or no? I notice on the drivers side at least that the spring still has a faded sticker on it...
Last edited by Marlon; 04-01-2017 at 08:57 AM.
04-01-2017, 09:05 AM
#17
Instructor
Thread Starter
04-01-2017, 09:34 AM
#18
Instructor
Thread Starter
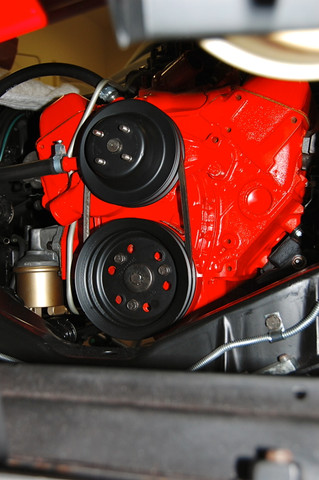
Quanta said I need 3 belts: Alternator, AIR pump and WP. How in the heck do you install the belt between the harmonic balancer pulley and WP??? There's no adjuster??? My car does not have P/S. So is the only two belts used: one for the AIR pump and another long one that wraps around the harmonic balancer, W/P and Alternator only? I gotta get that AIM...
Last edited by Marlon; 04-01-2017 at 09:55 AM.
04-01-2017, 10:05 AM
#19
Team Owner
Member Since: Sep 2006
Location: Westminster Maryland
Posts: 30,173
Likes: 0
Received 2,878 Likes
on
2,515 Posts
Hi Marlon,
An engine with out AIR, a/c, and p/s uses just 2 belts.
To install the crank/water-pump belt I slide the water pump-pulley foreword off the 4 threaded studs on the pump's flange.
Put the belt in the groove on the crank shaft pulley and tip the water-pump pulley down so the belt can seat in the groove.
You can then slide the water-pump pulley back on the flange studs.
After you see how it works it's pretty easy.
Regards,
Alan
Last edited by Alan 71; 04-01-2017 at 10:07 AM.