When you click on links to various merchants on this site and make a purchase, this can result in this site earning a commission. Affiliate programs and affiliations include, but are not limited to, the eBay Partner Network.
I love to drive my car, so try to limit projects to three for four each year that last no more than two or three weeks to limit down time. The temptation is always there to keep tearing into things, but I really want to keep the car running, so have to walk away from projects to do them another time.
My AC quit working because of a leak somewhere, so I decided to get rid of the VIR and put in an orifice and accumulator system while the system was down. The AC had not been super cold anyway so am hoping removing the VIR may help.
Normally don't attempt too many "while I am at it projects" but could not resist taking the evaporator out while the VIR was out so here goes details on my evap removal, cleaning, housing repair and reinstall from yesterday:
There are six large screws holding the evap housing to the firewall and blower housing you can access from the engine area. These are all 3/8" head screws. There is one more screw in the passenger compartment that is 7/16" head located just under the heater box here:
Then there is one small 1/4" screw located at the bottom on the firewall that attaches to the metal plate on the firewall. lower left in this pic:
Finally there is one 7/16 nut on the top near the resistors which is obvious. After removing all the screws, separating with a putty knife released the housing easily. It was a tight squeeze to pull it out, as is everything with a big block, but it came right up. Had to be careful with the heater hoses and moved those around the evap tubes as I pulled it up. Here it is coming out:
This is the firewall where the evaporator is attached:
The door in the right is controlled by the "hot/cold" wheel in the console. I wish I had adjusted it while I had my console out because it does not quite close all the way when it is on "cold". I do have a hot water cut off switch going to the heater core, so I guess it does not really matter when that is closed for the summer anyway.
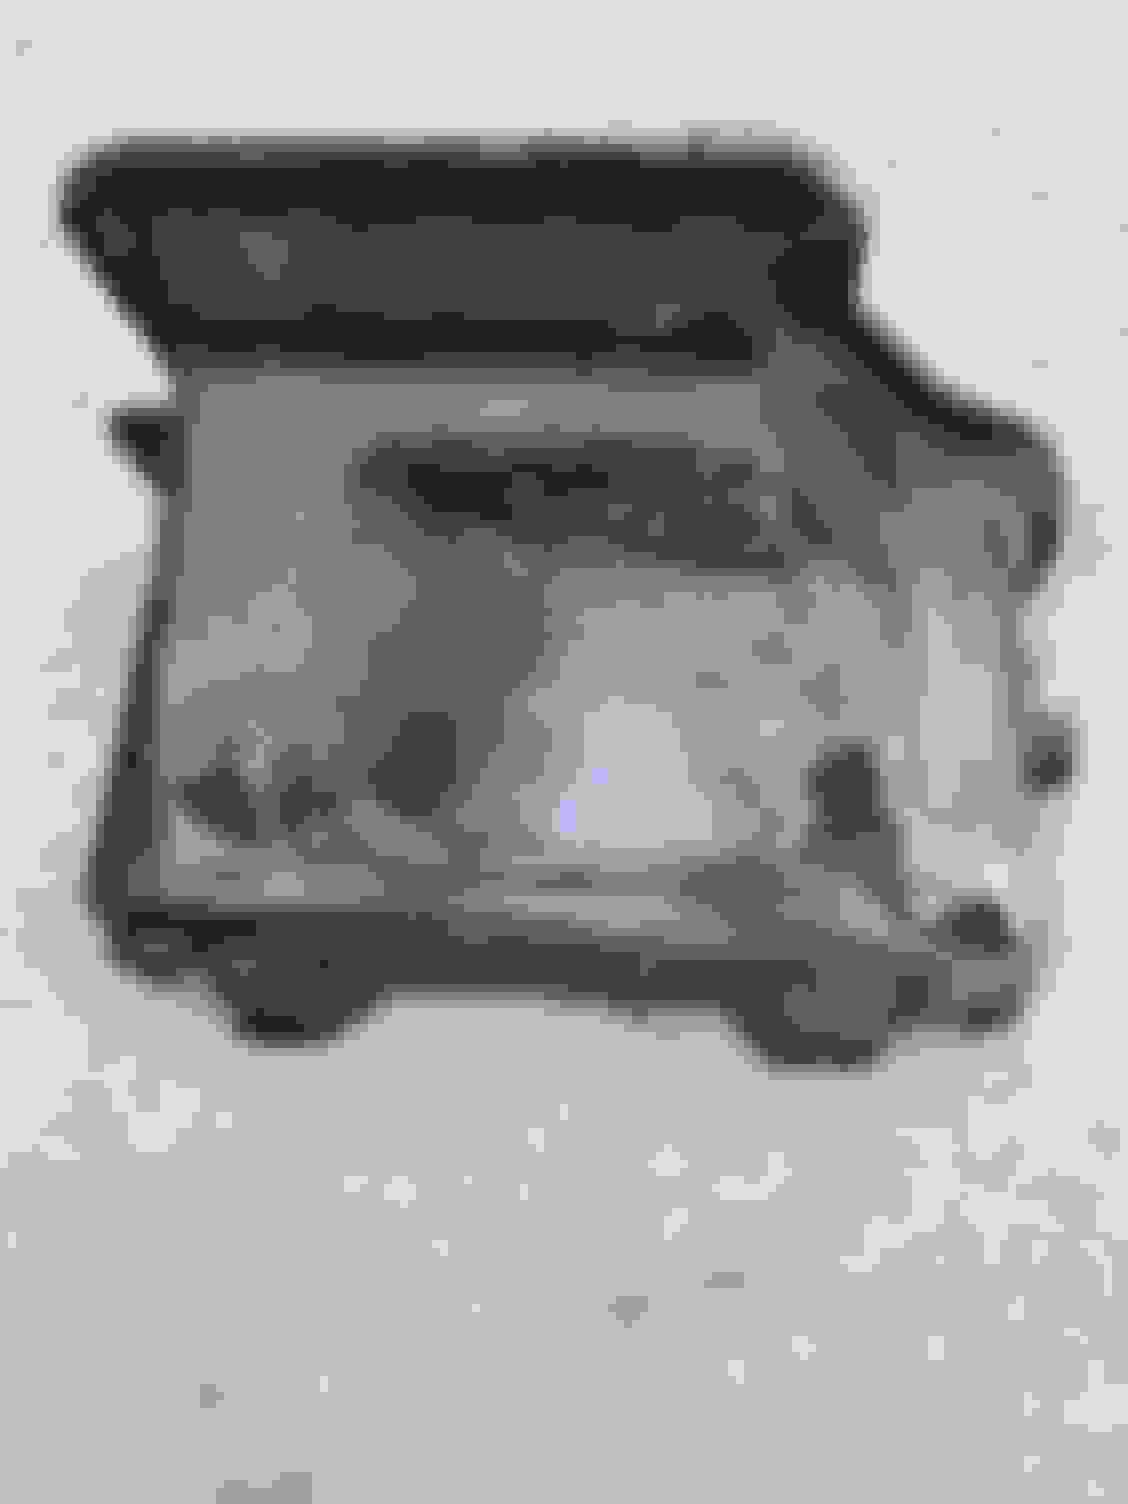
Here is the old seal that presses up against the evaporator core to make sure the blower air passes through the core and does not bypass around the edges. As you can see I had some leaf accumulation in the bottom of the housing:
The evaporator is attached to the housing with three screws. I removed all the patches and tape from the outside of the housing and it looked like swiss cheese. All of the holes had been patched and taped up so I had no idea there was so much damage to the housing. I had planned this for a one day project, or I would have thrown in the towel and ordered a new housing:
I tried straightening the fins with a radiator/condenser comb, but ended up using a small screw driver best I could. I blew the evaporator out with air, but not much debris came out. I then soaked it in some simple green and water for a couple of cycles, and the leaf bits really started coming out. (I plugged the tubes best I could with rubber vac hoses, but used aluminum foil on the larger tube):
Then I got more aggressive with the water hose and carefully spray back through the fins to get all the little bits out. I then got the shop vac for final water removal and final bits. It appeared pretty clean in the end.
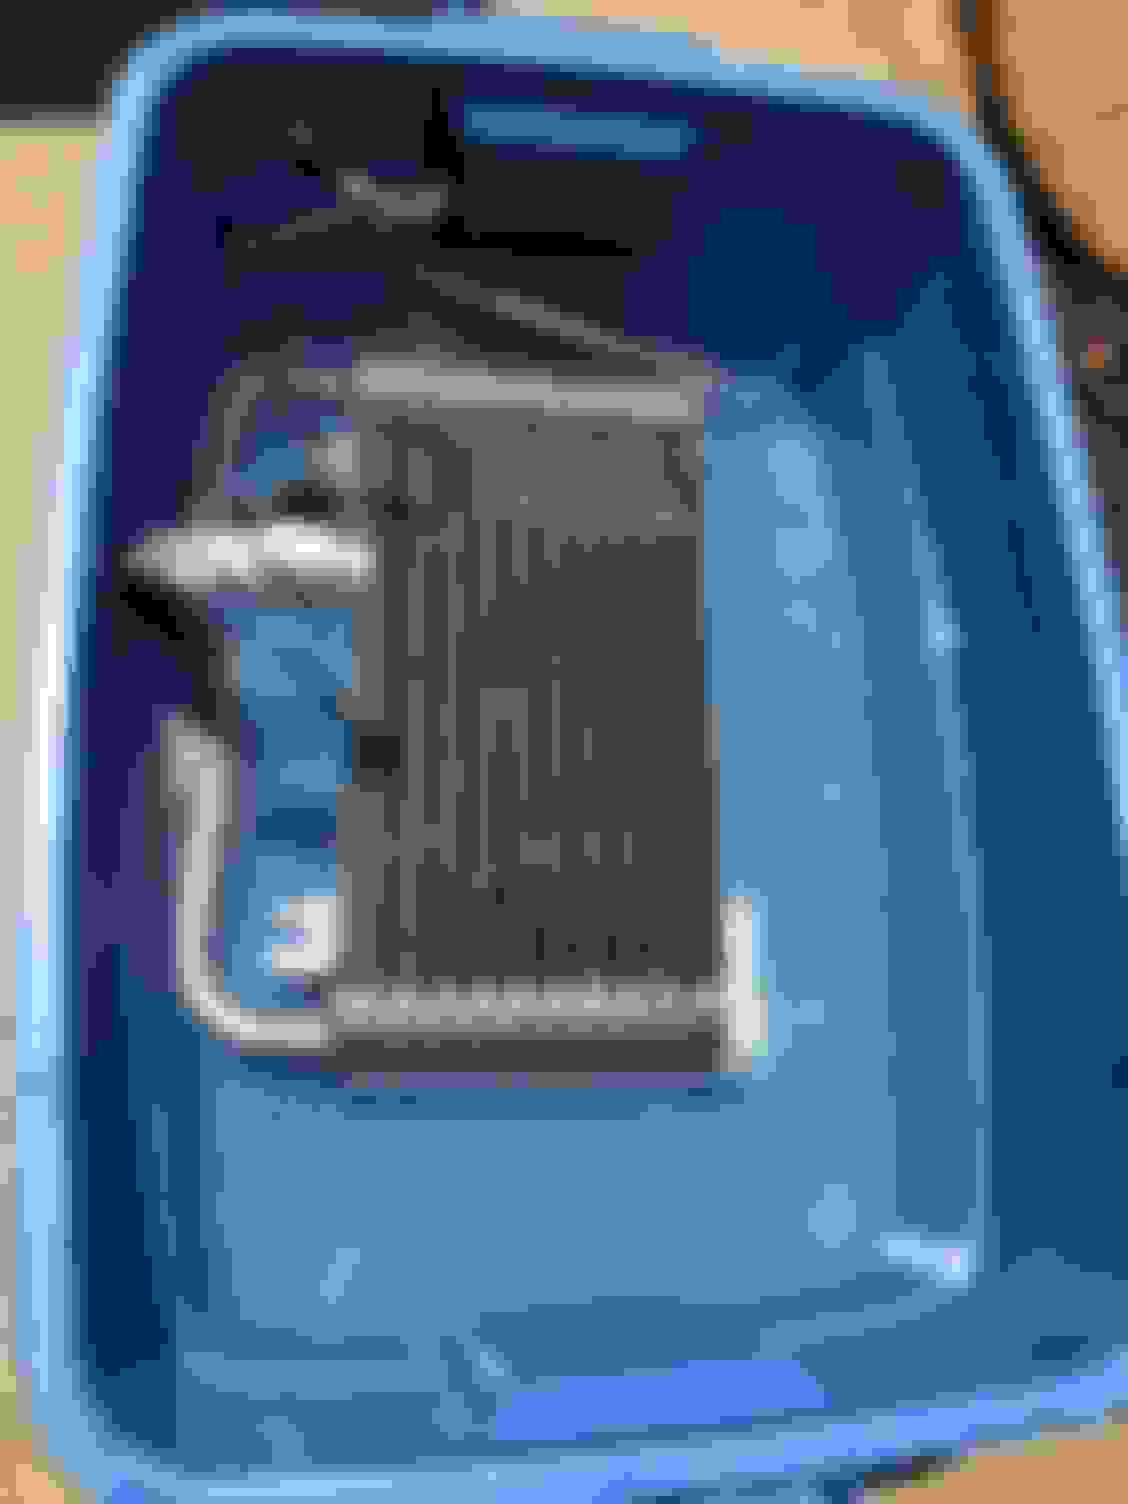
The housing took a lot of patch work with several coats of glass mat and polyester resin. I then painted it and put on an outside layer of aluminum coated glass with spray adhesive to help reflect the header heat. My box was really damaged the worst where it was closest to the headers. I reinstalled the evaporator. Here is the final product:
I scraped off the old seal on the blower housing side, put some spray adhesive on the replacement seal, and set it in place. I put butyl tape adhesive around the housing perimeter for sealer (there is a groove cut in the housing for it). The original sealant was a type that hardened, but I had some butyl tape available so went that route instead:
I then shoe horned the housing back into the engine bay and reinstalled all the screws and nut. Only problem I had was with the clearance around the seal that presses up against the evaporator. I maybe should have removed the valve cover to get more space, because when I pushed the housing down the bottom edge of the evaporator caught the bottom edge of the seal pushing it down. I could also have used a better adhesive to stick the seal into place. I think I got it pushed back up okay into place from underneath with a screwdriver.
I did have one screw that stripped out in the housing. I should have checked all those housing threads since they are fiberglass and patched the ones that were not solid while I had the housing out.
This project day wore me out, especially with the 95 degree heat here yesterday. Decided to take Sunday off and put my accumulator and orifice in during the evenings this week.
I just hope my evaporator was not the source of my leak. I noticed a couple of the VIR o rings were crushed and one of the connections was very loose, so hopefully that was the source of the leak.
hey don great thread, I'm thinking of doing this also, the pictures were great, wanting to get the a/c going on my 75 rag top, I will need a new evaporator for shore, can u post the pics of the of the remaining install
I love to drive my car, so try to limit projects to three for four each year that last no more than two or three weeks to limit down time. The temptation is always there to keep tearing into things, but I really want to keep the car running, so have to walk away from projects to do them another time.
My AC quit working because of a leak somewhere, so I decided to get rid of the VIR and put in an orifice and accumulator system while the system was down. The AC had not been super cold anyway so am hoping removing the VIR may help.
Normally don't attempt too many "while I am at it projects" but could not resist taking the evaporator out while the VIR was out so here goes details on my evap removal, cleaning, housing repair and reinstall from yesterday:
There are six large screws holding the evap housing to the firewall and blower housing you can access from the engine area. These are all 3/8" head screws. There is one more screw in the passenger compartment that is 7/16" head located just under the heater box here:
Then there is one small 1/4" screw located at the bottom on the firewall that attaches to the metal plate on the firewall. lower left in this pic:
Finally there is one 7/16 nut on the top near the resistors which is obvious. After removing all the screws, separating with a putty knife released the housing easily. It was a tight squeeze to pull it out, as is everything with a big block, but it came right up. Had to be careful with the heater hoses and moved those around the evap tubes as I pulled it up. Here it is coming out:
This is the firewall where the evaporator is attached:
The door in the right is controlled by the "hot/cold" wheel in the console. I wish I had adjusted it while I had my console out because it does not quite close all the way when it is on "cold". I do have a hot water cut off switch going to the heater core, so I guess it does not really matter when that is closed for the summer anyway.
Here is the old seal that presses up against the evaporator core to make sure the blower air passes through the core and does not bypass around the edges. As you can see I had some leaf accumulation in the bottom of the housing:
The evaporator is attached to the housing with three screws. I removed all the patches and tape from the outside of the housing and it looked like swiss cheese. All of the holes had been patched and taped up so I had no idea there was so much damage to the housing. I had planned this for a one day project, or I would have thrown in the towel and ordered a new housing:
I tried straightening the fins with a radiator/condenser comb, but ended up using a small screw driver best I could. I blew the evaporator out with air, but not much debris came out. I then soaked it in some simple green and water for a couple of cycles, and the leaf bits really started coming out. (I plugged the tubes best I could with rubber vac hoses, but used aluminum foil on the larger tube):
Then I got more aggressive with the water hose and carefully spray back through the fins to get all the little bits out. I then got the shop vac for final water removal and final bits. It appeared pretty clean in the end.
The housing took a lot of patch work with several coats of glass mat and polyester resin. I then painted it and put on an outside layer of aluminum coated glass with spray adhesive to help reflect the header heat. My box was really damaged the worst where it was closest to the headers. I reinstalled the evaporator. Here is the final product:
I scraped off the old seal on the blower housing side, put some spray adhesive on the replacement seal, and set it in place. I put butyl tape adhesive around the housing perimeter for sealer (there is a groove cut in the housing for it). The original sealant was a type that hardened, but I had some butyl tape available so went that route instead:
I then shoe horned the housing back into the engine bay and reinstalled all the screws and nut. Only problem I had was with the clearance around the seal that presses up against the evaporator. I maybe should have removed the valve cover to get more space, because when I pushed the housing down the bottom edge of the evaporator caught the bottom edge of the seal pushing it down. I could also have used a better adhesive to stick the seal into place. I think I got it pushed back up okay into place from underneath with a screwdriver.
I did have one screw that stripped out in the housing. I should have checked all those housing threads since they are fiberglass and patched the ones that were not solid while I had the housing out.
This project day wore me out, especially with the 95 degree heat here yesterday. Decided to take Sunday off and put my accumulator and orifice in during the evenings this week.
I just hope my evaporator was not the source of my leak. I noticed a couple of the VIR o rings were crushed and one of the connections was very loose, so hopefully that was the source of the leak.
I hope this write up is helpful to someone.
Don
Nice write up. I just disassembled my full plenum to also find a bunch of rubbish within. While I'm doing a complete redo of the car I also dismantled the Out Side Air intake located in the cowl ( passenger side with green vacuum hose ). Do you know if your O.A. intake functions properly from the console controls ? It seems to me if this item is overlooked in servicing the A/C all your hard labor to make things better may be for nought. Just thought I'd throw it out there. Btw, thank you for the tips on cleaning the coil.
I hope I only have to put in the orifice and accumulator, evac and charge and I will be back in business. I will write up that install in a different thread and send you the link. Good luck with your AC build.
I agree with you, cutting off the outside air by having the cowl plenum door working is important. Mine is cracked at the "hinge" seam and not functioning. I have a replacement door on hand and need to install also a part of this project. Thanks for the reminder. I am eating the elephant one bite at a time.
Note that the outside plenum door closes when the console left hand dial is on Max AC, which also opens the door above the passenger side kick panel to recycle interior air. My interior door was opening slowly and not quite all the way due to a vac leak somewhere so I wired it always open. Next step on the air side is to replace the outside plenum door. I have seen where some people have sealed that permanently shut so they are always recycling interior air, but I am trying to keep it functioning.
I did put in the C4 fan which helped a lot on the airflow.
Don
Thanks for the further instruction on how this whole enchilada works. I'll add that I found with the fan portion also removed it allowed for manipulation of the plenum door for removal/installation.On another post cowl screens were mentioned, here's what was posted, modification of some sort may be needed.
I still have the original metal cowl screens which are in okay shape. I like that look a little better than the late
model plastic aftermarket screens. You are correct it is important to make sure the screens are in place and filtering out the large debris from the fan intake.
I also installed seals around the evaporator tubes and wrapped the inlet with asphalt insulating tape. I found good seals from Zip products. I had purchased seals from Paragon but they were not good quality foam or cut the right size. The screw kit from Zip was not correct so I just recycled the originals.
Don Upper outlet tube Lower inlet tube and oil drain tube Zip screw kit versus original
This is very timeley, I have the engine out and want to check all the A/C components before I put it back. Is there any way to check the function of the doors/flaps without the engine installed? I am considering fixing them open. I don't care about heat; I live on the Guf Coast. We don't really have winter, not enough to bother me anyway. Besides, I have a leather jacket. Defrost/defog is somewhat of a consideration, but I have had cars before in which it didn't work, besides this car is a toy, not to be driven daily, maybe not even weekly.
Don,
Beautiful, comprehensive write up. I need to take on this project on a 72 sb, as my evaporator is leaking. I have been procrastinating as this is a big job. Did you pressure test the evaporator before you reinstalled it?
Ed
Ed,
I did blow out the evaporator with compressed air and only clean oil came out, so hopefully no corrosion. I did not pressure test it. I am always in a rush and hope I don't find out later that the leak is in the evaporator. Wouldn't be the first time I did a job twice if it is leaking.
I put in the orifice valve tonight and started on the accumulator (replacing the VIR). I need to buy some new tubing components to make it work.
I wish I had just stayed with the VIR as this is very difficult.
Richard,
I have checked all my vacuum components by hooking up some hose to the actuator and sucking on it till it moves. I also folded over the hose and clipped it with a paper clamp. In all cases the actuators held vac overnight so I knew there was no leak there. I assume you can do the same on other components in the system.
I have a 74' 350 with A/C and Hooker Headers. I did a frame-off restoration and decided to mount the motor/trans on the frame then lower the body down. Everything mounted fine. Here is where I made a huge mistake. I forgot to mount the Evap/Blower assembly prior to lowering the body. It wouldn't fit. So not wanting to take the engine out or raise the body, I decided to take the blower/evap housing apart and try to install it. The blower fit but when I lowered the evap housing into place, it made contact with the hooker header. There doesn't seem to be any room. Has anyone else run into this issue? Are there any solutions other than not running heat and A/C? Or taking out the headers?
Last edited by 74Stingray\\\; 03-10-2019 at 03:01 PM.

 07-23-2017, 05:10 PM