When you click on links to various merchants on this site and make a purchase, this can result in this site earning a commission. Affiliate programs and affiliations include, but are not limited to, the eBay Partner Network.
1969 big block
I am removing my control arms and have done lots of reading and all was going well but ran into a snag. Hope someone might have some ideas for me.
The engine and transmission are now out of the car.
I removed the connection to the tie rod.
Brake housing removed and brake rotor removed.
The shock is out and has been removed.
Shims out and control arm nuts loosened.
The two castle nuts to the steering knuckle loosened right off but still attached.
So here lies the problem,,,,, I jack up under the lower control arm and the arm moved a bit and just lifts the car off the jack stands. I am unable to break the steering knuckle free so it drops down onto the castle nuts.
I hit it hard several times on locator pad of the steering knuckle to break loose the steering knuckle with no success.
I was considering using spring compressors that I bought but the instructional video I have doesn't seem to require them.
I read that the big block spring is actually under less tension than the small block spring and is a bit easier to deal with.
Thanks for any ideas.
Pete
I definitely would use the spring compressor, without the weight of the motor and transmission in the car, it could be very dangerous to attempt... Be safe..
Without a question, either use spring compressor or a 5/8" threaded rod with large washers and nuts through the shock mounts. Without the engine in the car, once you break the the ball joint, the spring will fly out with catastrophic consequences. Do a search on the forum in C-2 and C-3 sections on this topic. I used the threaded rod to install springs on my car before I put the engine in. Be careful. Jerry
Hi Pete,
I also agree about the wisdom in using a spring compressor of some type.
I've had good success using the giant hex head bolt and just the bottom of a pretty typical store bought compressor.
Install the rod down through the shock absorber hole in the frame and attach the bottom go the compressor as low down as possible.
This location allows you to much of the spring up into the pocket in the frame.
Once the lower a-arm is free of the spring pressure it can easily be removed.
You do need to be VERY careful with the spring while it's compressed because it stores a tremendous energy.
Most folks recommend using a length of heavy chain to secure the spring to the frame.
Good Luck!
Regards,
Alan
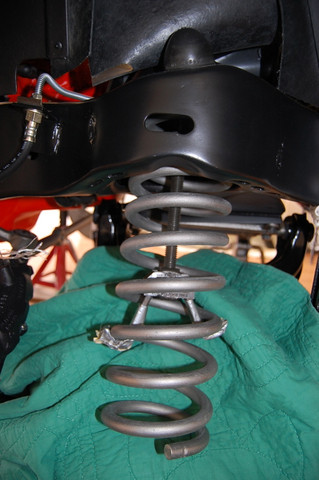
Here's a photo showing the 'hardware' in place getting ready to pull the spring back up into the frame pocket in order to put the bottom a-arm back on. The chain isn't in place yet!
Thanks so much guys,
sounds like I still have pressure on the spring and need it removed so I will go buy the correct spring compressor. Looks like these outside compressor springs will not work in this application.
That picture Alan is perfect, I hadn't considered using just the bottom arms of the spring compressor but that looks like a way better solution.
I will chain the spring just to be safe.
Thanks, will get back to you with the results.
Pete
I have not done this to my vette yet,but did do it on my 68 chevelle... They seem to be similar, so when you reinstall the springs,they must be clocked to the right location.... There are two holes on the bottom control arm where the spring rides on.... The end of the spring should end up between the two holes.... Others I hope will chime in and correct me if I am wrong.. Good luck...
I will look carefully where they sit on the lower control arm so they go in the same way.
Probably will be sometime before it all goes back together, this project just keeps getting bigger and bidder. If I am going to do it I may as well do it right so off to the blaster the parts will go.
Pete
As already eluded to, you will need to compress the spring. On the Vette you need to use an INTERNAL spring compressor (available at O'Reilly or another auto store near you). The externals (at least mine) would not fit in due to the depth of the upper spring pocket. Once the shock is out, you have to insert the compressor up through the bottom hole in the A-arm -- it's a PITA but once you are all hooked in it will work fine.
Once compressed and "loose", separate your ball joints (with a ball joint separator -- pickle fork). You should also use a fork to separate your other steering parts such as the rod ends if you're not planning to replace everything - just a bit easier on the threaded parts.
I definitely would use the spring compressor, without the weight of the motor and transmission in the car, it could be very dangerous to attempt... Be safe..
Be cautious with the coil! It might shoot out and damage the car or god forbids you!
Be cautious with the coil! It might shoot out and damage the car or god forbids you!
That's why I always use a heavy chain through the spring and frame when removing or installing springs. I know it was mentioned earlier, but I feel it is important enough to mention again.
I used the 5/8" rod method like shown on the Wilcox site for my 68 big block. Worked great. There was not really enough room for the other style of compressor.
I used the 5/8" rod method like shown on the Wilcox site for my 68 big block. Worked great. There was not really enough room for the other style of compressor.
I will look carefully where they sit on the lower control arm so they go in the same way.
Probably will be sometime before it all goes back together, this project just keeps getting bigger and bidder. If I am going to do it I may as well do it right so off to the blaster the parts will go.
Pete
I might be out there in January or February, maybe have a beer and check out your project. Rob
[QUOTE=VancouverL71;1595668142]1969 big block
I am removing my control arms and have done lots of reading and all was going well but ran into a snag. Hope someone might have some ideas for me.
Use the spring compressor thru the shock absorber hole like suggested by Alan71 and add a section of threaded rod and pipe with big washers lubricated with oil and then you can more easily turn the thing to compress the spring. You'll be working on top of the upper A arm where there is more room to swing your wrench.
Some have mentioned installing the spring and clocking it to the lower control arm. This is incorrect. Check the AIM. The top of the spring end must be within 3/8" or so of the inspection hole on the top of the spring pocket on the frame. I use blue painters tape so I can see the end. If the springs are not indexed or clocked correctly, the car could be off by an inch or more on either side. Do a search on the C-2 and C-3 forums for further information. Jerry
Sometimes the most simple things seem so complicated if you have not done them before.
So fast forward>>>
I have the correct spring compressor and have compressed the spring from above as Alan suggested, I am now trying to separate my ball joints and the control arm from the steering knuckle.
The lower control arm is free and it moved on its own with the spring compressed.
The problem is the steering knuckle will not drop, (I have the castle nuts on very loose just so it will not completely drop away.
When I put in the pickle fork, it just presses on the rubber bushing but doesn't hit anything solid so it will not force the steering knuckle to drop down.
Is there something I am missing here? I hit the locator pad on the steering knuckle several times.
I feel like I am 99 percent done but the steering knuckle will not drop off.
Any ideas.
Thanks as always, Pete
Here are some better pics.
Is this the correct place for the pickle fork on both the upper and lower ball joint?
Seems like I am just pressing on a rubber bushing?

 09-29-2017, 03:35 PM


 Easy and safe!