
tubular a-arms
 05-14-2019, 10:32 AM
#441
Burning Brakes

Has anyone installed these and run them yet? I have mine on order. Going to run them with coilovers. This is my takeaway from this thread....
-you need to swap the uppers and lowers left to right to make them work on a vette.
Lowers:
-lowers need the sway bar bracket moved to the front of the arm (I have new brackets to weld on so may just leave the originals mounted on the back side).
-remove the steering stop on the lower??
-remove and swap around the mounting shaft.
Uppers:
-swap left to right.
-machine the mounting shaft to achieve desirable alignment specs (camber/caster).
-possibly have to elongate one of the mounting holes on the shaft. Which hole is preferred to elongate?
If I missed anything, please let me know.
-Jimbo
 05-14-2019, 10:52 AM
#442
Burning Brakes
Has anyone installed these and run them yet? I have mine on order. Going to run them with coilovers. This is my takeaway from this thread....
-you need to swap the uppers and lowers left to right to make them work on a vette.
Lowers:
-lowers need the sway bar bracket moved to the front of the arm (I have new brackets to weld on so may just leave the originals mounted on the back side).
-remove the steering stop on the lower??
-remove and swap around the mounting shaft.
Uppers:
-swap left to right.
-machine the mounting shaft to achieve desirable alignment specs (camber/caster).
-possibly have to elongate one of the mounting holes on the shaft. Which hole is preferred to elongate?
If I missed anything, please let me know.
-Jimbo
-you need to swap the uppers and lowers left to right to make them work on a vette.
Lowers:
-lowers need the sway bar bracket moved to the front of the arm (I have new brackets to weld on so may just leave the originals mounted on the back side).
-remove the steering stop on the lower??
-remove and swap around the mounting shaft.
Uppers:
-swap left to right.
-machine the mounting shaft to achieve desirable alignment specs (camber/caster).
-possibly have to elongate one of the mounting holes on the shaft. Which hole is preferred to elongate?
If I missed anything, please let me know.
-Jimbo
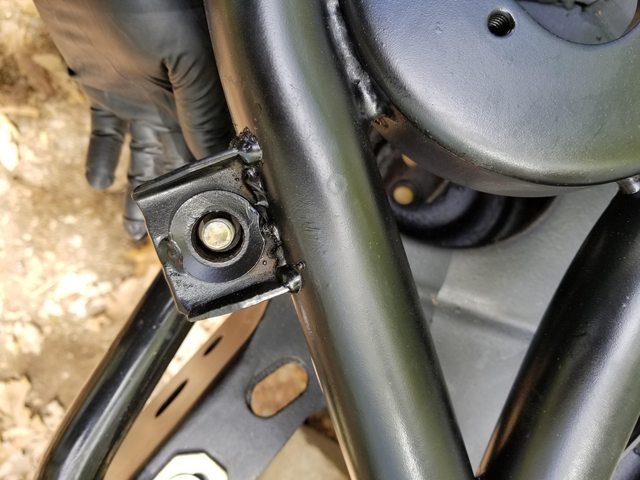
Gotta love New England weather. 30 degrees under average for the last week. It was 34 degrees overnight and warmed up to a balmy 44 during the day...and it has been raining for days. I did manage to find a little dry time between storms to get out and test fit the lower control arm project. I wanted to ensure that I was welding the sway bar tab back in absolutely the right spot so this was the most sure method that I could think of.
To so start I installed the sway bar link into the bar and tightened it enough so that it was rigid and then installed the lower control arm into place. It worked perfectly and gave me an exact idea of where I needed the tab to be welded.
Attachment 48348065
Attachment 48348066
Then it was a simple matter of fixing the tab in place so that it could be welded. I triple checked the location as I was borrowing an adage from the wood working community: measure thrice, weld once.
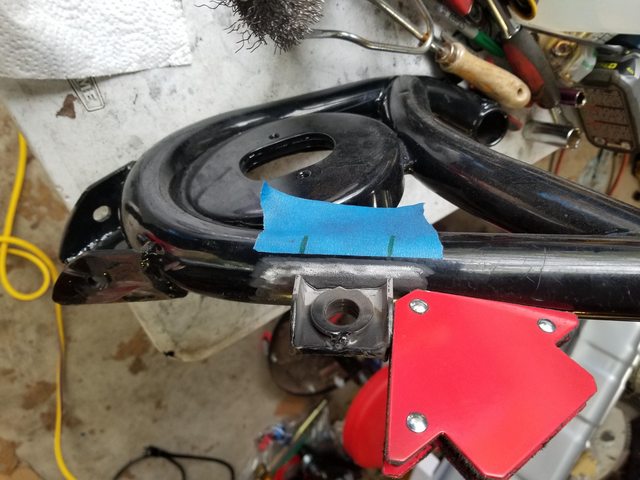
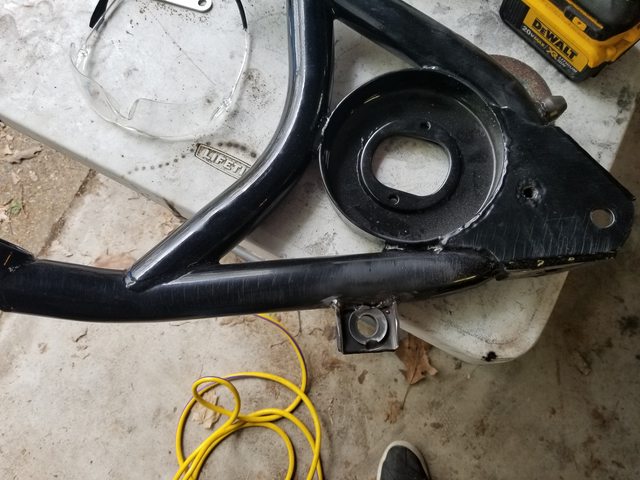
The weld looks terrible because I ran out of shielding gas mid-stream but it is very strong. Since I do not want this popping off while driving I did a very scientific test: I smacked the tab with a 5lb sledge. It passed :-p
I also welded the steering bump stop back in on the correct side. Note that it had to be placed up on the tube rather than on the flat spot that it came off of. This is based off of measurements taken from the original control arms. Since the shapes are different there is no easy way to do this so I used the center of the ball joint hole as a constant since I know that it has to be the same between both arms.
So, I have to go get more shielding gas today and then I will clean up the weld on this tab and start on the other side.
Last edited by PainfullySlow; 05-14-2019 at 10:54 AM.
05-14-2019, 01:40 PM
#443

Has anyone installed these and run them yet? I have mine on order. Going to run them with coilovers. This is my takeaway from this thread....
-you need to swap the uppers and lowers left to right to make them work on a vette.
Lowers:
-lowers need the sway bar bracket moved to the front of the arm (I have new brackets to weld on so may just leave the originals mounted on the back side).
-remove the steering stop on the lower??
-remove and swap around the mounting shaft.
Uppers:
-swap left to right.
-machine the mounting shaft to achieve desirable alignment specs (camber/caster).
-possibly have to elongate one of the mounting holes on the shaft. Which hole is preferred to elongate?
If I missed anything, please let me know.
-Jimbo
-you need to swap the uppers and lowers left to right to make them work on a vette.
Lowers:
-lowers need the sway bar bracket moved to the front of the arm (I have new brackets to weld on so may just leave the originals mounted on the back side).
-remove the steering stop on the lower??
-remove and swap around the mounting shaft.
Uppers:
-swap left to right.
-machine the mounting shaft to achieve desirable alignment specs (camber/caster).
-possibly have to elongate one of the mounting holes on the shaft. Which hole is preferred to elongate?
If I missed anything, please let me know.
-Jimbo
and I DID NOT swap left to right. I installed the left on the left side, and the right on the right. I would think if you swap the positions on the upper control arms, you will end up with NEGATIVE caster, which defeats the purpose of using these arms. In regards of elongating one of the upper control arm shaft mounting holes, I chose to use the rear mounting hole, although it really shouldn't make a difference.
Last edited by sunflower 1972; 05-14-2019 at 02:37 PM.
The following users liked this post:
bmans vette (05-14-2019)
05-14-2019, 09:12 PM
#444
Burning Brakes
One down, one to go. Perfectly powdercoated after all of the modifications.
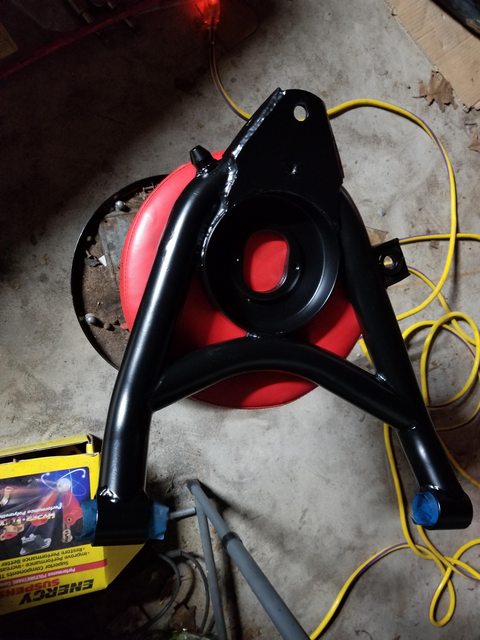
The second one is all welded up and just awaiting powder. If the weather holds I should be able to mount these tomorrow.
One important note: These are NOT powdercoated from the vendor, they are painted. If you want to powder coat these you will have to take them down to bare metal (which I did). I am really glad that I discovered this as I feel that the paint on them, while it looks nice new, is not very durable.
The following 3 users liked this post by PainfullySlow:
05-15-2019, 12:26 AM
#445
Race Director


Member Since: Nov 2006
Location: Athens GA
Posts: 19,446
Received 351 Likes
on
304 Posts
St. Jude Donor '12-'13, '15- '16-'17-'18-'19, '21

One down, one to go. Perfectly powdercoated after all of the modifications.

The second one is all welded up and just awaiting powder. If the weather holds I should be able to mount these tomorrow.
One important note: These are NOT powdercoated from the vendor, they are painted. If you want to powder coat these you will have to take them down to bare metal (which I did). I am really glad that I discovered this as I feel that the paint on them, while it looks nice new, is not very durable.
The second one is all welded up and just awaiting powder. If the weather holds I should be able to mount these tomorrow.
One important note: These are NOT powdercoated from the vendor, they are painted. If you want to powder coat these you will have to take them down to bare metal (which I did). I am really glad that I discovered this as I feel that the paint on them, while it looks nice new, is not very durable.
Nice look.
 05-15-2019, 07:23 AM
#446
Burning Brakes
I received my upper and lowers last night. Wow, these things are heavy duty!
Got the lowers all set and installed. They are nice quality. Still have to weld on the tab for the sway bar.
If these bushing ever fail, what can we replace them with?
-Jimbo
Got the lowers all set and installed. They are nice quality. Still have to weld on the tab for the sway bar.
If these bushing ever fail, what can we replace them with?
-Jimbo
05-15-2019, 11:01 AM
#447
Burning Brakes
Thread Starter

Member Since: Jul 2012
Location: Slovenia, EU
Posts: 1,116
Received 263 Likes
on
128 Posts
2017 C3 of Year Finalist

They should be OEM size!
Last edited by Primoz; 05-15-2019 at 11:01 AM.
05-15-2019, 08:52 PM
#448
Burning Brakes
I still have the lower bushings out and will compare them to the extreme energy set that I have sitting here for the OEM control arms. Stay tuned, I will let you know...
05-15-2019, 09:03 PM
#449
Race Director
Member Since: Nov 2006
Location: Athens GA
Posts: 19,446
Received 351 Likes
on
304 Posts
St. Jude Donor '12-'13, '15- '16-'17-'18-'19, '21
[QUOTE=PainfullySlow;1599409085]Ah nope, I didnt cover it but yes I did media blast them to bare metal and any time I expose bare ferrous metal, I always coat it with afterblast for the phosphate coating.
/QUOTE]
Thanks Mike!
/QUOTE]
Thanks Mike!
05-17-2019, 08:34 AM
#450
Burning Brakes
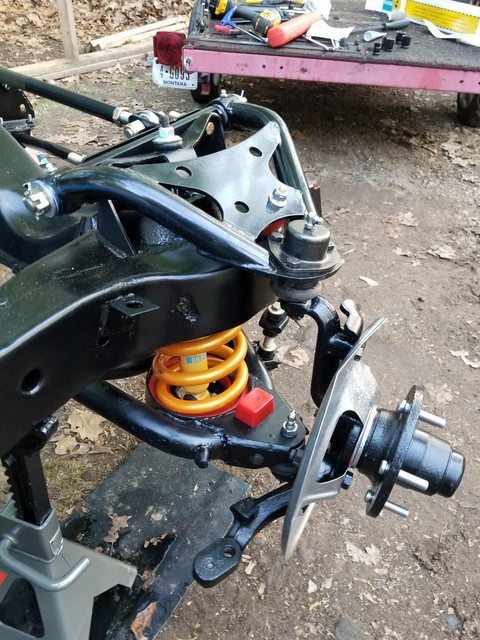
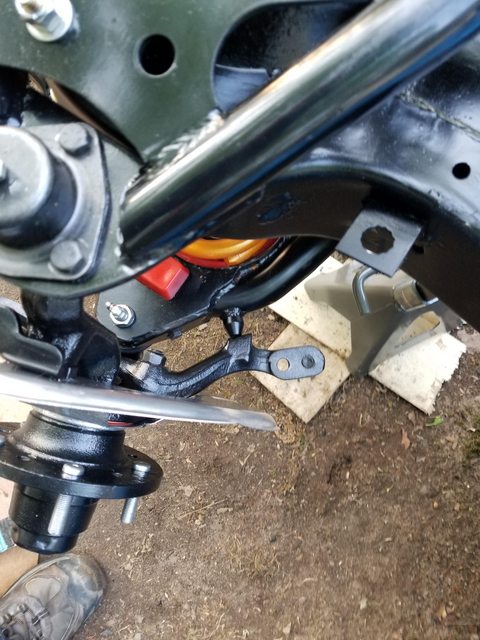
I got them mounted up and they look good. Installed new Moog ball joints since I was not sure what brand/quality was in there. The re-positioned tabs line up perfectly with the sway bar.
05-17-2019, 07:53 PM
#451
Burning Brakes
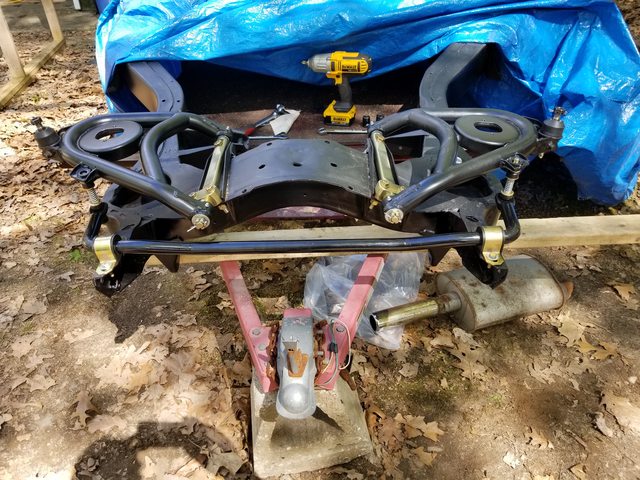
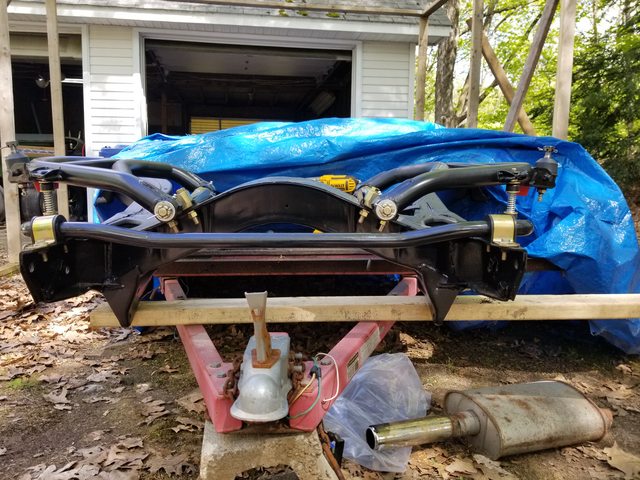
Final update on this thread for a bit as it will be a while before I can actually road test these however I did manage to get both uppers and lowers completely installed and they went in well and without a hitch. Also it is good to see that my OCD actually paid off for once. All that measuring was worth it as the steering stop ended up exactly where it needed to be.
As a personal note, I do not care for the red delrin bumpers. Those will be getting replaced with something a little more color appropriate for my project.
I will post here again once the car is roadworthy and able to be tested.
As a personal note, I do not care for the red delrin bumpers. Those will be getting replaced with something a little more color appropriate for my project.
I will post here again once the car is roadworthy and able to be tested.
The following 5 users liked this post by PainfullySlow:
bmans vette (05-17-2019),
OldCarBum (05-18-2019),
Primoz (05-18-2019),
sunflower 1972 (05-17-2019),
TreDawg (03-25-2021)
06-05-2019, 12:59 AM
#452


Wow, what a read. Well over an hour and a half.
Quick question, which may be stupid given I have the eBay tubular front upper and lower arms here (long story, eBay Impala stuff some guy on FB is pedaling as "Corvette" and I got taken for almost $600. Will address that separately).
In all these I see people have used the STOCK cross-rods on the POL arms, but I haven't seen anyone talk about using the stock cross-rods on the eBay Tubular arms.
That's probably $75-100 in machine work that I can't do myself. Why can't you use the factory cross-rods instead of machining the eBay ones?
Thanks,

The following users liked this post:
74_stingray (06-06-2019)
06-06-2019, 02:22 PM
#454
Burning Brakes
Member Since: Jul 2018
Location: LaFayette Georgia
Posts: 804
Received 280 Likes
on
217 Posts
C3 of Year Finalist (performance mods) 2019
St. Jude Donor '19
Wow, what a read. Well over an hour and a half.
Quick question, which may be stupid given I have the eBay tubular front upper and lower arms here (long story, eBay Impala stuff some guy on FB is pedaling as "Corvette" and I got taken for almost $600. Will address that separately).
In all these I see people have used the STOCK cross-rods on the POL arms, but I haven't seen anyone talk about using the stock cross-rods on the eBay Tubular arms.
That's probably $75-100 in machine work that I can't do myself. Why can't you use the factory cross-rods instead of machining the eBay ones?
Thanks,
Quick question, which may be stupid given I have the eBay tubular front upper and lower arms here (long story, eBay Impala stuff some guy on FB is pedaling as "Corvette" and I got taken for almost $600. Will address that separately).
In all these I see people have used the STOCK cross-rods on the POL arms, but I haven't seen anyone talk about using the stock cross-rods on the eBay Tubular arms.
That's probably $75-100 in machine work that I can't do myself. Why can't you use the factory cross-rods instead of machining the eBay ones?
Thanks,
Eddy
06-06-2019, 02:28 PM
#455
Thanks. Any idea why it works on the POL but not the eBay version? Wonder if it's more easily modified.
That's a lot of meat to take off those cross shafts. Small things I can do here, but that's just way too much metal to do on anything but a mill.
That's a lot of meat to take off those cross shafts. Small things I can do here, but that's just way too much metal to do on anything but a mill.
06-06-2019, 03:16 PM
#456
Race Director

After reading through this thread twice, I'm simply going to re-bush my factory arms and slot the factory cross shafts.
06-06-2019, 03:28 PM
#457
Burning Brakes
Member Since: Jul 2018
Location: LaFayette Georgia
Posts: 804
Received 280 Likes
on
217 Posts
C3 of Year Finalist (performance mods) 2019
St. Jude Donor '19
Yes sir I do, the POL control arms are designed to use factory style bushings and mounting hardware, the ones folks are modifying are not intended for use with factory mounting hardware and dimensions.
Eddy
Eddy
06-06-2019, 07:57 PM
#459
Race Director
Member Since: Nov 2006
Location: Athens GA
Posts: 19,446
Received 351 Likes
on
304 Posts
St. Jude Donor '12-'13, '15- '16-'17-'18-'19, '21
I think you will find that the factory a arms use a pressed-in bushing whereas the aftermarket ones are using a del-a-lum bushing which is different in how it is made and installed. The threaded ends are also different in size and how they are held in place. This would be true of Global West arms also vs the stock arms.
The following users liked this post:
LeeMajors (06-07-2019)
06-07-2019, 08:56 AM
#460
Race Director