
FYI Info to DIY Alignment
 11-11-2017, 02:51 PM
#1
Drifting

Thread Starter
Found this while searching for homemade toe plates:
Front End AlignmentIntroductionThis article is a "How to do a wheel alignment in the comfort of your own garage" Setting wheel alignment seems like weird science, but it's really very simple. Common hardware store items can handle most of the job and produce results good enough for street driving as well as racing. Once you get the methods down, you can set your wheel alignment in an afternoon, saving headaches trying to get the local alignment shop to do what you want, and allowing you to set alignment yourself whenever you tweak your suspension. That's why a lot of road racers and autocrossers do alignments themselves.Tools NeededWhat you need:
Finally, make sure the car is carrying all its normal weight in gas and other fluids, spare tire, etc. If you are aligning a project car that isn't finished, simulate missing parts by piling them near their future location on the car or using other objects with a similar weight. You may also simulate the driver's weight by piling heaving objects on the driver's seat.
You need a smooth, flat surface, like a garage or carport floor. Use the carpenter's level to make sure the floor is level. Few garage floors are perfectly level. Position a long, known-straight object (angle-iron, tubing or quality 2x4) across the width of the area where the front tires will sit.
Put flooring squares under the low side until the bubble is centered. Position the flooring squares where your front tires will sit and mark their location on the floor with a felt pen or nail scratch. Take two more flooring squares for each side and smear wheel bearing grease between them, then set these on top of the flooring squares you positioned earlier. These are homemade turning plates; they'll keep the suspension from binding as you make suspension adjustments (important for accuracy). Roll or drive the car up onto the flooring squares, set the parking brake, and block the rear wheels (you don't want the car moving).
CasterGM recommends setting caster first, followed by camber, then toe. The reason is obvious if you take a hard look at the suspension: Caster and camber changes also alter toe-in, because the tie rods are pivot points.

A caster-camber gauge is important at this stage. Some people use various carpenter's tools, but the caster-camber gauge from Racer Parts Wholesale is cheap enough that it's not worth bothering. This is a simple but precise tool, and it's the only special tool you need. It's simply a bubble gauge attached to a precisely cut frame that you hold against the wheel rim.
I'll leave the details to the instructions that come with the gauge. but basically, with the gauge against the wheel, you turn the adjusting **** until the bubble is centered, counting the number of turns. Each 1/8 turn equals 1/8 of a degree, and so on.
It's important to be consistent about WHERE you hold the gauge on the wheel; use the outermost edge of the rim if possible to avoid placing it on wheel curves. Caster is measured at each wheel by first turning the wheel ?in? one full turn of the steering wheel and taking a measurement, then turning it out one full turn and measuring again (you'll notice the wheels turn easily thanks to your slip plates!).
The difference is caster angle, or, simplified, the relationship in degrees between the upper and lower ball joints. Caster is adjusted by adding or subtracting shims from the two bolts that attach the upper A-arm to the frame. Fewer shims on the rear bolt means LESS positive caster; more shims means MORE positive caster (and vice-versa for the front bolt). You can add or subtract shims from either bolt, or move shims between front and rear bolts. Start with small changes, then take another reading to see where you?re at, and be sure to tighten the bolts after adjusting shims.
(NOTE: Don't allow the shim pack on these bolts to get too thick. GM specifies at least two full threads should show on the bolts, and that the front and rear shim packs should differ by no more than .40". If you do this and can't get the recommended settings, you have a bent frame or badly worn suspension parts).
Don't sweat too much about setting caster right on the money. This is a non-treadwear adjustment and mainly affects steering feel (more caster means more high-speed stability and steering effort). Just be sure the two sides are close.
CamberOnce you have caster set on both sides, move on to camber by centering the steering wheel. Hold the caster-camber gauge against the wheel on each side and take an initial reading. Camber is adjusted by adding or removing an equal number of shims on both A-arm bolts.
(NOTE: The number and size of shims you add or remove MUST BE EQUAL for each bolt or you will undo the caster adjustment you just made!).
Depending on that first reading, add or subtract shims to get the desired camber measurement. Adding shims creates more NEGATIVE camber; subtracting shims produces POSITIVE camber. Try shims of different widths, if you have them, to get the measurement you want.
Camber is very much a performance-oriented measurement. Road racers like a lot of negative camber because it helps the tires grip in hard cornering, but it also causes faster and uneven tread wear. A good compromise for the street would be 0 degrees camber, or maybe just slightly negative, as this will make the car handle better without hurting tire wear.
Toe SettingToe setting is the most difficult part of this exercise, and to do it right you need to build a box. First, double-check that your steering wheel is still centered, and check your slip plates to make sure they are still squarely under the tires (all that caster adjusting can shift them around).
Set a jackstand at each corner of the car and tie your string between them to make a box around the car. Carefully adjust the string and jackstands so the distance from the car to the string is identical on both sides, leaving yourself enough room to work around the wheels. Measure the rear distance from the front and rear edges of the wheel rims; measure the front from a flat surface on the wheel's center hub.
Draw a picture of the box you've just made and the measurements so you can refer to it later (it's good to check these measurements periodically to ensure the car hasn't moved). This box helps ensure your front wheels are square with the rear wheels, ensuring your car will travel straight and not sideways like a crab.

Next, focus on the front wheels and measure the distance from the wheel rims to the string, using both the front and rear edges of each rim (again, use the flat, outermost part of the rim and not a curved part). You'll notice right away that these measurements are different front and rear -- this is toe.
Note these measurements on your cheat sheet. Measure carefully, as you are dealing in 16ths of an inch or less. Study the measurements for a minute. If the front edge of one rim is further from the string than the rear edge, that wheel is toed in. Vice versa: if the rear edge is further away than the front edge, that wheel is toed out. If the left side is toed out and the right is toed in, the car will pull to the left. If both sides are toed out dramatically, you'll have a lot of tire wear and a twitchy feeling in the steering wheel.
Loosen the tie rod sleeves and start the adjustments by working on one front wheel at a time. Concentrate first on getting the wheel pointed straight ahead -- so the front and rear measurements from the wheel rim to the string are the same. Turn the sleeve in small amounts until you get familiar with how it affects toe; it's helpful to watch the slip plates move as you turn the sleeve and make frequent measurements.
Get one wheel straight, then move to the other side.
Now, with both front wheels aimed dead ahead, the car should be square (rear wheels following the path of the fronts). Verify that the steering wheel is still straight, and measure your box around the car once again to make sure nothing has changed. If everything looks good, it's time to make your toe plates.
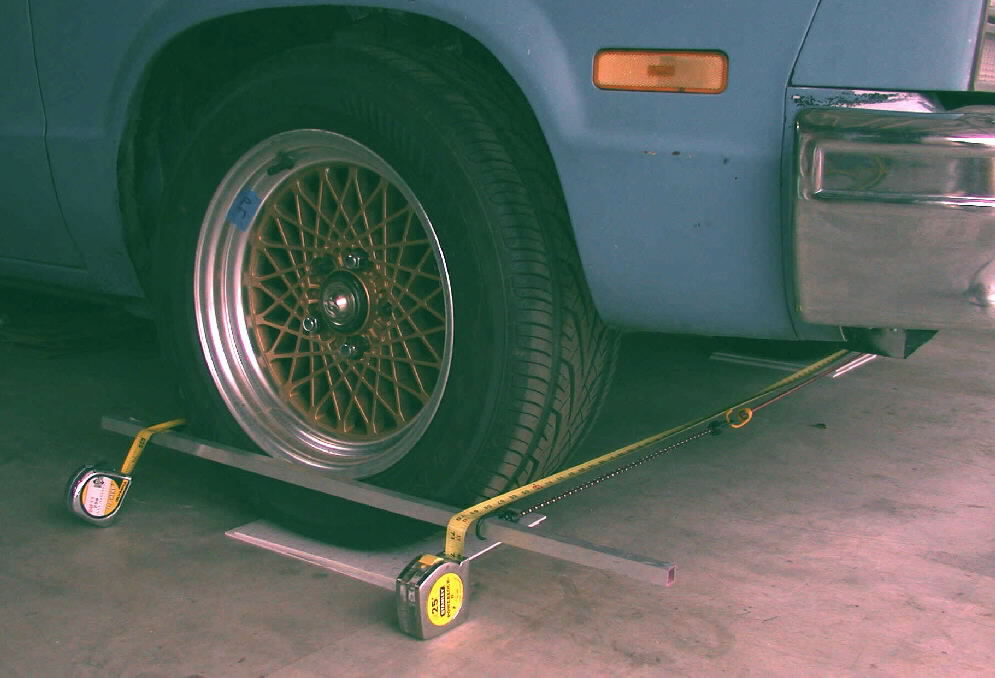
Take the two pieces of square-channel tubing and place them on the floor along the outside of each front tire. Hook a bungee cord to each end of the tube close to the tire, then hook another bungee to the free end of the first one. Move to the other side and reach under the car, grabbing the loose end of the bungees and hooking them to the other piece of square tubing. The two tubing sections should now be attached by the bungee cords to the outside of the front tires (use the right combination of bungees so the tubing is snug but not distorted).
Raise the tubing on each side so the tubes are above the tire bulge -- about 4" above the slip plates is good -- and measure front and rear ends of the tubes so they are approximately level. These tubes are your toe plates, a cheap version of a fancy alignment device.
The tubes will follow wheel movements as you adjust the suspension, and the crisp edge of the square tubing makes a good measuring point.
Next, run two tape measures under the car and across the tubing pieces both in front of and behind the tires. The tapes should be right up against the tire and not hung up on the bungee cords. Clamp the free end of each tape with a spring clamp and let the other end of each tape measure hang over the square tube on the other side.
Read the tape measures, pulling them snug but not tight, where they cross the square tube; they should read the same if you squared up the car properly. If not, make some more adjustments until the car is square and the two tapes give the same measurement.
You are done at this point if you want your car to have 0 toe. Toe is another performance setting that can be very personal. Some autocrossers like a little toe-out because it helps the car turn in quicker. But on the street, it can cause a lot of tire wear and make the car feel twitchy.
Zero toe may be a good compromise, but a smidge of toe-in is probably best for a street car. So, if you want a little toe-in, adjust the tie-rod sleeves equally, and in very small amounts, on each side of the car until you see a little toe-in, both on the tape measures and on your measurements of the box.
For a total toe-in measurement of 1/16", you want 1/32" on each side, which probably isn't even shown on your tape measure, so pay close attention to where the tape measures fall on the tubing and take precise readings against the box. It helps to write down each measurement at this stage to get it just right, and it may take a couple tries. When you've got it where you want, tighten up the tie-rod sleeves carefully so you don't change their position, torque the A-arm bolts and go enjoy a test drive.
Resources: Car Craft: June 2001
Grassroots Motorsports: July/August 1998, March 2002, June 2002
Last updated:
Front End AlignmentIntroductionThis article is a "How to do a wheel alignment in the comfort of your own garage" Setting wheel alignment seems like weird science, but it's really very simple. Common hardware store items can handle most of the job and produce results good enough for street driving as well as racing. Once you get the methods down, you can set your wheel alignment in an afternoon, saving headaches trying to get the local alignment shop to do what you want, and allowing you to set alignment yourself whenever you tweak your suspension. That's why a lot of road racers and autocrossers do alignments themselves.Tools NeededWhat you need:
- 2 3-foot lengths of square-channel aluminum tubing
- 10 to 20 linoleum flooring squares
- Wheel bearing grease
- Carpenter's level
- 2 spring clamps
- 3 tape measures
- 4 jackstands camber/caster gauge (#RPW-9500, $40 from racerpartswholesale.com)
- 40 feet of thin, high-visibility string (the orange stuff used by surveyors is good)
- 4 medium-length bungee cords
- Suspension adjusting shims of various widths (from most auto parts stores)
- Various wrenches and sockets
- GM settings...
- Caster: +2.8 deg, +/- 1 deg.
- Camber: +.5 deg, +/- .8 deg.
- Toe-in: .1 deg, +/- .2 deg.
- Performance settings (from Global West Suspension)...
- Caster: +2.5 deg. driver's side, +3 deg. Passenger side
- Camber: -.25 deg.
- Toe-in: 1/16"
Finally, make sure the car is carrying all its normal weight in gas and other fluids, spare tire, etc. If you are aligning a project car that isn't finished, simulate missing parts by piling them near their future location on the car or using other objects with a similar weight. You may also simulate the driver's weight by piling heaving objects on the driver's seat.
You need a smooth, flat surface, like a garage or carport floor. Use the carpenter's level to make sure the floor is level. Few garage floors are perfectly level. Position a long, known-straight object (angle-iron, tubing or quality 2x4) across the width of the area where the front tires will sit.
Put flooring squares under the low side until the bubble is centered. Position the flooring squares where your front tires will sit and mark their location on the floor with a felt pen or nail scratch. Take two more flooring squares for each side and smear wheel bearing grease between them, then set these on top of the flooring squares you positioned earlier. These are homemade turning plates; they'll keep the suspension from binding as you make suspension adjustments (important for accuracy). Roll or drive the car up onto the flooring squares, set the parking brake, and block the rear wheels (you don't want the car moving).
CasterGM recommends setting caster first, followed by camber, then toe. The reason is obvious if you take a hard look at the suspension: Caster and camber changes also alter toe-in, because the tie rods are pivot points.
I'll leave the details to the instructions that come with the gauge. but basically, with the gauge against the wheel, you turn the adjusting **** until the bubble is centered, counting the number of turns. Each 1/8 turn equals 1/8 of a degree, and so on.
It's important to be consistent about WHERE you hold the gauge on the wheel; use the outermost edge of the rim if possible to avoid placing it on wheel curves. Caster is measured at each wheel by first turning the wheel ?in? one full turn of the steering wheel and taking a measurement, then turning it out one full turn and measuring again (you'll notice the wheels turn easily thanks to your slip plates!).
The difference is caster angle, or, simplified, the relationship in degrees between the upper and lower ball joints. Caster is adjusted by adding or subtracting shims from the two bolts that attach the upper A-arm to the frame. Fewer shims on the rear bolt means LESS positive caster; more shims means MORE positive caster (and vice-versa for the front bolt). You can add or subtract shims from either bolt, or move shims between front and rear bolts. Start with small changes, then take another reading to see where you?re at, and be sure to tighten the bolts after adjusting shims.
(NOTE: Don't allow the shim pack on these bolts to get too thick. GM specifies at least two full threads should show on the bolts, and that the front and rear shim packs should differ by no more than .40". If you do this and can't get the recommended settings, you have a bent frame or badly worn suspension parts).
Don't sweat too much about setting caster right on the money. This is a non-treadwear adjustment and mainly affects steering feel (more caster means more high-speed stability and steering effort). Just be sure the two sides are close.
CamberOnce you have caster set on both sides, move on to camber by centering the steering wheel. Hold the caster-camber gauge against the wheel on each side and take an initial reading. Camber is adjusted by adding or removing an equal number of shims on both A-arm bolts.
(NOTE: The number and size of shims you add or remove MUST BE EQUAL for each bolt or you will undo the caster adjustment you just made!).
Depending on that first reading, add or subtract shims to get the desired camber measurement. Adding shims creates more NEGATIVE camber; subtracting shims produces POSITIVE camber. Try shims of different widths, if you have them, to get the measurement you want.
Camber is very much a performance-oriented measurement. Road racers like a lot of negative camber because it helps the tires grip in hard cornering, but it also causes faster and uneven tread wear. A good compromise for the street would be 0 degrees camber, or maybe just slightly negative, as this will make the car handle better without hurting tire wear.
Toe SettingToe setting is the most difficult part of this exercise, and to do it right you need to build a box. First, double-check that your steering wheel is still centered, and check your slip plates to make sure they are still squarely under the tires (all that caster adjusting can shift them around).
Set a jackstand at each corner of the car and tie your string between them to make a box around the car. Carefully adjust the string and jackstands so the distance from the car to the string is identical on both sides, leaving yourself enough room to work around the wheels. Measure the rear distance from the front and rear edges of the wheel rims; measure the front from a flat surface on the wheel's center hub.
Draw a picture of the box you've just made and the measurements so you can refer to it later (it's good to check these measurements periodically to ensure the car hasn't moved). This box helps ensure your front wheels are square with the rear wheels, ensuring your car will travel straight and not sideways like a crab.
Note these measurements on your cheat sheet. Measure carefully, as you are dealing in 16ths of an inch or less. Study the measurements for a minute. If the front edge of one rim is further from the string than the rear edge, that wheel is toed in. Vice versa: if the rear edge is further away than the front edge, that wheel is toed out. If the left side is toed out and the right is toed in, the car will pull to the left. If both sides are toed out dramatically, you'll have a lot of tire wear and a twitchy feeling in the steering wheel.
Loosen the tie rod sleeves and start the adjustments by working on one front wheel at a time. Concentrate first on getting the wheel pointed straight ahead -- so the front and rear measurements from the wheel rim to the string are the same. Turn the sleeve in small amounts until you get familiar with how it affects toe; it's helpful to watch the slip plates move as you turn the sleeve and make frequent measurements.
Get one wheel straight, then move to the other side.
Now, with both front wheels aimed dead ahead, the car should be square (rear wheels following the path of the fronts). Verify that the steering wheel is still straight, and measure your box around the car once again to make sure nothing has changed. If everything looks good, it's time to make your toe plates.
Raise the tubing on each side so the tubes are above the tire bulge -- about 4" above the slip plates is good -- and measure front and rear ends of the tubes so they are approximately level. These tubes are your toe plates, a cheap version of a fancy alignment device.
The tubes will follow wheel movements as you adjust the suspension, and the crisp edge of the square tubing makes a good measuring point.
Next, run two tape measures under the car and across the tubing pieces both in front of and behind the tires. The tapes should be right up against the tire and not hung up on the bungee cords. Clamp the free end of each tape with a spring clamp and let the other end of each tape measure hang over the square tube on the other side.
Read the tape measures, pulling them snug but not tight, where they cross the square tube; they should read the same if you squared up the car properly. If not, make some more adjustments until the car is square and the two tapes give the same measurement.
You are done at this point if you want your car to have 0 toe. Toe is another performance setting that can be very personal. Some autocrossers like a little toe-out because it helps the car turn in quicker. But on the street, it can cause a lot of tire wear and make the car feel twitchy.
Zero toe may be a good compromise, but a smidge of toe-in is probably best for a street car. So, if you want a little toe-in, adjust the tie-rod sleeves equally, and in very small amounts, on each side of the car until you see a little toe-in, both on the tape measures and on your measurements of the box.
For a total toe-in measurement of 1/16", you want 1/32" on each side, which probably isn't even shown on your tape measure, so pay close attention to where the tape measures fall on the tubing and take precise readings against the box. It helps to write down each measurement at this stage to get it just right, and it may take a couple tries. When you've got it where you want, tighten up the tie-rod sleeves carefully so you don't change their position, torque the A-arm bolts and go enjoy a test drive.
Resources: Car Craft: June 2001
Grassroots Motorsports: July/August 1998, March 2002, June 2002
Last updated:

The following 2 users liked this post by sunflower 1972:
69L46vert (08-26-2018),
Rescue Rogers (11-12-2017)


