When you click on links to various merchants on this site and make a purchase, this can result in this site earning a commission. Affiliate programs and affiliations include, but are not limited to, the eBay Partner Network.
Tried to insert it (bit tight under there for my hands) but it goes not thru all the way.
Just to make sure (and not to waste any time): the gage has to go thru till the stop? What can I do if not? Alle levers are in neutral also tried to move the levers to align the slot with the gage.
If it's the same gauge shown in the AIM the answer is yes and it can be a real PIA to get it in....You will probably have to unhook the levers from the transmission....A real long pair of hemostats helps.
I had shifting issues with a '77 Pontiac T/A, with a Hurst shifter, even though I had CAREFULLY set the neutral gate on the shifter, using the pin. For me, I had to get the shift levers on the tranny in the neutral position, and while the first two levers in the shifter were then aligned with the pins, and the "gauge holes" in the levers, I had to have the innermost lever just a slight bit off center. Just a thought........
I posted this in the past hopefully this may help.
Rick
Originally Posted by RickDett
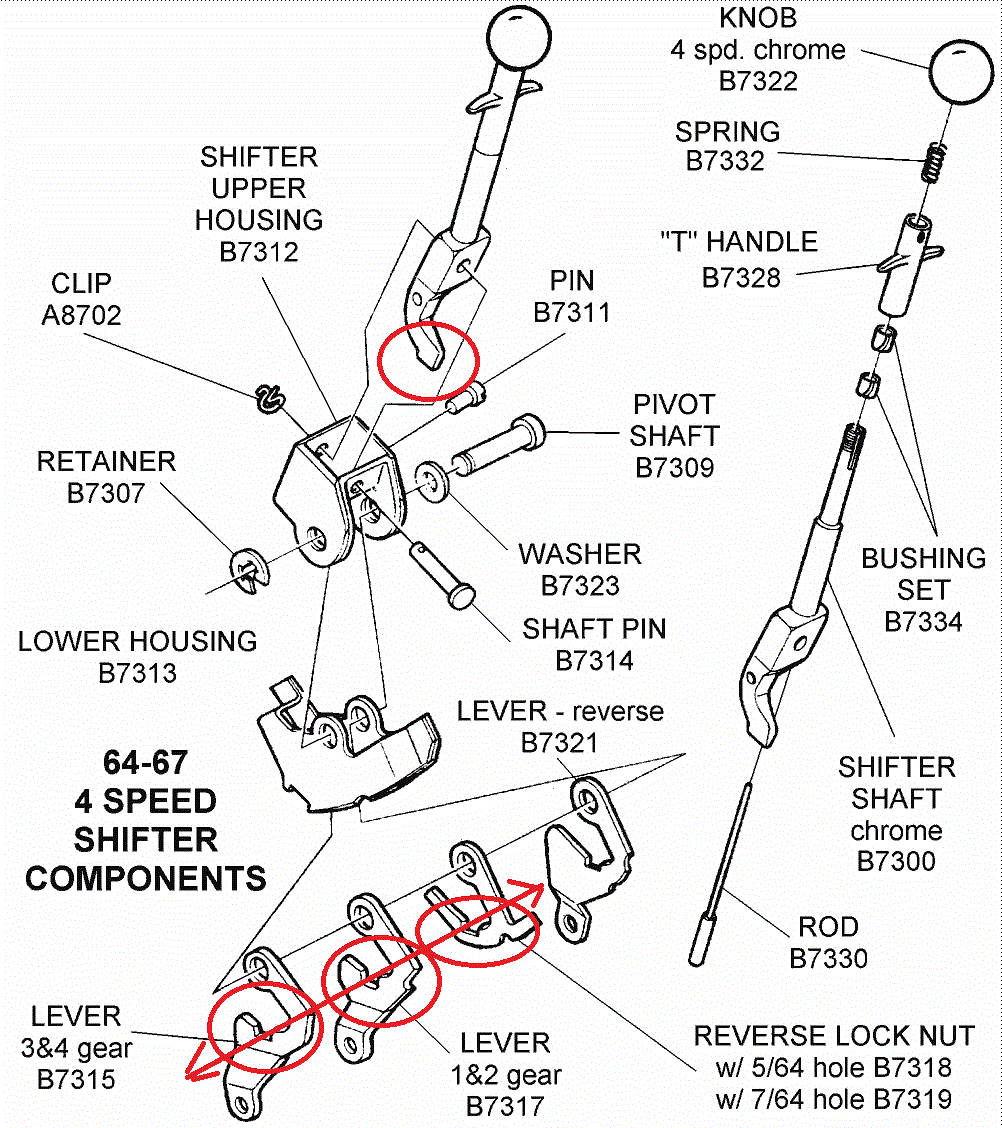
Linkage adjustment can be done with or without the tool, without the tool is done by feel and can work very well if you understand what you are doing. It helps to have an idea of what the shifter linkage looks like see picture below.
On the bottom of the shifter handle there is a flat portion that lines up and passes though/across each of the open square portions in the linkage lever plates; this is also the area where the locating gauge would align the plates. Note about the shifter handle, the shift pattern is opposite at the bottom below the pivot point, as you put the shifter in first gear, forward left position, the bottom of the shifter is moved to the opposite right rear position. So the leaver plates are as follows from left to right: one plate for 3 & 4 on left, the center one for 1 & 2 and right side one for reverse. With the engine off pull up on the reverse lock out leaver and run through the gears to let them set in to their natural gear position. Then set the shifter in the neutral position and pull up on the reverse lock out leaver again then you should be able to move the shifter handle from side to side and feel as the bottom of the shifter handle passes through each of the three plates that they should not touch or bump the edges of the square pass through sections in the plates (don�t expect the plates to be perfectly lined up just feel that it passes though without bumping the edges of the plates. If you are bumping a plate you will need to adjust the transmission linkage nut just a thread turn or a few turns at a time until if feels clear. If you are bumping a plate on the forward front side (as if pulling the handle) you will need to extend the linkage rod, if you are pumping at the rear (as if pushing the handle) you will need to shorten the rod length, you should not have to pull or push the handle. It should be perfect when you are able to move the handle side to side with out bumping the plates. On another note if you are hitting the console at the front or back equally adjust the three transmission linkage rods (same number of thread turns) to center the shifter throw, if you are hitting in the forward 1, 3 or R shorten the rods or extend for 2 and 4th gears in equal thread length turns. Before you change any linkage count the number of turns to unthread the linkage bar so if you are unsuccessful you can return everything to the original starting point without father miss adjustment.
It should go through B7315, B7317, B7319 and B7321
My tool made from some scrap aluminum I had laying around:
If you're having trouble getting it all the way through loosen up the rods ends at the transmission to allow the shifter plates to move so you can wiggle the tool into place. Once there you can adjust the rods to the correct length. If your shifter has never been rebuilt it may need it. The rebuild kits come with different thickness plates to take up the slack.
Also, take a look at the transmission arms that the rods attach to. If they have two holes switch them to the lower hole for short throw action.
I researched the shifter adjustment topic for my '75 until I was blue in the face. I don't think I missed any internet post regarding the shifter. This post along with the accompanying threads were by far the best and most thorough. My wife and I, yes my wife, after reviewing this post one more time, went to the garage and after an hour or so were able to successfully shift the car into reverse; and the other four gears with ease.
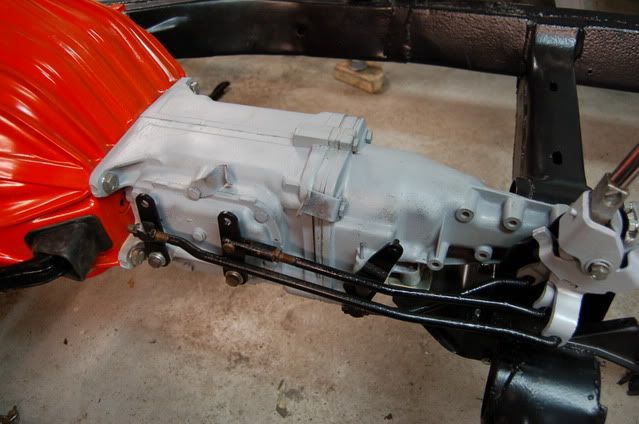
The shifter was in the car while the adjustment was made. I don't think this is cheating but I have to admit that I have a 10,000# two post hydraulic lift in my garage. This beats the crap out of laying on a creeper.
My tip: if the shifter is in the car, which it was, remove the 3rd/4th gear linkage rod totally from the shifter and the transmission. Removal of this rod make it so much easier to get your hand into the workspace. We also unbolted the 1st/2nd rod from the tranny, leaving it on the shifter and unbolted the reverse linkage from the tranny only as well. This allowed us to insert the adjustment tool all the way through the shifter, and move the shifter linkages much easier.
This whole ordeal started when I removed the tranny, the shifter, bell housing, to replace the clutch. I had no clue that the shifter can easily get out of adjustment. Had I known I would have inserted the little shifter linkage adjustment tool I made into the shifter before I put it back in the car.
Now that I have my baby running and off the lift. I'll be searching for a good paint/body shop.
Here's another tip that worked for us. The official tool dimensions are: Width = .630 (41/64 in.), Length = 2.50, Thickness = 22 gauge sheet metal to make a locating gauge. Buy this gauge of a soft steel sheet at most hardware stores; about $6 or so.
We had trouble getting the official size tool all the way through the slots so we made a tool out of the same sheet metal that was not quite as wide; from 41/64th of an inch to about half: (5/8th). This width tool was easier to get all the way through the reverse linkage. At that point then we moved to the wider tool. With this method, we were able to dial in the correct linkage to get reverse to work.
And... per an earlier thread in this post, the linkage at the tranny, 1st/2nd and 3rd/4th, were already in the holes to create the short throw of the shifter so somebody was messing around before I bought the car. which was in 1997.
This seems so simple now. Not so much when I was sitting in the car trying to find reverse.

 11-12-2017, 07:15 AM