
How to: Remove valve locks, keepers, & Springs?
 01-01-2018, 04:50 PM
#1
Melting Slicks

Thread Starter
Well, while using my valve compressor to open up my valves and clean out some of the little metal bits from chasing my spark plug threads and smoothing out the sharp edges in my chambers, I accidentally popped off a valve keeper...
I used the valve compressor, a pick, and some needle nose pliers to get the keepers back on and the spring reinstalled, but I'm 90% sure that's now how you're SUPPOSED to do it.
How are you supposed to remove valve locks, keepers, springs, etc??
Can't help but feel like I'm missing a tool that I should be using...
Adam
 01-01-2018, 04:56 PM
#2
Drifting


Member Since: Aug 2013
Location: perth Aus w.a
Posts: 1,263
Received 510 Likes
on
270 Posts
2020 Corvette of the Year Finalist (stock)
C3 of Year Winner (stock) 2019

I would tap the top of the valve with a copper hammer to break the keepers loose then use your spring compressor and compress the spring and remove the keepers with a strong magnet .Hope this helps.
01-01-2018, 05:00 PM
#3

dont you typically either use compressed air in the cylinder you are working on or a length of rope to prevent the valves from dropping?
 01-01-2018, 05:35 PM
#4
Le Mans Master

With cylinder head on engine. You need to remove spark plug. Use compressed air with adapter, hose, rope, roll engine until piston is at TDC...etc. Idea is you don't want valve to fall below valve guide. Use a socket and hammer to tap retainer to loosen retainer from keepers. It's possible keepers will come loose so be careful removing socket. Install valve spring compressor an compress assembly. Use pick and magnet to remove keepers. The little "O" ring can hold retainer even without keepers in place. It can get rock hard over time. When reassembling - retainer , "O" ring , keepers. Seal can be pushed down on to valve stem by retainer an ineffective if installed first. Lightly tapping on valve stems afterwards helps make sure keepers stay in place. There is a tool with a magnet designed to install keepers.
01-01-2018, 07:01 PM
#5
Melting Slicks
Thread Starter
I was really asking about with the heads off of the engine.
Here's what I did to accidentally remove the keepers and spring:
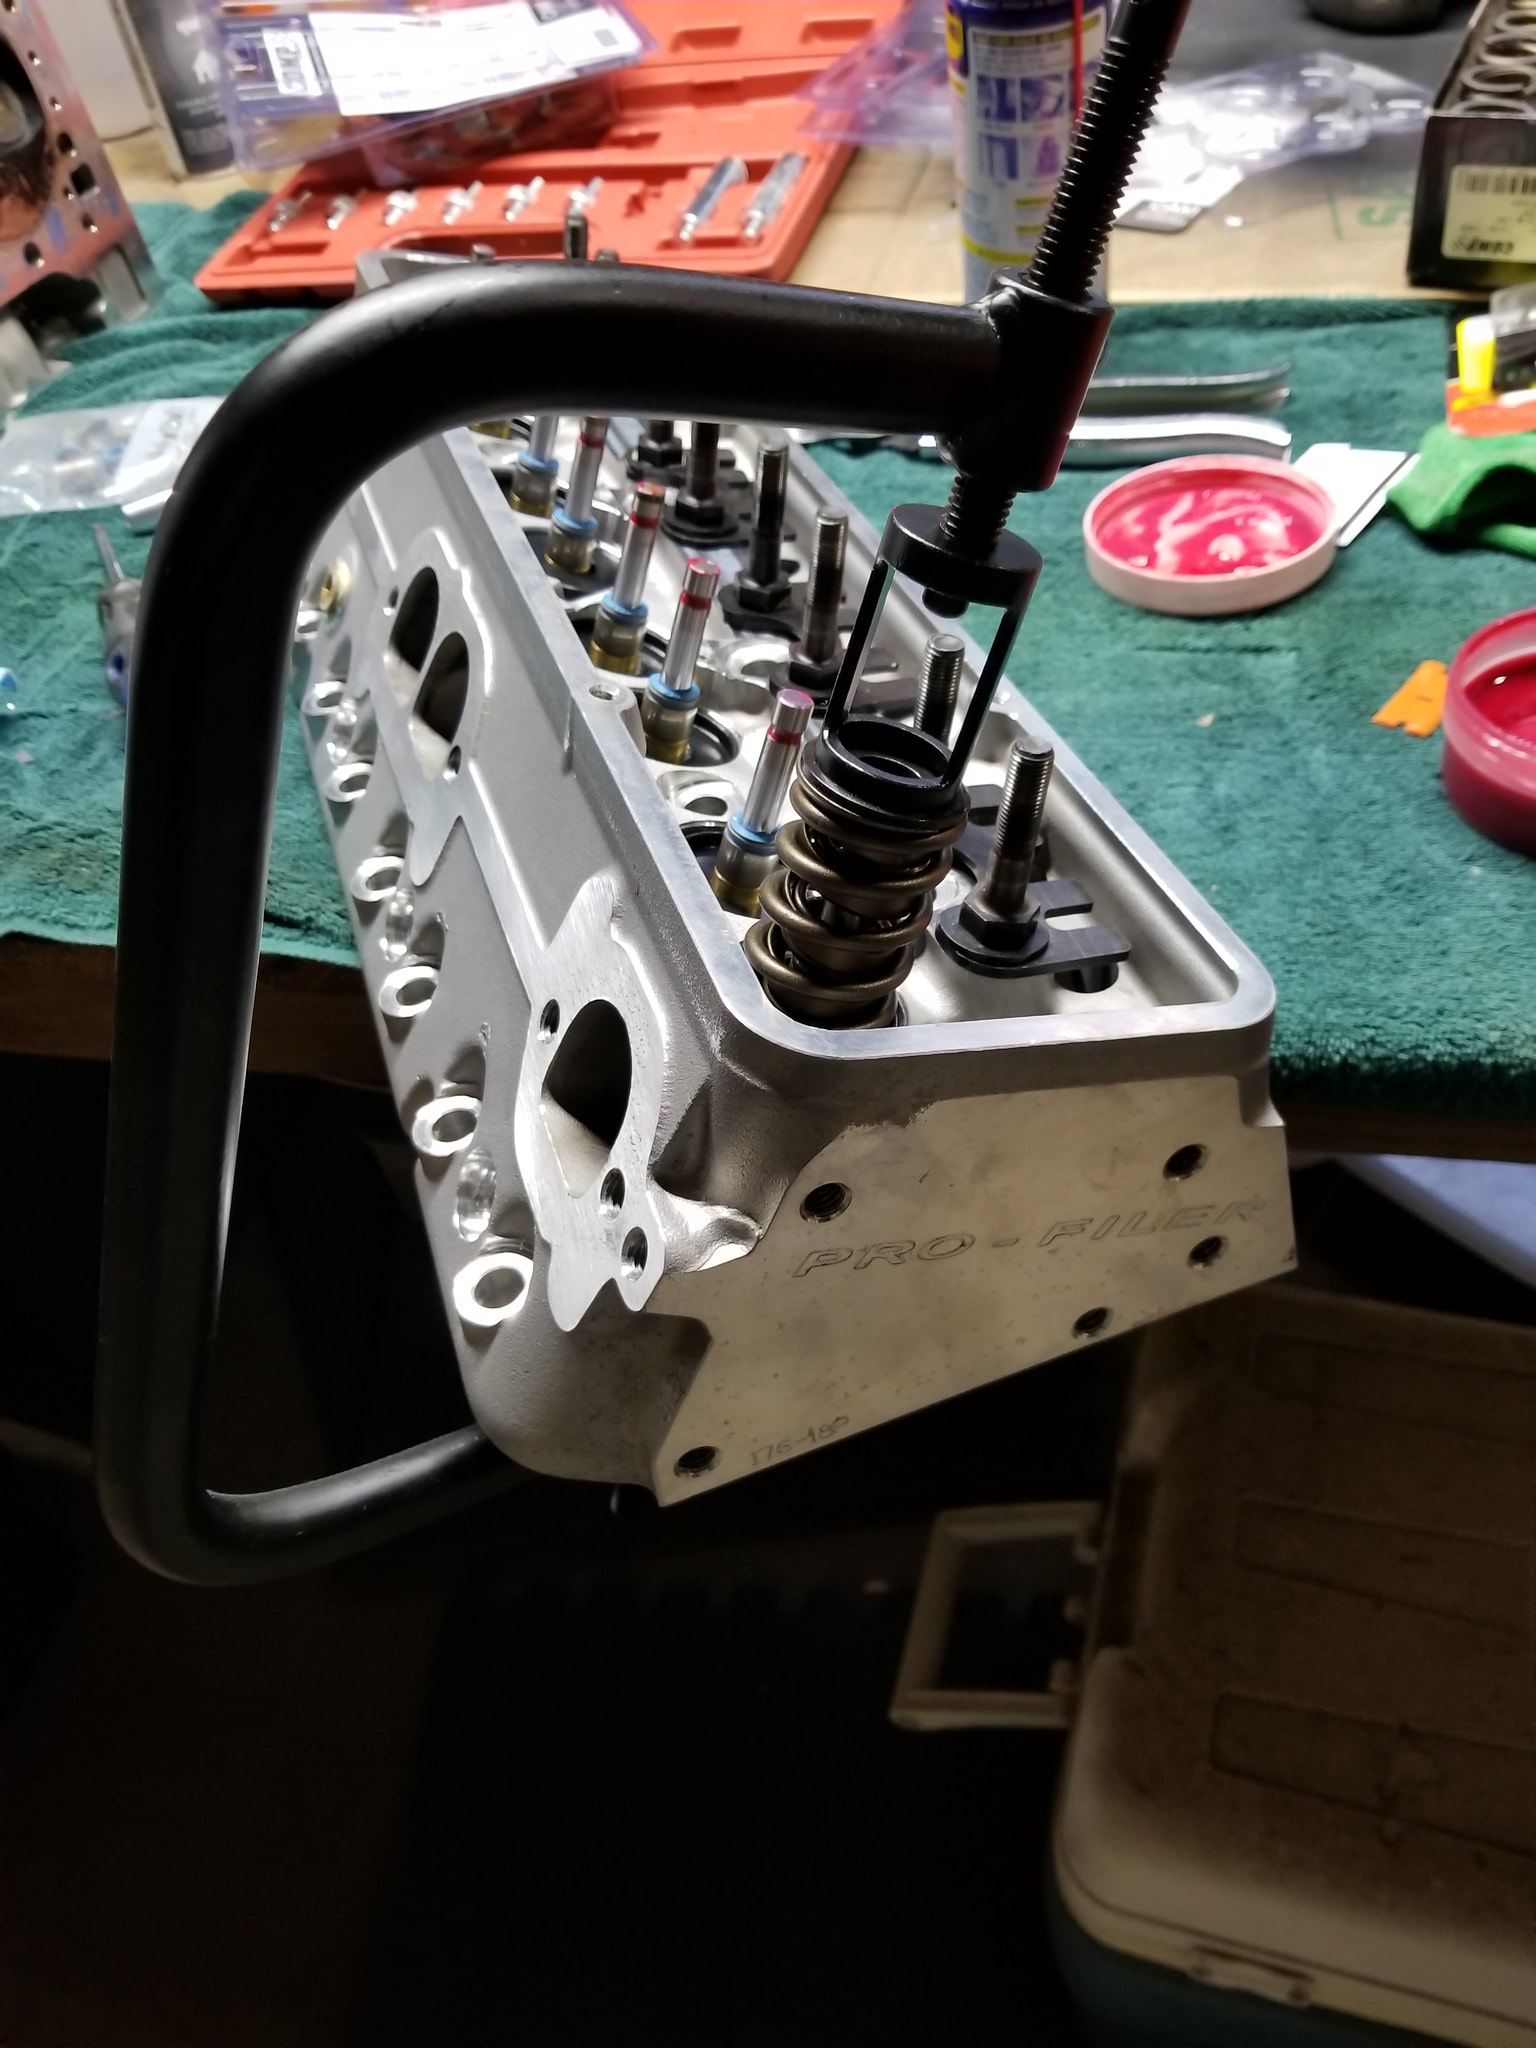
With the heads on the floor and using this (https://www.summitracing.com/parts/sum-906784) when I compress the valve spring with the pressure pushing towards the valves the pressure of the valve pushing down on the floor after the spring is compressed will pop the valve keeper out for easy removal.
I wasn't clear on how you're supposed to put them back together again- when I compress the spring via the retainer, without the keepers being on- the spring bends towards the compressor and I can't fit the keepers in, I just jammed a pick in there to pry down and then could put the keepers in but I'm afraid to hold them with my finger while I decompress the spring (I like keeping my fingers) so then I have to awkwardly hold the keepers with needle nosed pliers. -How do other people do this?
Adam
Here's what I did to accidentally remove the keepers and spring:
With the heads on the floor and using this (https://www.summitracing.com/parts/sum-906784) when I compress the valve spring with the pressure pushing towards the valves the pressure of the valve pushing down on the floor after the spring is compressed will pop the valve keeper out for easy removal.
I wasn't clear on how you're supposed to put them back together again- when I compress the spring via the retainer, without the keepers being on- the spring bends towards the compressor and I can't fit the keepers in, I just jammed a pick in there to pry down and then could put the keepers in but I'm afraid to hold them with my finger while I decompress the spring (I like keeping my fingers) so then I have to awkwardly hold the keepers with needle nosed pliers. -How do other people do this?
Adam
01-01-2018, 07:11 PM
#6
Le Mans Master
Member Since: Aug 2017
Location: Cool Northern Michigan
Posts: 6,899
Received 2,125 Likes
on
1,632 Posts
I was really asking about with the heads off of the engine.
Here's what I did to accidentally remove the keepers and spring:
With the heads on the floor and using this (https://www.summitracing.com/parts/sum-906784) when I compress the valve spring with the pressure pushing towards the valves the pressure of the valve pushing down on the floor after the spring is compressed will pop the valve keeper out for easy removal.
I wasn't clear on how you're supposed to put them back together again- when I compress the spring via the retainer, without the keepers being on- the spring bends towards the compressor and I can't fit the keepers in, I just jammed a pick in there to pry down and then could put the keepers in but I'm afraid to hold them with my finger while I decompress the spring (I like keeping my fingers) so then I have to awkwardly hold the keepers with needle nosed pliers. -How do other people do this?
Adam
When the tool is set up correctly, you should be able to squeeze the spring, sit back and pour a cup of coffee, then slip in the splitlocks easily. As I recall, there is a big adjustment nut on there too, which you have to play with.
Last edited by HeadsU.P.; 01-01-2018 at 07:13 PM.
01-01-2018, 07:17 PM
#7
Race Director


You have find the correct angle of the tool you bought...so when you go and compress the spring and cup...it goes down basically straight.
Finding a way to make sure the valve stays at the top and seated against the heads is a must.
I either do the valves when the head is on the engine so I can pressurize the cylinder...or if it is off...I use the large special 'C' clamp tool that does it so I do not have to wrestle the head.
QUESTION:
Are you replacing the valve seals??? Not knowing what type of head you have or any of that...IF you have the 'O' ring style valve seal....you DO KNOW how to install them correctly???
Because the 'O' ring MUST go on the valve stem AFTER you have compressed the spring and cup. IF you install the 'O' ring on the valve stem and assemble it after that...you wipe the 'O' ring out of the groove. Thus rendering it useless.
DUB
Last edited by DUB; 01-01-2018 at 07:19 PM.
01-01-2018, 07:43 PM
#8
Le Mans Master
Member Since: Aug 2017
Location: Cool Northern Michigan
Posts: 6,899
Received 2,125 Likes
on
1,632 Posts
DUB is correct. And there is a reason the "O" rings are a hundred pcs for a dollar: cheap. There is not much rubber there to dry up, crack and fall into the oil system. Short lived.
A better stem seal is Comp Cams Viton(sp?) umbrella style with a wire clip to hold it in place. (16 pcs for about $25). A lot more rubber to dry up, crack and fall off. And this style helps hold the valve up for you. To each their own.
A better stem seal is Comp Cams Viton(sp?) umbrella style with a wire clip to hold it in place. (16 pcs for about $25). A lot more rubber to dry up, crack and fall off. And this style helps hold the valve up for you. To each their own.
Last edited by HeadsU.P.; 01-01-2018 at 07:44 PM.
01-01-2018, 08:40 PM
#9
Burning Brakes

I really dislike that tool you are using. If the head is off the car I prefer to use the C clamp style as I find them a lot more precise and easy to use.
Anyway, the catch is to have the valve spring cap just below the point where the keepers fit into the groove on the valve and not so low that they flop around. Easy to do with the tool I have shown above.
With the tool that you have I can imagine that it can be more challenging. I would use some assembly lube on the inside of the keepers to hold them in place while you position them and allow the spring cap to rise back into place.
Hope that explains it well enough, if not feel free to PM and I will see if I can help you.
The following 2 users liked this post by PainfullySlow:
20mercury (01-07-2018),
NewbVetteGuy (01-02-2018)
01-02-2018, 12:05 PM
#10
Le Mans Master
I've used that tool (moroso version) you have for removing valve springs while the head is off and it is harder vs the C-clamp style but still doable.
Have the head on a board or surface that will not mar the aluminum ie not a concrete floor.
put a balled up rag in the combustion chamber. This will hold the valve up.
you will probably have to swing the the spring one way or the other to start the compressing for keeper replacement. this is because the tool pushes in an arc as it compresses. That may not be as correct as saying the apring compresses in an arc. It's minor but effects the process of replacing the locks. So in order to get the valve stem to be pretty centered once the spring is compressed you have to work opposite the arc.
If it comes up not centered you can get a small flat screwdriver and kind of slide the spring in relationship to the valve stem to get it pretty close.
I use a magnetic pickup tool to remove the keepers to keep them from falling somewhere.
To install once you've compressed the spring, just put the keepers in place and hold them there with your fingers. slowly release the compressor, and this is the hard part, because once again it releases in an arc. So while slowly releasing keep an eye on the centering of the retainer. It'll move a little laterally trying to catch the keeper and push it up. Keep the retainer on the spring close to centered while releasing so as to not catch on the lock and push it up.
Really the key is keeping the valve stem all the way up with the balled up rag in the combustion chamber. Then you may not even need to fully compress the spring and be able to work with less arcing on the spring.
If you pull the valve out of the head use a split drinking straw to wrap around the valve stem head where the lock engage as it pulls through the valve guide seal.
Those seals can be cut by pulling the valve stem through and can compromise the seal on the valve stem.
As I said before I would recommend pulling all the valves out and checking things out on those heads as you already found an issue with the spark plug hole threading.
Last edited by REELAV8R; 01-02-2018 at 12:08 PM.
01-02-2018, 02:05 PM
#11
Melting Slicks
Thread Starter
I really dislike that tool you are using. If the head is off the car I prefer to use the C clamp style as I find them a lot more precise and easy to use.
Anyway, the catch is to have the valve spring cap just below the point where the keepers fit into the groove on the valve and not so low that they flop around. Easy to do with the tool I have shown above.
With the tool that you have I can imagine that it can be more challenging. I would use some assembly lube on the inside of the keepers to hold them in place while you position them and allow the spring cap to rise back into place.
Hope that explains it well enough, if not feel free to PM and I will see if I can help you.
Anyway, the catch is to have the valve spring cap just below the point where the keepers fit into the groove on the valve and not so low that they flop around. Easy to do with the tool I have shown above.
With the tool that you have I can imagine that it can be more challenging. I would use some assembly lube on the inside of the keepers to hold them in place while you position them and allow the spring cap to rise back into place.
Hope that explains it well enough, if not feel free to PM and I will see if I can help you.
Do you have a link to a C-Clamp style valve spring compressor like that? (I just might return mine and get one like that; although, I guess the big advantage of the kind that I have is that you can use it while the heads are still installed, huh?)
Adam
P.S. Are those triple springs on those Profiler heads?!? (176 stamped on the side is the 23 deg SBC heads; "18P" means the 185cc intake port size?)
Last edited by NewbVetteGuy; 01-02-2018 at 02:19 PM.
01-02-2018, 02:15 PM
#12
Melting Slicks
Thread Starter
you will probably have to swing the the spring one way or the other to start the compressing for keeper replacement. this is because the tool pushes in an arc as it compresses. That may not be as correct as saying the apring compresses in an arc. It's minor but effects the process of replacing the locks. So in order to get the valve stem to be pretty centered once the spring is compressed you have to work opposite the arc.
To install once you've compressed the spring, just put the keepers in place and hold them there with your fingers. slowly release the compressor, and this is the hard part, because once again it releases in an arc. So while slowly releasing keep an eye on the centering of the retainer. It'll move a little laterally trying to catch the keeper and push it up. Keep the retainer on the spring close to centered while releasing so as to not catch on the lock and push it up.
Adam
Last edited by NewbVetteGuy; 01-02-2018 at 02:15 PM.
01-02-2018, 03:44 PM
#13
Burning Brakes
Anyway, you are correct in that this style is only good if the heads are off the engine. It was so cheap that it made sense to keep both styles as this one makes it SO much easier. If it were me, I would keep the one you have and grab this one as well. Oh, and I would NEVER put my fingers near the valve head with the compressor you are using. Way too many ways that things can go south. This C clamp style is very safe, stable, and easy to use.
I am sure it is a Chinese made tool but as often as I will use it, this will be fine.
Last edited by PainfullySlow; 01-02-2018 at 03:45 PM.
The following 2 users liked this post by PainfullySlow:
20mercury (01-07-2018),
NewbVetteGuy (01-02-2018)
01-02-2018, 03:54 PM
#14
Team Owner


If you have a large enough C-clamp or go out a buy one you could make that tool out of an old socket, a grinder or dremel tool to make the business end and I think it would work just fine and would be cheaper for a cheap-scape like me that has a lot of old junk laying around.

 01-02-2018, 07:04 PM
#16
Race Director

Ok, I pulled out a big c clamp and a small valve adapter. HUGE PITA! But it kind of worked.
01-02-2018, 10:14 PM
#17
Race Director
Get a lever operated c-clamp style compressor. https://m.ebay.com/itm/8-UNIVERSAL-V...wAAOSwuOxZwdwt but I think these cheapie are too light-duty...at least for big blocks. They all say 30 mm spring diameter. I guess OK for small block springs.
01-02-2018, 11:43 PM
#18
You have find the correct angle of the tool you bought...so when you go and compress the spring and cup...it goes down basically straight.
Finding a way to make sure the valve stays at the top and seated against the heads is a must.
I either do the valves when the head is on the engine so I can pressurize the cylinder...or if it is off...I use the large special 'C' clamp tool that does it so I do not have to wrestle the head.
QUESTION:
Are you replacing the valve seals??? Not knowing what type of head you have or any of that...IF you have the 'O' ring style valve seal....you DO KNOW how to install them correctly???
Because the 'O' ring MUST go on the valve stem AFTER you have compressed the spring and cup. IF you install the 'O' ring on the valve stem and assemble it after that...you wipe the 'O' ring out of the groove. Thus rendering it useless.
DUB
Finding a way to make sure the valve stays at the top and seated against the heads is a must.
I either do the valves when the head is on the engine so I can pressurize the cylinder...or if it is off...I use the large special 'C' clamp tool that does it so I do not have to wrestle the head.
QUESTION:
Are you replacing the valve seals??? Not knowing what type of head you have or any of that...IF you have the 'O' ring style valve seal....you DO KNOW how to install them correctly???
Because the 'O' ring MUST go on the valve stem AFTER you have compressed the spring and cup. IF you install the 'O' ring on the valve stem and assemble it after that...you wipe the 'O' ring out of the groove. Thus rendering it useless.
DUB
 01-05-2018, 12:15 AM
#19
Drifting
Well, while using my valve compressor to open up my valves and clean out some of the little metal bits from chasing my spark plug threads and smoothing out the sharp edges in my chambers, I accidentally popped off a valve keeper...
I used the valve compressor, a pick, and some needle nose pliers to get the keepers back on and the spring reinstalled, but I'm 90% sure that's now how you're SUPPOSED to do it.
How are you supposed to remove valve locks, keepers, springs, etc??
Can't help but feel like I'm missing a tool that I should be using...
Adam
I used the valve compressor, a pick, and some needle nose pliers to get the keepers back on and the spring reinstalled, but I'm 90% sure that's now how you're SUPPOSED to do it.
How are you supposed to remove valve locks, keepers, springs, etc??
Can't help but feel like I'm missing a tool that I should be using...
Adam
01-05-2018, 06:34 PM
#20
Race Director