
Installing Foam Frame Rail Heat Shields? (for 1969)
 01-15-2018, 11:54 AM
#1
Burning Brakes

Thread Starter
I haven't been having any luck figuring out how to install these, nor am I sure of how to interpret the AIM.
• Do they go in front of or to the rear of the body mount?
• Is it the #1 body mount that they're supposed to be "installed flush" with?
• Should they have been installed BEFORE the body drop?
It seems nearly impossible to "feed" them over the top of the frame within the small gap between the body and the frame.
Thanks,
-Doug
 01-15-2018, 01:23 PM
#2
Racer


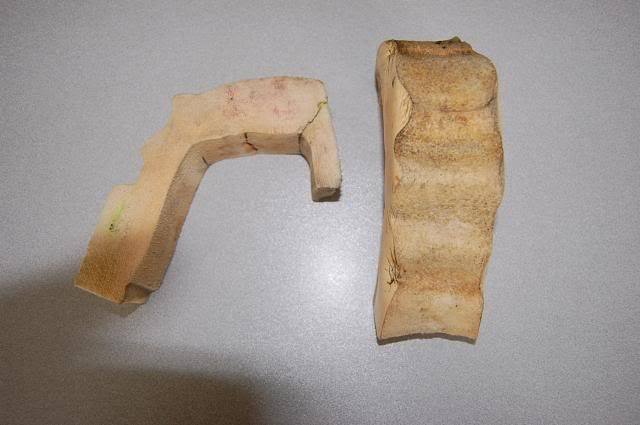
I know nothing about these but the drawing shows them ahead of the body mout, apparently flush with the top of it, with the short leg outboard and hanging about 1.6" below the top of the frame rail.
It appears that these would need to be installed before the body is dropped unless they are super spongy.
Someone who knows what they are talking about can surely fill you in.
It appears that these would need to be installed before the body is dropped unless they are super spongy.
Someone who knows what they are talking about can surely fill you in.
01-15-2018, 01:44 PM
#3
Team Owner

Member Since: Sep 2006
Location: Westminster Maryland
Posts: 30,173
Likes: 0
Received 2,878 Likes
on
2,515 Posts

Hi CU,
Here's a photo showing the body coming down on the chassis.
If you look carefully you can see the frame shields which which were a 'cream' colored foam and also the heat collar on the top of the bell housing.
Regards,
Alan
The frame shields are just forward of the #2 body mount.
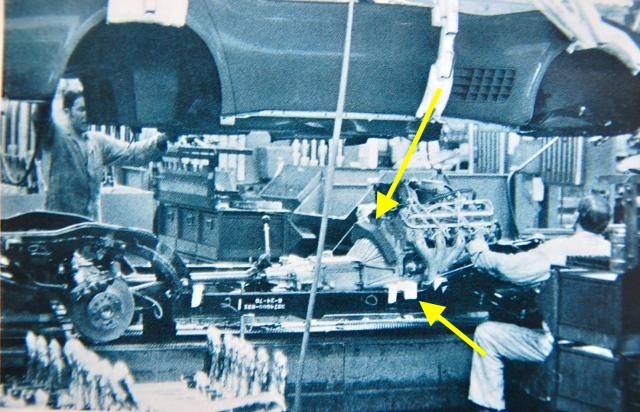
The long 'tail' was on the inside of the frame rail.
Here's a photo showing the body coming down on the chassis.
If you look carefully you can see the frame shields which which were a 'cream' colored foam and also the heat collar on the top of the bell housing.
Regards,
Alan
The frame shields are just forward of the #2 body mount.
The long 'tail' was on the inside of the frame rail.
Last edited by Alan 71; 01-15-2018 at 01:50 PM.
01-15-2018, 02:01 PM
#4
Burning Brakes
Thread Starter
I know nothing about these but the drawing shows them ahead of the body mout, apparently flush with the top of it, with the short leg outboard and hanging about 1.6" below the top of the frame rail.
It appears that these would need to be installed before the body is dropped unless they are super spongy.
Someone who knows what they are talking about can surely fill you in.
It appears that these would need to be installed before the body is dropped unless they are super spongy.
Someone who knows what they are talking about can surely fill you in.
BTW: We vacation in the Humboldt Nation quite a bit. Gorgeous place. You ever go to the Auto Expo in Fortuna? Do many Corvettes show up?
01-15-2018, 02:06 PM
#5
Burning Brakes
Thread Starter
01-15-2018, 02:53 PM
#6
Team Owner
Member Since: Sep 2006
Location: Westminster Maryland
Posts: 30,173
Likes: 0
Received 2,878 Likes
on
2,515 Posts
Hi CU,
With some ingenuity and time it's possible to get them in place with the body on the chassis.
Regards,
Alan
With some ingenuity and time it's possible to get them in place with the body on the chassis.
Regards,
Alan
01-15-2018, 04:20 PM
#7
Racer
I go to auto in Fortuna but usually just to hit the swap meets. Over the years I've entered a couple of cars just to hit the cruise. I did shows for a few years but became bored sitting around in a lawn chair all day. Maybe a half dozen vettes show but lots of kit cars it seems. Last year we were gone all summer (and most of the winter) but might make it this year.
Last edited by stumpshot; 01-15-2018 at 04:21 PM.
01-17-2018, 11:09 AM
#8
Melting Slicks

When I did my mounts the passenger side came out. I only did the one side at a time lift method. I haven't put it back in as of now. I do get a lot more heat in the cockpit without it. You should be able to get it in by lifting the body a bit on each side.
The following users liked this post:
CrossedUp (01-17-2018)


The following users liked this post:
69FASTFUN (01-17-2018)
01-17-2018, 01:29 PM
#10
Team Owner
Member Since: Sep 2006
Location: Westminster Maryland
Posts: 30,173
Likes: 0
Received 2,878 Likes
on
2,515 Posts
Hi Glenn,
The various larger vendors sell them...
Paragon... 153034K.
ZIP ... ZM-2569.
I'd GLADLY buy your originals!
I'll send you a PM.
Regards,
Alan
The various larger vendors sell them...
Paragon... 153034K.
ZIP ... ZM-2569.
I'd GLADLY buy your originals!
I'll send you a PM.
Regards,
Alan
Last edited by Alan 71; 01-17-2018 at 01:36 PM.
01-17-2018, 04:38 PM
#11
Burning Brakes
Thread Starter
I may have "lucked out" by having an N14 car!
Unlike gw's car, the foam heat blocks were NOT on the car when the body was lifted, but the side exhaust sill insulators were there and I replaced them with new ones when the chassis was restored. I'm not sure both would fit anyway as there doesn't appear nearly enough space left for the foam pieces.
BTW: The frame was very clean and virtually rust free. The only place where very light pitting occurred was underneath the insulators which apparently had, sometime in the past, trapped moisture holding it against the frame.
01-17-2018, 04:50 PM
#12
Burning Brakes
Thread Starter
01-17-2018, 05:07 PM
#13
Team Owner
Member Since: Sep 2006
Location: Westminster Maryland
Posts: 30,173
Likes: 0
Received 2,878 Likes
on
2,515 Posts
Hi Doug,
What good photos and detailed work!!!!
I'd think if the insulators had been there they would left 'some' kind of sign.
Regards,
Alan
What good photos and detailed work!!!!
I'd think if the insulators had been there they would left 'some' kind of sign.
Regards,
Alan
01-18-2018, 08:25 AM
#15
Burning Brakes
Thread Starter
Thanks for the compliments gentlemen. It's a long journey but IMO a worthy effort. Although not a NCRS build, I'm hoping my results can at least approximate Alan's incredible work.
Currently I'm sorting out the body panel and door, pre-fit issues before sending the car to "paint prison". When I got it, every body panel (including the driver's door) had been replaced in a somewhat careless manner except the rear deck, tail light panel and roof. The left fender even had to be replaced a second time because it was installed too low and too far back.
Latest accomplishment was to get the side exhaust covers to fit properly utilizing the original factory attachment points.
01-18-2018, 09:13 AM
#16
Team Owner
Member Since: Sep 2006
Location: Westminster Maryland
Posts: 30,173
Likes: 0
Received 2,878 Likes
on
2,515 Posts
Hi CU,
"Although not a NCRS build, I'm hoping my results can at least approximate Alan's incredible work."
Doing what I did is really pretty easy since it doesn't require very many dollars and even less sense.
Regards,
Alan
"Although not a NCRS build, I'm hoping my results can at least approximate Alan's incredible work."
Doing what I did is really pretty easy since it doesn't require very many dollars and even less sense.
Regards,
Alan
