C3 Tech/Performance V8 Technical Info, Internal Engine, External Engine, Basic Tech and Maintenance for the C3 Corvette
Sponsored by:
Sponsored by:

Replacement of radiator core support - 1972 base motor

Thread Tools
 
Search this Thread
 
Old 02-24-2018, 05:26 PM
  #1  
Tonio
Drifting
Thread Starter
 
Tonio's Avatar
 
Member Since: Apr 2017
Location: Bedford New York
Posts: 1,377
Received 281 Likes on 226 Posts
Default Replacement of radiator core support - 1972 base motor

I just bought a 1972 vette, base motor, manual trans. It's in great shape, nice paint, runs and drives fantastically, but the radiator core support is rotted along its lower section. I can fabricate steel and repair it, or buy a new replacement. Either way, I need to remove the core support.

I've never done this, so need to understand what's involved. I see that the hood need to be removed, no biggee. Do I need to support the fenders before removing it?

Thanks in advance.
Old 02-24-2018, 09:21 PM
  #2  
Dean_Fuller
Pro
 
Dean_Fuller's Avatar
 
Member Since: Jun 2011
Location: Columbus Mississippi
Posts: 542
Received 50 Likes on 47 Posts

Default

I don't think you need to support the fenders BUT you will NOT be able to bear any weight on them. The rad support is what holds the whole front end steady. I would remove the radiator , shroud, fan...as much as I need BEFORE the support is loosen and removed. I have to do than same thing soon on a 1970 I have.
Old 02-24-2018, 09:31 PM
  #3  
PainfullySlow
Burning Brakes
 
PainfullySlow's Avatar
 
Member Since: Sep 2017
Location: Tolland CT
Posts: 1,219
Received 361 Likes on 228 Posts
Default

No need to support the fenders however if your radiator support is rotted, chances are the lower front crossmember is as well.

Looks like this:


The radiator support bolts right on top of that piece.

Anyway, it is kind of a PITA to do and you will absolutely need to remove the hood. If your car has A/C you will also need to remove the condenser and some plumbing. Also the 72 has a fiberglass cover in the passenger front wheel well that will need to be removed in order to get to the upper mounting bolt on that side.

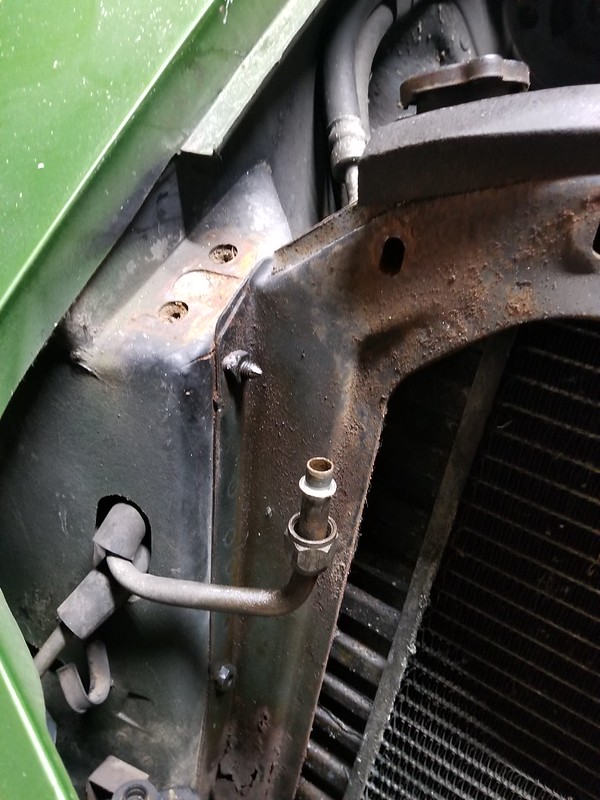
That is the bolt that will give you trouble


If you have A/C, this is the cover. It is held on with panel bonding adhesive so you need to heat it up and then gently pry it off, just like if you were separating any of the body panels.


Once removed you can see the bolt head that you need to get to.


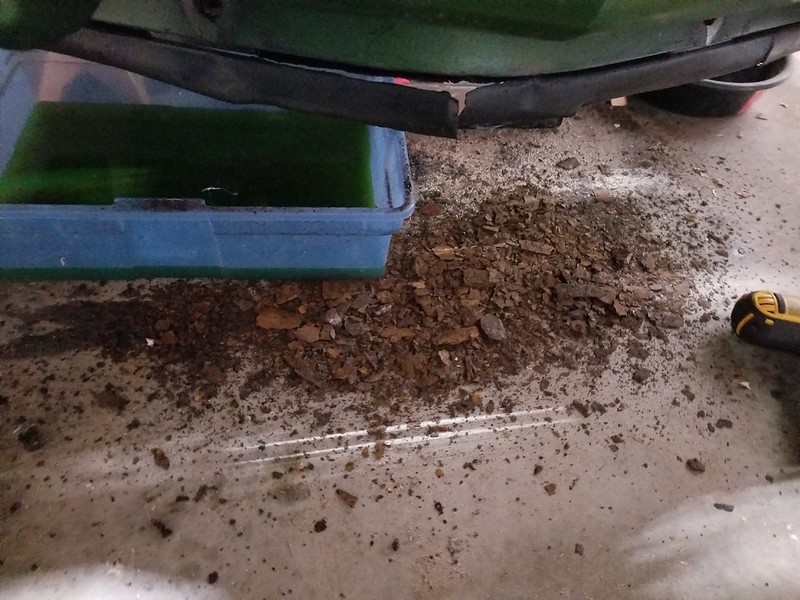
Mine wasn't super rotted to the naked eye but once you get into it you may find that it is a lot worse than it first appeared.


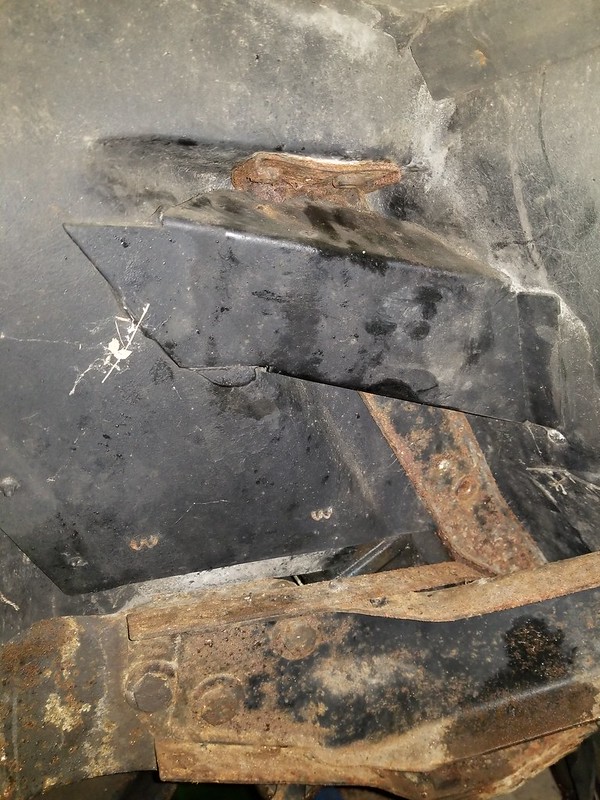
This was the pile of rust from trying to get off the lower front crossmember. It was entirely rusted through.


The lower bolts which hold the radiator support to the crossmember can be a real PITA if it is as rusted as mine


My advice is: if it ends up looking like this you will need to replace the cross member so do not waste time trying to get the bolt out. Use a die grinder and just cut it off.


Hope this helps and good luck!
The following 2 users liked this post by PainfullySlow:
dan1495 (02-25-2018), Eddie 70 (03-04-2018)
Old 02-24-2018, 10:01 PM
  #4  
Tonio
Drifting
Thread Starter
 
Tonio's Avatar
 
Member Since: Apr 2017
Location: Bedford New York
Posts: 1,377
Received 281 Likes on 226 Posts
Default

Great info and photos, very helpful! Thank you!!
Old 02-24-2018, 11:14 PM
  #5  
CanadaGrant
Safety Car
 
CanadaGrant's Avatar
 
Member Since: Apr 2006
Location: BC
Posts: 4,057
Received 415 Likes on 336 Posts

Default

One thing you will find is that removal and installation is far easier if you do the whole unit, support, rad and shroud in one piece. It makes it a very easy job as the whole thing just slides right in and you can make sure all your new shroud seals are in place properly outside the car before dropping it in place. You have the 3 bolts in each fender well, the two underneath to the crossmember, the front support bar and a ground strap on the left side and other than the hoses, that's it.
Old 02-25-2018, 06:54 AM
  #6  
Alan 71
Team Owner
 
Alan 71's Avatar
 
Member Since: Sep 2006
Location: Westminster Maryland
Posts: 30,173
Likes: 0
Received 2,878 Likes on 2,515 Posts

Default

Hi C2,
I find that working by myself it's easier to remove the shroud and radiator before lifting out the radiator core support.
This makes the core support lighter and and quite a bit less bulky.
The radiator and shroud likely will need to be removed to repair the core support so you might consider doing that before rather than after the core support is removed from the car.

I remove the fan and fan clutch first to gain a bit more room to get the shroud and radiator out.

I begin by putting a piece on cardboard on each side of the finned area of the radiator to protect the radiator's core.
Regards,
Alan

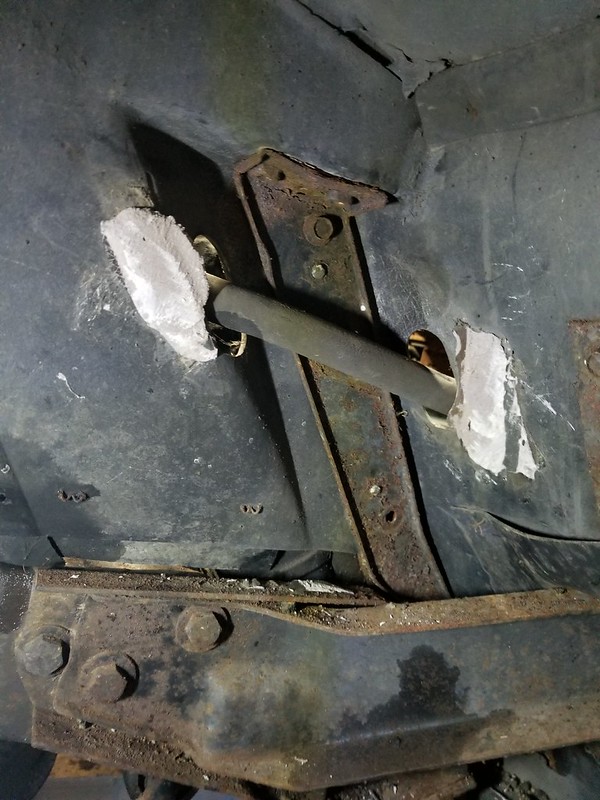
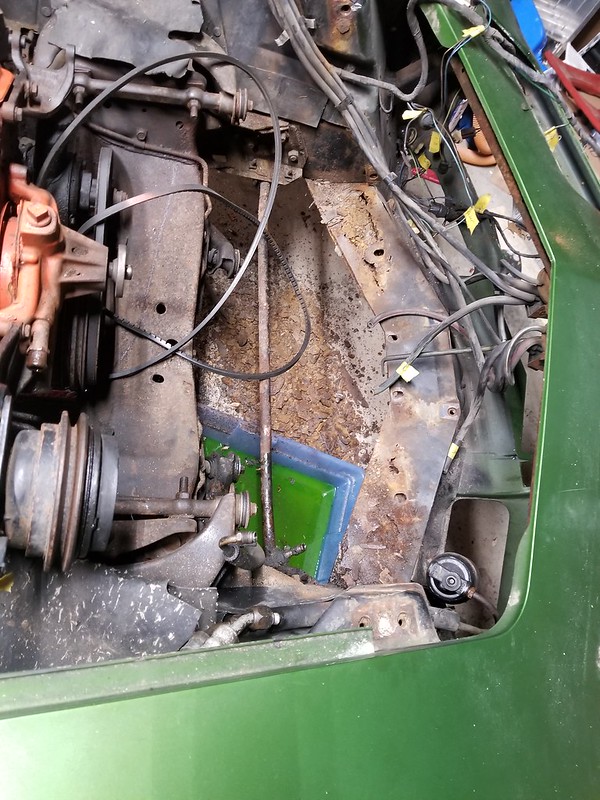
IF your car DOESN'T have A/C perhaps this is what you're seeing? You can see why it helps to get the fan and clutch out of the way.


If your car doesn't have a/c and has the steel shroud the 2 bottom 'legs' on the shroud will need to be unbolted from the front crossmember.

Last edited by Alan 71; 02-25-2018 at 07:08 AM.
Old 02-25-2018, 07:53 AM
  #7  
lvmyvt76
Melting Slicks
 
lvmyvt76's Avatar
 
Member Since: May 2011
Location: Springfield Missouri
Posts: 2,755
Received 121 Likes on 118 Posts
Default

the cardboard is a VERY important tool on this operation, IMO. I was putting in a new alum radiator from Dewitts, I did not want to mess that up.
Old 02-25-2018, 10:25 AM
  #8  
derekderek
Race Director
 
derekderek's Avatar
 
Member Since: Jul 2015
Location: SW Florida.
Posts: 13,020
Received 3,387 Likes on 2,632 Posts
Default

So basically save the box the rad comes in. Then you don't hafta dumpster dive for a big enough piece of cardboard...
Old 02-25-2018, 06:21 PM
  #9  
Tonio
Drifting
Thread Starter
 
Tonio's Avatar
 
Member Since: Apr 2017
Location: Bedford New York
Posts: 1,377
Received 281 Likes on 226 Posts
Default

Fantastic help, fellas, thank you! The photos make it so clear to me, much appreciated!! I'll be attempting this repair work this Thursday with some help from friends, all of which are all thumbs, but are eager to help. Will let you know how it goes! Thanks again!
Old 02-26-2018, 07:07 AM
  #10  
Alan 71
Team Owner
 
Alan 71's Avatar
 
Member Since: Sep 2006
Location: Westminster Maryland
Posts: 30,173
Likes: 0
Received 2,878 Likes on 2,515 Posts

Default

Hi C2,
I'm curious... is it a car with a/c or not?
Regards,
Alan
Old 02-26-2018, 11:19 AM
  #11  
Tonio
Drifting
Thread Starter
 
Tonio's Avatar
 
Member Since: Apr 2017
Location: Bedford New York
Posts: 1,377
Received 281 Likes on 226 Posts
Default

Originally Posted by Alan 71
Hi C2,
I'm curious... is it a car with a/c or not?
Regards,
Alan
Hi Alan. No A/C. Manual trans, and power steering only.

The original engine (base motor) is present, numbers match and the broach marks look aoriginal. But it's has been bored .040 over and built up a little bit. The dyno sheet shows 271hp at the rear wheels, 370 ft-lbs of torque. 4:11 gears in the rear. Drag slips show a best time of 12.76 seconds and 107 mph in the 1/4-mile.
Old 02-26-2018, 11:24 AM
  #12  
Tonio
Drifting
Thread Starter
 
Tonio's Avatar
 
Member Since: Apr 2017
Location: Bedford New York
Posts: 1,377
Received 281 Likes on 226 Posts
Default

The car: Yeah, I have a thing for green.....
Attached Images  

Last edited by Tonio; 02-26-2018 at 11:25 AM.
The following users liked this post:
Brooklinite (02-27-2018)
Old 02-26-2018, 12:35 PM
  #13  
Alan 71
Team Owner
 
Alan 71's Avatar
 
Member Since: Sep 2006
Location: Westminster Maryland
Posts: 30,173
Likes: 0
Received 2,878 Likes on 2,515 Posts

Default

Hi C2,
Thanks!
I was curious if it was an aluminum radiator and steel fan shroud car or not.

The car in the picture AND the 'timing slip' info both look GOOD!!!!
Regards,
Alan
Old 02-26-2018, 01:24 PM
  #14  
Tonio
Drifting
Thread Starter
 
Tonio's Avatar
 
Member Since: Apr 2017
Location: Bedford New York
Posts: 1,377
Received 281 Likes on 226 Posts
Default

Alan,

Yeah it has the steel fan shroud. Radiator looks to be an OEM type (aluminum? not sure yet). I'll find out when I remove the crusty looking core support.

Last edited by Tonio; 02-26-2018 at 01:24 PM.
Old 03-04-2018, 11:25 AM
  #15  
ZRXGreen
Racer
 
ZRXGreen's Avatar
 
Member Since: Dec 2017
Location: Chicago Suburbs Illinois
Posts: 355
Received 46 Likes on 41 Posts
Default

Originally Posted by Chapter2
The car: Yeah, I have a thing for green.....
Great looking car. How did the core support removal go?
Old 03-04-2018, 02:40 PM
  #16  
Tonio
Drifting
Thread Starter
 
Tonio's Avatar
 
Member Since: Apr 2017
Location: Bedford New York
Posts: 1,377
Received 281 Likes on 226 Posts
Default

Thanks! Removal of the core support went well. Pretty straight forward, no drama. Core support is way too far gone to save, so I ordered a replacement. While in there I rebuilt the headlight actuators. They work great now. The lower boomerang shaped member is in great shape. I got lucky I guess. The radiator is indeed an aluminum unit. Appears to be OEM.
Attached Images  

Last edited by Tonio; 03-04-2018 at 02:44 PM.
Old 03-04-2018, 02:48 PM
  #17  
Tonio
Drifting
Thread Starter
 
Tonio's Avatar
 
Member Since: Apr 2017
Location: Bedford New York
Posts: 1,377
Received 281 Likes on 226 Posts
Default

A couple of "before" photos.....
Attached Images   

Get notified of new replies

To Replacement of radiator core support - 1972 base motor

Old 03-04-2018, 02:52 PM
  #18  
Tonio
Drifting
Thread Starter
 
Tonio's Avatar
 
Member Since: Apr 2017
Location: Bedford New York
Posts: 1,377
Received 281 Likes on 226 Posts
Default

Some of the rot on the rad support....other areas were far worse. It's toast and not worth the effort to save it. New one on the way.
Attached Images  
Old 03-04-2018, 03:04 PM
  #19  
Alan 71
Team Owner
 
Alan 71's Avatar
 
Member Since: Sep 2006
Location: Westminster Maryland
Posts: 30,173
Likes: 0
Received 2,878 Likes on 2,515 Posts

Default

Hi C2,
Things look good in the photos!

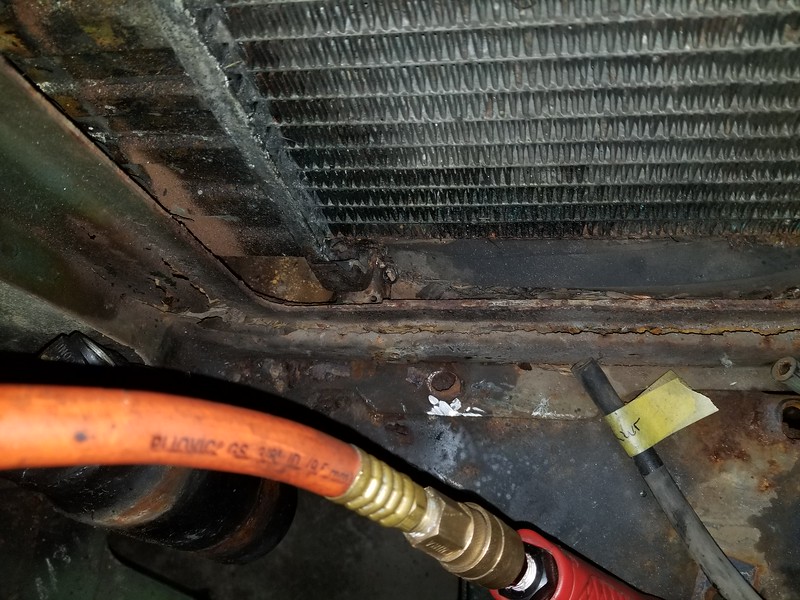
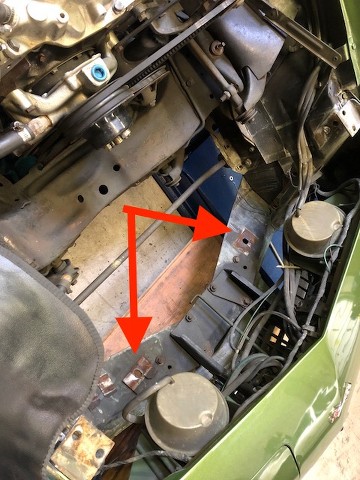
It appears there were shims between the core-support and front crossmember.
Ordinarily I'd say it would be a good idea to get the same number of shims back in the same locations.

But, since the core-support is a new one you may have to begin installing it before you'll know IF and WHERE shims may be needed now.

Good Luck as you continue!
Regards,
Alan

I'd like to see a photo of the top of your radiator if you get a chance.
Thanks.

The following users liked this post:
Tonio (03-04-2018)
Old 03-04-2018, 05:36 PM
  #20  
PainfullySlow
Burning Brakes
 
PainfullySlow's Avatar
 
Member Since: Sep 2017
Location: Tolland CT
Posts: 1,219
Received 361 Likes on 228 Posts
Default

Looks great and yes, you got lucky that there was no additional rot on the car.
The following users liked this post:
Tonio (03-04-2018)


Quick Reply: Replacement of radiator core support - 1972 base motor


All times are GMT -4. The time now is 05:48 AM.