
Another '68 stop light switch thread
 04-14-2018, 12:14 PM
#1

I have searched quite a bit here and although some of you have solved this problem, I can't find the pics I'm going to need to decide whether or not I can get this done myself. I would prefer to convert to the '69 plunger type switch if I can find clear instructions or images. Most of what I've found are quite old threads where the formerly 3rd party hosted pics no longer show up.
One thing I found elsewhere was that Zip stocks a wire assembly to convert to the '69 plunger type switch, but also says that you'll need a '69 switch and adaptor bracket (of course not included). I can't find a bracket on their site so don't know if II have to make one myself or if they sell it under a name I haven't searched for yet.
I could bubba the wiring conversion myself, but what I really need is some clear ideas for switch and depressor mounting. Frankly, I'm not all that creative, especially when twisted up into a pretzel under that dash. Ideas, pics, anyone?
 04-14-2018, 12:22 PM
#2
Team Owner

Member Since: Sep 2006
Location: Westminster Maryland
Posts: 30,173
Likes: 0
Received 2,878 Likes
on
2,515 Posts

Hi st,
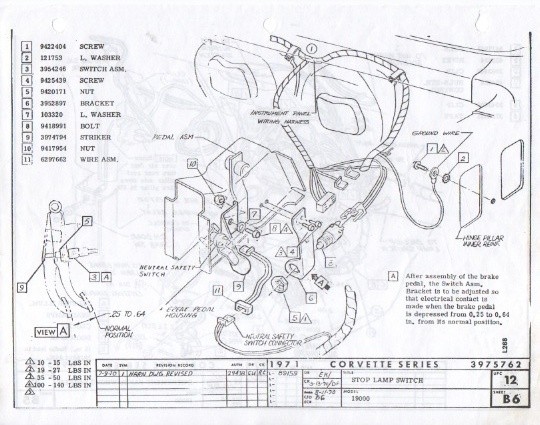
Here's the brake lamp switch sheet from the AIM.
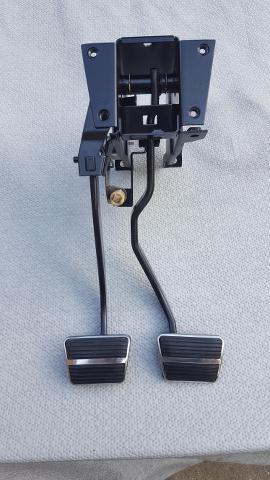
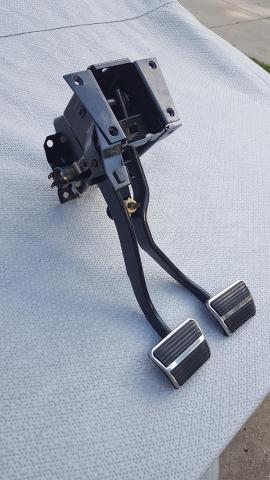
These are the photos of the switch and it's bracket.
I don't know if they illustrate what you need to see in order to make the change on your 68.
Hopefully?
Regards,
Alan
Look at Item 6, the Bracket, (it's the one that appears to be zinc plated), and Item 9, the Striker (it's the one that appears to be zinc plated with a dichromate wash).
Here's the brake lamp switch sheet from the AIM.
These are the photos of the switch and it's bracket.
I don't know if they illustrate what you need to see in order to make the change on your 68.
Hopefully?
Regards,
Alan
Look at Item 6, the Bracket, (it's the one that appears to be zinc plated), and Item 9, the Striker (it's the one that appears to be zinc plated with a dichromate wash).
Last edited by Alan 71; 04-15-2018 at 06:13 AM.
04-14-2018, 01:19 PM
#3
Thanks, Alan. Boy, that looks like a piece of cake out of the car!  Not sure if I can use that for conversion purposes or not but maybe so. I think I need to remove more electrical and vacuum stuff to get a better look at mine before I decide anything.
I think the guys converting a '68 to this style switch are mounting it down lower on the pedal arm to make it easier to get to.
I tried to get a wrench on my switch this morning (had about 30 minutes to give it) and I need to try different tools. So far an offset wratcheting box wrench and a standard socket didn't give me enough clearance to work up there.
I am also wondering if it's worth pulling the driver's gauges out - sounds like a project all by itself but if it makes it waaaaay easier maybe it's the way to go.....?
Not sure if I can use that for conversion purposes or not but maybe so. I think I need to remove more electrical and vacuum stuff to get a better look at mine before I decide anything.I think the guys converting a '68 to this style switch are mounting it down lower on the pedal arm to make it easier to get to.
I tried to get a wrench on my switch this morning (had about 30 minutes to give it) and I need to try different tools. So far an offset wratcheting box wrench and a standard socket didn't give me enough clearance to work up there.
I am also wondering if it's worth pulling the driver's gauges out - sounds like a project all by itself but if it makes it waaaaay easier maybe it's the way to go.....?
04-14-2018, 03:09 PM
#4
Team Owner
Member Since: Sep 2006
Location: Westminster Maryland
Posts: 30,173
Likes: 0
Received 2,878 Likes
on
2,515 Posts
Hi st,
Some folks find that taking the driver's seat out of the car so you can lay on your back in a comfortable position helps with some jobs under/behind the left left side dash.
Maybe in this case too?
Regards,
Alan
Some folks find that taking the driver's seat out of the car so you can lay on your back in a comfortable position helps with some jobs under/behind the left left side dash.
Maybe in this case too?
Regards,
Alan
Last edited by Alan 71; 04-14-2018 at 03:10 PM.
The following users liked this post:
ST68 (04-14-2018)
04-14-2018, 07:41 PM
#5
Alan, I just put the seat back in last week. I'd had it out when I was trying to resolve this problem before.
At that time I found that when I pulled the wires to one side the switch worked "perfectly" and repeatedly, so I pulled them over and zip tied them to something thinking that maybe they'd keep working for a while. I didn't driven it at all at the time because I'd had the gas tank out. I finally got the new tank in and needed to fill it up, so put the seat in and we took it for a spin and that's when the brake light switch quit on me again. I guess I'm going to have to do this one right, or better than right, to be able to have any confidence.
At that time I found that when I pulled the wires to one side the switch worked "perfectly" and repeatedly, so I pulled them over and zip tied them to something thinking that maybe they'd keep working for a while. I didn't driven it at all at the time because I'd had the gas tank out. I finally got the new tank in and needed to fill it up, so put the seat in and we took it for a spin and that's when the brake light switch quit on me again. I guess I'm going to have to do this one right, or better than right, to be able to have any confidence.
04-14-2018, 09:04 PM
#7
Several reasons, actually. One, they're between $60-$75, have to be purchased from specialty outlets (online, primarily), sometimes are wired incorrectly, and seem to be prone to failure. The '69 switch is under $10 and can be had at Napa. Secondly, they are a bear to get to and I am thinking if I do this now and it craps out, I'm not going to want to do it again. This stuff isn't getting any easier for me as the years go by.
04-14-2018, 09:29 PM
#8

Have you considered opening up your 68 switch? Looks rebuildable to me. I replaced mine (ages ago) and I was able to do it from below the dash. You can look for 69+ switches and you can also buy the contraption that holds them if you cannot repair it.
Several reasons, actually. One, they're between $60-$75, have to be purchased from specialty outlets (online, primarily), sometimes are wired incorrectly, and seem to be prone to failure. The '69 switch is under $10 and can be had at Napa. Secondly, they are a bear to get to and I am thinking if I do this now and it craps out, I'm not going to want to do it again. This stuff isn't getting any easier for me as the years go by.
04-14-2018, 10:50 PM
#10
Le Mans Master

Member Since: Aug 2006
Location: mount holly NC
Posts: 6,989
Received 1,246 Likes
on
966 Posts
C3 of Year Finalist (appearance mods) 2019
Thanks for the reply. Now I understand
68 repo = $62.99
68 NOS $250.00
69 and up $10.99.
The old one lasted 50 years how long will a new one last?
https://willcoxcorvette.com/catalogs...e+light+switch
68 repo = $62.99
68 NOS $250.00
69 and up $10.99.
The old one lasted 50 years how long will a new one last?
https://willcoxcorvette.com/catalogs...e+light+switch
04-14-2018, 11:15 PM
#11
Thanks for the reply. Now I understand
68 repo = $62.99
68 NOS $250.00
69 and up $10.99.
The old one lasted 50 years how long will a new one last?
https://willcoxcorvette.com/catalogs...e+light+switch
68 repo = $62.99
68 NOS $250.00
69 and up $10.99.
The old one lasted 50 years how long will a new one last?
https://willcoxcorvette.com/catalogs...e+light+switch
I did finally get mine out today and I broke it while trying to tighten up the contacts, which were loose and the cause of the intermittent failures. Rebuilding this is no option, so I guess it's a new '68 switch for me unless someone sells a kit to convert to a later year plunger type. I do not think I can spend enough time under there to design something to convert it myself, so it's off to the 1-off parts store(s)!
04-15-2018, 01:33 AM
#12
Sorry, meant to ask if what you pulled at the yard was just the standard 69 bracket? If so did you need to perform any mods to mount that?
Last edited by ST68; 04-15-2018 at 04:51 PM.
04-16-2018, 05:28 PM
#13

its tight for sure,,,,but a 60 year old friend of mine replaced my 1968 rear brake switch in about an hour,,in my garage,,with the seat in,.so i know its doable,,,need the right guy,,,thats all. good luck,,ask around.
04-16-2018, 11:45 PM
#15
 I will be giving this a go.
04-17-2018, 12:04 AM
I will be giving this a go.
04-17-2018, 12:04 AM
#16
Drifting

Alan- your advice is spot-on, as usual. That is except for the comment about a "comfortable position" to work under the dash. I usually require a trip to the chiropractor after performing the contortions of my neck and back to get my arm in the correct position to loosen a bolt or get at a bulb. You must be a lot more agile than I am! RA
04-22-2018, 12:05 AM
#17
Switch came in yesterday, just in time for the weekend. This was way easier than I expected. I was able to do all of the mounting just sitting on the floor (no seat, no steering wheel). Threaded the screws by hand until snug, then got an offset box ratchet on them and tightened them up. Not counting the running back and forth to get my wife to check the lights for me and installing the seat and wheel, it took less than an hour. Celebrated with dinner at Burgermaster.
07-15-2018, 09:06 PM
#18
[QUOTE=Peterbuilt;1596999708]Thanks for the reply. Now I understand
68 repo = $62.99
68 NOS $250.00
69 and up $10.99.
The old one lasted 50 years how long will a new one last?
The answer is 3 #^$*%#$^ months, since you asked. "Show quality" my @$$.
68 repo = $62.99
68 NOS $250.00
69 and up $10.99.
The old one lasted 50 years how long will a new one last?
The answer is 3 #^$*%#$^ months, since you asked. "Show quality" my @$$.
