When you click on links to various merchants on this site and make a purchase, this can result in this site earning a commission. Affiliate programs and affiliations include, but are not limited to, the eBay Partner Network.
So, I've been searching for a good while on our newly acquired '81 and haven't gotten very far in identifying some of the stuff the previous owner disconnected under the hood.
I know it's the smog pump that's disconnected but I'm not sure how halfass it was done because I just don't know what to search for based on the things I'm looking at. I've got a GM shop manual on the way after a bunch of threads recommended it.
Anyone able to comment on some of the things flopping around disconnected under my hood? I put comments under each pic. Just hoping for some general guidance here on whether or not I should reconnect these things or leave them?
Is this the headlight system check valve? They recently stopped going up/down. Should something connect here? Broken on purpose? He removed the belt and replaced it with a smaller one bypassing the pump all together. Is that ok? I saw some delete kits have a dummy pulley? Left hose goes down to the frame but it's disconnected there too! What should this do?
When I get home I can look at mine to tell you where the missing hoses should come from.
Picture #1 -- Yes it is for headlight checkvalve. I think it goes to port on the intake just behind the carb, but I will look later when I get home
Picture #2 -- That controls the exhaust heat riser valve that is mounted just beneath the header. Helps to warm up the engine faster on cold starts. Wont effect anything after the car is warm. I think the other end comes off a port in the front of the carb, but I will need to look when I get home
Picture #3 -- that is a plastic hose that pumps air into the air filter. You will see a round hole in the front of the air cleaner where it is supposed to go. They were made out of plastic and they broke down -- rare as hens teeth, but will not effect the performance of the car
As for the pump being removed -- no performance loss nor gain. You can leave it the way it is or put the belt back on and see if there is a reason he disconnected it.
Picture #4 -- Plug those two together. I think the hose goes down into the charcoal filter. they need to be separated when you take off the air filter and it looks like someone forgot to connect them back up.
For what it is worth, It seems like most of the 1981 emissions stuff is still there if you want to put it all back together again and keep it original.
You rock, thank you so much for the help! You've confirmed some suspicions and maybe even helped me start diagnosing the gas smell when the car sits - probably the hose to the charcoal filter or something nearby. It's so hard searching when you're not sure what exactly you're looking at
If you're able to confirm where #1 plugs when you have a moment I would love it!
Picture #3 -- that is a plastic hose that pumps air into the air filter. You will see a round hole in the front of the air cleaner where it is supposed to go. They were made out of plastic and they broke down -- rare as hens teeth, but will not effect the performance of the car
It's not rare at all. The 1981 A.I.R. Control Valve Hose has been available as a repro for 2 or 3 years now. They sell for about $30 and are available from most of the Corvette vendors. Also, the hole it goes into in the air cleaner is square, not round.
If you're able to confirm where #1 plugs when you have a moment I would love it!
The metal device in #1 is the vacuum system check valve, There is a fitting in the top rear of the intake manifold, between the carb and distributor, that it connects too. There should be a short rubber hose coming off the fitting, and going to a white plastic vacuum filter (it's about the diameter of a quarter), and then another hose from the filter to the open single port on your check valve. I'm assuming that your headlights don't open or close, because the headlights get their vacuum from that check valve?
The metal device in #1 is the vacuum system check valve, There is a fitting in the top rear of the intake manifold, between the carb and distributor, that it connects too. There should be a short rubber hose coming off the fitting, and going to a white plastic vacuum filter (it's about the diameter of a quarter), and then another hose from the filter to the open single port on your check valve. I'm assuming that your headlights don't open or close, because the headlights get their vacuum from that check valve?
You're correct, the lights are currently not opening or closing though they did when we bought it a couple weeks ago. Hopefully the hose is hanging around as you described, I'll take a look when it's light outside. Thank you
Left hose goes down to the frame but it's disconnected there too! What should this do?
There should be a black plastic can there (by the frame) with a few hose connectors on it. Like this one https://www.corvettecentral.com/c3-6...-80-l82-353009
There is no reason to ever remove this item. If it's not there there should be some other hoses that are not connected in that same area.
There should be a black plastic can there (by the frame) with a few hose connectors on it. Like this one https://www.corvettecentral.com/c3-6...-80-l82-353009
There is no reason to ever remove this item. If it's not there there should be some other hoses that are not connected in that same area.
Ok cool so I saw that canister when I crawled under the car the other day but couldn't find the port where this hose might plug in. Now that we're more sure it should go there, I'll look harder. After some more searching it seems like this could solve the issue of the car stinking up the garage (and house) with gas fumes. It's been sitting in the driveway until we figure it out.
Ok cool so I saw that canister when I crawled under the car the other day but couldn't find the port where this hose might plug in. Now that we're more sure it should go there, I'll look harder. After some more searching it seems like this could solve the issue of the car stinking up the garage (and house) with gas fumes. It's been sitting in the driveway until we figure it out.
That is certainly part of it. Also, never top-off the tank. There are several hoses that run to the canister. In addition to the larger purge hose, and lines from the tank, you need a signal hose to activate a valve in the canister (unless I'm confusing 79 and 80-82).
Do you still have a mess of vacuum switches on your thermostat water neck?
Willcox Corvette has posted some vacuum diagrams that may help. If a Google image search doesn't find them, I'll see if I can find them tonight.
Good to know about not topping off, that was definitely done last week. I hadn't looked at the water neck yet but wow, yes, a mess of switches is a good description. I'm guessing one of those might head to the vacuum canister? I'll try to find a diagram.
Did some digging this morning and think I found the other end (see pic below) of the hose to control the exhaust heat riser valve. Can I hurt anything by plugging that back in? Nevermind those two ends don't fit together. I'm just finding more things that are disconnected.
Couldn't find the other end that connects to the headlight check valve but not 100% sure where it could be so I'll try to find some pictures to help guide me.
Couldn't find the other end that connects to the headlight check valve but not 100% sure where it could be so I'll try to find some pictures to help guide me.
there should be a fitting on the manifold between the carb and distributor that has some rubber lines coming off of it. One of them should have the plastic filter described in a previous post. That's the one for the headlights.
A shop manual and assembly manual for your year of car will also help a lot. You can get them from RockAuto, or any of the Corvette vendors.
The switches in the water neck control vacuum events that help the car warm up a bit faster. Things like the heat riser, the hot air intake on the air cleaner housing, etc. Once you understand what everything is and where it goes, you may find that you don't need any of that (though you might this week, if you live in Chicago). You'll want to make sure that the disconnected heat riser is open (it should fail open, but please check), otherwise half of your exhaust will be forced up through the intake manifold and out the other exhaust. Any leftover open ports on the carb and intake manifold should be covered with vacuum caps to prevent vacuum leaks.
Also, with this many missing hoses, please make sure that the following critical vacuum components are connected and working:
Distributor vacuum advance
Power brake booster
PCV valve (it looks like it is, but check)
Good luck! There's a lot to learn, but there is a lot of documentation on this site.
You are missing the heat riser actuator located on the passenger side. The rod you show gets connected to it. This actuator is about 2 inches in diameter and 11 inch high with a vacuum connection that goes to one of the TVS (thermal vacuum switch) located on or near the cooling hose connection. At the other end of that rod you will find a valve in the exhaust pipe. Inside that valve is a butterfly plate. When engine is cold this valve is closed to restrict air flow to help heat the engine up faster. As the coolant fluid gets warmer the TVS switch sends vacuum to the actuator and opens the valve to allow full exhaust flow. I no longer have mine on my 78 L82 anymore and the TVS vacuum line is plugged. I took it off when I installed a dual exhaust set of pipes. The butterfly in mine was disintegrated anyway. You want to look at yours and make sure that the butterfly is in the open position. Unfortunately I don't remember which position is open or closed. Moving it up and down with the engine running might let you know?
My car was in similar shape when I got it. Knew even less at that time then I know Now! But from my experience I would suggest that you sturdy the vacuum diagram from Willcox shown above and get a complete hose replacement kit. Those hoses are all old, dried and brittle. As you now see, they easily can become disconnected. And they leak. Need to stop all those leaks as the cause your engine to run lean.
When you get your AIM (assembly instruction manual) look up the fuel canister. It will show you all the hoses that are connected to it. My 78 has one hose coming off the carburetor with a "Y" connector. One branch goes to the PVC valve located on the left valve cover -it looks like yours is - send the other branch to the canister. My canister is located just behind the left front wheel well under the windshield washer bottle. There are several hoses leading to that canister on my 78. Yours might be different. The AIM will help you with that. This canister is filled with granular carbon that absorbs gas fumes. When operating the carb pulls some air which may may gas vapors in it from this canister into the carb. This device scavanges fuel fumes mostly from the fuel tank and eliminates the gas fumes you now smell. You will need to remove the water bottle to reach it if you need to. Much easier the third time you go there LOL!
This forum is a tremendous source of information and the search engine is your friend. Everything you never wanted to know about vacuum systems is here. And there are a couple of really qualified people on this forum ( not me be any measure) that have and will offer lots of good help.
If I was at my desktop I would have some pictures to offer. But I'll bet someone with an 80 has some that might get posted here.
A shop manual and assembly manual for your year of car will also help a lot. You can get them from RockAuto, or any of the Corvette vendors.
The switches in the water neck control vacuum events that help the car warm up a bit faster. Things like the heat riser, the hot air intake on the air cleaner housing, etc. Once you understand what everything is and where it goes, you may find that you don't need any of that (though you might this week, if you live in Chicago). You'll want to make sure that the disconnected heat riser is open (it should fail open, but please check), otherwise half of your exhaust will be forced up through the intake manifold and out the other exhaust. Any leftover open ports on the carb and intake manifold should be covered with vacuum caps to prevent vacuum leaks.
Also, with this many missing hoses, please make sure that the following critical vacuum components are connected and working:
Distributor vacuum advance
Power brake booster
PCV valve (it looks like it is, but check)
Good luck! There's a lot to learn, but there is a lot of documentation on this site.
I have the shop manual coming but it sounds like I need to buy an assembly manual still so I'll order one. I've been using the Wilcox guide until now but that Autozone is helpful as well, thank you!
Appreciate you listing out the vital stuff that needs checked, with all this stuff I'm trying to identify I did wonder if I should start verifying the things that are connected at some point.
It's a lot to learn but it's starting to come together, as soon as it warms up I plan on putting all this information to use. Definitely going to find some vacuum caps, this thing won't leave Tampa so probably won't need any help heating up most of the year.
Originally Posted by StDomingos
That is the manifold fitting that is the vacuum source for the headlights.
Nice!! Thank you for the pic, I've had no luck so far trying to find exactly what I was looking for there so that's perfect
Originally Posted by biackbenz
You are missing the heat riser actuator located on the passenger side. The rod you show gets connected to it. This actuator is about 2 inches in diameter and 11 inch high with a vacuum connection that goes to one of the TVS (thermal vacuum switch) located on or near the cooling hose connection. At the other end of that rod you will find a valve in the exhaust pipe. Inside that valve is a butterfly plate. When engine is cold this valve is closed to restrict air flow to help heat the engine up faster. As the coolant fluid gets warmer the TVS switch sends vacuum to the actuator and opens the valve to allow full exhaust flow. I no longer have mine on my 78 L82 anymore and the TVS vacuum line is plugged. I took it off when I installed a dual exhaust set of pipes. The butterfly in mine was disintegrated anyway. You want to look at yours and make sure that the butterfly is in the open position. Unfortunately I don't remember which position is open or closed. Moving it up and down with the engine running might let you know?
My car was in similar shape when I got it. Knew even less at that time then I know Now! But from my experience I would suggest that you sturdy the vacuum diagram from Willcox shown above and get a complete hose replacement kit. Those hoses are all old, dried and brittle. As you now see, they easily can become disconnected. And they leak. Need to stop all those leaks as the cause your engine to run lean.
When you get your AIM (assembly instruction manual) look up the fuel canister. It will show you all the hoses that are connected to it. My 78 has one hose coming off the carburetor with a "Y" connector. One branch goes to the PVC valve located on the left valve cover -it looks like yours is - send the other branch to the canister. My canister is located just behind the left front wheel well under the windshield washer bottle. There are several hoses leading to that canister on my 78. Yours might be different. The AIM will help you with that. This canister is filled with granular carbon that absorbs gas fumes. When operating the carb pulls some air which may may gas vapors in it from this canister into the carb. This device scavanges fuel fumes mostly from the fuel tank and eliminates the gas fumes you now smell. You will need to remove the water bottle to reach it if you need to. Much easier the third time you go there LOL!
This forum is a tremendous source of information and the search engine is your friend. Everything you never wanted to know about vacuum systems is here. And there are a couple of really qualified people on this forum ( not me be any measure) that have and will offer lots of good help.
If I was at my desktop I would have some pictures to offer. But I'll bet someone with an 80 has some that might get posted here.
Tons of good information here, appreciate you taking the time to write it up. I get what you're talking about for the heat riser and I'll definitely locate and verify that exhaust valve, sounds important.
Didn't realize the leaks could mess with fuel ratios but it makes sense. I will look for the right hoses and as mentioned above get some plugs to stop the ones I'm not reconnecting.
I definitely will need to use the AIM to help with the canister hoses, I looked again last night and just can't figure out what's missing. Think it'll help getting up on some ramps so I have more room though. Thanks again for the help, I'm going to be coming back and referencing this thread for a while it seems
It has been mentioned, but a GM shop manual and the assembly manual will be your friend for a car that is 38 years old. Look on eBay, I'm sure you will find them. Headlights can be a PITA on a C3, but once you get it sorted out, they should be fine for years.
Afraid the pic didn't come through but @StDomingos posted a good pic above so I should be able to find it now
Originally Posted by Buccaneer
It has been mentioned, but a GM shop manual and the assembly manual will be your friend for a car that is 38 years old. Look on eBay, I'm sure you will find them. Headlights can be a PITA on a C3, but once you get it sorted out, they should be fine for years.
Yep, got 'em coming. Ordered all kinds of crap from eBay.
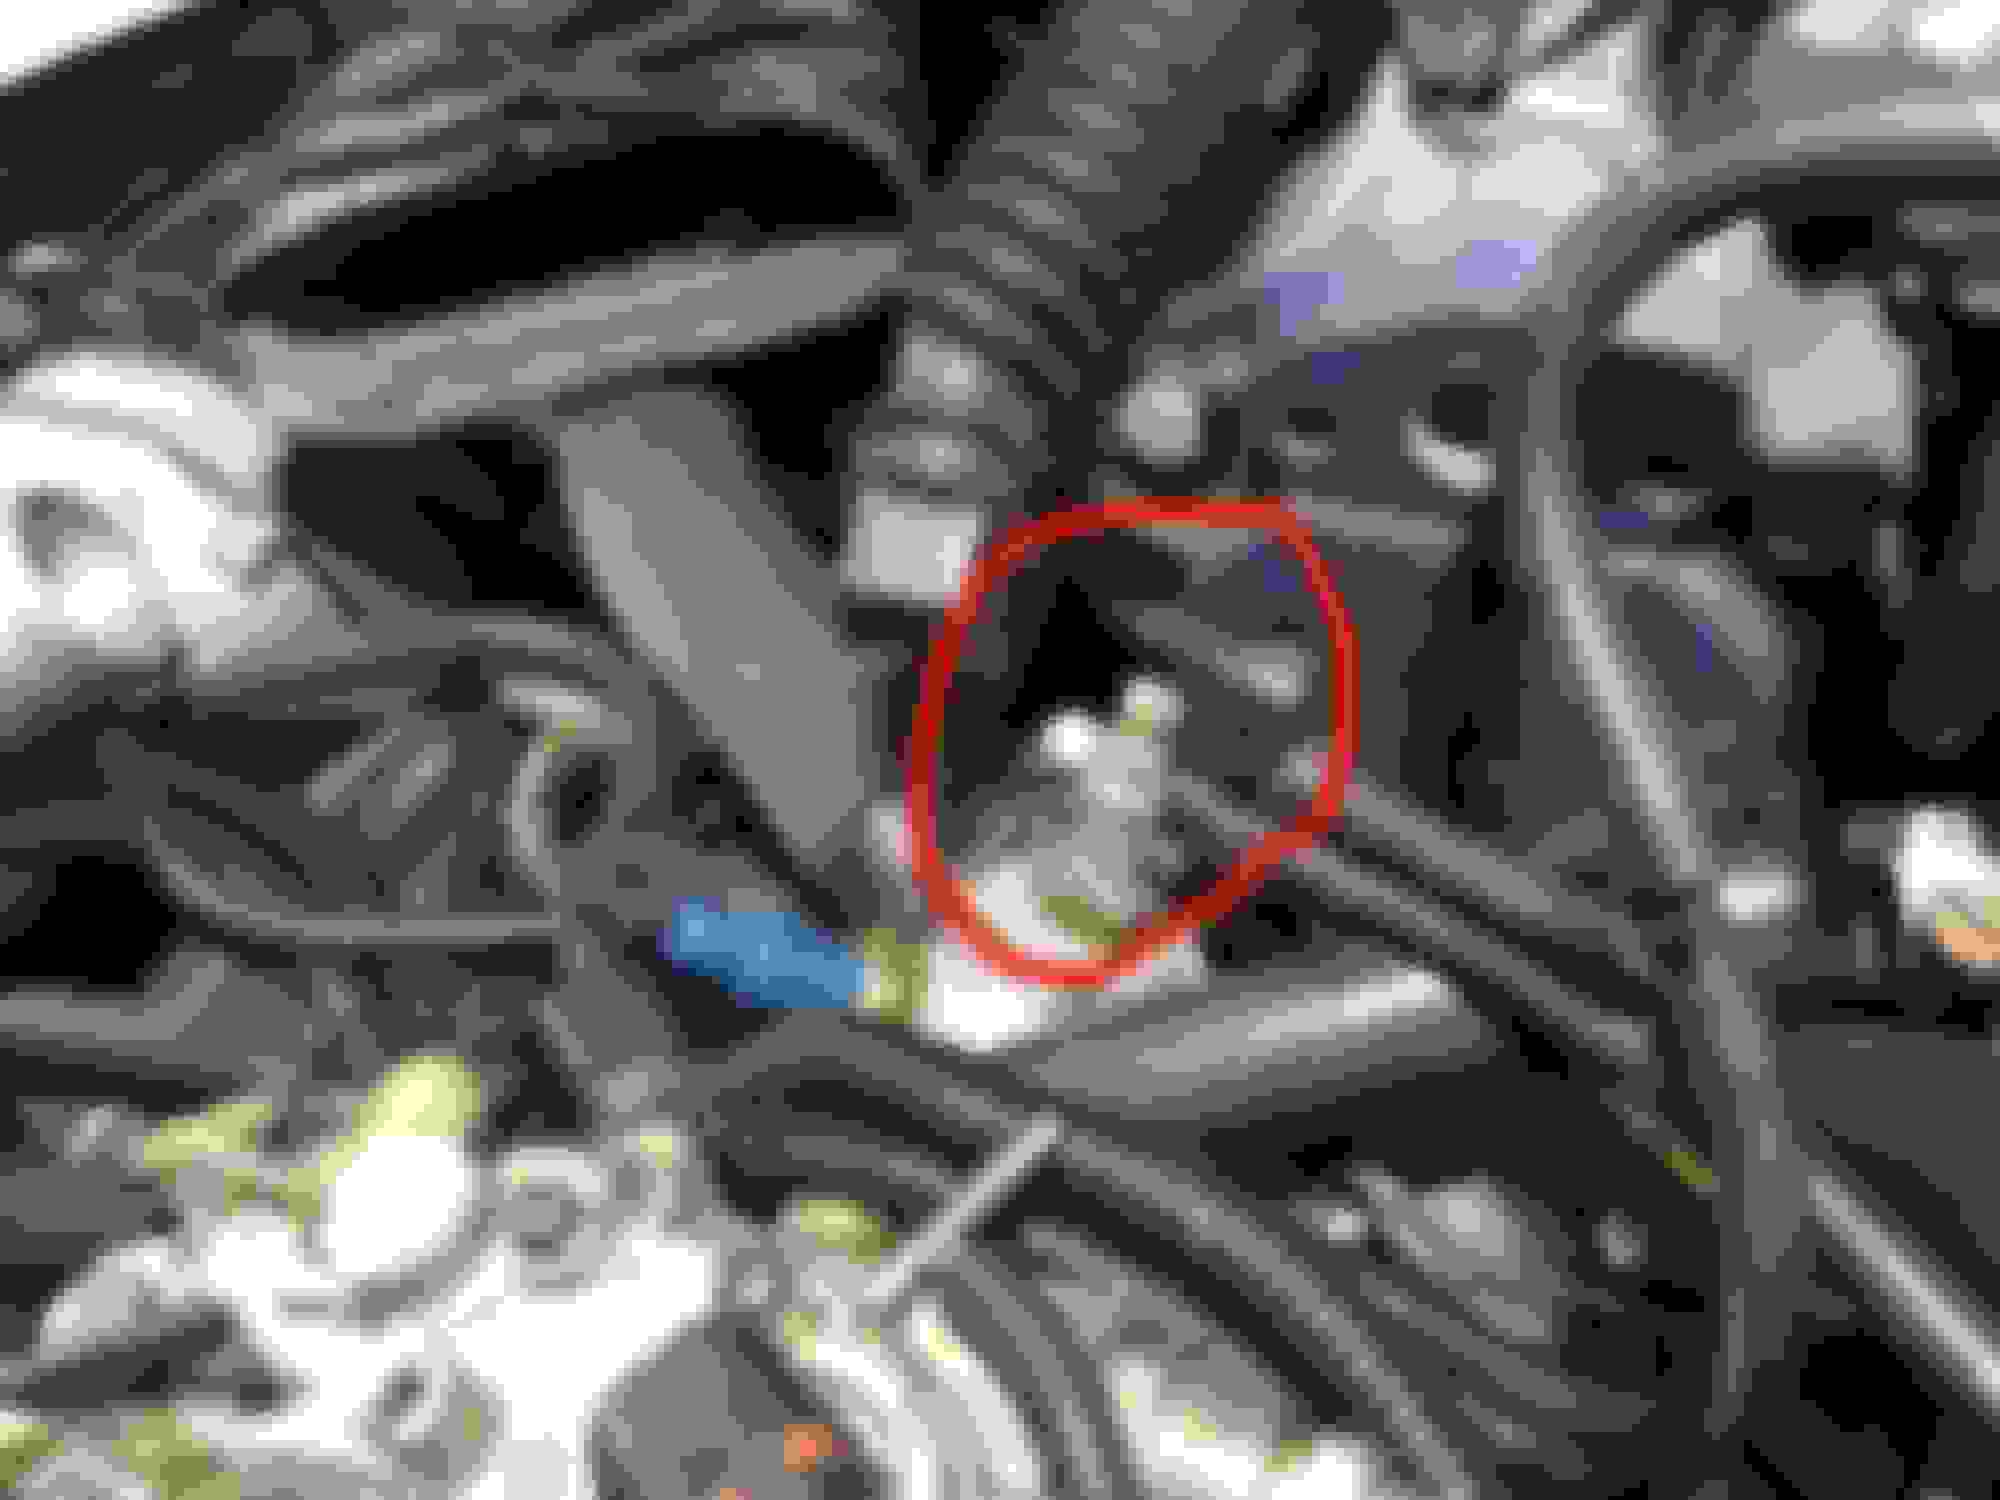
Picture #2 -- The hose goes to a thermo switch that is mounted on the thermostat housing. Since the thermos switch has a funny connector on it, I would guess that the copper is a way to splice the hose together. The hose is the lower of the two hoses pictured

 01-28-2019, 03:47 PM