C4 Hood Latch Adjustment
 11-19-2010, 07:48 AM
#21
Instructor


If you adjust the plastic nut and the locking clamp still won't release it is time to replace the the hood latch cable because eventually they will stretch and break, I 've had this to happen to me, it is best to replace it.
 11-19-2010, 08:31 AM
#22
Drifting

Member Since: Dec 2004
Location: Doylestown PA
Posts: 1,834
Likes: 0
Received 0 Likes
on
0 Posts

I think the only way these heavy hoods should pop all the way up is maybe the two gas rods up front and down by the hinges make it happen but mine don't-I think the gas charge has leaked away over the years. I got a couple of new ones from Corvette Central but haven't put 'em in yet. Hard to believe those little gas rods could lift that hood!! Anyone know if they do?
11-27-2010, 03:03 AM
#23
Pro

Thread Starter
I had a chance to play around with my hood release today, and I found that when pulling the lever..the latch clears the hole completely on both sides. So...it looks like the hood pins themselves are what is causing the problem. I will go the lube and adjust route next...and hope that clears up the problem. Thanks again for all the suggestions
11-27-2010, 03:27 AM
#24
Le Mans Master

I had a chance to play around with my hood release today, and I found that when pulling the lever..the latch clears the hole completely on both sides. So...it looks like the hood pins themselves are what is causing the problem. I will go the lube and adjust route next...and hope that clears up the problem. Thanks again for all the suggestions
If adjustment does not fix it consider replacing the entire unit with new springs. This set has the thick beefy "valve spring" like springs. Some cars came with thinner barrel shaped springs which do not appear to be as stiff for popping the hood as the ones in this kit.
http://www.corvetterecycling.com/product_p/10273994.htm
 11-27-2010, 03:23 PM
#26
Instructor

 06-25-2012, 08:19 PM
#27
Cruising
Member Since: Aug 2005
Location: atlanta ga
Posts: 10
Likes: 0
Received 0 Likes
on
0 Posts
Mine was doing the same thing.I would take it for a ride and the right side would pop open.Then after a year or so the release wouldn't work at all.I had to take the tire off then take out the wheel well to open the hood.If i were you I would buy the emergency release cables ($20.00) or have the hood release fixed because you are just asking for a headache.
Be sure you can access this loop resting under the wiper blade when the hood is closed. Do the same to the other latch. Now, if the hood ever fails to release; reach in and hook the wire loop and pull to release the latch.
06-25-2012, 10:23 PM
#28
Team Owner


Member Since: Sep 2003
Location: Freedom is never more than one generation away from extinction.
Posts: 20,161
Received 640 Likes
on
444 Posts
St. Jude '03-'04-'05-'06-'07-'08-'09-'10-'11-'12-'13-'14-'15-'16-'17-'18-�19-'20-'21-'22-'23-'24


I replaced the cables. fifty bucks for the set and about an hours worth of work.
Still have the safety cables installed (just in case)
Still have the safety cables installed (just in case)
06-26-2012, 02:08 AM
#29
Race Director

I have looked into this, as my hood began to not release after I spun out at an autocross and went into a gravel "so you won't hit the wall" pit sideways. I think it tweaked the frame a little. I had to pull up on the hood while pulling the hood release to get it to release. I must say though that it got much better after I replaced the support strut (I converted mine from the scissors style about 20 years ago -- I still have the original 1985-vintage small gas struts at the front).
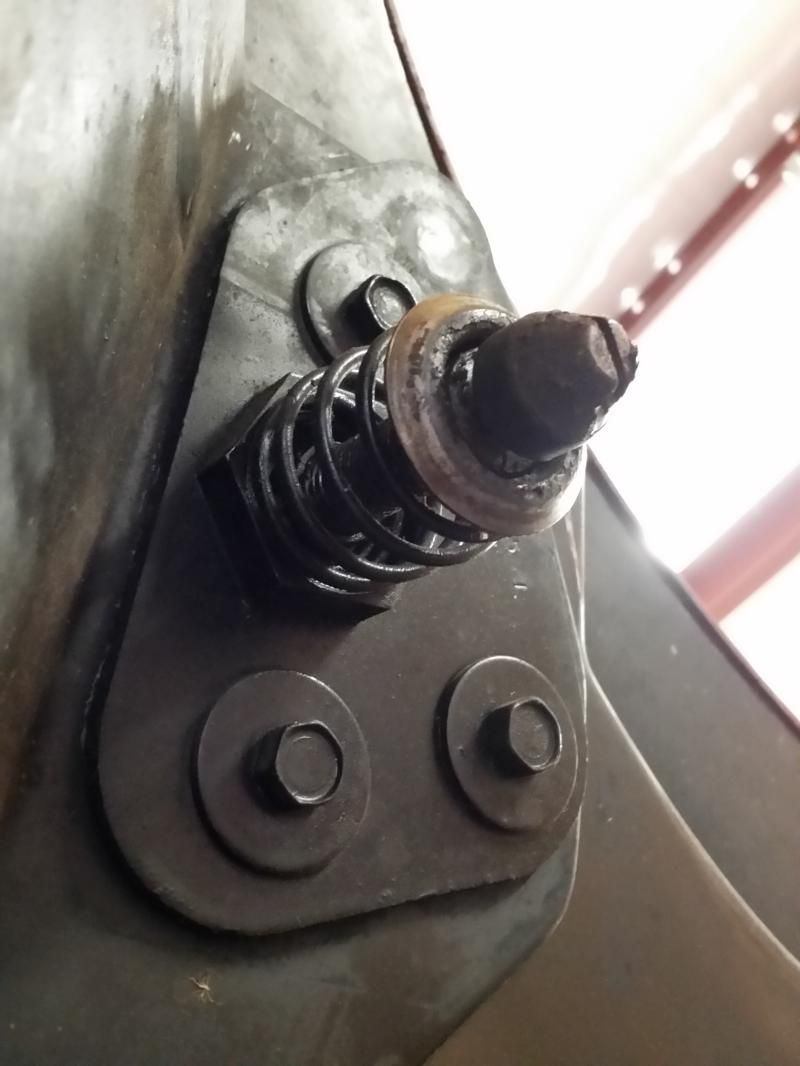
This is the hood stud and spring with a paper towel behind it for contrast. The latch grabs the head of the stud where it reduces in diameter. The spring is what does the popping. The nut is 1-1/2" and I have a 15" Crescent wrench that barely opens far enough to fit, so you definitely need a big wrench to turn it.

Here is the latch. Notice the round rubber bumper on the left. This adjusts the hood gap where the hood meets the "whatever injection" strip. You can adjust it by prying off the rubber bumper, loosening the lock nut and turning the stud.

The hood stud has a slot in the end that adjusts the depth into the latch (you can see the threads inside the spring in the first picture -- there is a large nut welded on the inside of the plate). If this is adjusted too high the hood latch will bind and sometimes you can't release the hood at all (sometimes you can fix this by adjusting the rubber bumper). To check this, close the hood and push down on the hood right above the latch. There should be a TINY bit of up-and-down play. It needs to be just loose enough to allow the latch to release the stud but you don't want it so loose that the hood bounces around as you're driving down the street. Turn the stud with a LARGE screwdriver to adjust the depth.
If your hood doesn't pop up when you pull on the cable, it's probably because the stud is binding because it is not centered in the hole in the latch. This is where the fun begins because there is no way to see what is going on and there is no way to tighten/loosen things while the hood is closed. I have seen a couple of ways to check the centering.
One is to put white grease on the latch hole area and then lower the hood so the stud smears the grease so you can see the relationship between the two.
A second method I saw was to put some masking tape over the latch hole and smear some grease on the stud. Lower the hood just enough so that the stud touches the masking tape and leaves some grease behind. Now you can see how the stud and hole line up.
I did mine a different way. I used the adjusters on the cable to pull the latches out of the way. Then I loosened the 1-1/2" nut on the stud (it was REALLY TIGHT!). I lowered the hood and pushed it in and out of the latch several times, which centers the stud in the hole. Then I tightened the nut. It's kind of tricky to get the nut just loose enough to move but not so loose it flops around and loses the adjustment.
This is the hood stud and spring with a paper towel behind it for contrast. The latch grabs the head of the stud where it reduces in diameter. The spring is what does the popping. The nut is 1-1/2" and I have a 15" Crescent wrench that barely opens far enough to fit, so you definitely need a big wrench to turn it.
Here is the latch. Notice the round rubber bumper on the left. This adjusts the hood gap where the hood meets the "whatever injection" strip. You can adjust it by prying off the rubber bumper, loosening the lock nut and turning the stud.
The hood stud has a slot in the end that adjusts the depth into the latch (you can see the threads inside the spring in the first picture -- there is a large nut welded on the inside of the plate). If this is adjusted too high the hood latch will bind and sometimes you can't release the hood at all (sometimes you can fix this by adjusting the rubber bumper). To check this, close the hood and push down on the hood right above the latch. There should be a TINY bit of up-and-down play. It needs to be just loose enough to allow the latch to release the stud but you don't want it so loose that the hood bounces around as you're driving down the street. Turn the stud with a LARGE screwdriver to adjust the depth.
If your hood doesn't pop up when you pull on the cable, it's probably because the stud is binding because it is not centered in the hole in the latch. This is where the fun begins because there is no way to see what is going on and there is no way to tighten/loosen things while the hood is closed. I have seen a couple of ways to check the centering.
One is to put white grease on the latch hole area and then lower the hood so the stud smears the grease so you can see the relationship between the two.
A second method I saw was to put some masking tape over the latch hole and smear some grease on the stud. Lower the hood just enough so that the stud touches the masking tape and leaves some grease behind. Now you can see how the stud and hole line up.
I did mine a different way. I used the adjusters on the cable to pull the latches out of the way. Then I loosened the 1-1/2" nut on the stud (it was REALLY TIGHT!). I lowered the hood and pushed it in and out of the latch several times, which centers the stud in the hole. Then I tightened the nut. It's kind of tricky to get the nut just loose enough to move but not so loose it flops around and loses the adjustment.
Last edited by Cliff Harris; 12-26-2014 at 01:50 AM.
04-02-2014, 06:19 PM
#30
Intermediate

KARR you are right i have this same problem for year and after checking the adjustment on the cable turns out both sides were pulling the latch's all they way out just fine cleaned and degreased and regreased the springs and latch area's now it opes just as pretty as it pleases lol
04-03-2014, 07:01 AM
#32
Le Mans Master
Member Since: Oct 2004
Location: South-central Missouri
Posts: 6,314
Received 500 Likes
on
395 Posts

Cheap fix that works like a charm. Get some picture hanging wire; attach a loop around the same short hood release arm that has the original cable attached; extend enough wire (8-10") to lay in the cavity beneath the wiper blade ; then twist another loop on the other end of the wire.
Be sure you can access this loop resting under the wiper blade when the hood is closed. Do the same to the other latch. Now, if the hood ever fails to release; reach in and hook the wire loop and pull to release the latch.
Be sure you can access this loop resting under the wiper blade when the hood is closed. Do the same to the other latch. Now, if the hood ever fails to release; reach in and hook the wire loop and pull to release the latch.
 I owned a 95 for 5 years and now my 90 Z for 7 and have never had a problem, but can appreciate the PIA it would be if I did. SO, having picture hanging wire handy, I'll be making a pair of these gizmoez and installing them.
I have looked into this, as my hood began to not release after I spun out at an autocross and went into a gravel "so you won't hit the wall" pit sideways. I think it tweaked the frame a little. I had to pull up on the hood while pulling the hood release to get it to release. I must say though that it got much better after I replaced the support strut (I converted mine from the scissors style about 20 years ago -- I still have the original 1985-vintage small gas struts at the front).
This is the hood stud and spring with a paper towel behind it for contrast. The latch grabs the head of the stud where it reduces in diameter. The spring is what does the popping. The nut is 1-1/2" and I have a 15" Crescent wrench that barely opens far enough to fit, so you definitely need a big wrench to turn it.
Here is the latch. Notice the round rubber bumper on the left. This adjusts the hood gap where the hood meets the "whatever injection" strip. You can adjust it by prying off the rubber bumper, loosening the lock nut and turning the stud.
The hood stud has a slot in the end that adjusts the depth into the latch (you can see the threads inside the spring in the first picture -- there is a large nut welded on the inside of the plate). If this is adjusted too high the hood latch will bind and sometimes you can't release the hood at all (sometimes you can fix this by adjusting the rubber bumper). To check this, close the hood and push down on the hood right above the latch. There should be a TINY bit of up-and-down play. It needs to be just loose enough to allow the latch to release the stud but you don't want it so loose that the hood bounces around as you're driving down the street. Turn the stud with a LARGE screwdriver to adjust the depth.
If your hood doesn't pop up when you pull on the cable, it's probably because the stud is binding because it is not centered in the hole in the latch. This is where the fun begins because there is no way to see what is going on and there is no way to tighten/loosen things while the hood is closed. I have seen a couple of ways to check the centering.
One is to put white grease on the latch hole area and then lower the hood so the stud smears the grease so you can see the relationship between the two.
A second method I saw was to put some masking tape over the latch hole and smear some grease on the stud. Lower the hood just enough so that the stud touches the masking tape and leaves some grease behind. Now you can see how the stud and hole line up.
I did mine a different way. I used the adjusters on the cable to pull the latches out of the way. Then I loosened the 1-1/2" nut on the stud (it was REALLY TIGHT!). I lowered the hood and pushed it in and out of the latch several times, which centers the stud in the hole. Then I tightened the nut. It's kind of tricky to get the nut just loose enough to move but not so loose it flops around and loses the adjustment.
Also... should the frame be tweaked ever so slightly, causing the hood pins to bind (hood won't pop open), removing the headlight assembly is easy (remove the halo bolts and disconnect the 'lectrics') and one has access to the hood bolts, which is really where to start (IMO) with hood regulation.
I enjoy your posts.
Paul.
Last edited by Paul Workman; 04-03-2014 at 07:16 AM.
12-25-2014, 04:39 AM
#34
Race Director
Somebody mentioned a while back that his hood was bouncing around and he found that the foam rubber piece in front of the round bumper was missing. [ EDIT ] Note that this bumper was moved to the hood sometime in the early '90s. [ /EDIT ]
.
.
Last edited by Cliff Harris; 09-18-2015 at 12:01 AM. Reason: Added note on hood bumper location.
12-26-2014, 01:05 AM
#35
Safety Car

 12-26-2014, 01:55 AM
#36
Race Director
I don't know when the change was made, but one way to tell is to look at the shape of the springs. The straight springs are the later ones and the beehive-shaped springs are the earlier ones. The later ones are stronger. They are also slightly larger in diameter at the ends, so the spring retainer is larger. i assume the big nut is larger also.
[ EDIT ] I did some research in the parts book and found that there is a different part number for '94 - '96 hood springs. The difference is in the shape of the springs. The older ones are "beehive" shaped and bulge outward in the middle. The newer ones are made with larger diameter wire and are straight. [ /EDIT ]
[ EDIT ] I did some research in the parts book and found that there is a different part number for '94 - '96 hood springs. The difference is in the shape of the springs. The older ones are "beehive" shaped and bulge outward in the middle. The newer ones are made with larger diameter wire and are straight. [ /EDIT ]
Last edited by Cliff Harris; 12-29-2014 at 02:05 AM. Reason: Added more information.
12-28-2014, 12:22 PM
#37
Drifting
Thanks Cliff!
I'll check the bumpstop first and while I'm out there I'll grab a picture of my spring and plate.
Hot Rod I'm not sorry! I can't see the difference between your pic in the "Source for new hood springs" thread and Cliff's picture. I see the three bolts holding the plate to the hood and then one large nut at the base of the spring. My car looks like both of your pictures!
I'll grab a picture of it later today...
I'll check the bumpstop first and while I'm out there I'll grab a picture of my spring and plate.
Hot Rod I'm not sorry!
I can't see the difference between your pic in the "Source for new hood springs" thread and Cliff's picture. I see the three bolts holding the plate to the hood and then one large nut at the base of the spring. My car looks like both of your pictures! I'll grab a picture of it later today...
01-03-2015, 11:44 AM
#38
Drifting
Okay I adjusted the bumpstop down and the movement increased. I adjusted the bumpstop up above the level that it was at originally and the movement seems to be the same as original maybe a tad bit better. I adjusted the bumpstop real high and the hood wouldn't close.
Should I try to find a bumpstop adjustment point between the "too high" and "not high enough" points?
IMO I think that the spring needs to be adjusted.
Here is a pic of my setup:
Should I try to find a bumpstop adjustment point between the "too high" and "not high enough" points?
IMO I think that the spring needs to be adjusted.
Here is a pic of my setup:
 01-04-2015, 02:40 AM
#39
Race Director
I ordered a pair of the hood spring mechanisms from Corvette Recycling and they arrived today. The springs are definitely different than the ones in the picture is post #29:

It remains to be seen if these will be an improvement over the old springs.
One of the things I've seen that makes the hood not pop up is if the stud is not centered in the latch. If that happens it rubs on the hole in the latch and the extra friction is enough to prevent the hood from popping up.
It remains to be seen if these will be an improvement over the old springs.
One of the things I've seen that makes the hood not pop up is if the stud is not centered in the latch. If that happens it rubs on the hole in the latch and the extra friction is enough to prevent the hood from popping up.
Last edited by Cliff Harris; 01-05-2015 at 03:53 AM.
01-04-2015, 11:28 PM
#40
Race Director
A lot of good responses and info here!
When I first got my car, the latch was so hard to pull I thought I was going to break off the release handle or one of the cables!The old grease on the latches was hard as candle wax and had no lubricating ability at all. I cleaned up the pins and the latches and applied a little machinists dye to the pins and closed but didn't latch the hood. I opened it and saw one of the pins was not centered. Fixed that and finished up with fresh grease on all the parts and now it pops every time with just a light pull on the release handle. Alignment and lubrication did wonders! 
When I first got my car, the latch was so hard to pull I thought I was going to break off the release handle or one of the cables!
The old grease on the latches was hard as candle wax and had no lubricating ability at all. I cleaned up the pins and the latches and applied a little machinists dye to the pins and closed but didn't latch the hood. I opened it and saw one of the pins was not centered. Fixed that and finished up with fresh grease on all the parts and now it pops every time with just a light pull on the release handle. Alignment and lubrication did wonders!