1987 Conv.Restore - A Greenwood Corvette is born
 04-03-2011, 09:53 AM
#41
Instructor

Hey Greenwood-Robban,
Looking good, brother. I recently started to polish the aluminum under my hood too. I recently polished the aluminum A/C canister that is next to the radiator. I cleaned it with simple green, then I sanded it with 0000 grit steel wool, and polished it with Meguire's Aluminum polish. I also polished the front suspension, as well as the A/C lines. I think next winter I will hit the TPI plenum and SLP siamese runners.
But anyways, that's a beautiful Vette you got!
Chuck


 04-04-2011, 11:22 AM
#44
Drifting

I love following your progress here and I hate when I get to the end. Look forward to the next installment. You are going to end up with one of the nicest vettes on the planet. I know what it takes to do all that polishing work. I did all my suspension and started on the plenum, then decided powder coating would be much easier. You certainly have a lot of will power to stick with it. Nice job
04-05-2011, 04:35 PM
#45
Advanced
Thread Starter

Member Since: Mar 2011
Location: Stockholm
Posts: 50
Likes: 0
Received 0 Likes
on
0 Posts
Hey Greenwood-Robban,
Looking good, brother. I recently started to polish the aluminum under my hood too. I recently polished the aluminum A/C canister that is next to the radiator. I cleaned it with simple green, then I sanded it with 0000 grit steel wool, and polished it with Meguire's Aluminum polish. I also polished the front suspension, as well as the A/C lines. I think next winter I will hit the TPI plenum and SLP siamese runners.
But anyways, that's a beautiful Vette you got!
Chuck
Looking good, brother. I recently started to polish the aluminum under my hood too. I recently polished the aluminum A/C canister that is next to the radiator. I cleaned it with simple green, then I sanded it with 0000 grit steel wool, and polished it with Meguire's Aluminum polish. I also polished the front suspension, as well as the A/C lines. I think next winter I will hit the TPI plenum and SLP siamese runners.
But anyways, that's a beautiful Vette you got!
Chuck
Thanks for you kind words
 Unfortunately my ECC doesn´t work ( i guess there is no gas) so that canister wil need to get replaced, so that is why i haven´t bother to deal with it. yes, it takes hugh amount of time and most important, a strong will. Never ever give up!
As you probably have noticed, i have polished my A/C lines aswell.
I have so much more i want to do but i have to draw the line and make a stop for now so i can start working on the body and all the other stuff.
Beautiful annivers. you´ve go Chuck
 04-05-2011, 04:43 PM
#47
Advanced
Thread Starter
Member Since: Mar 2011
Location: Stockholm
Posts: 50
Likes: 0
Received 0 Likes
on
0 Posts
04-05-2011, 04:48 PM
#48
Advanced
Thread Starter
Member Since: Mar 2011
Location: Stockholm
Posts: 50
Likes: 0
Received 0 Likes
on
0 Posts
I love following your progress here and I hate when I get to the end. Look forward to the next installment. You are going to end up with one of the nicest vettes on the planet. I know what it takes to do all that polishing work. I did all my suspension and started on the plenum, then decided powder coating would be much easier. You certainly have a lot of will power to stick with it. Nice job
You think so? My goal is to have the car the way i want it without it being a trailer queen. That will never happen.
Stay tuned for the next update, will take a few days though. It is more fun to make big updates with many pictures than small with less pictures.
powdercoating was a great choice aswell
06-15-2011, 04:48 PM
#49
Advanced
Thread Starter
Member Since: Mar 2011
Location: Stockholm
Posts: 50
Likes: 0
Received 0 Likes
on
0 Posts
LONG TIME NO SEE!!!
Hi all, guess who´s back! I have been very busy with different things the latest time so thats why this thread has been resting for a while. Besides that, i have been doing so much detailing on the car that i didn´t felt it was neccessary to show you a new bolt vs the old etc. So i let some time pass to be able to give you a big update, the ones you guys usually enjoys so much
So, lets take a closer look, i hope you enjoy part VI !
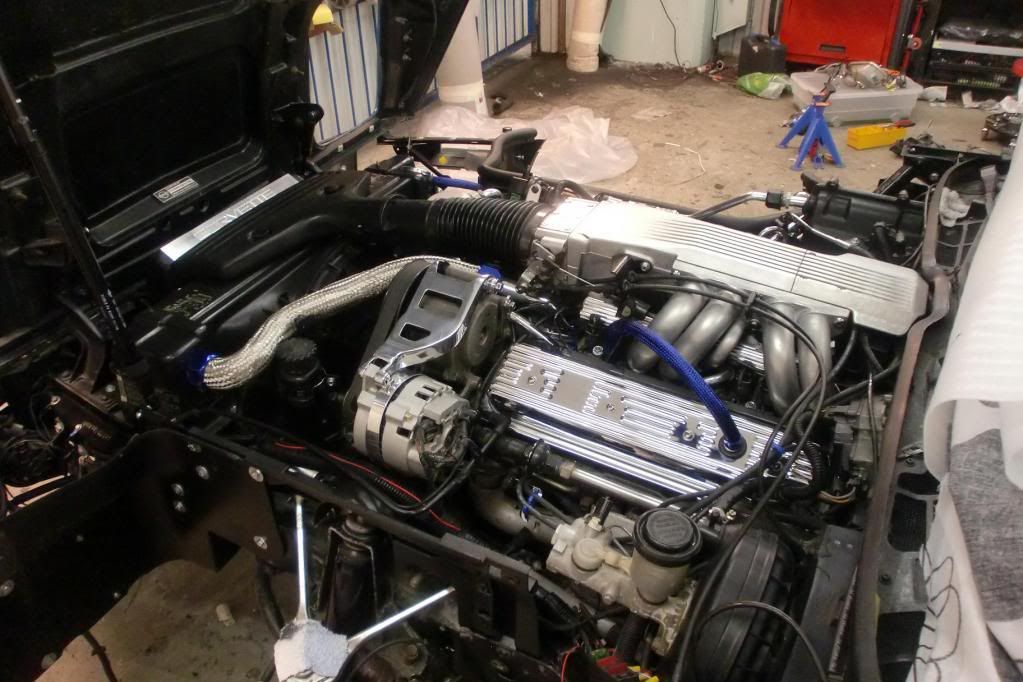
I kept putting the plenum and runners and everything around together. Finally i started to put things together instead of taking everything apart.
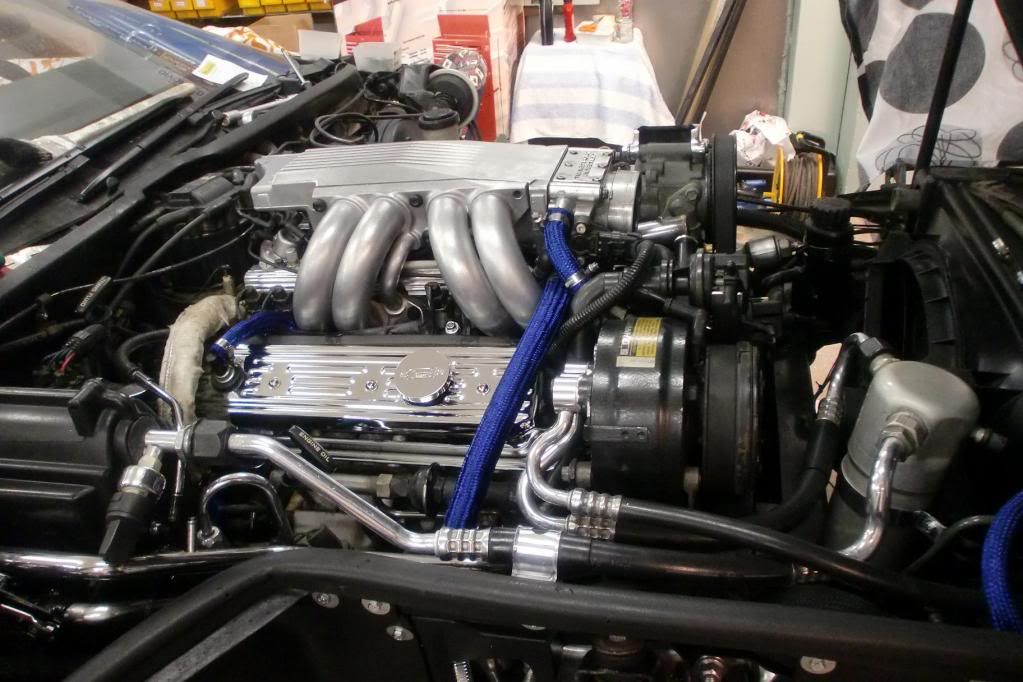
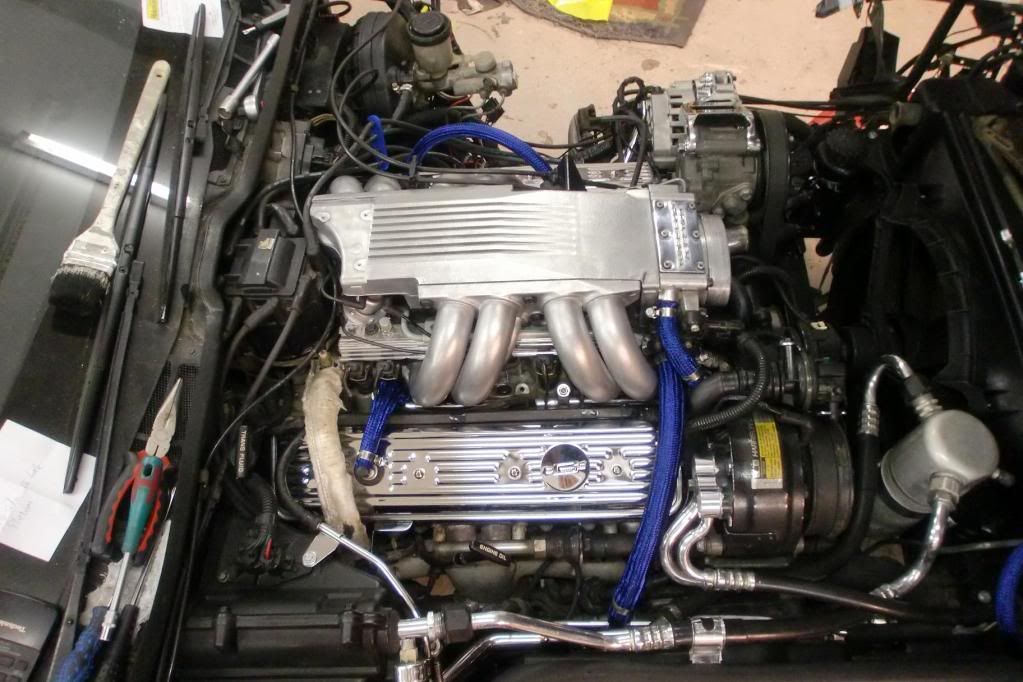
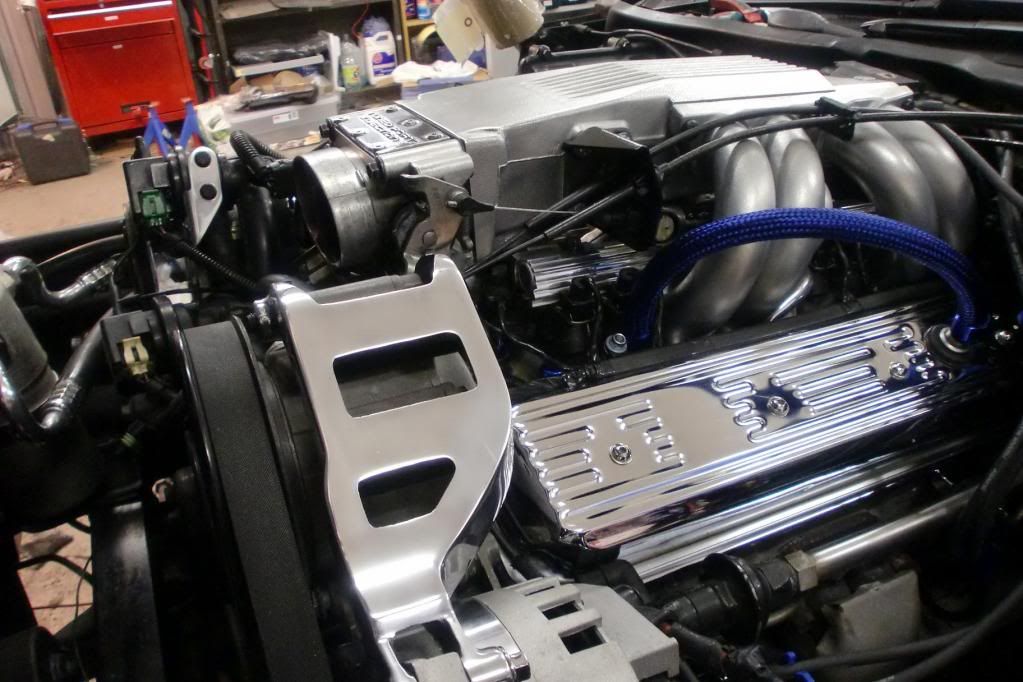
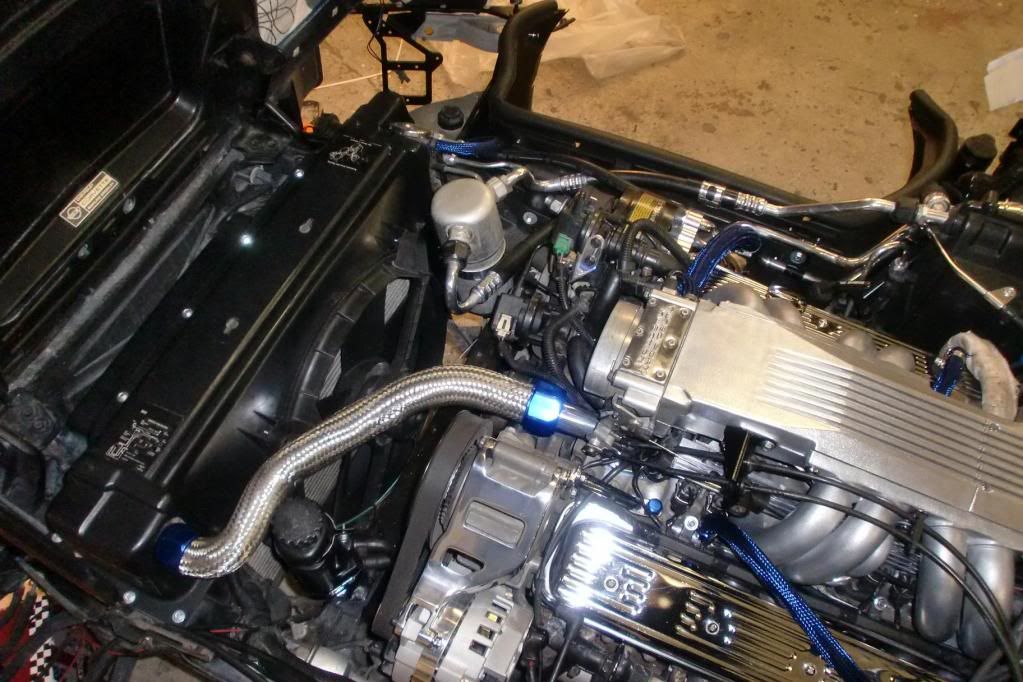
The plenum and runners are back together. I put on some new blue steelhose covers on some of the hoses, adding a nice touch to the engine bay (in my opinion that is)
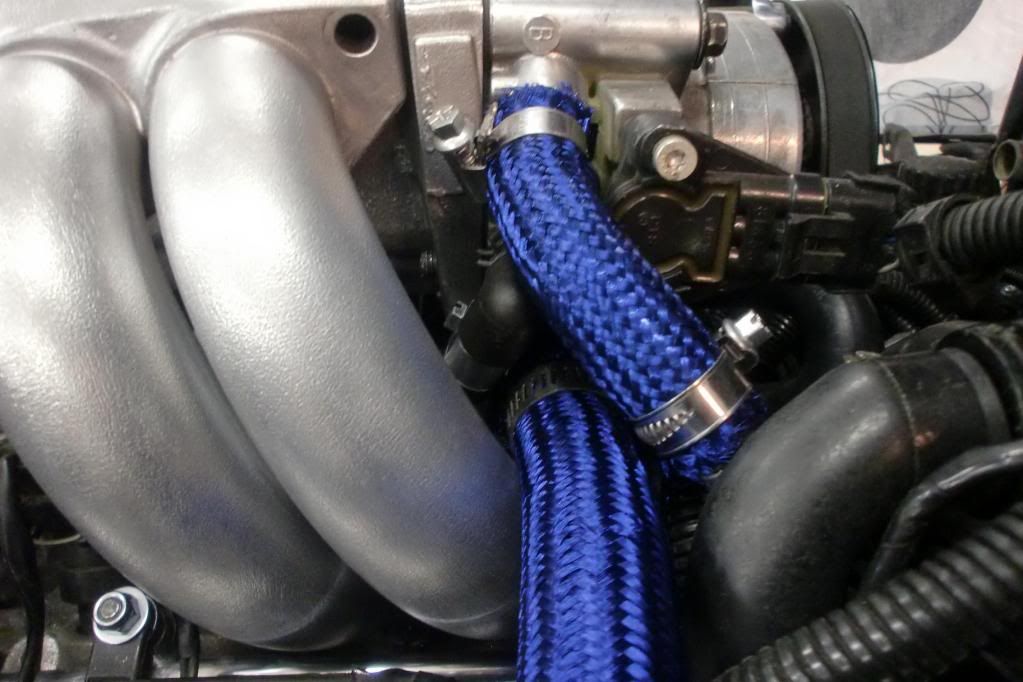
This little short hosie-hose is what caused the cooling system leak that totally soaked the entire intake, throttle body, runners and everything around. A new hose with hardly tightened stainless hoseclamps is what secures me from doing this dirty job one more time...
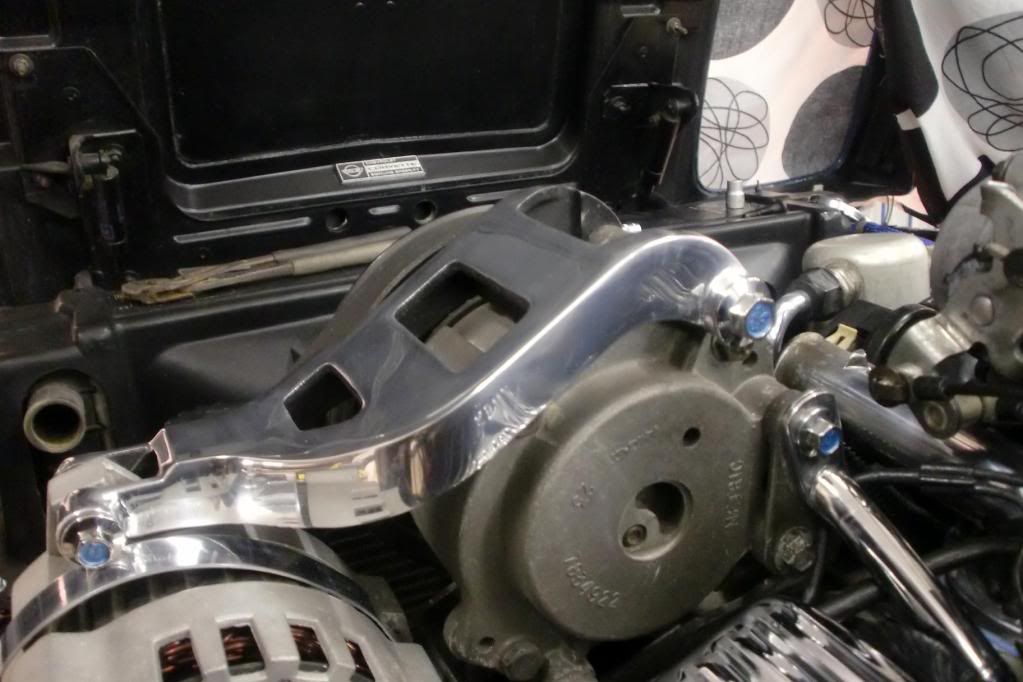
By now i was studying my black alternator bracket. I said stop earlier, to be able to start working with the body, but ofcourse, the demons in my head couldn´t stop me... So i spent a buch of hours with sanding and polishing. A homemade ring that covers the alternator was made which i polished.
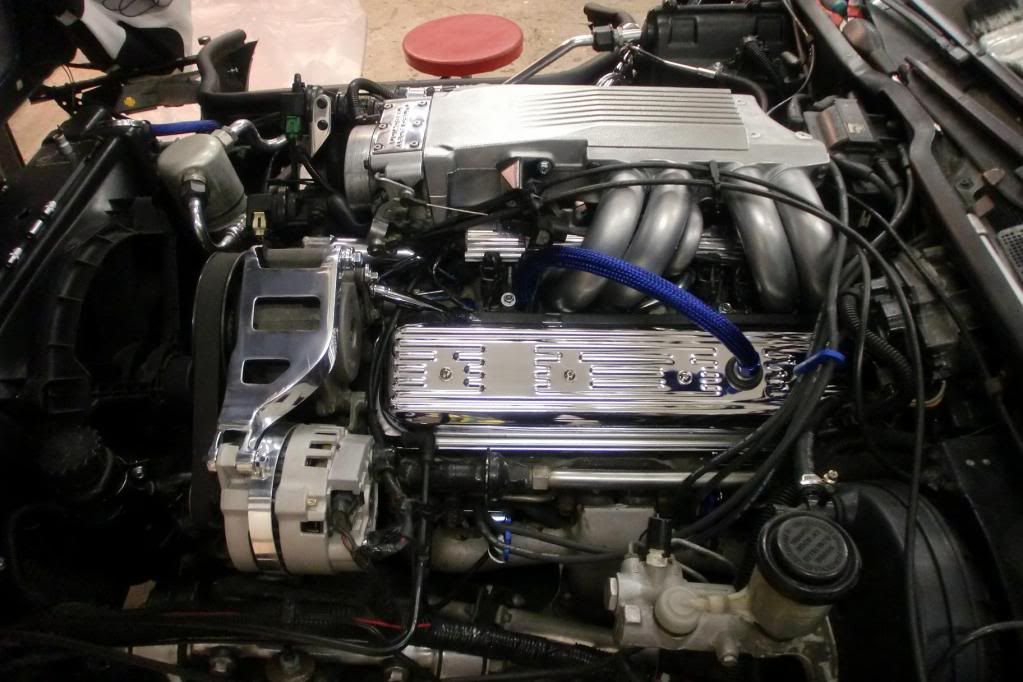
Much better ! !
A closer look with the bolts polished aswell.
I then put the upper coolant hose back in place with the stainless braid covering the boring black look of it.
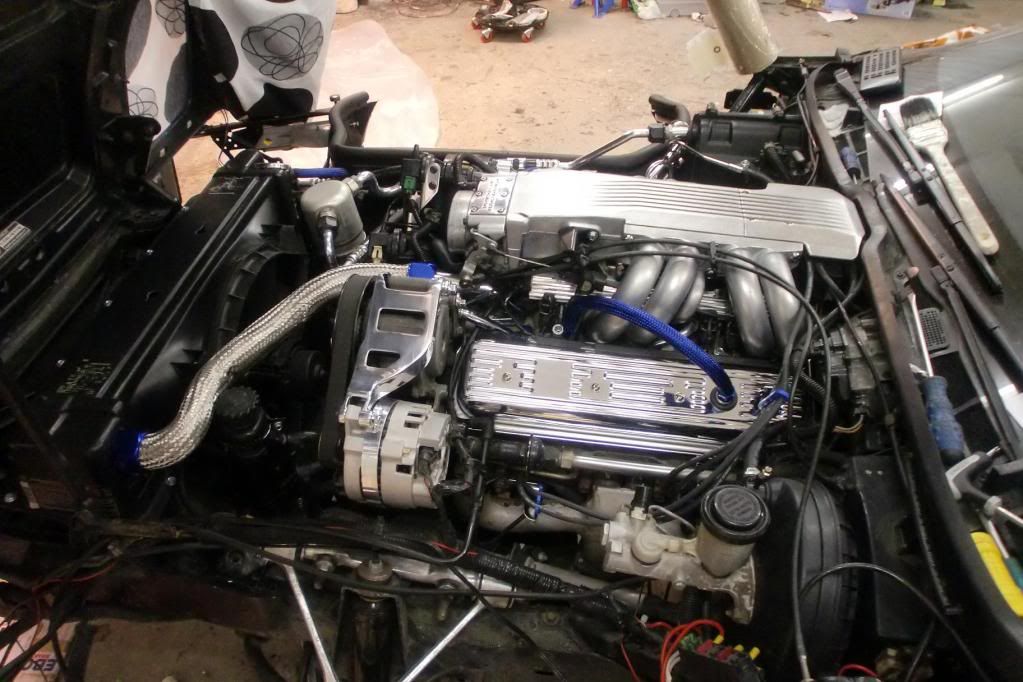
Another one..
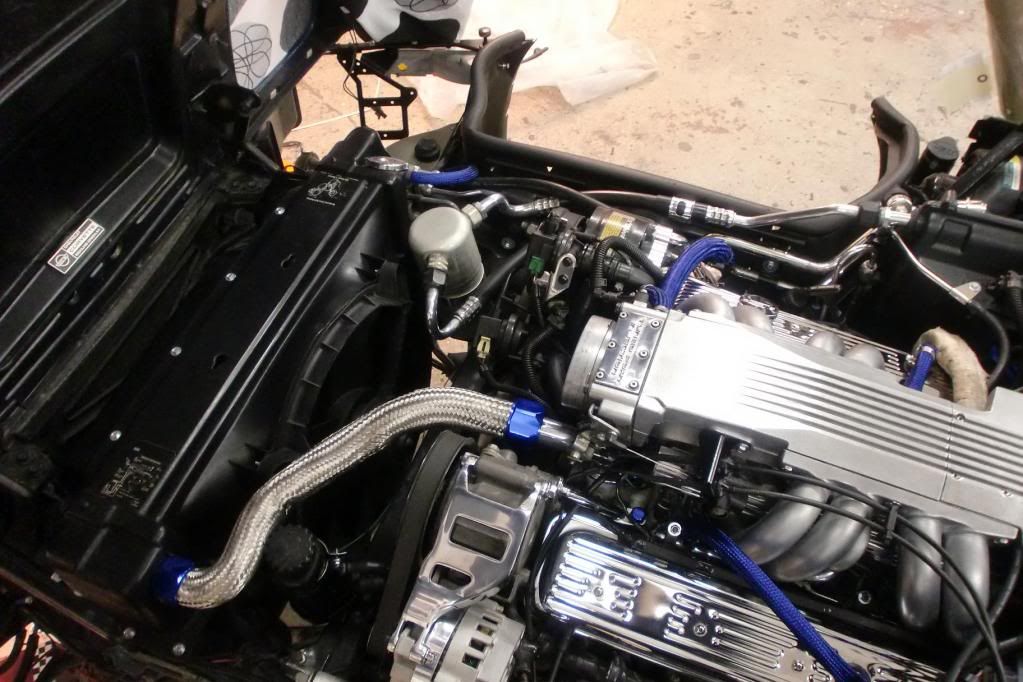
With flash, just to Bling Bling up things alittle

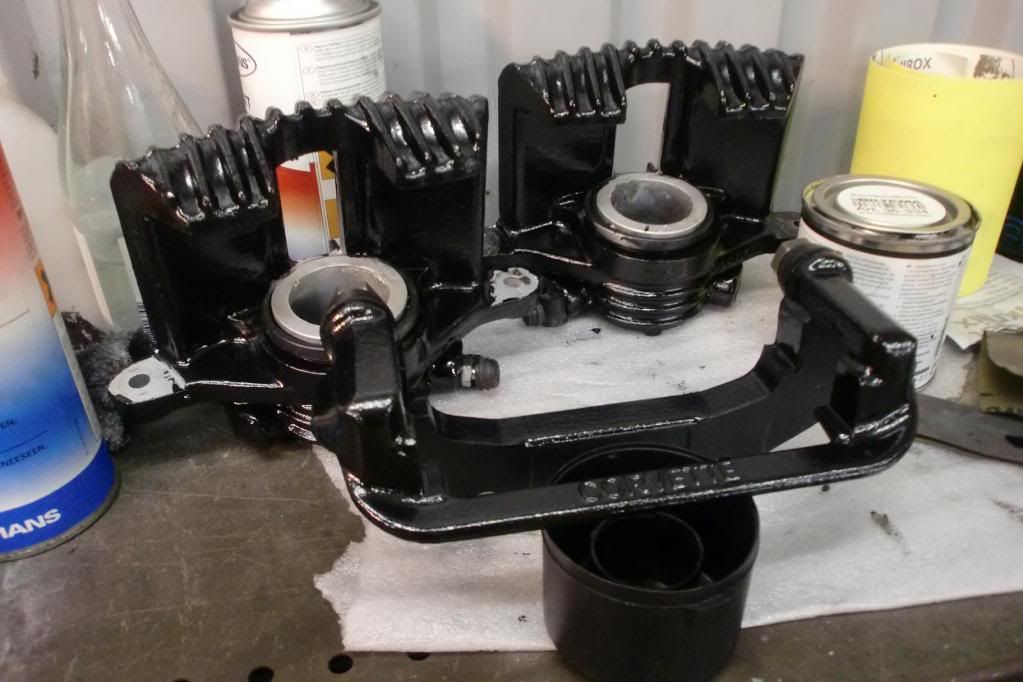
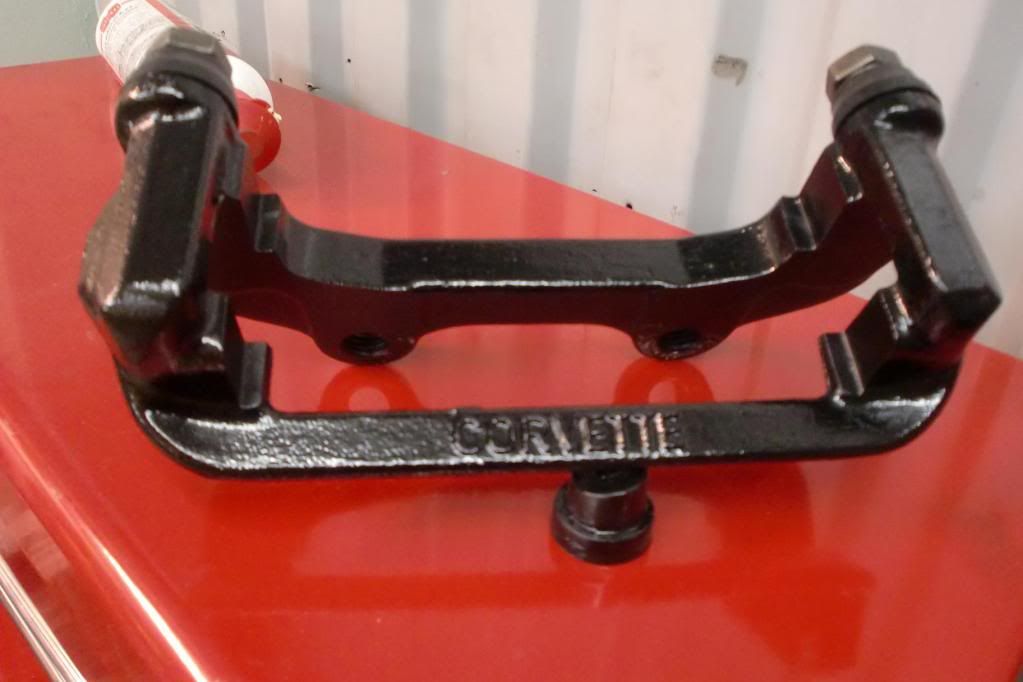
So the next move i made was to deal with my front calipers..They where..kind of dirty with many years brakedust on them. I left them at a brake-shop who was going to sandblaster them for me. But the pistons where in such a bad shape that i instead got the remanufactured with new pistons and gaskets. Wifie has a fetish on red calipers but i refused, so instead, painted them black. The brakes sucks on the C4´s, they are way to small, but maybe this will help. Along with new brake hoses and doing the same in the rear, maybe i will feel a slight difference?
Front Calipers painted black.
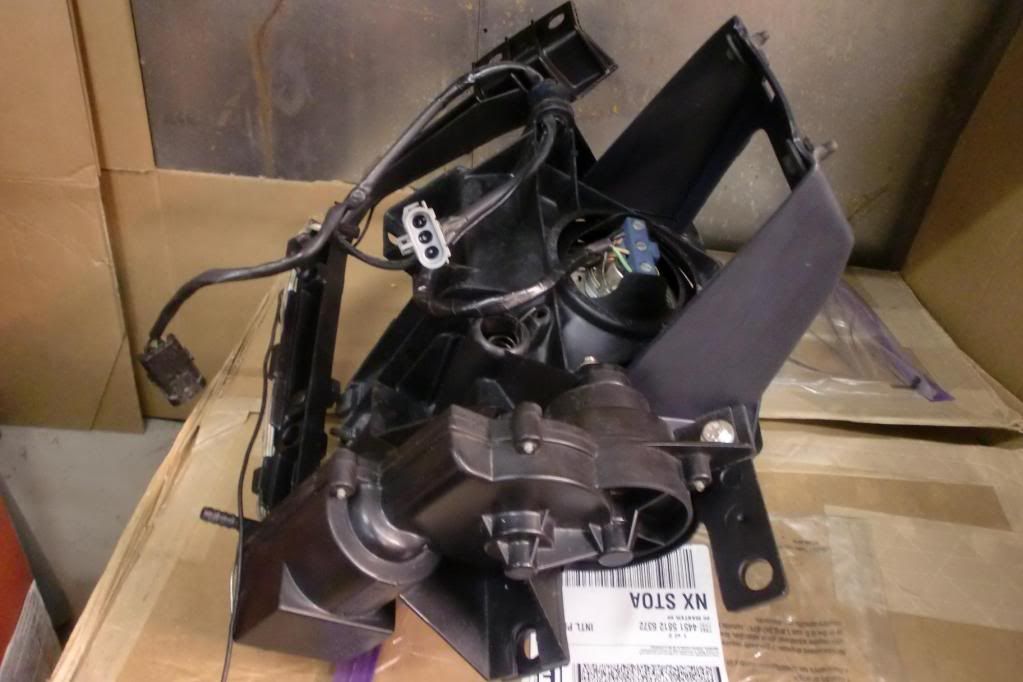
I then decided to take the headlights apart and refurb them.
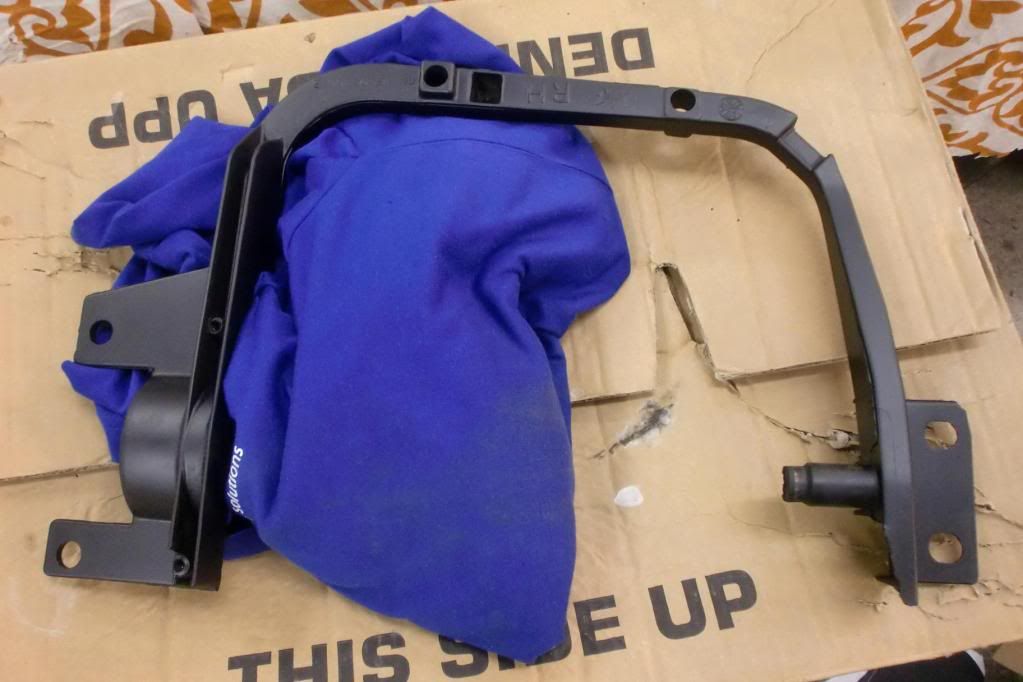
The holders for the Hella headlights was a bit rusty so i sanded them and painted them.
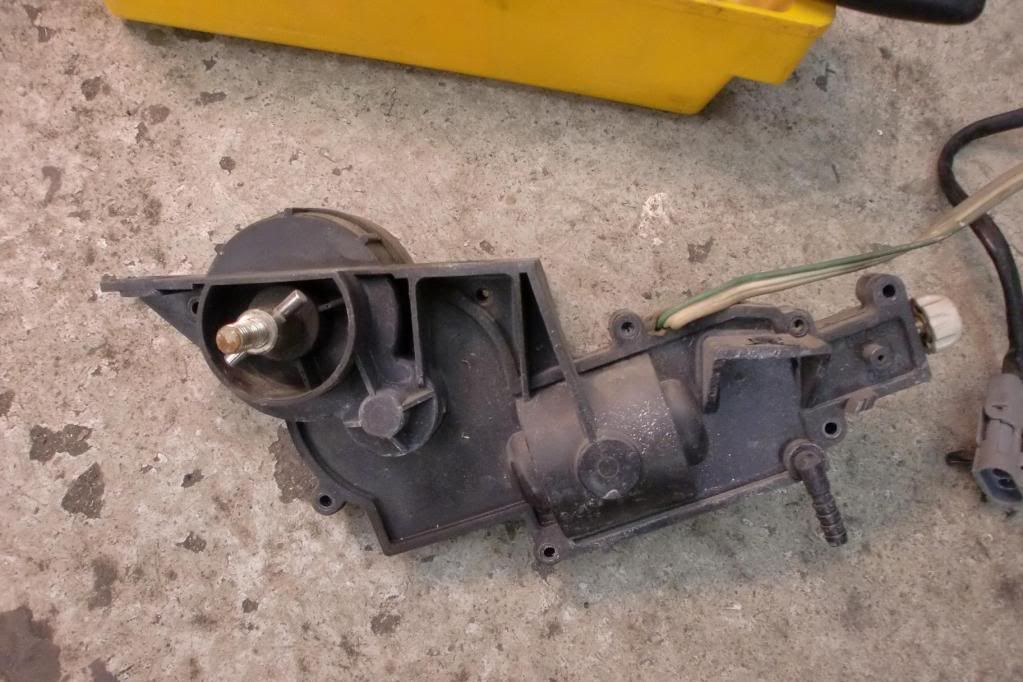
Headlightmotor before cleaning and getting re-greased...
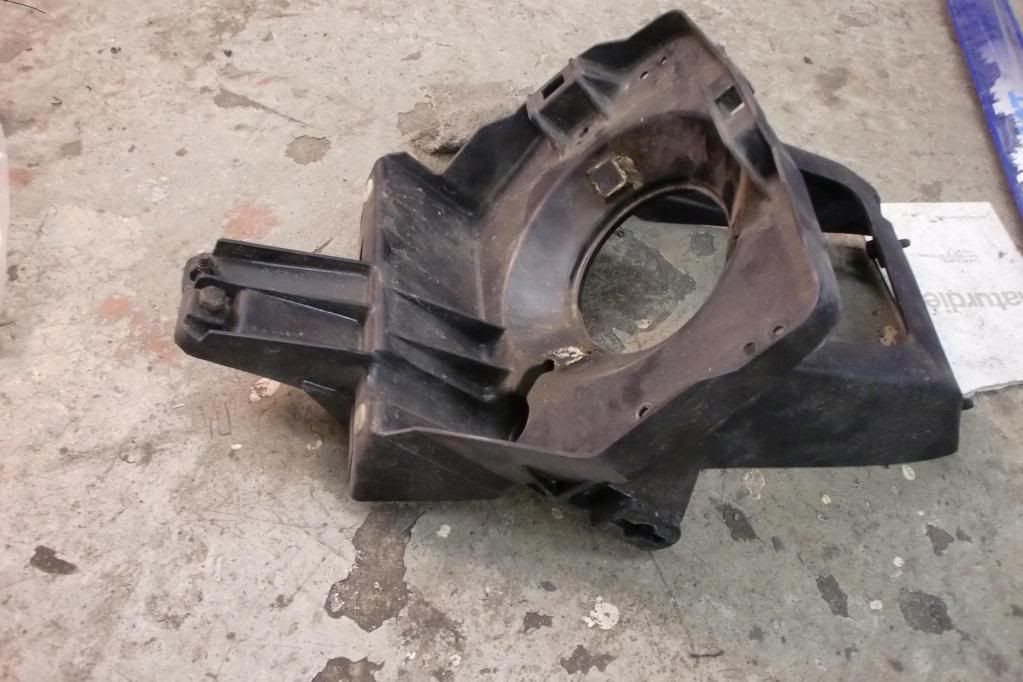
The aluminum frame that the whole headlight package is attached to was a little bit corroded here and there so sanding it down and putting new paint on it resulted in:
The plastic that houses the headlight and adjusting spring etc before cleaning:
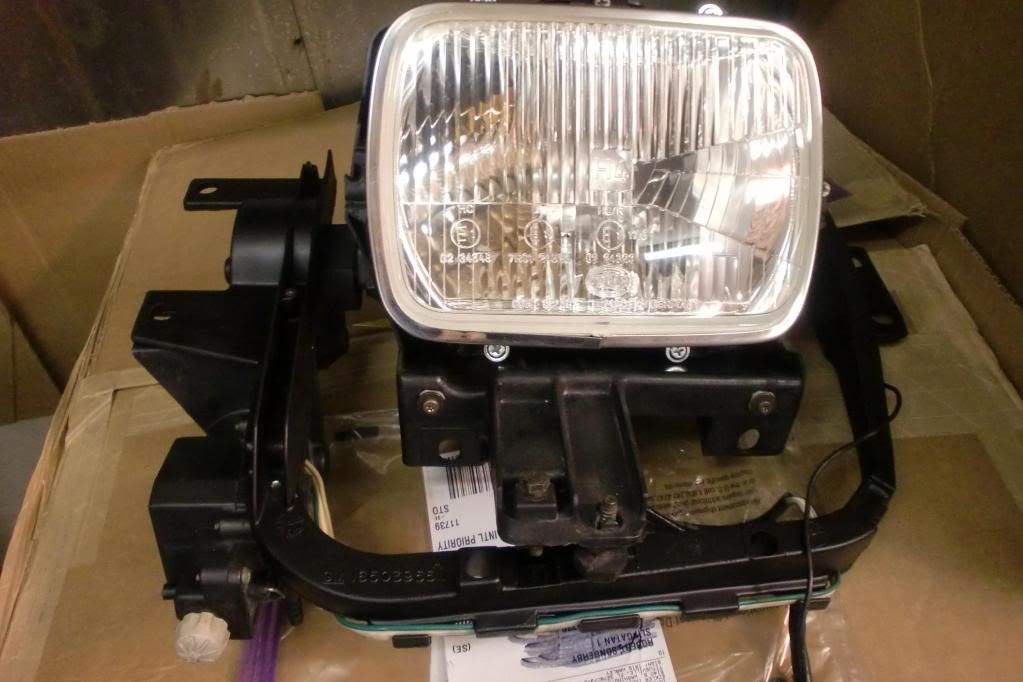
The left side headlight is already done, so here is the finished result!
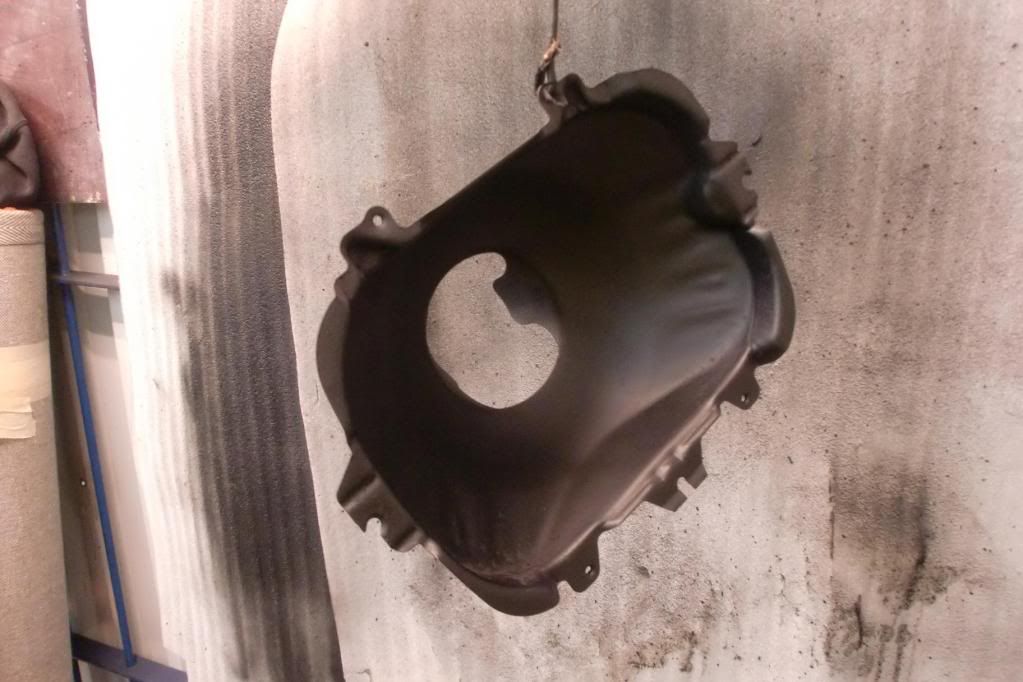
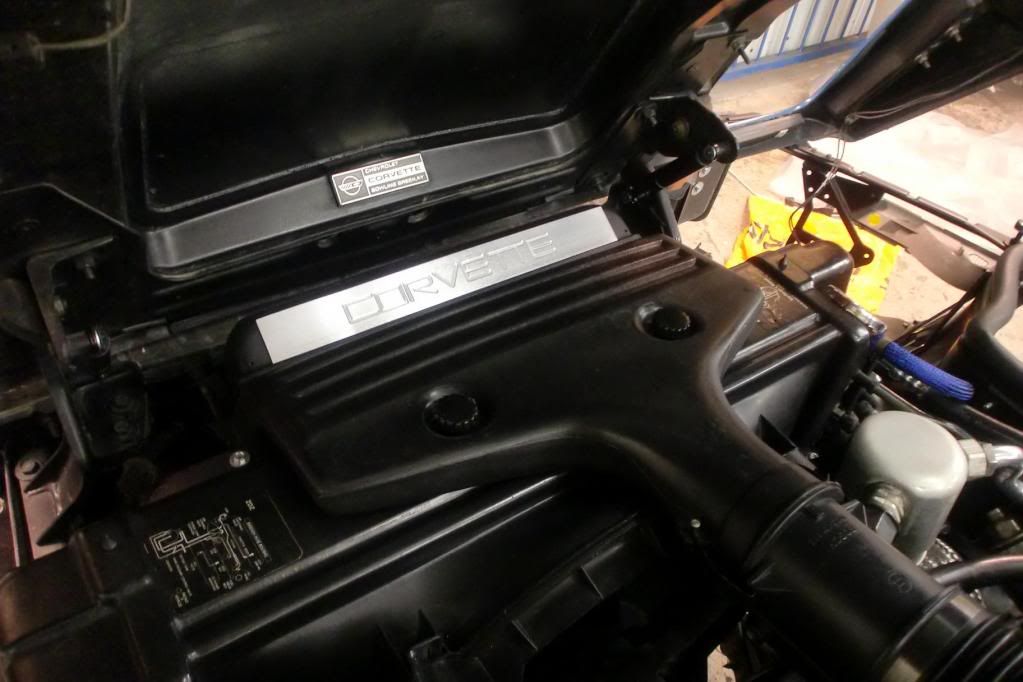
I then dealt with the hood. The gas springs where totally worned out! I could only find the two small in the front, but my car also had the third one, the long gas spring. I finally found out that the long one came 1988-1996 and replaced the short ones the 1984-1987 had. However there is a kit which allows you to put the long one on earlier models. I had already painted the brackets so i decided to go with it aswell. The old one on the car had screws for attaching, the new one had balljoints, so i had to make some modifications. The short gas springs in the front has a pressure of 1100 NM EACH! Plus 450 NM on the long one. So opening the hood nowadays is a dream I also put the fan shroud plate on to add some bling to all the black plastics in the front of the engine bay.
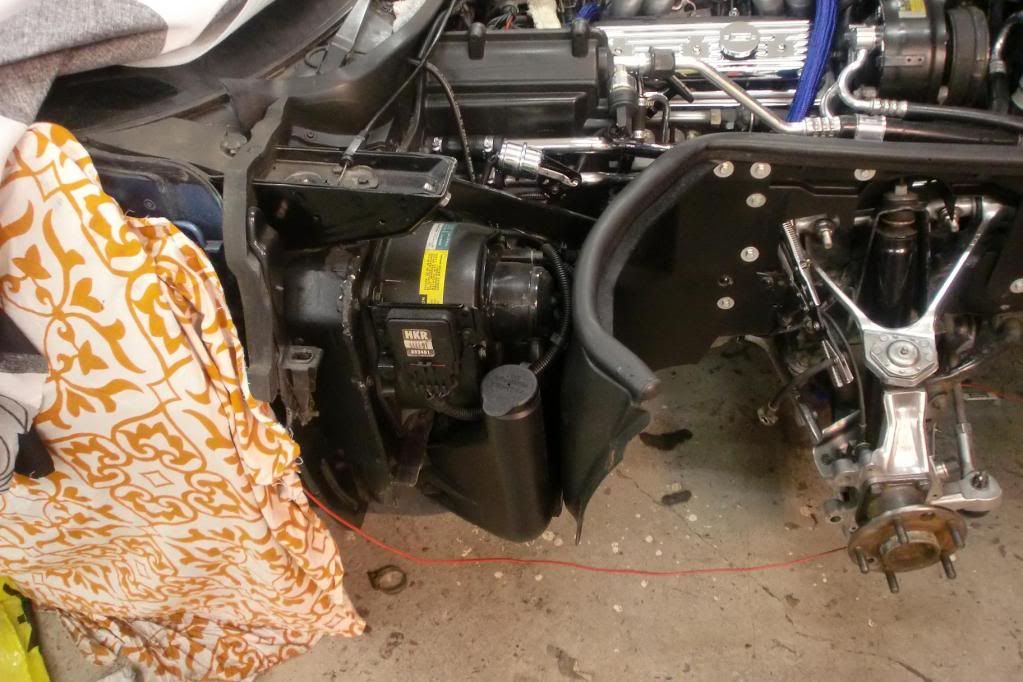
The washer fluid container is cleaned along with the fan motor, this whole area was basically grey from all old dirt and stuff.
Part VI will end with me leaving the car as it stands right now. Main focus now is to put the calipers back on, bleed the system, and start the car for the first time. Then i have to force the demons out of my head and start working with the body. So that gives you a clue of what part VII will include
Hi all, guess who´s back! I have been very busy with different things the latest time so thats why this thread has been resting for a while. Besides that, i have been doing so much detailing on the car that i didn´t felt it was neccessary to show you a new bolt vs the old etc. So i let some time pass to be able to give you a big update, the ones you guys usually enjoys so much
So, lets take a closer look, i hope you enjoy part VI !
I kept putting the plenum and runners and everything around together. Finally i started to put things together instead of taking everything apart.
The plenum and runners are back together. I put on some new blue steelhose covers on some of the hoses, adding a nice touch to the engine bay (in my opinion that is)
This little short hosie-hose is what caused the cooling system leak that totally soaked the entire intake, throttle body, runners and everything around. A new hose with hardly tightened stainless hoseclamps is what secures me from doing this dirty job one more time...
By now i was studying my black alternator bracket. I said stop earlier, to be able to start working with the body, but ofcourse, the demons in my head couldn´t stop me... So i spent a buch of hours with sanding and polishing. A homemade ring that covers the alternator was made which i polished.
Much better ! !
A closer look with the bolts polished aswell.
I then put the upper coolant hose back in place with the stainless braid covering the boring black look of it.
Another one..
With flash, just to Bling Bling up things alittle
So the next move i made was to deal with my front calipers..They where..kind of dirty with many years brakedust on them. I left them at a brake-shop who was going to sandblaster them for me. But the pistons where in such a bad shape that i instead got the remanufactured with new pistons and gaskets. Wifie has a fetish on red calipers but i refused, so instead, painted them black. The brakes sucks on the C4´s, they are way to small, but maybe this will help. Along with new brake hoses and doing the same in the rear, maybe i will feel a slight difference?
Front Calipers painted black.
I then decided to take the headlights apart and refurb them.
The holders for the Hella headlights was a bit rusty so i sanded them and painted them.
Headlightmotor before cleaning and getting re-greased...
The aluminum frame that the whole headlight package is attached to was a little bit corroded here and there so sanding it down and putting new paint on it resulted in:
The plastic that houses the headlight and adjusting spring etc before cleaning:
The left side headlight is already done, so here is the finished result!
I then dealt with the hood. The gas springs where totally worned out! I could only find the two small in the front, but my car also had the third one, the long gas spring. I finally found out that the long one came 1988-1996 and replaced the short ones the 1984-1987 had. However there is a kit which allows you to put the long one on earlier models. I had already painted the brackets so i decided to go with it aswell. The old one on the car had screws for attaching, the new one had balljoints, so i had to make some modifications. The short gas springs in the front has a pressure of 1100 NM EACH! Plus 450 NM on the long one. So opening the hood nowadays is a dream
I also put the fan shroud plate on to add some bling to all the black plastics in the front of the engine bay.The washer fluid container is cleaned along with the fan motor, this whole area was basically grey from all old dirt and stuff.
Part VI will end with me leaving the car as it stands right now. Main focus now is to put the calipers back on, bleed the system, and start the car for the first time. Then i have to force the demons out of my head and start working with the body. So that gives you a clue of what part VII will include
 06-16-2011, 12:20 AM
#52
Moderator

Member Since: Jun 2002
Location: Maryville Tn
Posts: 46,071
Received 109 Likes
on
84 Posts
CI 5-6-7-8-9-10-11-12 Veteran
St. Jude Donor '09-'10-'11-12-'13-'14-'15-'16-'17-‘18-'19-'20-'21-'22-'23
NCM Sinkhole Donor


Glad to see you're making progress! Keep us posted.
 06-16-2011, 01:09 AM
#54
Advanced
Thread Starter
Member Since: Mar 2011
Location: Stockholm
Posts: 50
Likes: 0
Received 0 Likes
on
0 Posts
06-16-2011, 01:41 AM
#55

From a Greenwood Corvette bro to another....great job, awesome car!
By the way I have a 2001 Saab 93 Turbo with an electronic (I think) problem thats driving me bunkers the engine wont rev over 2000 RPM and the turbo surges....anyways, since its from your country maybe you know a few tricks....long shot but, hey....never know...
but again you brought that vette back to its original glory n then some keep'em pics coming!.
06-16-2011, 02:52 AM
#56
Advanced
Thread Starter
Member Since: Mar 2011
Location: Stockholm
Posts: 50
Likes: 0
Received 0 Likes
on
0 Posts
From a Greenwood Corvette bro to another....great job, awesome car!
By the way I have a 2001 Saab 93 Turbo with an electronic (I think) problem thats driving me bunkers the engine wont rev over 2000 RPM and the turbo surges....anyways, since its from your country maybe you know a few tricks....long shot but, hey....never know...
but again you brought that vette back to its original glory n then some keep'em pics coming!.
By the way I have a 2001 Saab 93 Turbo with an electronic (I think) problem thats driving me bunkers the engine wont rev over 2000 RPM and the turbo surges....anyways, since its from your country maybe you know a few tricks....long shot but, hey....never know...
but again you brought that vette back to its original glory n then some keep'em pics coming!.
Unfortunately yes, SAAB is from our country...
at least for a while. No one knows what ever is going to happen with that brand. As for your problems, drop me an email at greenwood-corvette@hotmail.com and i will try to help you. I have dealt with some of these cars while working at a tuning workshop. Tell me the problems as detailed as possible along with facts about the car and i will do my best my friend!
10-05-2011, 04:26 PM
#57
Advanced
Thread Starter
Member Since: Mar 2011
Location: Stockholm
Posts: 50
Likes: 0
Received 0 Likes
on
0 Posts
PEOPLE!
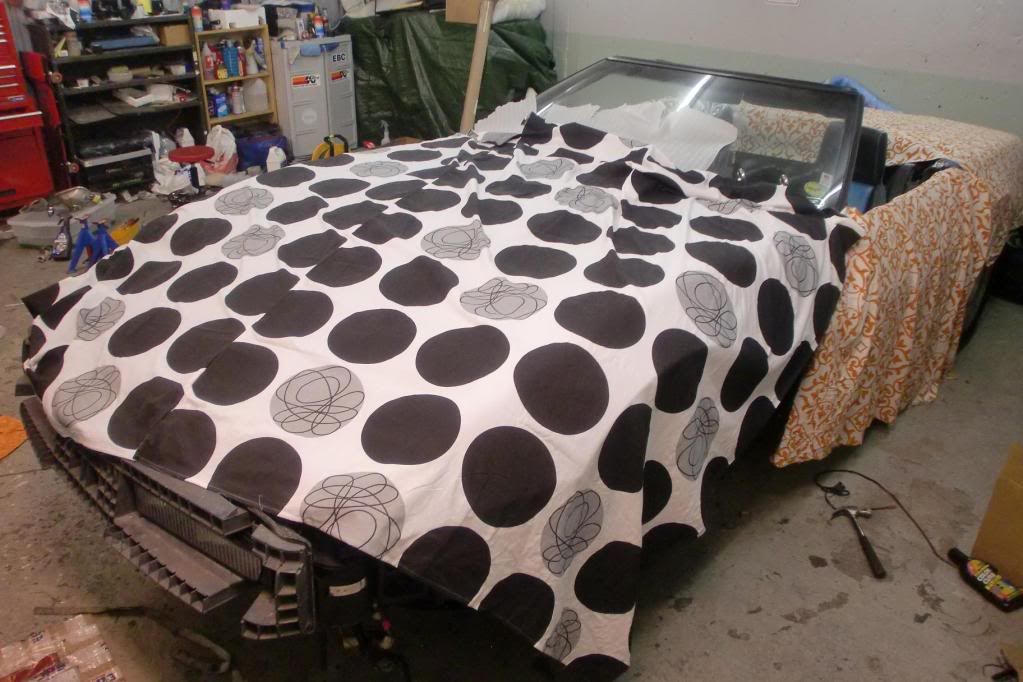
Many of you might wonder whatever happened to this project. Well to put it this way. The summer has been very busy for me with friends and family coming visiting us and then vacation for two weeks in the middle of the summer and we also ended up the summer with 17 totally ***-kicking days in Florida! YES; that includes a visit to Ecklers and yes parts where bought but i won´t show you until the project has reached that point.
However. It was clearly obvious that the summer 2011 would be another "no it is not done yet" summer. Due to me not being satisfied with different things of the engine bay. But one day something strange happened. My good partner in crime - Paul - called me up and said he was visiting town. This is the guy who helped me dismantle the car. He is very hard to get a hold on and now all of a sudden, a wednesday evening he calls me saying he is in town and having the whole weekend free here. He also said "Are you going to sit on your *** or shall we work on your car"? Talk about him saving alot of problems for me!!! And yes, ALOT of things where made that weekend. timeconsuming! We worked for 14 hours each day and by the end of that weekend we really managed to solve many problems. And we had a blast, as usual when working on our Corvettes together.
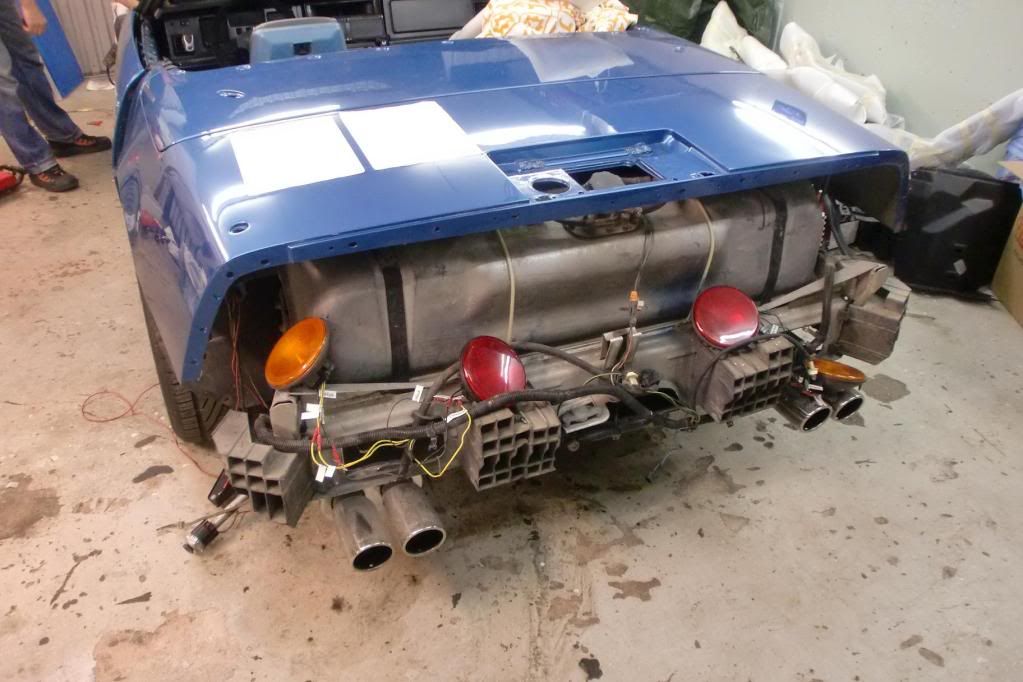
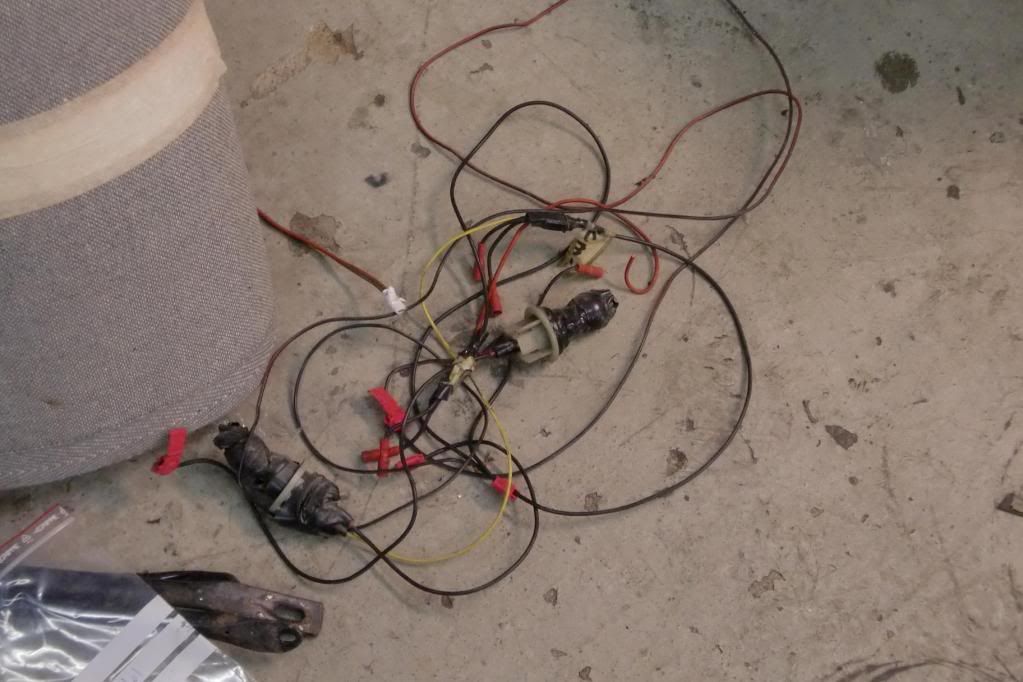
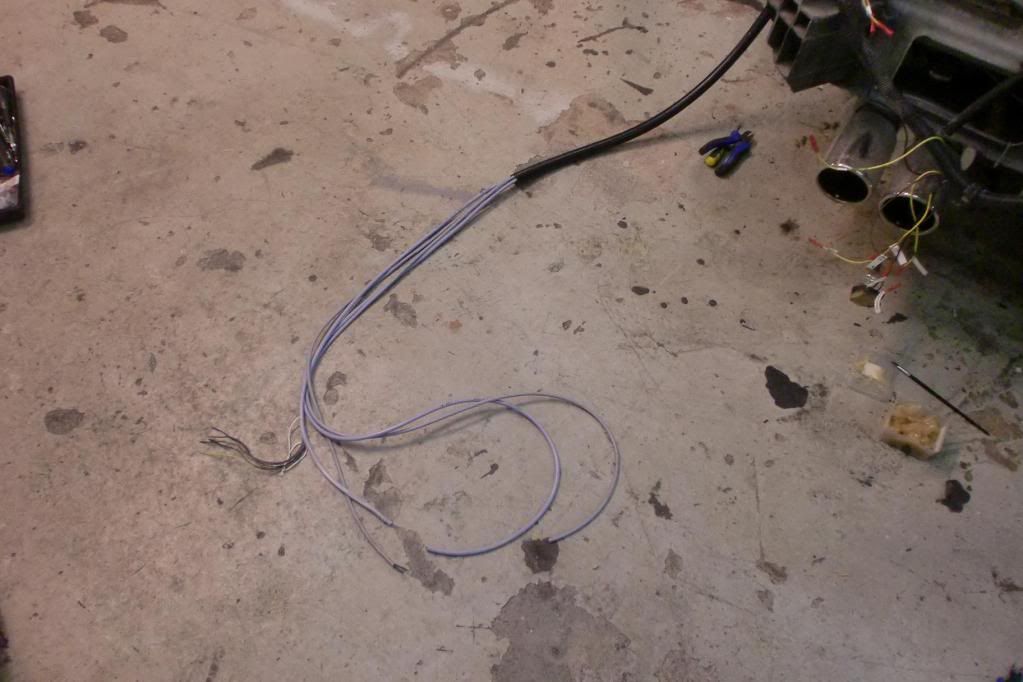
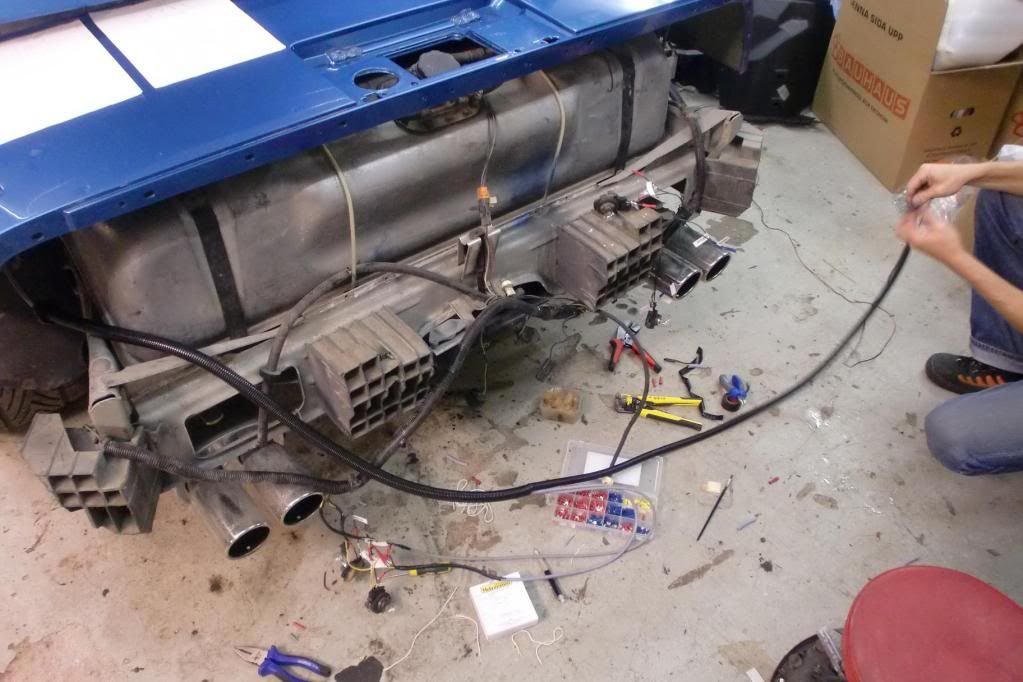
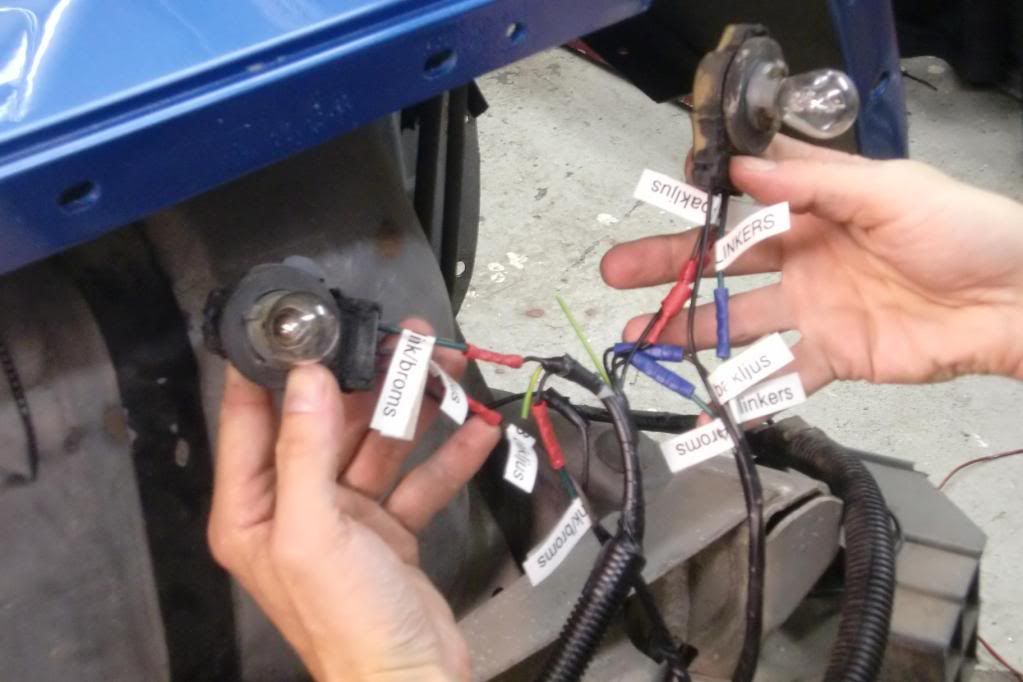
We started off with rebuilding the electical system for the whole rear end. Here in Sweden we must have yellow turn signals (Sweden is such a pathetic country) so alot of wires where cut and to put it this way. It was a mess, headache and a pain in the ***. But we ended up overdoing it, as usual...
We re-wired everything, put it in new cable ducts, marked everything and pulled the cables into the convertible compartment. Why? because i only need to change the two outer red lights to yellow ones, press two switches to make it work whenever going to the car test centre. After that, i put the red lights back on, hit the switches and voila! The red lights are flashing again. All of you that has ever replaced the rearlights now what a major pain in the *** that is.
Here the system is ready with the yellow rearlights.
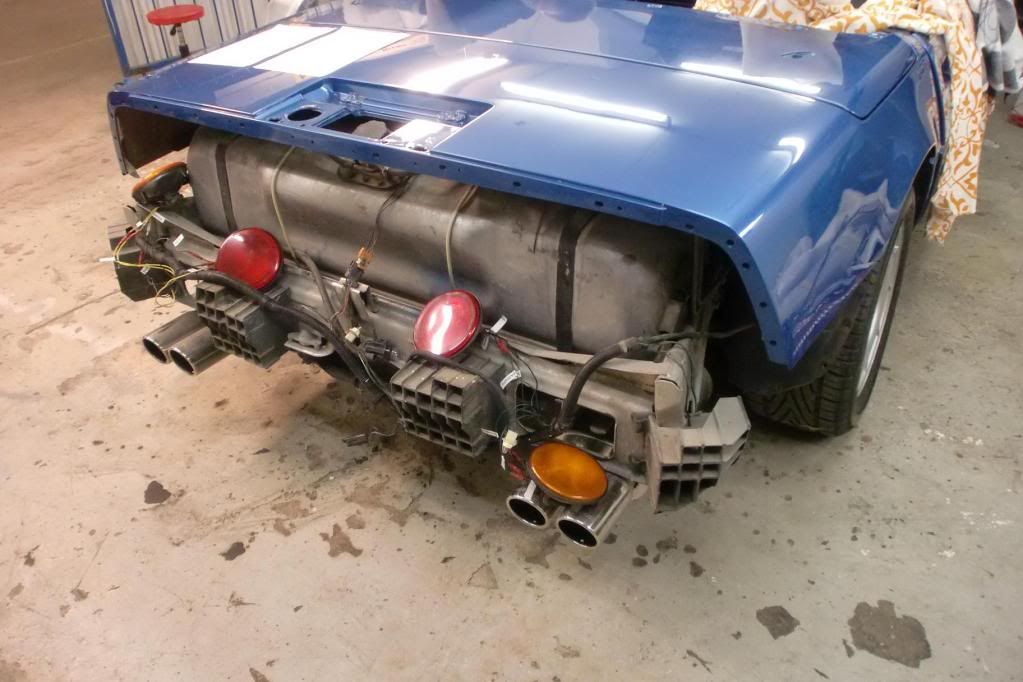
Some of the electrical mess found in the rear that we sorted out...
New wiring for the left rearlights...
Things are starting to look normal again!
All cables marked for the upcoming switchpanel.
It turned out really nice! So nice that Paul got jelaous for me having a better wiringsystem than he has. I love it when i beat him!

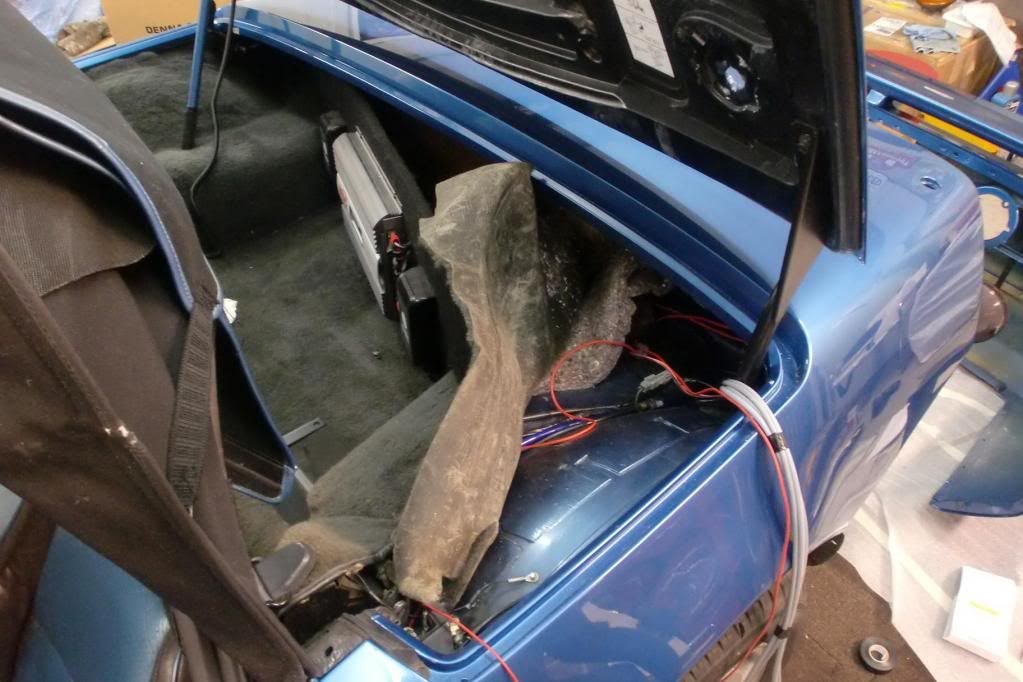
And here is the wiring in the conv.compartment. This is where i will build the small switchpanel and hide it.
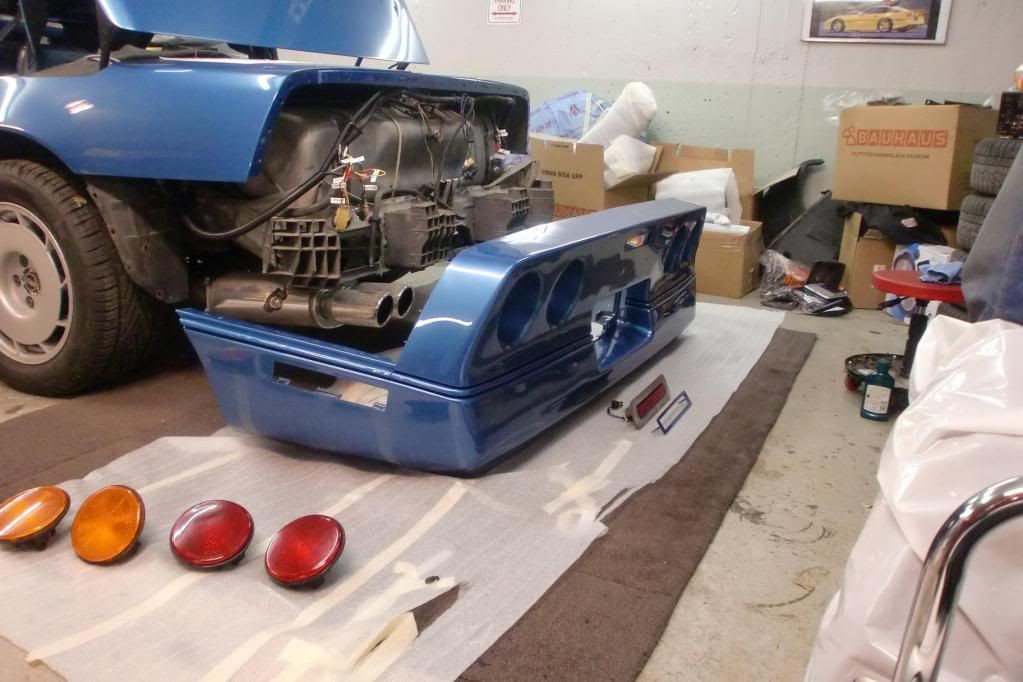
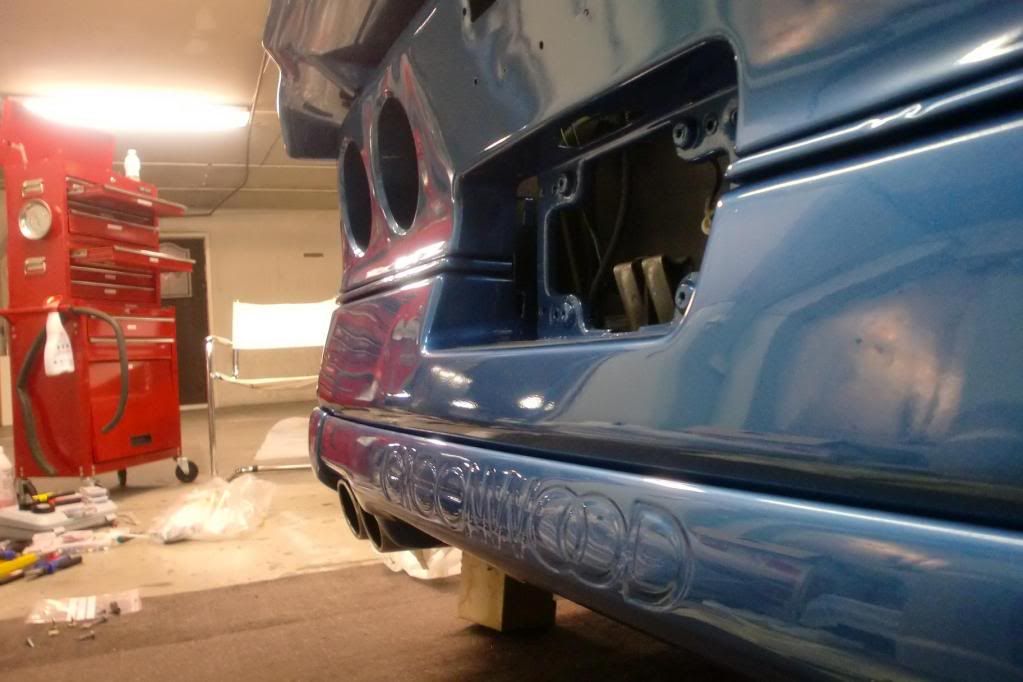
By now the fun part started. the first bodypieces was finally going to be installed for the first time since the repainting. Here we are preparing the whole rearend for the sidemoldings.
Moldings in place, painted in the cars colour aswell.
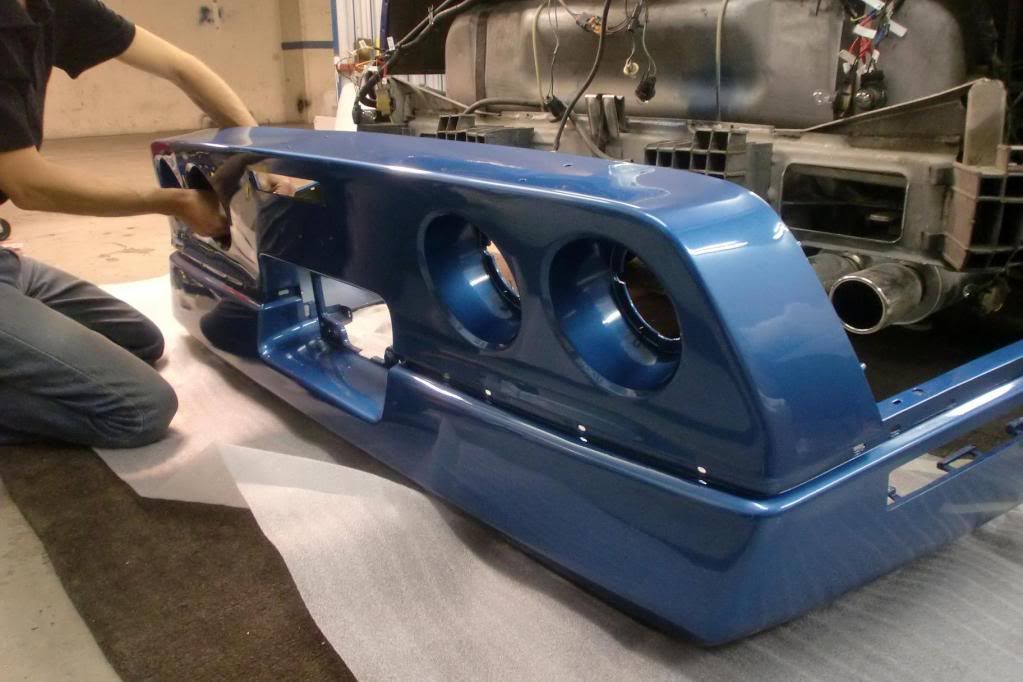
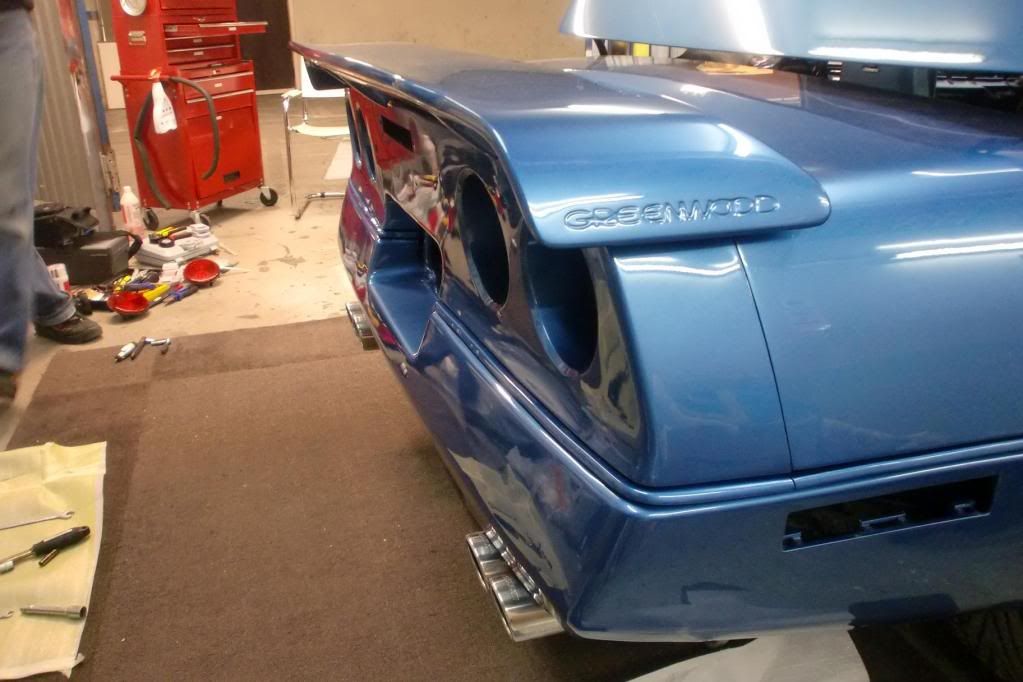
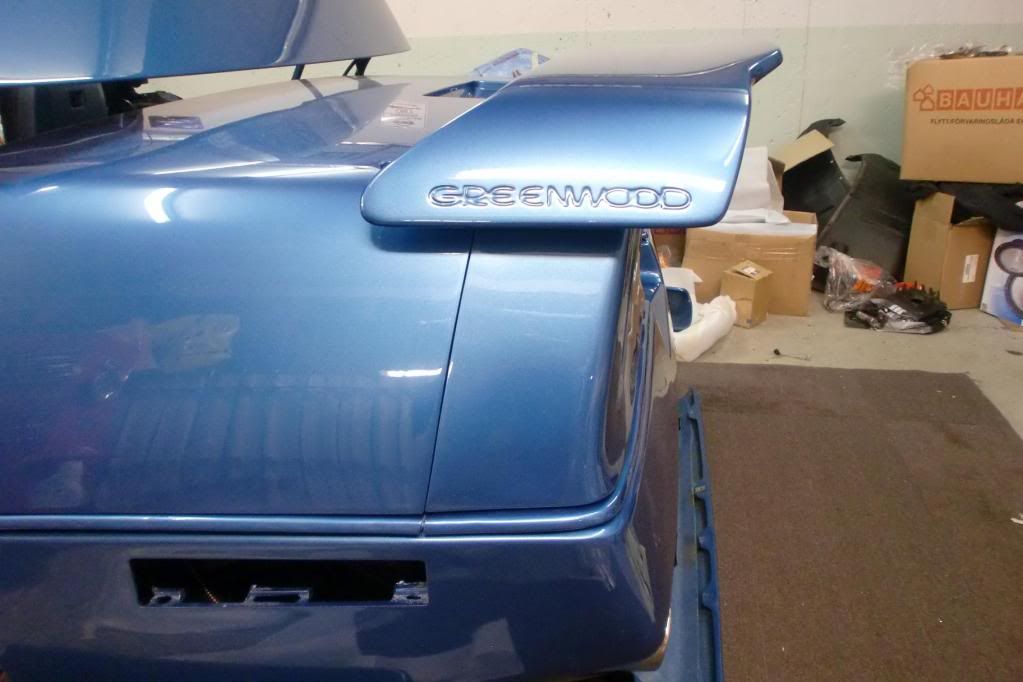
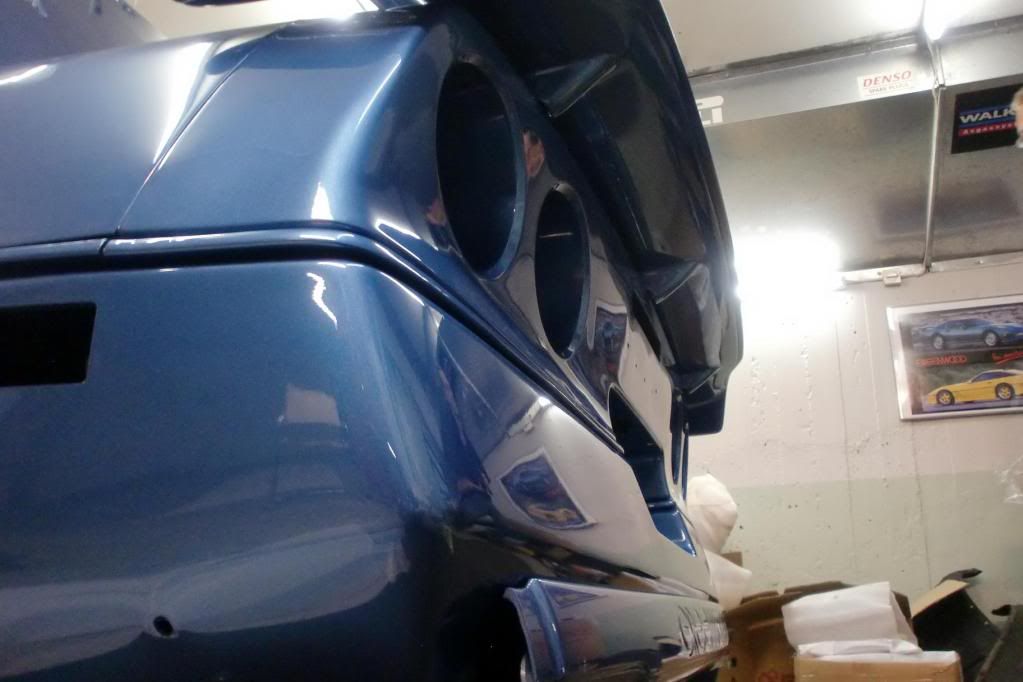
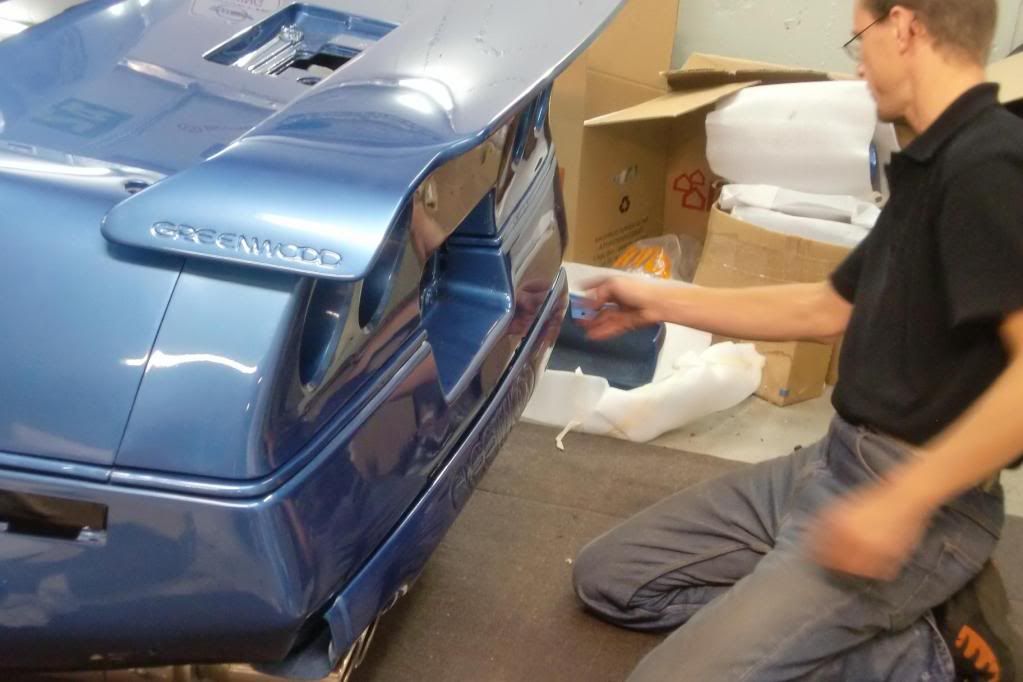
The rearend ready for the Greenwood wing!
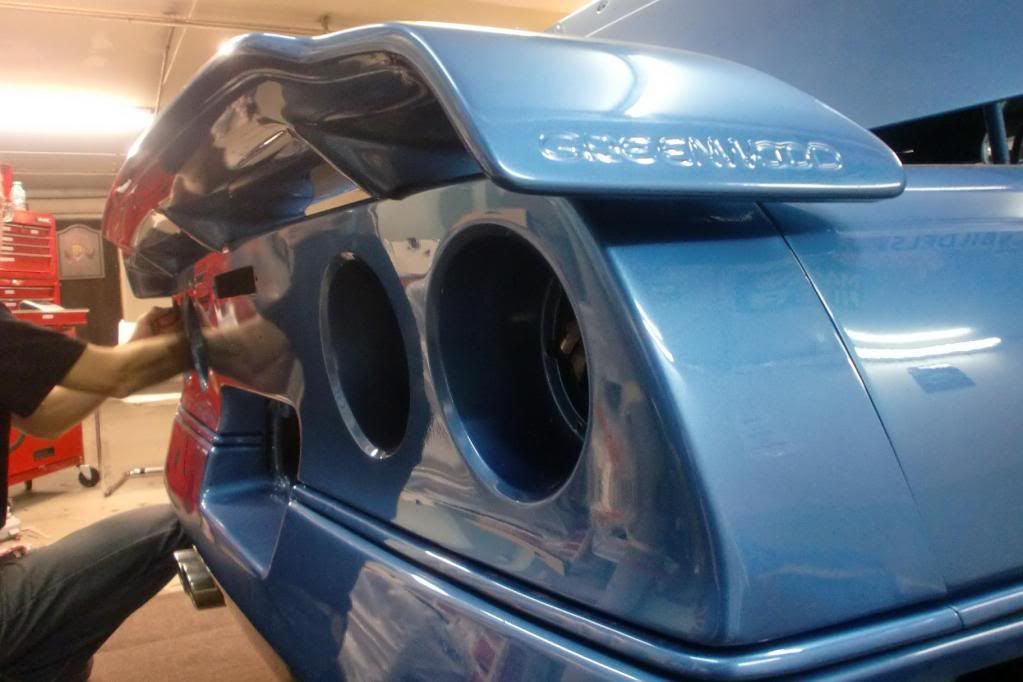
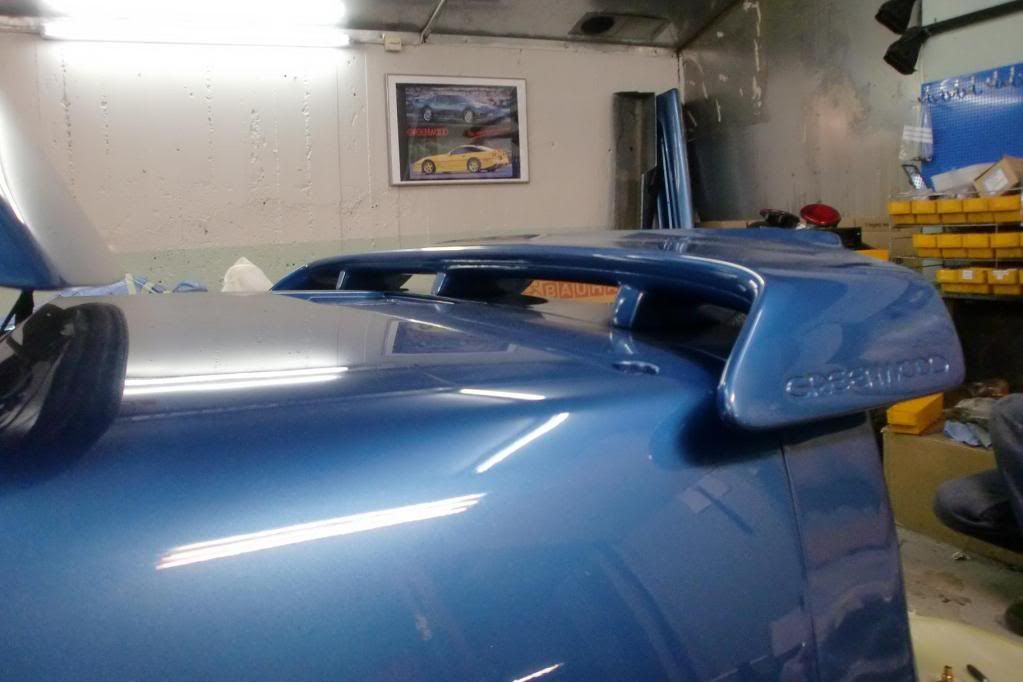
Here we have put on the rearwing on the whole rearend of the car. We have also attached the two legs that the whole wing rests on. These are then drilled and bolted onto a alloy frame in the rear of the car. Without these two black legs the wing would have moved way to much from the forces. The Greenwood rearwing is quite a massive piece. By the way, that is me on the picture!
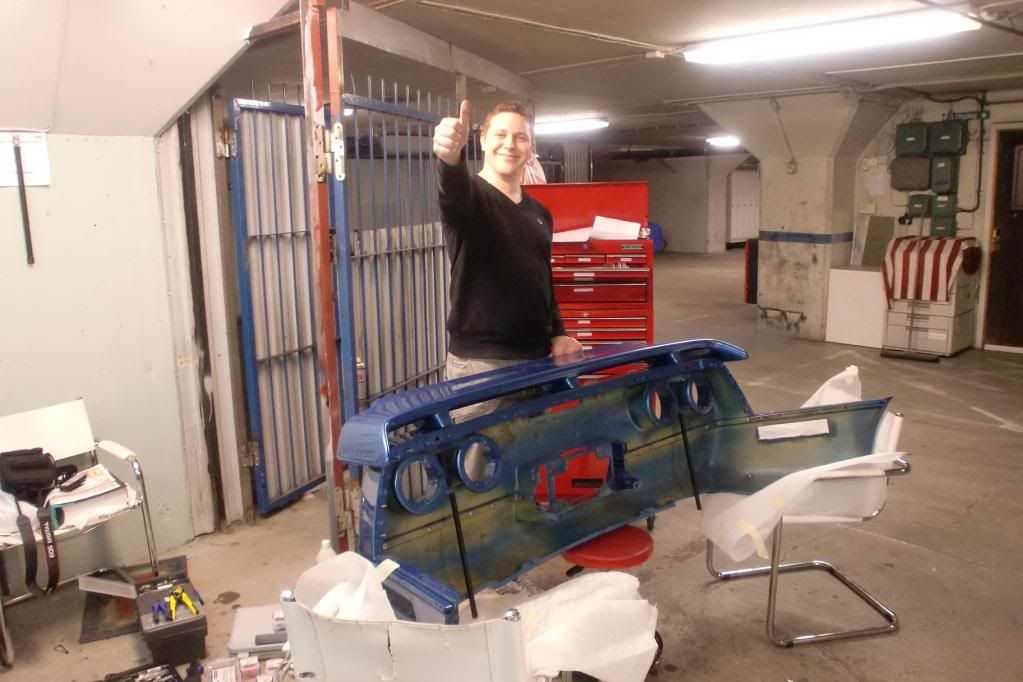
Getting ready for the big lift!
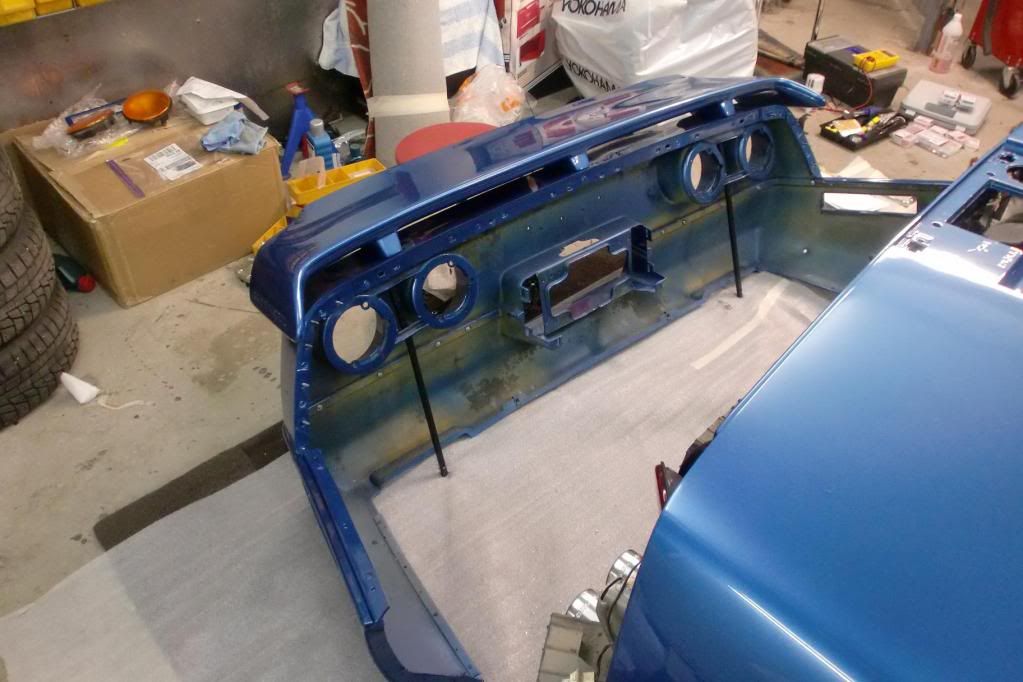
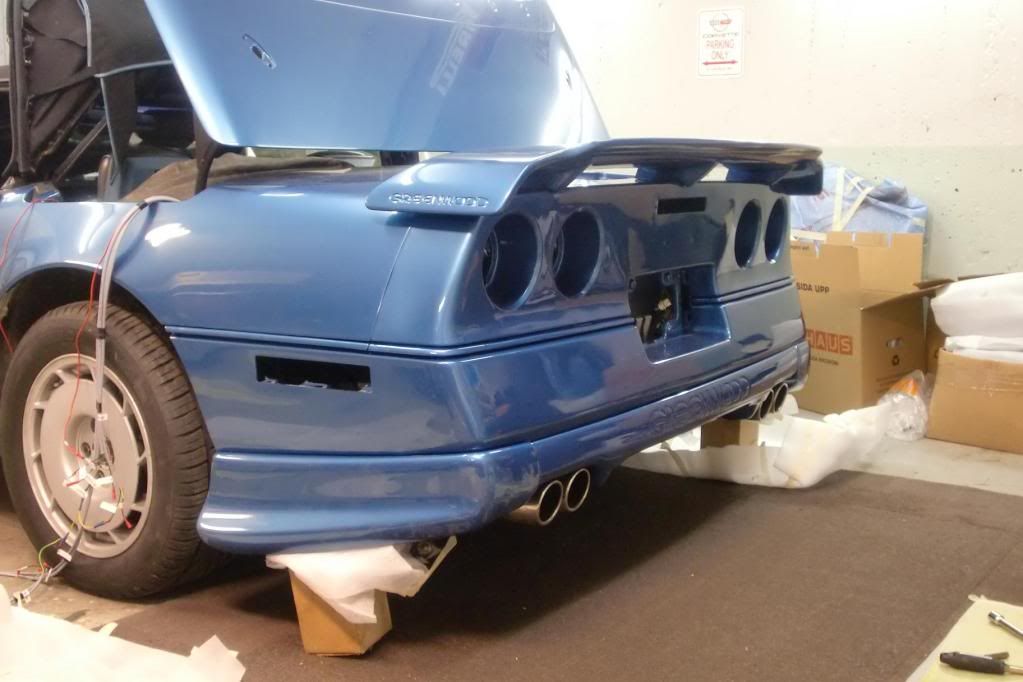
After an hour or so the whole end is put on the car. I don´t know how many times we had to loose all the bolts to adjust it for perfect fit. And those bolts are sooo strategically placed...

Now finally i am starting to see the result !!
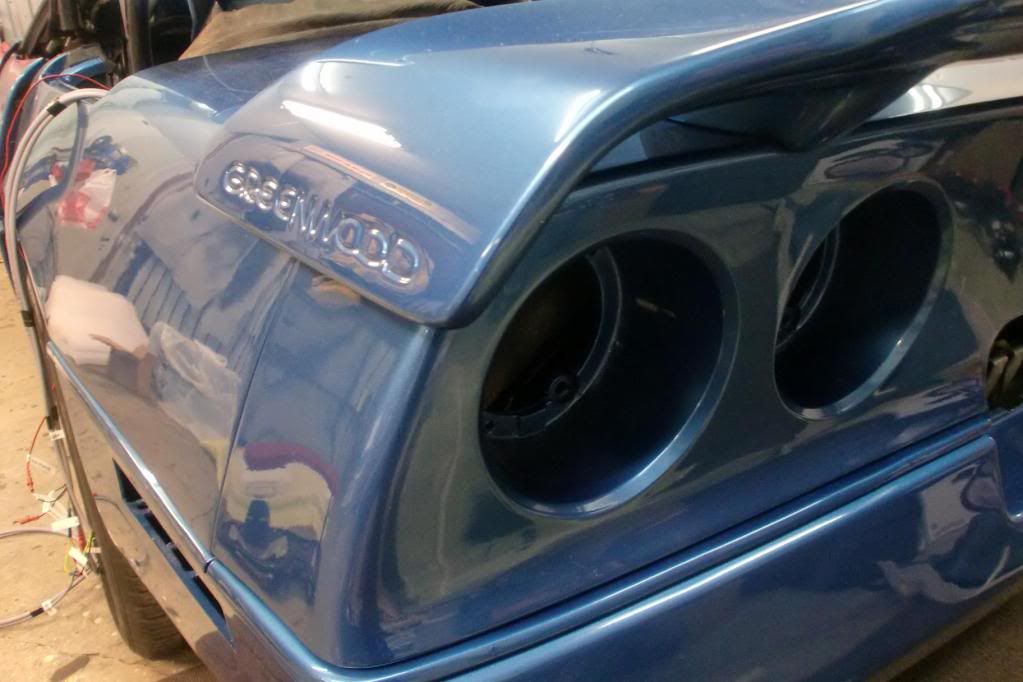
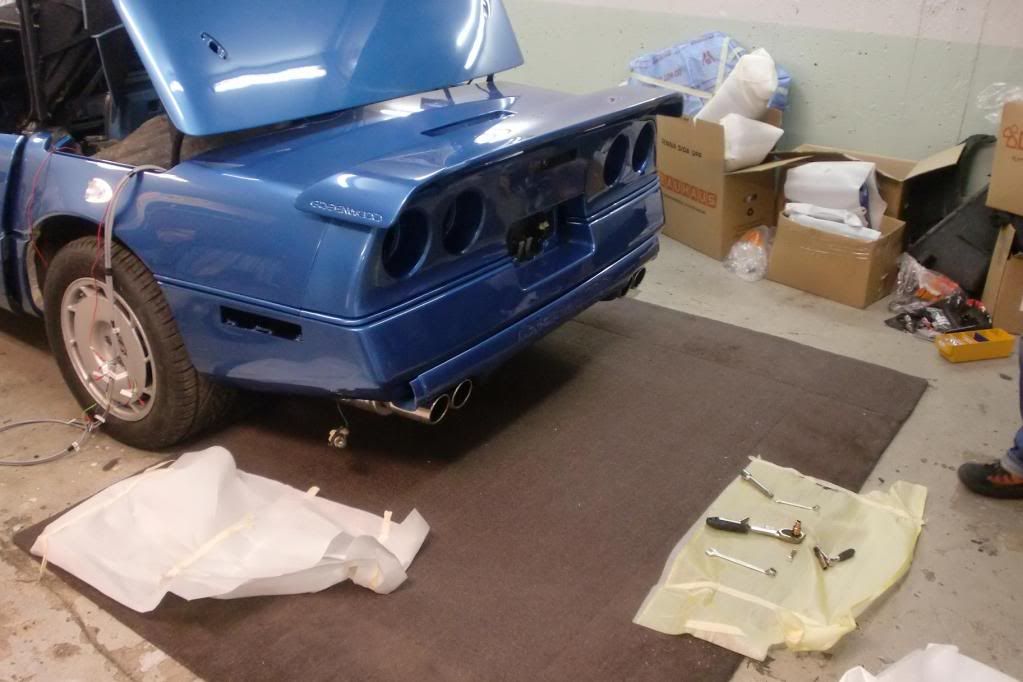
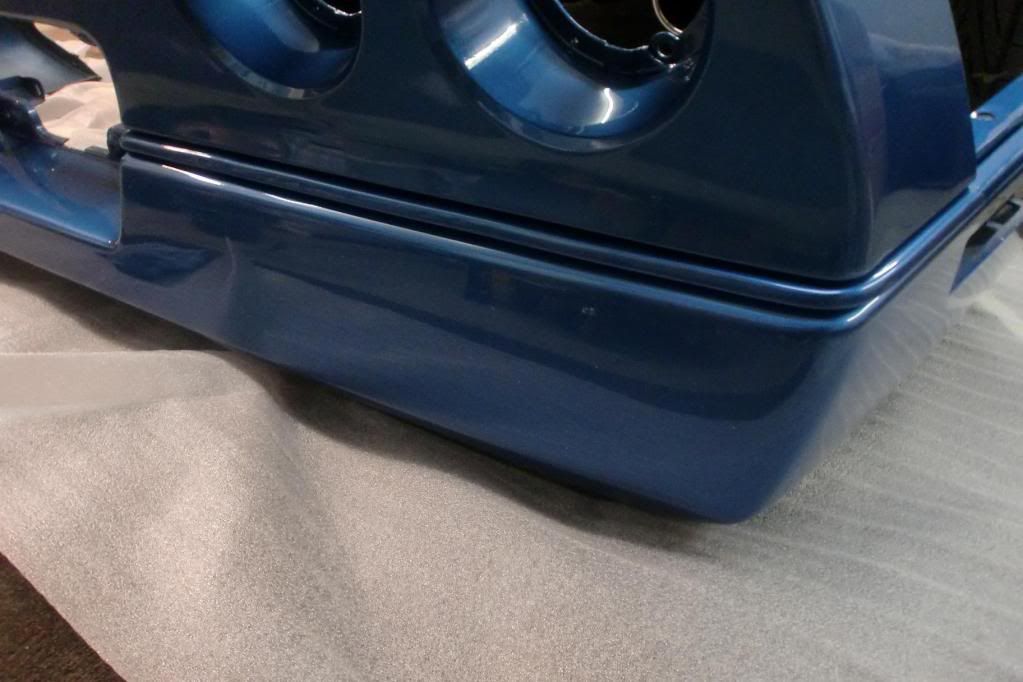
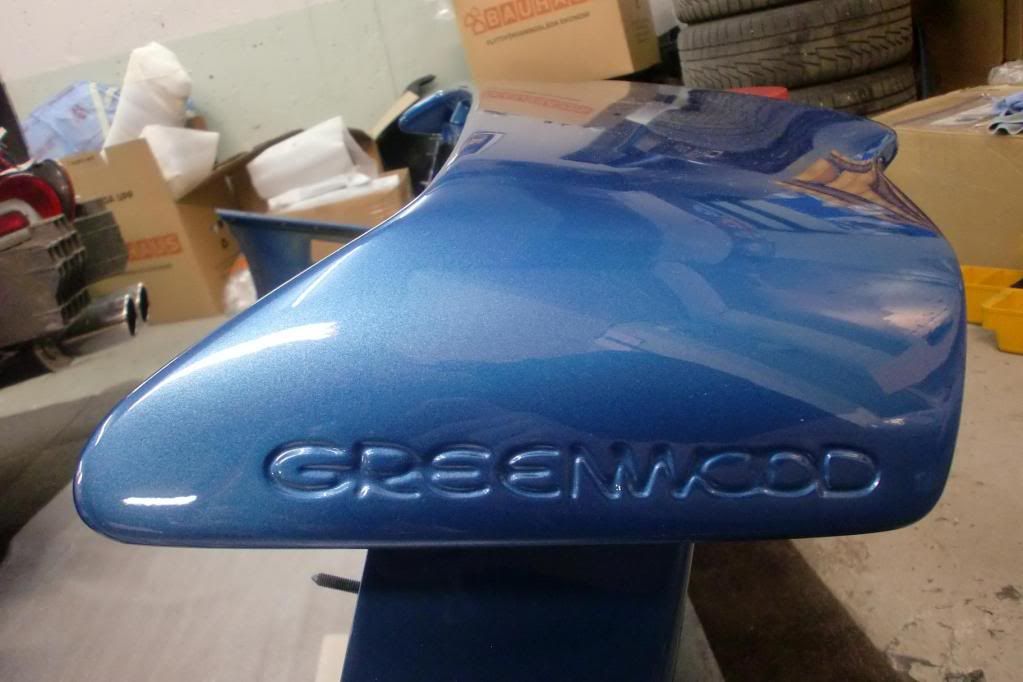
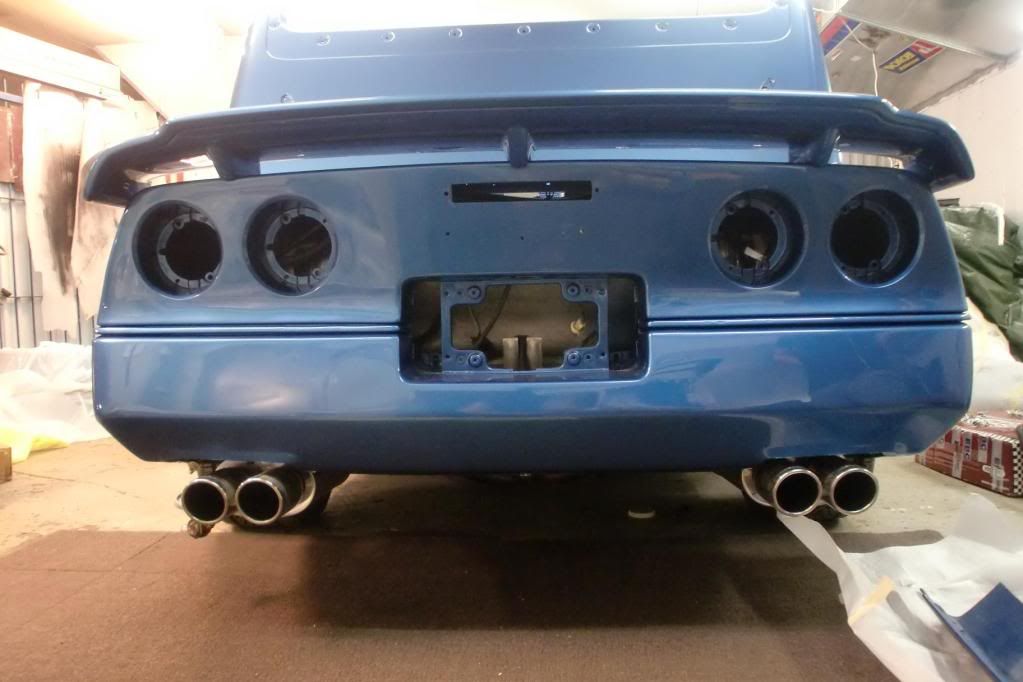
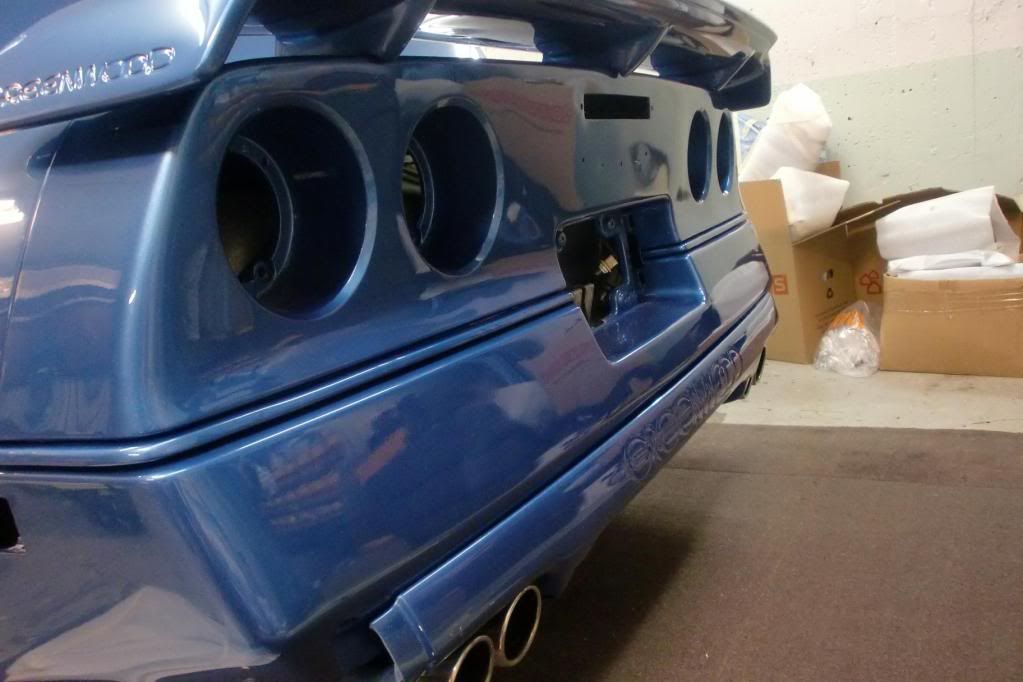
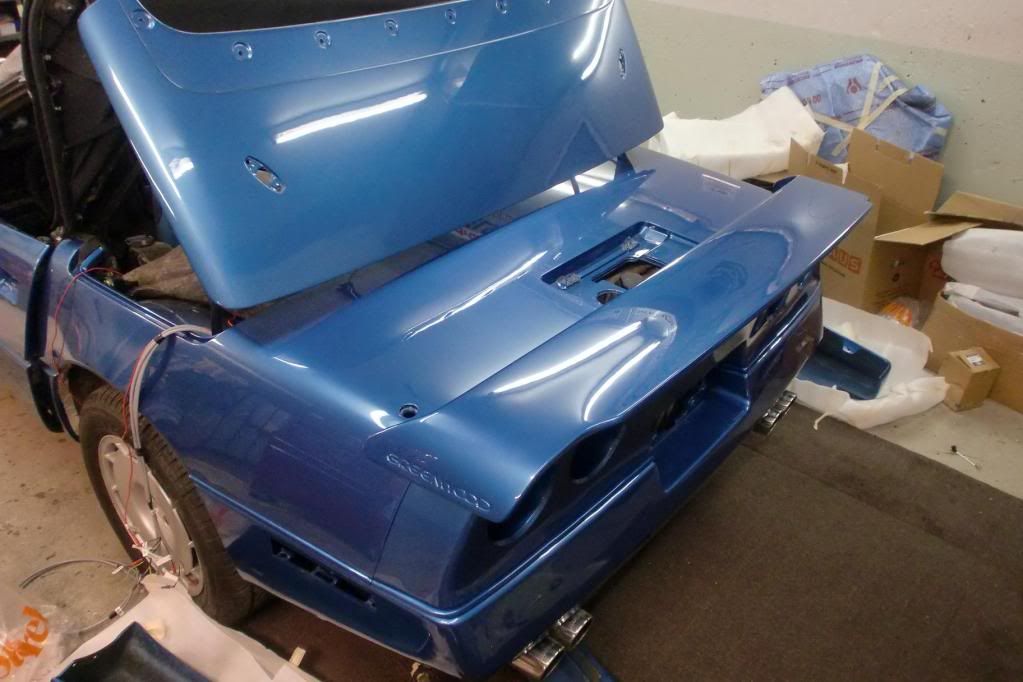
Next up was to try put together the rest of the rear pieces. We start off with the part between the exhaust tips. I totally love that piece...Oh yes, did i mention it is a real Greenwood kit?

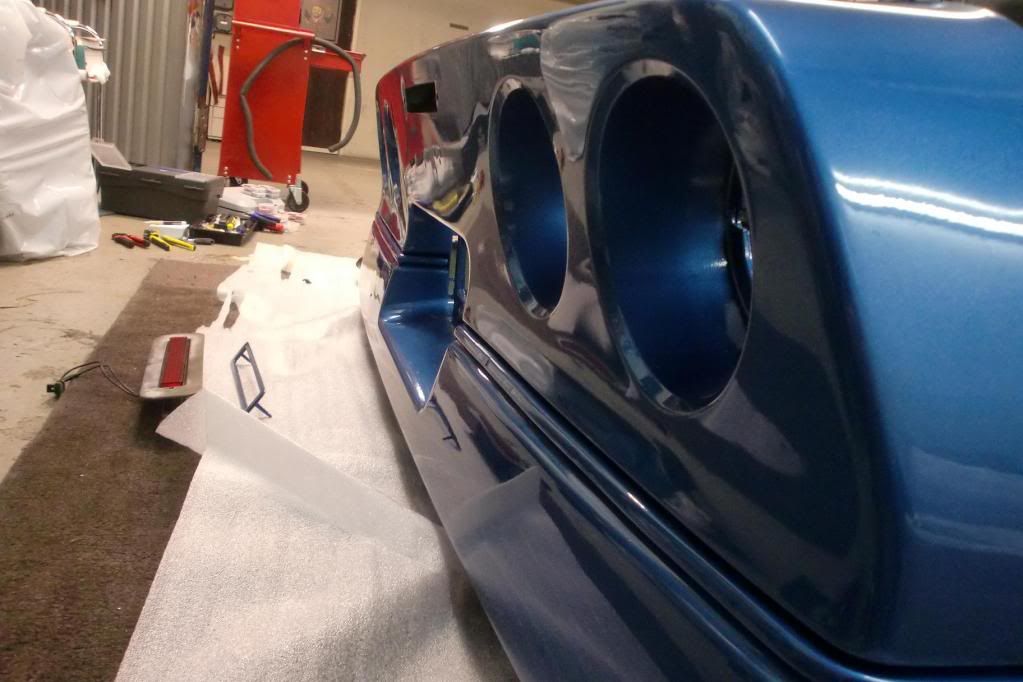
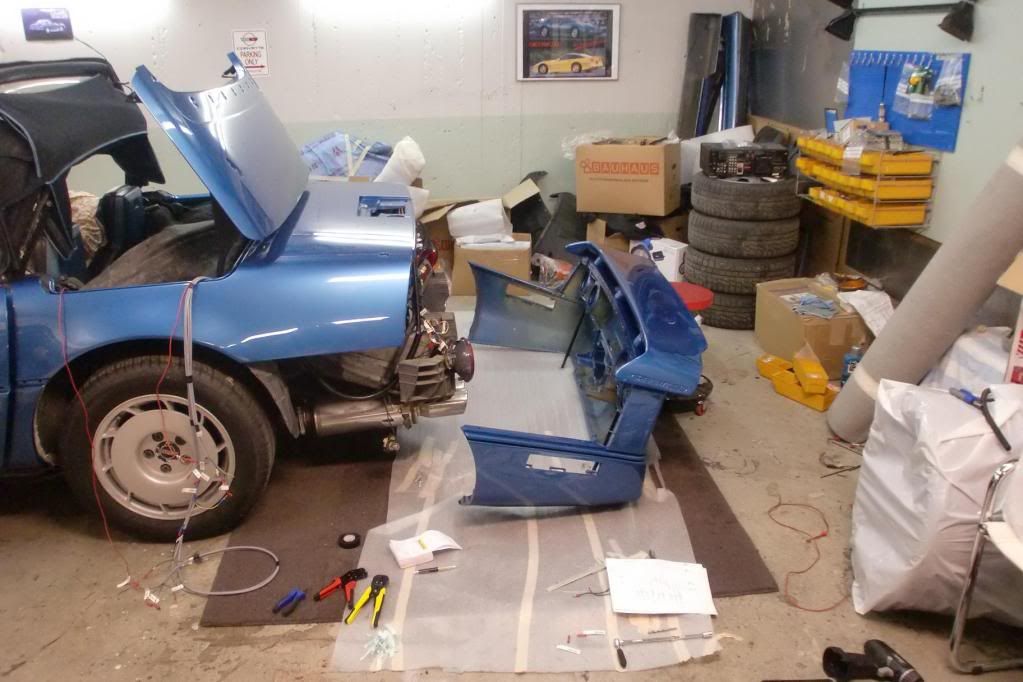
Next up we just used two small boxes to hold the quarter panels in place to see what the rearend is going to turn out like. Holy **** is this a major difference from the old bodykit? Is this really the same car as seen on the first page? It totally ROCKS!!!!
Artsy sideview shot...

Now you get a better glimpse of the result!
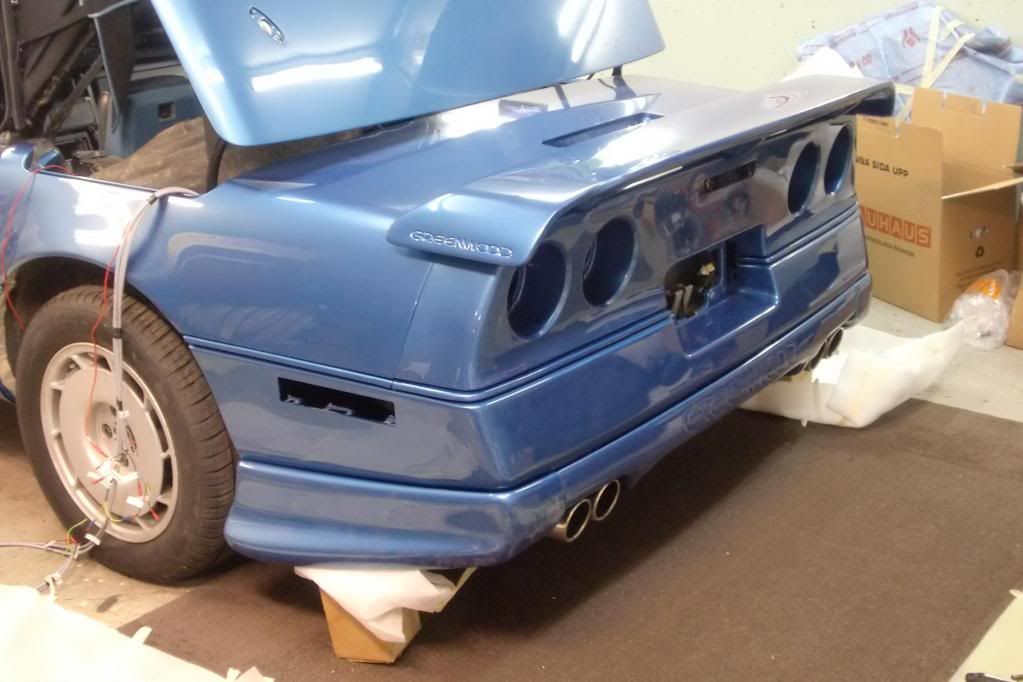
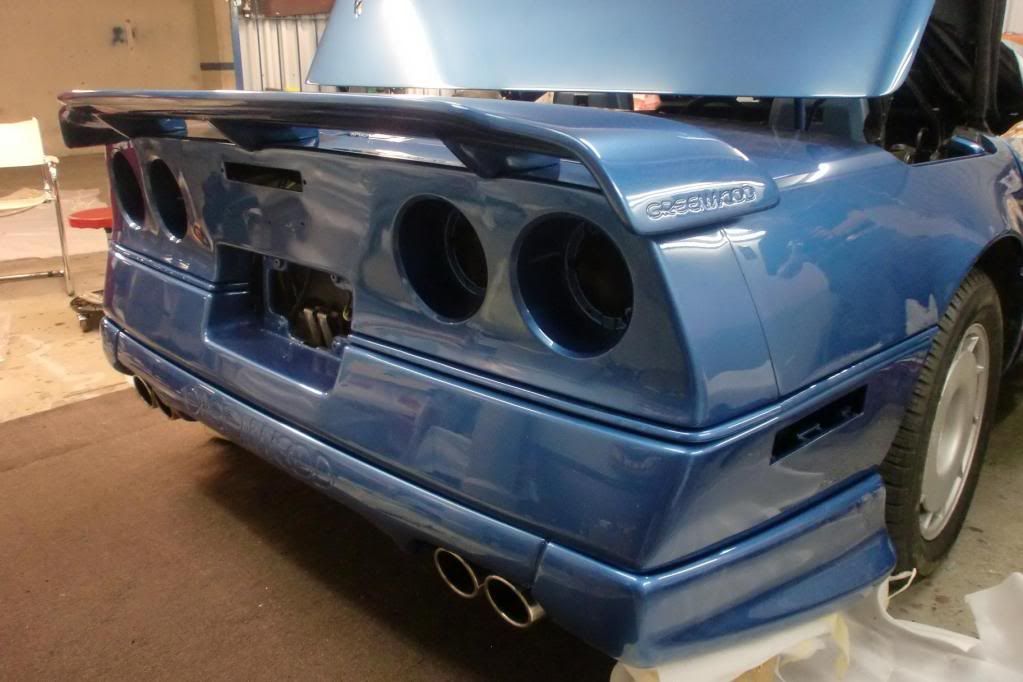
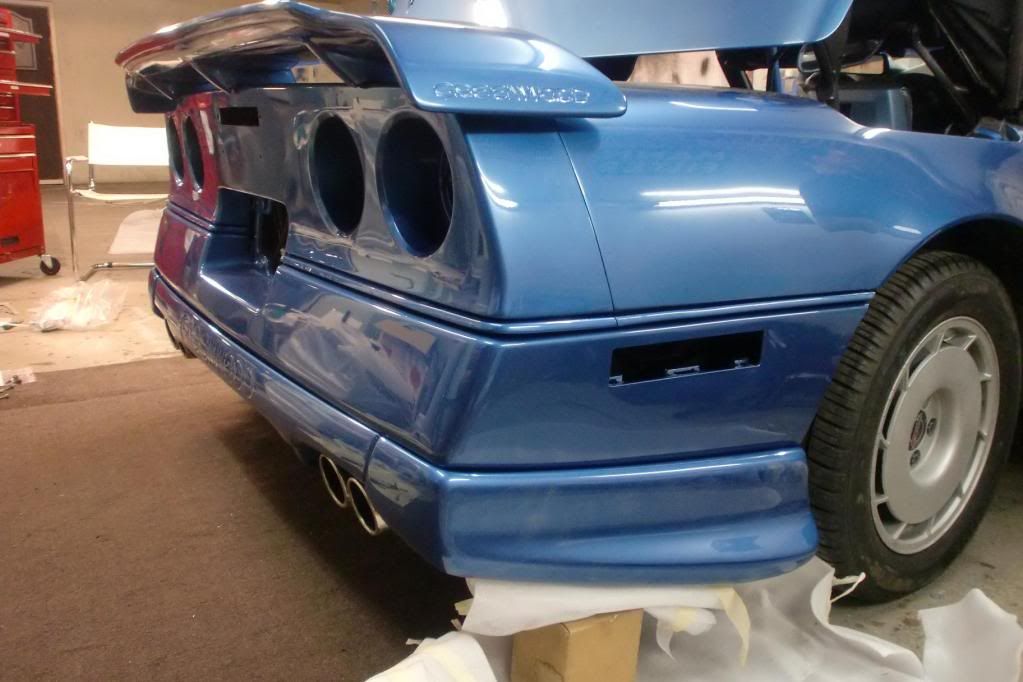
I have to say that i am pleased with the new paintwork. It is very easy to get very picky because of the price for repainting the car. The pictures just don´t do justice for the paintwork. You have to see it in real life.
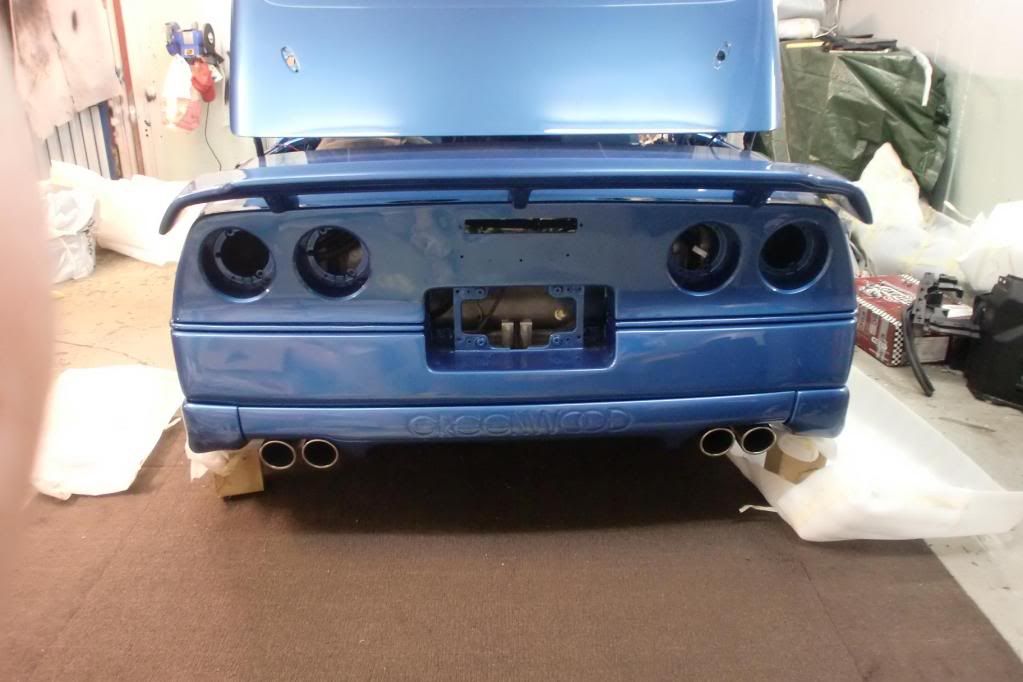
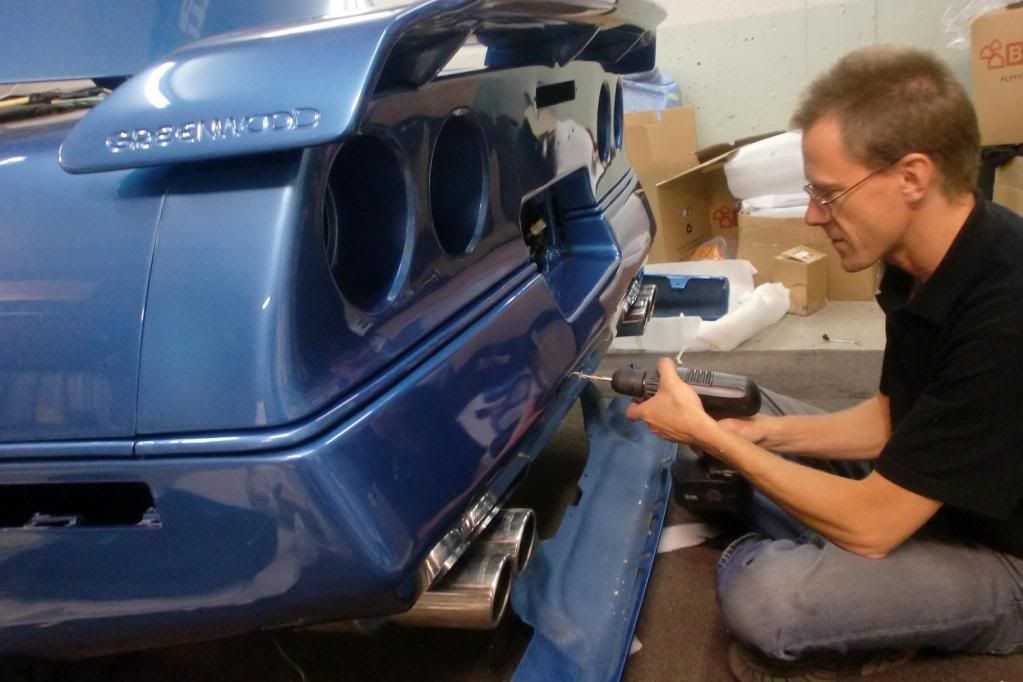
After this we had to test afew times before we finally could marking out the holes to drill. We used clay to mark the holes. Paul got the honour of drilling through my new paint. Because if he screwed up it would be easier for me to blaim him for screwing up the car than myself
After this the weekend was sadly over. I could never manage to pull all this off on my own. Paul - you are the man!! After this the car has pretty much been sitting because of all the vacation but now the season is here, the garage season. So, i will start working hard on the car again so i can keep you guys updated. Enjoy the pictures amigos!
Many of you might wonder whatever happened to this project. Well to put it this way. The summer has been very busy for me with friends and family coming visiting us and then vacation for two weeks in the middle of the summer and we also ended up the summer with 17 totally ***-kicking days in Florida! YES; that includes a visit to Ecklers and yes parts where bought but i won´t show you until the project has reached that point.
However. It was clearly obvious that the summer 2011 would be another "no it is not done yet" summer. Due to me not being satisfied with different things of the engine bay. But one day something strange happened. My good partner in crime - Paul - called me up and said he was visiting town. This is the guy who helped me dismantle the car. He is very hard to get a hold on and now all of a sudden, a wednesday evening he calls me saying he is in town and having the whole weekend free here. He also said "Are you going to sit on your *** or shall we work on your car"? Talk about him saving alot of problems for me!!! And yes, ALOT of things where made that weekend. timeconsuming! We worked for 14 hours each day and by the end of that weekend we really managed to solve many problems. And we had a blast, as usual when working on our Corvettes together.
We started off with rebuilding the electical system for the whole rear end. Here in Sweden we must have yellow turn signals (Sweden is such a pathetic country) so alot of wires where cut and to put it this way. It was a mess, headache and a pain in the ***. But we ended up overdoing it, as usual...
We re-wired everything, put it in new cable ducts, marked everything and pulled the cables into the convertible compartment. Why? because i only need to change the two outer red lights to yellow ones, press two switches to make it work whenever going to the car test centre. After that, i put the red lights back on, hit the switches and voila! The red lights are flashing again. All of you that has ever replaced the rearlights now what a major pain in the *** that is.
Here the system is ready with the yellow rearlights.
Some of the electrical mess found in the rear that we sorted out...
New wiring for the left rearlights...
Things are starting to look normal again!
All cables marked for the upcoming switchpanel.
It turned out really nice! So nice that Paul got jelaous for me having a better wiringsystem than he has. I love it when i beat him!
And here is the wiring in the conv.compartment. This is where i will build the small switchpanel and hide it.
By now the fun part started. the first bodypieces was finally going to be installed for the first time since the repainting. Here we are preparing the whole rearend for the sidemoldings.
Moldings in place, painted in the cars colour aswell.
The rearend ready for the Greenwood wing!
Here we have put on the rearwing on the whole rearend of the car. We have also attached the two legs that the whole wing rests on. These are then drilled and bolted onto a alloy frame in the rear of the car. Without these two black legs the wing would have moved way to much from the forces. The Greenwood rearwing is quite a massive piece. By the way, that is me on the picture!
Getting ready for the big lift!
After an hour or so the whole end is put on the car. I don´t know how many times we had to loose all the bolts to adjust it for perfect fit. And those bolts are sooo strategically placed...
Now finally i am starting to see the result !!
Next up was to try put together the rest of the rear pieces. We start off with the part between the exhaust tips. I totally love that piece...Oh yes, did i mention it is a real Greenwood kit?
Next up we just used two small boxes to hold the quarter panels in place to see what the rearend is going to turn out like. Holy **** is this a major difference from the old bodykit? Is this really the same car as seen on the first page? It totally ROCKS!!!!
Artsy sideview shot...
Now you get a better glimpse of the result!
I have to say that i am pleased with the new paintwork. It is very easy to get very picky because of the price for repainting the car. The pictures just don´t do justice for the paintwork. You have to see it in real life.
After this we had to test afew times before we finally could marking out the holes to drill. We used clay to mark the holes. Paul got the honour of drilling through my new paint. Because if he screwed up it would be easier for me to blaim him for screwing up the car than myself
After this the weekend was sadly over. I could never manage to pull all this off on my own. Paul - you are the man!! After this the car has pretty much been sitting because of all the vacation but now the season is here, the garage season. So, i will start working hard on the car again so i can keep you guys updated. Enjoy the pictures amigos!
10-05-2011, 05:20 PM
#59
Instructor

Member Since: May 2002
Location: Corvettes ruined my life. CA
Posts: 249
Likes: 0
Received 0 Likes
on
0 Posts

Looks kick ***! This is motivating me to keep going on my car.
http://forums.corvetteforum.com/c4-g...e-from-cl.html
This is motivating me to keep going on my car.http://forums.corvetteforum.com/c4-g...e-from-cl.html
