I'm about to start weather stripping replacement...


 09-05-2011, 11:20 AM
#3
Burning Brakes

well, I was going to show you my old thread when I did this, but look what happened to it!!!
Oh well, here's a few tips.
TAKE YOUR TIME.
Work on one section at a time. Don't try to take it ALL out and do it at the same time. Make it easy on yourself.
The doors are pretty easy. No adhesive required, it should already have hole clips in it.
When you get the weatherstripping off, some sections have a black retainer that you pop the weatherstripping in to (shown below). Get your torx set out and take them off. It makes it easier to clean them.
Once you get the cleaned out, reinstall them. When you lay the bead of adhesive/sealant, make it one long line. If there are gaps, you could get leaks.
Take your time putting the new stuff on. While you are removing the old stuff, let the new weatherstripping sit out in the sun. It'll get warm and pliable.
When you get done, everything won't quite fit correctly. Don't worry, it's normal. When it heats up in the sun, the weatherstripping will mold to the shape that is needed.
*edit*
Forgot to say. Good luck
.
.
and
TAKE YOUR TIME.
09-05-2011, 11:33 AM
#4
Race Director

What the guys above said......one piece at a time, and work at a slow steady pace. I used acetone to aid in the old adhesive removal, just protect painted surfaces and again, work slowly and carefully. This is not a job you want to try and speed through.
I didn't use any adhesive on the A and B pillars....no issues.
I didn't use any adhesive on the A and B pillars....no issues.
09-05-2011, 12:10 PM
#5
I found it easier to remove the tracks and clean them off the car, also allowed me to replace the double stick tape that seals them, they also have screws holding them on , not just the tape
09-05-2011, 01:09 PM
#6
Race Director

Thread Starter

The adhesive that was sent with the kit appears to be a contact cement (apply to both sides, let it dry, apply to one side and it bonds instantly). Is that what you guys are using?
Last edited by Craq; 09-05-2011 at 07:19 PM.
09-05-2011, 02:04 PM
#8
Team Owner

Member Since: Aug 2008
Location: Rochester NY
Posts: 31,358
Received 5,010 Likes
on
2,529 Posts
St. Jude Donor '09-'10-'11-'12-'13-'14-'15-'16-'17-'18-�19-'20-'21-'22-'23-'24


Ignore the troll.
Here's a thread which may help
http://forums.corvetteforum.com/c4-g...therstrip.html
and another
https://www.corvetteforum.com/techti...D=63&TopicID=2
Good luck! I have done a lot of mine but didn't bother with the ones that still seemed good. As said above, it takes a while for the rubber to adjust so don't expect factory original perfect the moment you are done.
09-05-2011, 02:49 PM
#9
Race Director
Thread Starter
I started with the rear hatch. It's taken about 30 minutes to clean about four feet. I masked off the area I'm working. So far I've tried alcohol and (believe it or not) Go-Jo hand cleaner, which is working better than the alcohol. I'll try acetone next. This is not a lot of fun.
09-05-2011, 05:17 PM
#10
Race Director
Yeah, I know....but the slower and more methodical you work, the faster it will go, believe it or not.
I used to use Permatex gasket remover to take the old adhesive off, but I can't find the stuff anymore. It worked even better than acetone.
I used to use Permatex gasket remover to take the old adhesive off, but I can't find the stuff anymore. It worked even better than acetone.
09-05-2011, 05:56 PM
#11
Team Owner

Member Since: Aug 2005
Location: Riverside County Southern California
Posts: 34,988
Received 501 Likes
on
342 Posts
Co-winner 2020 C4 of the Year - Modified
2018 Corvette of Year Finalist
2017 C4 of Year
2016 C7 of Year Finalist
St. Jude Donor '09-'10-'11-'12-'13-'14-'15-'16-'17-'18-'19-'20


 09-05-2011, 06:01 PM
#12
Race Director
Thread Starter
Rear hatch seal is on. Removal of old seal did eventually start to go faster. I slathered it with acetone (I used PVC pipe cleaner), that would get it soft, and then I scrape it down the line until it firmed up. I kept doing that until I had a glob big enough to scoop up with a paper towel. Once all the big stuff was done I wiped it down over and over with cleaner and a rag until it was clean and smooth.
I did not use any sealant. It doesn't look like it needs it with the way it's made. I'll keep an eye on it, it won't be hard to pull it loose and apply if I see any evidence of leakage.
I did not use any sealant. It doesn't look like it needs it with the way it's made. I'll keep an eye on it, it won't be hard to pull it loose and apply if I see any evidence of leakage.
Last edited by Craq; 09-05-2011 at 06:05 PM.
09-05-2011, 06:04 PM
#13
Race Director
Thread Starter
09-05-2011, 06:47 PM
#14
Burning Brakes
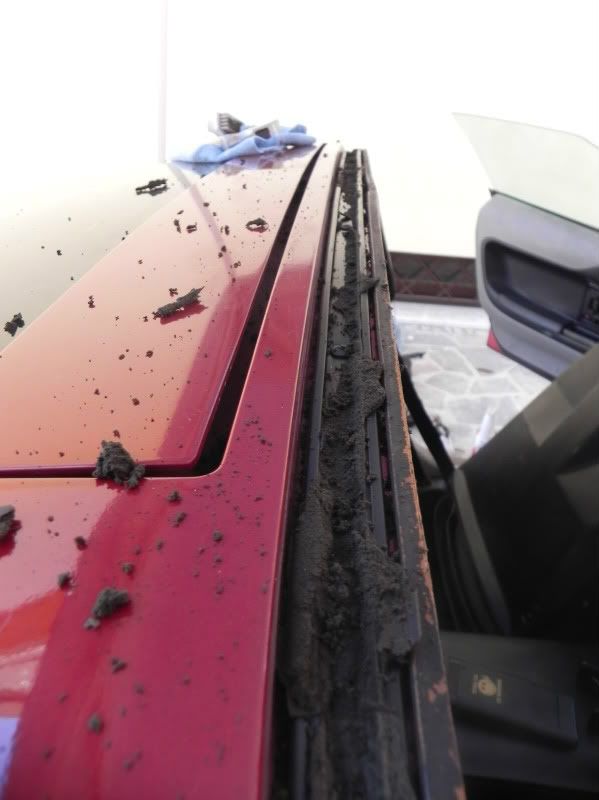
My A and B pillar weatherstrip just crumbled when I removed it like the pic above. Do yourself a favor and cover your interior with a old bed sheet. It'll make cleaning up a whole lot easier. I used 3m adhesive remover to get the old stuff off and it worked great.
I also didn't use any adhesive on the A and B pillars or the hatch.
Take your time.
I also didn't use any adhesive on the A and B pillars or the hatch.
Take your time.
09-05-2011, 07:22 PM
#15
Race Director
Thread Starter
My A and B pillar weatherstrip just crumbled when I removed it like the pic above. Do yourself a favor and cover your interior with a old bed sheet. It'll make cleaning up a whole lot easier. I used 3m adhesive remover to get the old stuff off and it worked great.
I also didn't use any adhesive on the A and B pillars or the hatch.
Take your time.
I also didn't use any adhesive on the A and B pillars or the hatch.
Take your time.
One of the things I did do: I put a thin layer of car wash soap on the seal where it meets the rear glass, to allow for some movement between the seal and the glass and let the rubber relax into a shape it wants to be in; I'll wipe it down tomorrow night.
Last edited by Craq; 09-05-2011 at 07:24 PM.
09-06-2011, 02:47 AM
#16
Burning Brakes
My A and B pillar weatherstrip just crumbled when I removed it like the pic above. Do yourself a favor and cover your interior with a old bed sheet. It'll make cleaning up a whole lot easier. I used 3m adhesive remover to get the old stuff off and it worked great.
I also didn't use any adhesive on the A and B pillars or the hatch.
Take your time.
I also didn't use any adhesive on the A and B pillars or the hatch.
Take your time.
5 minutes of prep, or 30 minutes of cleanup. Your choice
09-06-2011, 07:21 AM
#17

 09-08-2011, 02:28 AM
#19
Burning Brakes
09-08-2011, 04:04 AM
#20
Race Director
well, I was going to show you my old thread when I did this, but look what happened to it!!!

Go edit the OP in your linked thread. Put the 1st post in Edit mode and add the Corvette folder to your IMG paths. IOW, your urls are missing /Corvette/ as part of the image path.
It's obvious you created a new Photobucket folder called "Corvette" and moved the pics into that folder AFTER you posted them in the linked thread.
That's what happens when you move the location of your links.