stripping dulso - part 2 - conclusion
 01-28-2016, 03:16 PM
#21
Instructor


You guys are very creative. I wish I had thought of these solutions. I purchased a replacement from Ecklers. Looks great, but very expensive. I hope it lasts. Gary
 07-29-2016, 09:13 AM
#22
Melting Slicks


i don't know who's been following my original thread on stripping dulso - http://forums.corvetteforum.com/c4-g...nailed-it.html - so here's the link to my original thread.
sorry, i didn't mean to lead anyone along here, but i wanted to wait until i was finished with this project to finalize the thread. BTW,
just because this seemed to work for me, i can't guarantee this will work for you. i don't need flames because someone screwed up the console bezel on their 96 GS vert, so having said that, use a certain amount of caution - you're on your own. you may come up with something better, or a better way of doing it, or you may fine-tune this for your particular application. finally, read all directions, and use appropriate safety procedures.
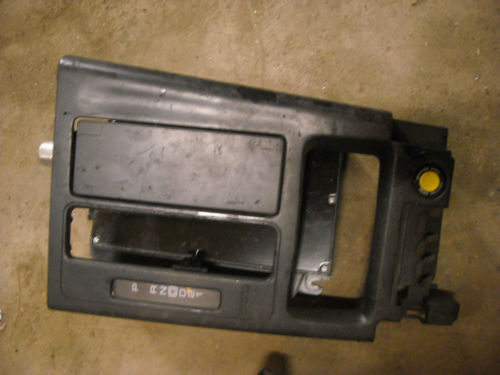
i bought a 94 console bezel on fleabay for $5 (with $15 shipping) for a "down the road", project.
my intent was to replace my original with something that i wouldn't make me a nervous wreck if it got scratched or damaged on my DD. i was in the middle of restoring/reconditioning a set of 96 CE wheels, and my poor hands were taking a beating, so i went into the bathroom to get a band-aid, and saw this sitting on the shelf -
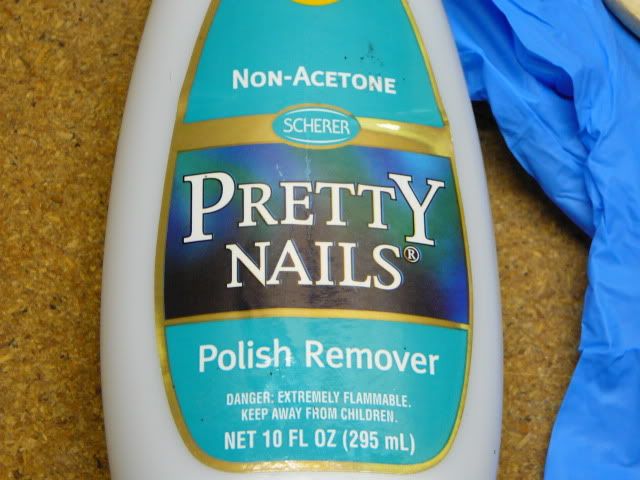
nail polish remover! well, the light bulb went off - what caught my eye, was the term "non-acetone". well, it was off to the garage to give this a try on the dulso. i poured some on the ashtray door, and after a couple minutes, the dulso started to "wrinkle up" similar to paint stripper. i used a maroon scotch-brite, soaked with the nail polish remover, and gave it a quick once over. well, it removed the duslo, and didn't appear to have any ill-effect on the plastic base material. i can't say this was amazing, but what was amazing was that the old lady didn't go "postal" when she caught me in the garage using her girly stuff on my corvette parts . anyway, after i stripped the dulso, i put the ashtray door in my (glass) bead blasting cabinet and gave it a quick cleaning at 40psi. it all seemed to work OK, so i proceeded on the console bezel following the same procedure. the nail polish remover took most of the dulso off, but any that was left came of with the scotch brite, and some detail work. again a quick and final cleaning at 40psi in the blasting cabinet.
one thing i noticed was on the fleabay console, under the dulso, the plastic base had a gloss black finish.
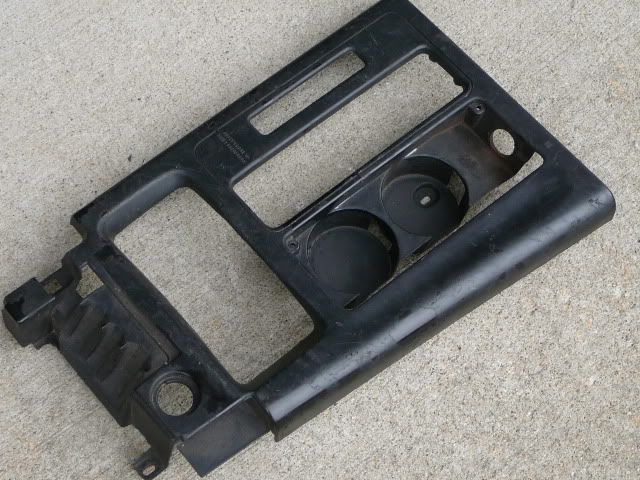
when i bead blasted the part it took on a satin finish, but instead of black, it seemed to be a dark gray.
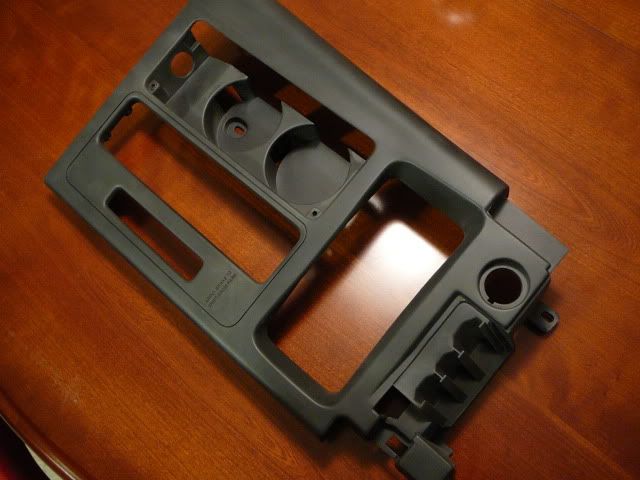
BTW, one $2.59 bottle of the nail polish remover was enough to do both pieces. the surface is perfect for top coating. i gave some "how to" thought to refinishing the parts - plasti-dip rubberized coating, various types of black paint, etc, but everything to have some drawbacks. i ruled out the rubberized coating, because i would be back at square one on the durability issue. paint might scratch and chip - similar to the dark gray 90-91 console bezels. having weighed out all options, i figured the best, scratch resistant, chip resistant finish, was not to have any topcoat finish at all. one thing i learned in reconditioning my "USA-1" rear license plate frames is, if you apply a coat of "plastic conditioner -
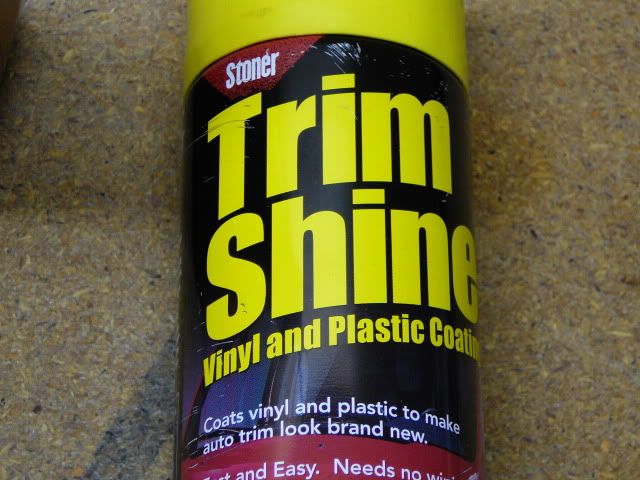
it gives plastic a "like new" appearance. so in a final step, i cranked up the pressure on my regulator to 80psi, and gave the bezel/ashtray a bit more texture before applying the plastic conditioner. i applied a good wet coat of the conditioner, and let it soak into the plastic for about 5-10 minutes. a final wipe with a soft cotton towel, and it looked pretty good. i finalized all parts with leather cleaner conditioner on the shift boot, plastic polish on the gear selector lens, a coat of fluorescent orange on the shift needle. assembly and installation.

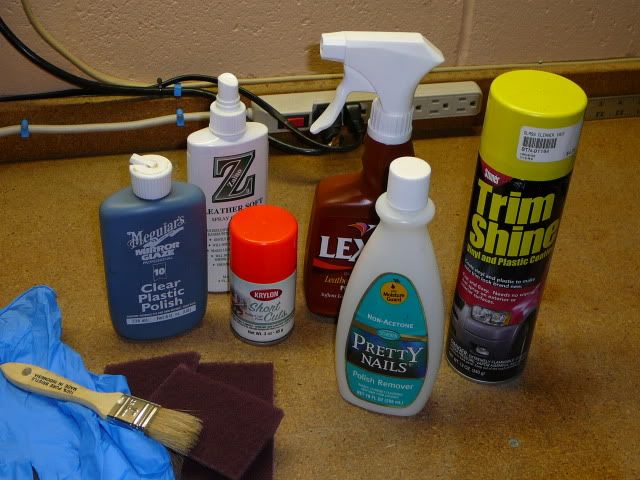
here is pretty much what i used on this project -
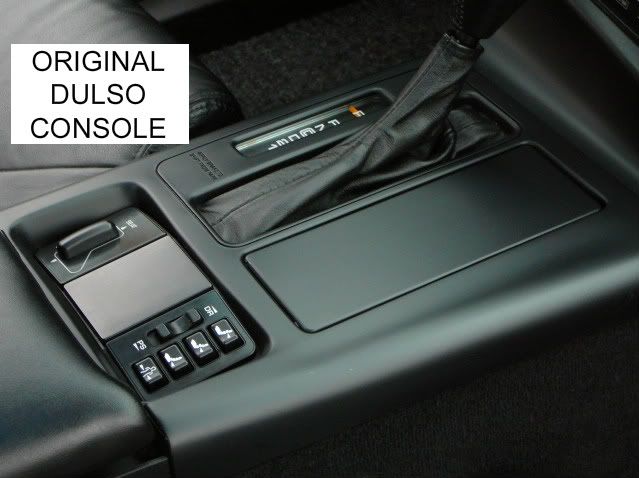
conclusion - what i learned, my end result, etc. here is my before and after pics -
refinished console installed -
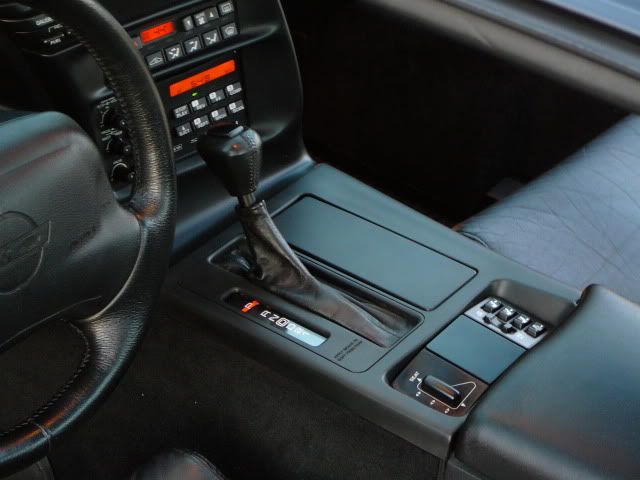
how satisfied am i on the finished console? well, i'm 90% satisfied. i guess i could play around more with the top coat, and maybe get a bit closer, a bit darker. the color and sheen is slightly off, but it's fairly close - about 90% there. for now, this will serve my purpose. at least i won't have to worry about my original getting damaged. one thing i can do is refinish the radio bezel, and i may do that if i can find a cheap fleabay part. doing that will lessen the difference between the two bezels.
so there you have it. now it's off to refinishing those CE wheels...

sorry, i didn't mean to lead anyone along here, but i wanted to wait until i was finished with this project to finalize the thread. BTW,
DISCLAIMER
just because this seemed to work for me, i can't guarantee this will work for you. i don't need flames because someone screwed up the console bezel on their 96 GS vert, so having said that, use a certain amount of caution - you're on your own. you may come up with something better, or a better way of doing it, or you may fine-tune this for your particular application. finally, read all directions, and use appropriate safety procedures.
i bought a 94 console bezel on fleabay for $5 (with $15 shipping) for a "down the road", project.
my intent was to replace my original with something that i wouldn't make me a nervous wreck if it got scratched or damaged on my DD. i was in the middle of restoring/reconditioning a set of 96 CE wheels, and my poor hands were taking a beating, so i went into the bathroom to get a band-aid, and saw this sitting on the shelf -
nail polish remover! well, the light bulb went off - what caught my eye, was the term "non-acetone". well, it was off to the garage to give this a try on the dulso. i poured some on the ashtray door, and after a couple minutes, the dulso started to "wrinkle up" similar to paint stripper. i used a maroon scotch-brite, soaked with the nail polish remover, and gave it a quick once over. well, it removed the duslo, and didn't appear to have any ill-effect on the plastic base material. i can't say this was amazing, but what was amazing was that the old lady didn't go "postal" when she caught me in the garage using her girly stuff on my corvette parts
. anyway, after i stripped the dulso, i put the ashtray door in my (glass) bead blasting cabinet and gave it a quick cleaning at 40psi. it all seemed to work OK, so i proceeded on the console bezel following the same procedure. the nail polish remover took most of the dulso off, but any that was left came of with the scotch brite, and some detail work. again a quick and final cleaning at 40psi in the blasting cabinet.one thing i noticed was on the fleabay console, under the dulso, the plastic base had a gloss black finish.
when i bead blasted the part it took on a satin finish, but instead of black, it seemed to be a dark gray.
BTW, one $2.59 bottle of the nail polish remover was enough to do both pieces. the surface is perfect for top coating. i gave some "how to" thought to refinishing the parts - plasti-dip rubberized coating, various types of black paint, etc, but everything to have some drawbacks. i ruled out the rubberized coating, because i would be back at square one on the durability issue. paint might scratch and chip - similar to the dark gray 90-91 console bezels. having weighed out all options, i figured the best, scratch resistant, chip resistant finish, was not to have any topcoat finish at all. one thing i learned in reconditioning my "USA-1" rear license plate frames is, if you apply a coat of "plastic conditioner -
it gives plastic a "like new" appearance. so in a final step, i cranked up the pressure on my regulator to 80psi, and gave the bezel/ashtray a bit more texture before applying the plastic conditioner. i applied a good wet coat of the conditioner, and let it soak into the plastic for about 5-10 minutes. a final wipe with a soft cotton towel, and it looked pretty good. i finalized all parts with leather cleaner conditioner on the shift boot, plastic polish on the gear selector lens, a coat of fluorescent orange on the shift needle. assembly and installation.
here is pretty much what i used on this project -
conclusion - what i learned, my end result, etc. here is my before and after pics -
refinished console installed -
how satisfied am i on the finished console? well, i'm 90% satisfied. i guess i could play around more with the top coat, and maybe get a bit closer, a bit darker. the color and sheen is slightly off, but it's fairly close - about 90% there. for now, this will serve my purpose. at least i won't have to worry about my original getting damaged. one thing i can do is refinish the radio bezel, and i may do that if i can find a cheap fleabay part. doing that will lessen the difference between the two bezels.
so there you have it. now it's off to refinishing those CE wheels...
Bill


