stripping dulso - part 2 - conclusion
 12-01-2011, 10:17 AM
#1
Race Director

Thread Starter


i don't know who's been following my original thread on stripping dulso - http://forums.corvetteforum.com/c4-g...nailed-it.html - so here's the link to my original thread.
sorry, i didn't mean to lead anyone along here, but i wanted to wait until i was finished with this project to finalize the thread. BTW,
just because this seemed to work for me, i can't guarantee this will work for you. i don't need flames because someone screwed up the console bezel on their 96 GS vert, so having said that, use a certain amount of caution - you're on your own. you may come up with something better, or a better way of doing it, or you may fine-tune this for your particular application. finally, read all directions, and use appropriate safety procedures.
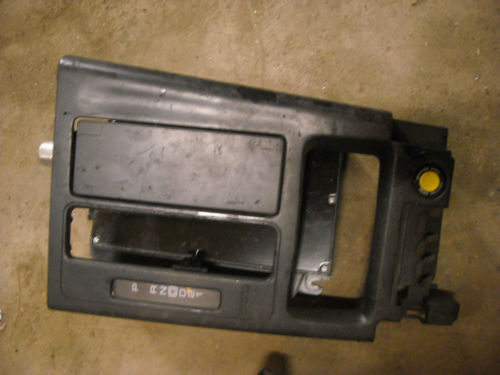
i bought a 94 console bezel on fleabay for $5 (with $15 shipping) for a "down the road", project.
my intent was to replace my original with something that i wouldn't make me a nervous wreck if it got scratched or damaged on my DD. i was in the middle of restoring/reconditioning a set of 96 CE wheels, and my poor hands were taking a beating, so i went into the bathroom to get a band-aid, and saw this sitting on the shelf -
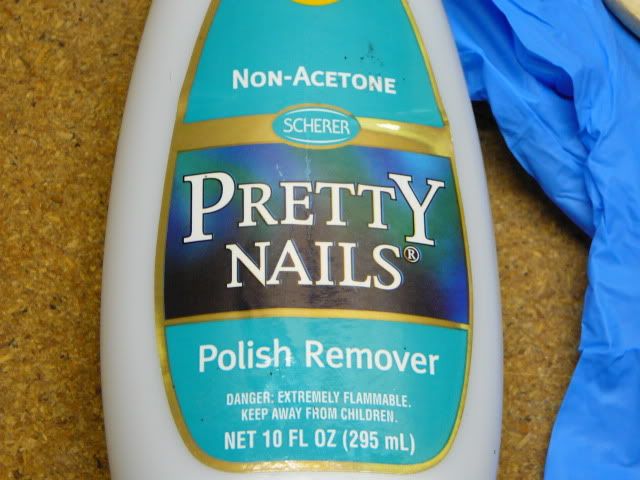
nail polish remover! well, the light bulb went off - what caught my eye, was the term "non-acetone". well, it was off to the garage to give this a try on the dulso. i poured some on the ashtray door, and after a couple minutes, the dulso started to "wrinkle up" similar to paint stripper. i used a maroon scotch-brite, soaked with the nail polish remover, and gave it a quick once over. well, it removed the duslo, and didn't appear to have any ill-effect on the plastic base material. i can't say this was amazing, but what was amazing was that the old lady didn't go "postal" when she caught me in the garage using her girly stuff on my corvette parts . anyway, after i stripped the dulso, i put the ashtray door in my (glass) bead blasting cabinet and gave it a quick cleaning at 40psi. it all seemed to work OK, so i proceeded on the console bezel following the same procedure. the nail polish remover took most of the dulso off, but any that was left came of with the scotch brite, and some detail work. again a quick and final cleaning at 40psi in the blasting cabinet.
one thing i noticed was on the fleabay console, under the dulso, the plastic base had a gloss black finish.
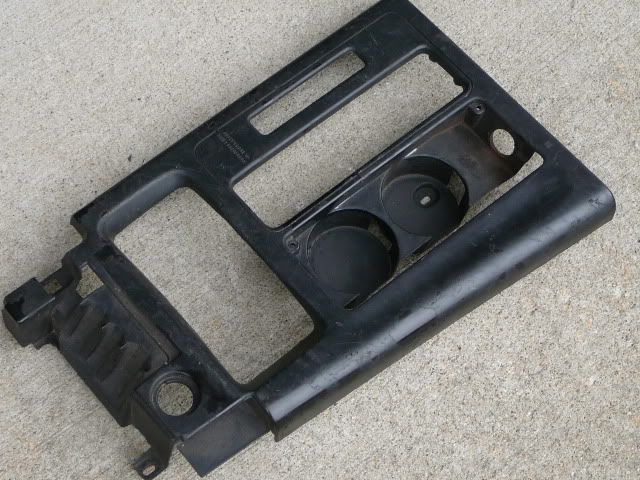
when i bead blasted the part it took on a satin finish, but instead of black, it seemed to be a dark gray.
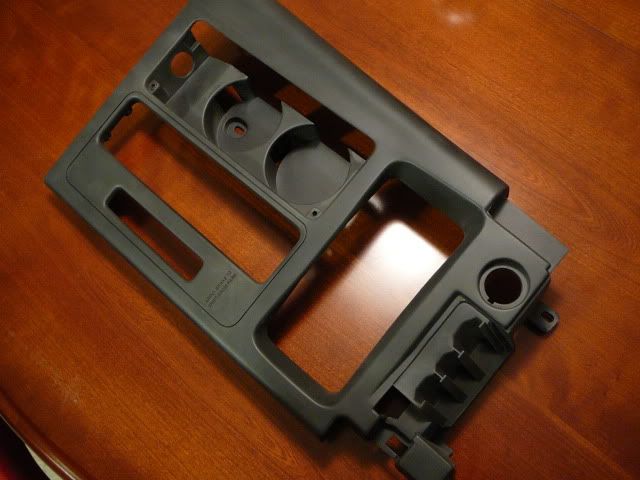
BTW, one $2.59 bottle of the nail polish remover was enough to do both pieces. the surface is perfect for top coating. i gave some "how to" thought to refinishing the parts - plasti-dip rubberized coating, various types of black paint, etc, but everything to have some drawbacks. i ruled out the rubberized coating, because i would be back at square one on the durability issue. paint might scratch and chip - similar to the dark gray 90-91 console bezels. having weighed out all options, i figured the best, scratch resistant, chip resistant finish, was not to have any topcoat finish at all. one thing i learned in reconditioning my "USA-1" rear license plate frames is, if you apply a coat of "plastic conditioner -
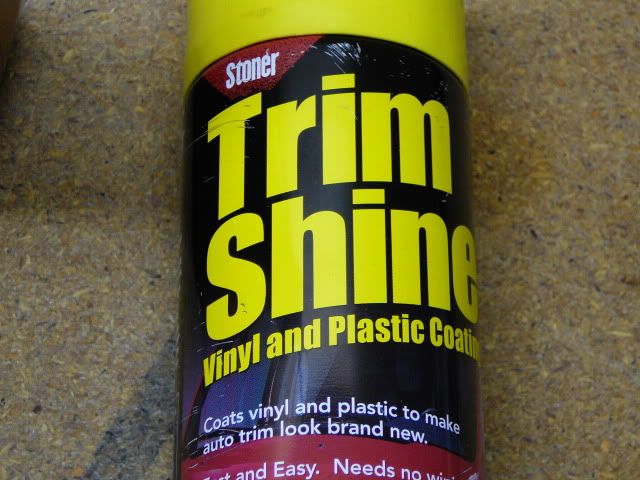
it gives plastic a "like new" appearance. so in a final step, i cranked up the pressure on my regulator to 80psi, and gave the bezel/ashtray a bit more texture before applying the plastic conditioner. i applied a good wet coat of the conditioner, and let it soak into the plastic for about 5-10 minutes. a final wipe with a soft cotton towel, and it looked pretty good. i finalized all parts with leather cleaner conditioner on the shift boot, plastic polish on the gear selector lens, a coat of fluorescent orange on the shift needle. assembly and installation.

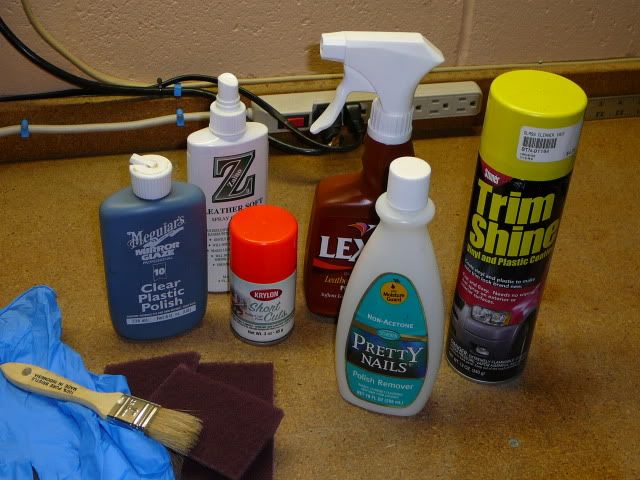
here is pretty much what i used on this project -
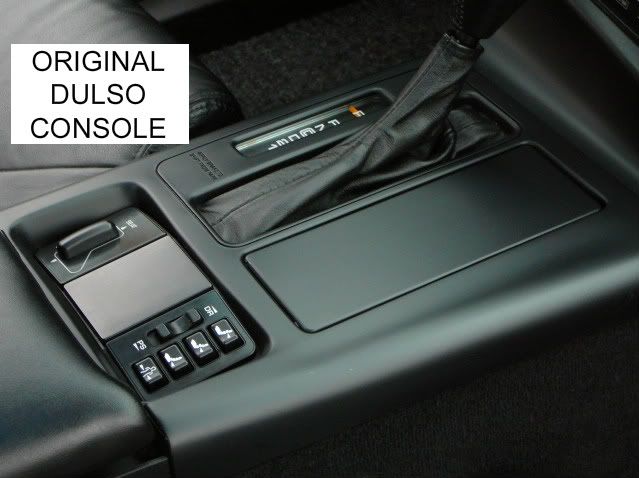
conclusion - what i learned, my end result, etc. here is my before and after pics -
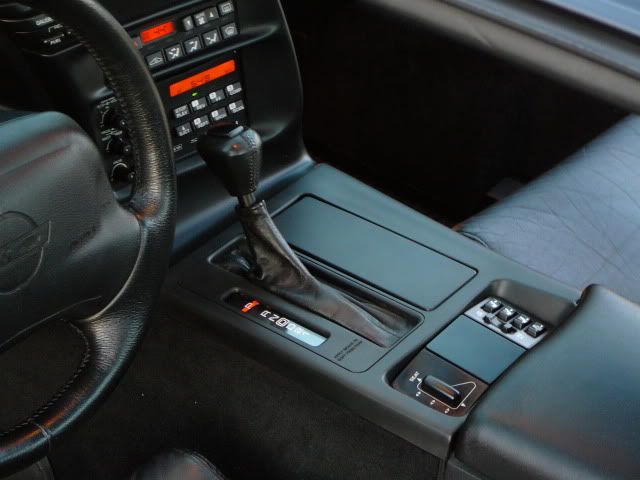
refinished console installed -
how satisfied am i on the finished console? well, i'm 90% satisfied. i guess i could play around more with the top coat, and maybe get a bit closer, a bit darker. the color and sheen is slightly off, but it's fairly close - about 90% there. for now, this will serve my purpose. at least i won't have to worry about my original getting damaged. one thing i can do is refinish the radio bezel, and i may do that if i can find a cheap fleabay part. doing that will lessen the difference between the two bezels.
so there you have it. now it's off to refinishing those CE wheels...

sorry, i didn't mean to lead anyone along here, but i wanted to wait until i was finished with this project to finalize the thread. BTW,
DISCLAIMER
just because this seemed to work for me, i can't guarantee this will work for you. i don't need flames because someone screwed up the console bezel on their 96 GS vert, so having said that, use a certain amount of caution - you're on your own. you may come up with something better, or a better way of doing it, or you may fine-tune this for your particular application. finally, read all directions, and use appropriate safety procedures.
i bought a 94 console bezel on fleabay for $5 (with $15 shipping) for a "down the road", project.
my intent was to replace my original with something that i wouldn't make me a nervous wreck if it got scratched or damaged on my DD. i was in the middle of restoring/reconditioning a set of 96 CE wheels, and my poor hands were taking a beating, so i went into the bathroom to get a band-aid, and saw this sitting on the shelf -
nail polish remover! well, the light bulb went off - what caught my eye, was the term "non-acetone". well, it was off to the garage to give this a try on the dulso. i poured some on the ashtray door, and after a couple minutes, the dulso started to "wrinkle up" similar to paint stripper. i used a maroon scotch-brite, soaked with the nail polish remover, and gave it a quick once over. well, it removed the duslo, and didn't appear to have any ill-effect on the plastic base material. i can't say this was amazing, but what was amazing was that the old lady didn't go "postal" when she caught me in the garage using her girly stuff on my corvette parts
. anyway, after i stripped the dulso, i put the ashtray door in my (glass) bead blasting cabinet and gave it a quick cleaning at 40psi. it all seemed to work OK, so i proceeded on the console bezel following the same procedure. the nail polish remover took most of the dulso off, but any that was left came of with the scotch brite, and some detail work. again a quick and final cleaning at 40psi in the blasting cabinet.one thing i noticed was on the fleabay console, under the dulso, the plastic base had a gloss black finish.
when i bead blasted the part it took on a satin finish, but instead of black, it seemed to be a dark gray.
BTW, one $2.59 bottle of the nail polish remover was enough to do both pieces. the surface is perfect for top coating. i gave some "how to" thought to refinishing the parts - plasti-dip rubberized coating, various types of black paint, etc, but everything to have some drawbacks. i ruled out the rubberized coating, because i would be back at square one on the durability issue. paint might scratch and chip - similar to the dark gray 90-91 console bezels. having weighed out all options, i figured the best, scratch resistant, chip resistant finish, was not to have any topcoat finish at all. one thing i learned in reconditioning my "USA-1" rear license plate frames is, if you apply a coat of "plastic conditioner -
it gives plastic a "like new" appearance. so in a final step, i cranked up the pressure on my regulator to 80psi, and gave the bezel/ashtray a bit more texture before applying the plastic conditioner. i applied a good wet coat of the conditioner, and let it soak into the plastic for about 5-10 minutes. a final wipe with a soft cotton towel, and it looked pretty good. i finalized all parts with leather cleaner conditioner on the shift boot, plastic polish on the gear selector lens, a coat of fluorescent orange on the shift needle. assembly and installation.
here is pretty much what i used on this project -
conclusion - what i learned, my end result, etc. here is my before and after pics -
refinished console installed -
how satisfied am i on the finished console? well, i'm 90% satisfied. i guess i could play around more with the top coat, and maybe get a bit closer, a bit darker. the color and sheen is slightly off, but it's fairly close - about 90% there. for now, this will serve my purpose. at least i won't have to worry about my original getting damaged. one thing i can do is refinish the radio bezel, and i may do that if i can find a cheap fleabay part. doing that will lessen the difference between the two bezels.
so there you have it. now it's off to refinishing those CE wheels...
Last edited by Joe C; 03-06-2017 at 12:51 AM.

The following 2 users liked this post by Joe C:
johno504 (07-18-2018),
silversport (07-29-2016)
12-01-2011, 10:56 AM
#2
Drifting


Thanks Joe. I am so there. That sounds like a great project for the winter. I'll do all the stuff like the console, radio bezel, A/C vents, and speedo housing. Then you won't notice the color difference.
I did an A/C vent this past summer and finished it off with 2500 sandpaper and it looked about like your console. But the one vent took me about 2 hours. My patience is not that long. If I did something that tedious for an entire day, I'd have to kill something.
If you want to make sure you got it right, and in the spirit of friendship, I'd be glad to let you play with mine. Of course, since you're still experimenting the price would have to be about zero.............I didn't think so but thanks anyways. ---Gunny---
I did an A/C vent this past summer and finished it off with 2500 sandpaper and it looked about like your console. But the one vent took me about 2 hours. My patience is not that long. If I did something that tedious for an entire day, I'd have to kill something.
If you want to make sure you got it right, and in the spirit of friendship, I'd be glad to let you play with mine.
Of course, since you're still experimenting the price would have to be about zero.............I didn't think so but thanks anyways. ---Gunny---


 12-30-2012, 02:13 PM
#7
Advanced


Member Since: Jul 2005
Posts: 65
Likes: 0
Received 0 Likes
on
0 Posts

I know this thread is old, but the non-acetone polish remover has helped me much and I wanted to say thanks. Also, I discovered the best way to make it work is to soak a papertowel in the polish remover and stick it to the part wet. Keep pouring small amounts on for a few minutes and when you take the towels off, just about all of the dulso is bubbled up. I just use the wet paper towel to wipe off. The non-acetone version does no damage to the plastic at all, even after 10 or more minutes soaking.
I then used Duplicolor flat black and painted everything. Looks great. Thanks for the the write-up.
I then used Duplicolor flat black and painted everything. Looks great. Thanks for the the write-up.
12-30-2012, 02:51 PM
#8
Le Mans Master


first time i saw the write up and i'm glad i did. the Dulso is a neat idea but terrible in practice as it ages poorly. i think i know what my next project is going to be..
12-30-2012, 08:40 PM
#9
Melting Slicks


Your thread was a great help / inspiration in the repair and refinishing of the console in my 96. Thanks. To make a short story shorter...and your results may vary...I sprayed on an industrial gasket remover which seemed identical to oven cleaner, and that ole Dulso just melted off. After throughly removing any trace of the remaining gasket remover with brake cleaner, I roughed the surface with 400 grit and applied PlastiCoat spray paint in satin black for a very nice, near factory finish.
12-30-2012, 09:45 PM
#10

Great thread. 
I also tried refurbishing mine in a similar way.

I wrote a thread about it here.
At first it worked out great but a couple of week but first the paint on the lid started bubbling and cheeping off and then later the console.
Now it looks something like this

I used the plastic primer before spraying the paint and cleaned the surface very well before spraying with the primer.
I don't know what to do I'm afraid if I do it the same way again it will bubble again the same way so a friend of mine said that he could paint it when he painted a car or something and that it would be more resilient.
I also tried refurbishing mine in a similar way.
I wrote a thread about it here.
At first it worked out great but a couple of week but first the paint on the lid started bubbling and cheeping off and then later the console.
Now it looks something like this
I used the plastic primer before spraying the paint and cleaned the surface very well before spraying with the primer.
I don't know what to do I'm afraid if I do it the same way again it will bubble again the same way so a friend of mine said that he could paint it when he painted a car or something and that it would be more resilient.
12-30-2012, 10:59 PM
#11
Burning Brakes

Your thread was a great help / inspiration in the repair and refinishing of the console in my 96. Thanks. To make a short story shorter...and your results may vary...I sprayed on an industrial gasket remover which seemed identical to oven cleaner, and that ole Dulso just melted off. After throughly removing any trace of the remaining gasket remover with brake cleaner, I roughed the surface with 400 grit and applied PlastiCoat spray paint in satin black for a very nice, near factory finish.
12-31-2012, 04:52 PM
#12
Burning Brakes
Thanks to Joe C! Looks good.
Does anyone know what Dulso is made from in the first place??? I've used Plastidip on other surfaces. Has anyone tried it in this application? I like the idea of applying some kind of coating that can absorb scratches and UV rays and protect the underlying plastic. That's probably what the Dulso was supposed to do. Whatever happened to Dulso, anyway?
Thanks!
12-31-2012, 09:51 PM
#13
Melting Slicks
Great thread.
I also tried refurbishing mine in a similar way.
I used the plastic primer before spraying the paint and cleaned the surface very well before spraying with the primer.
I don't know what to do I'm afraid if I do it the same way again it will bubble again the same way so a friend of mine said that he could paint it when he painted a car or something and that it would be more resilient.
As I said before, I used a spray can of gasket remover to remove the old Dulso; I then throughly flushed everything with warm water, blew any remaining water off with compressed air, and then cleaned the surface(s) with brake cleaner.
The paint I used was: KRYLON FUSION FOR PLASTIC, 2421 Satin Black which amongst its other claims on the label is "BONDS TO PLASTIC"; "The no-prep, superbond paint"; the small print claims its for use on "most plastic, PVC, vinyl, ceramic, glass, tile ...and other hard to bond surfaces"
My console required considerable repair, this all required sanding off excess epoxy repair filler with a very rough grit to a final sand, including between coats, with 400 grit. Although the paint can said "NO SANDING OR PRIMING" I wouldn't attempt it without sanding. For a final cleaning before starting to paint, I again used brake cleaner.
This particular paint comes in either "flat", "satin" or "gloss".
I only tried "satin"; it is a bit shinier than the stock Dulso finish and a tad bit blacker also....but darn close for a rattle can. I think that if the stock Dulso got a swipe or two of Armor All or some other similiar product designed to spruce up the interior, the match would very close.
Then again, flat might work even better; I just never experimented with it.
My suggestion would be prep some out of the way piece of plastic and give it a try. In my case the console was such a wreck that I had nothing to lose; and so far, so good....heck, even my wife complimented it.
01-01-2013, 08:47 PM
#14
Yeah I sanded down the whole thing and cleaned it very well with a cleaner specially made for cleaning stuff like this. It doesn't damage the plastic and doesn't effect painting. Then sprayed the primer on and let it dry for a day. Then cleaned it with water and dried it of and painted it with spry paint. It looked great for a couple of weeks but then started to bubble. I don't know weather it was some dirt or the paint just wasn't right or maybe it's some wired type of plastic that paint doesn't want to stick to.
Now I have to first figure out how to get this stuff off without ruining the plastic and then try and paint it with some different type of paint.
Thanks for the tips and happy new year to everyone.
Now I have to first figure out how to get this stuff off without ruining the plastic and then try and paint it with some different type of paint.
Thanks for the tips and happy new year to everyone.
01-02-2013, 02:15 PM
#15
Melting Slicks
I think I started the first coat after a 120 (maybe 240) grit sanding on the theory that I wanted a really roughed up surface for the initial paint to mechanically (as well as chemically) adhere to; later coats got finer and finer grit, since by then the paint was bonding to itself and not the plastic substrate; again I used brake cleaner as a cleaning agent because it aggressively removes contaminants (even oil from your hands) and leaves behind a dry surface which (I believe anyway) promotes adhesion by attracking and absorbing the solvents in the paint.
Last edited by mtwoolford; 01-02-2013 at 02:25 PM. Reason: needed added info
01-04-2013, 01:07 PM
#16
I used first a spray primer specially made for plastic and then black satin spray.
For cleaning I used a special enzyme based cleaner that gets rid of all contaminants like oil, dust, anything basically but doesn't corrode plastic and becomes inert after a couple of minutes when it drys up. It stops working gradually at the beginning it gets rid of everything then when drying gradually stops. I didn't want to use anything nitro based that could hurt the plastic.
I don't know maybe the paint wasn't correct but it said it was specifically for this. Maybe some contaminants got under the paint because the primer isn't cheeping but the paint over it. I know I forgot to clean the primer before spraying the paint.
I guess I'll have to take it off and redo it.
But I'm not sure how to strip the old paint off again.
01-04-2013, 03:34 PM
#17
Melting Slicks
I used first a spray primer specially made for plastic and then black satin spray.
I don't know maybe the paint wasn't correct but it said it was specifically for this. Maybe some contaminants got under the paint because the primer isn't cheeping but the paint over it. I know I forgot to clean the primer before spraying the paint.
I guess I'll have to take it off and redo it.
But I'm not sure how to strip the old paint off again.
and; could you give the name of the brand of primer and paint you used ?
01-04-2013, 05:19 PM
#18
I don't know if you guys have the same brands but here goes.
The primer was
Prisma Color Plastic Primer

The paint was
Belton Molotow Acrylic Satin Black

You think if I just sanded down the paint, cleaned it and repainted it that it wouldn't cheep anymore?
01-28-2013, 07:55 PM
#19
Well I had some time and decided to tackle my problem again.
I took out the panels again and sanded them down. Then degrease them and sprayed the primer. When it was dry spray painted it a few times and left the panels to dry for a couple of day.
I think it came out looking great.
Let's just hope it holds.
Here are a few photos
Before:


During:

And the final result:


I even painted the seat recline **** brackets:

Can't wait to install it tomorrow.
I took out the panels again and sanded them down. Then degrease them and sprayed the primer. When it was dry spray painted it a few times and left the panels to dry for a couple of day.
I think it came out looking great.
Let's just hope it holds.
Here are a few photos
Before:
During:
And the final result:
I even painted the seat recline **** brackets:
Can't wait to install it tomorrow.