Restoring Plastic Interior Pieces
 01-11-2016, 09:24 AM
#1
Instructor

Thread Starter
Looking for some input on restoring the plastic pieces that make up a lot of the interior. Of course over the years they have faded and are really a dark grey vs black. I have seen a couple of products on the market, but they seem to be geared more towards exterior pieces.
Has anyone successfully used a product that helped restore the color to the interior pieces?
Thanks!
Has anyone successfully used a product that helped restore the color to the interior pieces?
Thanks!
 01-11-2016, 09:36 AM
#2


a heat gun or wifes hair dryer then rub with dielectric grease
01-11-2016, 11:11 AM
#3
Pro

Member Since: Aug 2015
Location: Jackson Wisconsin
Posts: 656
Likes: 0
Received 79 Likes
on
70 Posts
The center gage cluster cover in my C4 was broken due to poor radio installation. I'd spent quite a bit on other interior pieces so to save money I attempted to fix it with Duro plastic mender and Rustoleum satin black spray paint for plastics. Turned out to look good as new. Others have found rattle can spray paints that look just as good as factory. Flexible parts, like the arm rest covers and center counsel clean up pretty good with various products from Mothers, available from Autozone and places like that. I've had limited success with vinyl repair glues as well, but I stress "Limited". Sort parts that have become hard and crack are pretty much toast. Good luck. Keep us posted as to your trials.
01-11-2016, 11:40 AM
#4
Melting Slicks


If I had a picture I'd post it, bur since I don't , bear with me.
On my center console, I had excellent results by repairing, reinforcing the piece by laying in lengths of metal rod into the various channels formed on the underside of the piece and then filling everything in with JB Weld. The top side of the console, after stripping off the factory coating, I repainted the piece with black semi gloss (or was it satin?) rattle can paint for plastic.
On my center console, I had excellent results by repairing, reinforcing the piece by laying in lengths of metal rod into the various channels formed on the underside of the piece and then filling everything in with JB Weld. The top side of the console, after stripping off the factory coating, I repainted the piece with black semi gloss (or was it satin?) rattle can paint for plastic.
Last edited by mtwoolford; 01-11-2016 at 11:41 AM.
01-11-2016, 02:36 PM
#5
Instructor
Thread Starter
Thanks to all! I am going to wrap the console pieces and the radio housing, most concerned with the piece that wraps around the rear hatch area.
Not sure I want to heat and grease it up, seems like that would just make it greasy and attract dust?
I am fortunate in the fact that there are very few pieces that are broken or cracked, those that were I have already reinforced and glued back together...not sure how long that will last, but time will tell.
I am on my way to get some paint now!
thanks guys!
01-11-2016, 03:00 PM
#6
Advanced

Not sure what yr yours is and I am sure the newer ones, mine is an 86, have different texture and material. I took a mild metal polish that I had for my Harley's aluminum parts and peices and mildly rubbed the dash surround and center console. In my opinion it came out great!
Last edited by C486Bill; 01-11-2016 at 03:03 PM.
The following users liked this post:
Need4Sneed (11-14-2023)
01-11-2016, 03:03 PM
#7
Instructor

Make sure to use paint intended for use on plastic or vinyl and clean the piece very thoroughly to remove any residual armor all, etc., before painting. I think some systems also have am adhesion-promoting primer. I used one of these products on the dash cap of my 1988 Camaro about 6 years ago and it looks as good as the day it was done.

 01-11-2016, 04:50 PM
#9
Racer
Oh yea! Finally another Lemon Pledge user. I've been using Lemon Pledge for over 40 years and love it. It's basically just a wax but works wonders. Used it on every Harley and Jeep Wrangler I ever owned. Best of all...it's not expensive!
01-11-2016, 06:06 PM
#10
Thanks to all! I am going to wrap the console pieces and the radio housing, most concerned with the piece that wraps around the rear hatch area.
Not sure I want to heat and grease it up, seems like that would just make it greasy and attract dust?
I am fortunate in the fact that there are very few pieces that are broken or cracked, those that were I have already reinforced and glued back together...not sure how long that will last, but time will tell.
I am on my way to get some paint now!
thanks guys!
Not sure I want to heat and grease it up, seems like that would just make it greasy and attract dust?
I am fortunate in the fact that there are very few pieces that are broken or cracked, those that were I have already reinforced and glued back together...not sure how long that will last, but time will tell.
I am on my way to get some paint now!
thanks guys!

 01-12-2016, 04:59 AM
#12
Safety Car

I like SEM trim black and their adhesion promoter. If you can use a spray gun buy the quart and mix 50/50 with lacquer thinner. You will have enough to do your whole car.
01-12-2016, 04:19 PM
#13

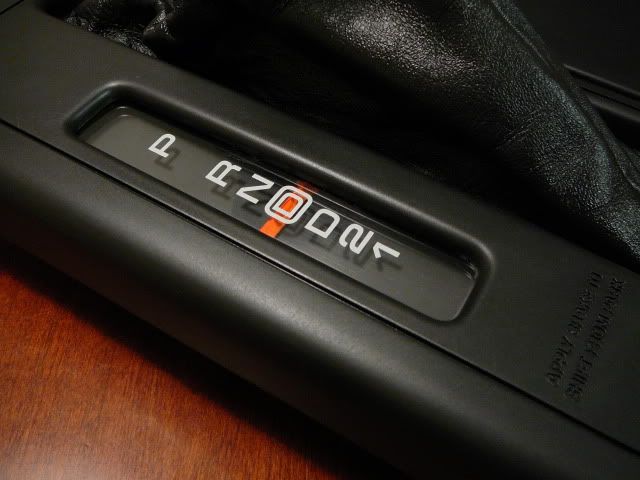
you can run plastic interior pieces through a (glass) bead blaster, with excellent results. here's a couple shots of a 96 console shifter bezel without any dulso, paint, or fancy topcoat -
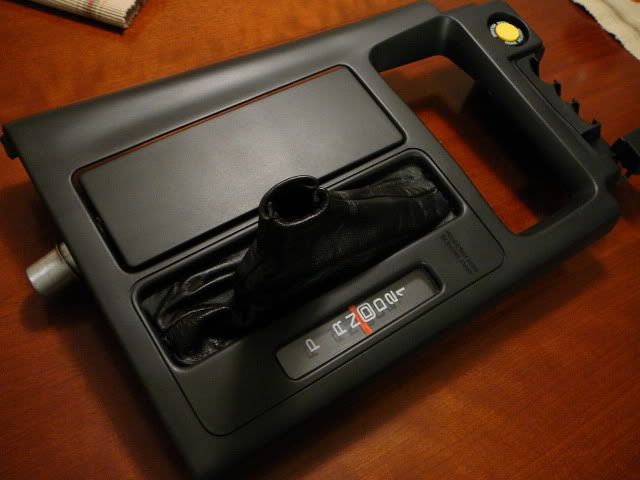

here's a pic of what I started with... paid $5 (+shipping) for it on fleabay.
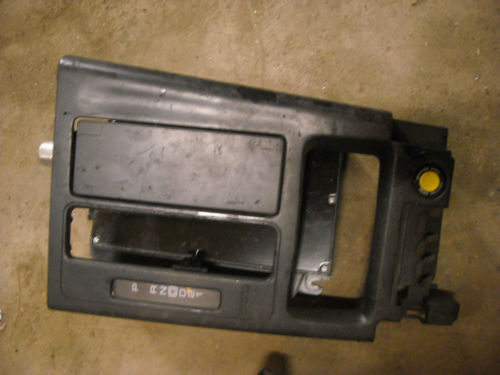
here's a pic of what I started with... paid $5 (+shipping) for it on fleabay.
Last edited by Joe C; 01-13-2016 at 06:40 AM.
The following 2 users liked this post by Joe C:
Need4Sneed (11-14-2023),
steve1657 (01-13-2016)
01-12-2016, 04:33 PM
#14
Pro
[QUOTE=Joe C;1591307337]you can run plastic interior pieces through a (glass) bead blaster, with excellent results. here's a couple shots on a 96 console shifter bezel without any dulso, paint, or fancy topcoat -
Hi Joe. Those look very sharp, IMO better than any of the repaint finishes I have seen (and some good ones too). Thanks for the post, I know how to tackle mine in the future.
Hi Joe. Those look very sharp, IMO better than any of the repaint finishes I have seen (and some good ones too). Thanks for the post, I know how to tackle mine in the future.
01-12-2016, 05:06 PM
#15
Instructor
Thread Starter
WOW, those look brand new! So basically use a media blaster? Must be something different than what I have used to remove rust/paint, etc... seems like that would just cut the plastic in half?
01-12-2016, 09:37 PM
#16
01-13-2016, 05:04 PM
#18
Instructor
Thread Starter
Since it is cold here and can't paint, don't have access to a media blaster, etc... I thought I would give the heat gun a try, epic FAIL. The plastic does not change at all and in fact I now have a couple of "waves". I watched a video on this process on YouTube and it works for sure, but I think the plastic in our cars is too old? or they used a different kind of plastic back in the day....anyway, I am going to clean the crap out of it and wait for warm weather.
01-13-2016, 05:29 PM
#19
[QUOTE=Joe C;1591307337]you can run plastic interior pieces through a (glass) bead blaster, with excellent results. here's a couple shots of a 96 console shifter bezel without any dulso, paint, or fancy topcoat -
did you use any sealant afterwards?
did you use any sealant afterwards?
01-13-2016, 05:36 PM
#20
Instructor
Thread Starter
Not sure what yr yours is and I am sure the newer ones, mine is an 86, have different texture and material. I took a mild metal polish that I had for my Harley's aluminum parts and peices and mildly rubbed the dash surround and center console. In my opinion it came out great!