LTCC 1992 Corvette Install
 12-30-2016, 11:22 PM
#1
Instructor

Thread Starter
Well guys, after some help from TorchTarga94, Bob Bailey, and PLRX, I finally finished my LTCC project. In all I probably put in about 15 hours of work (mostly spent trying to find the best mounting location of the "brain") Like many said, the job wasn't too difficult. The only skills that may be tested are your soldering and heat-shrinking skills.
So, I spent $399.00 on the LTCC kit from Bob Bailey, $180.00 on 2 mounting brackets D514A from EFI Connections and $20.00 on the screw to mount the brackets to the valve covers (replaced the old valve cover screws), $92.72 for 8 LS3 coils from Rock Auto, $91.58 for 2 LS3 coil harnesses, $107.89 for a new WPS optispark (hopefully I get luck with a cheap one since there is no high voltage running through the cap).
The entire setup set me back a whopping $891.19. Could have been a lot more, and had potential to be a lot less if I didn't have to buy a new optispark and if I made my own brackets to mount the coils.
As far as the install went, the instructions that were supplied with the unit were very descriptive and helped with the install. The only thing that was a bit vague was the Tach Filter connection that had to be made... I'll get into that later.
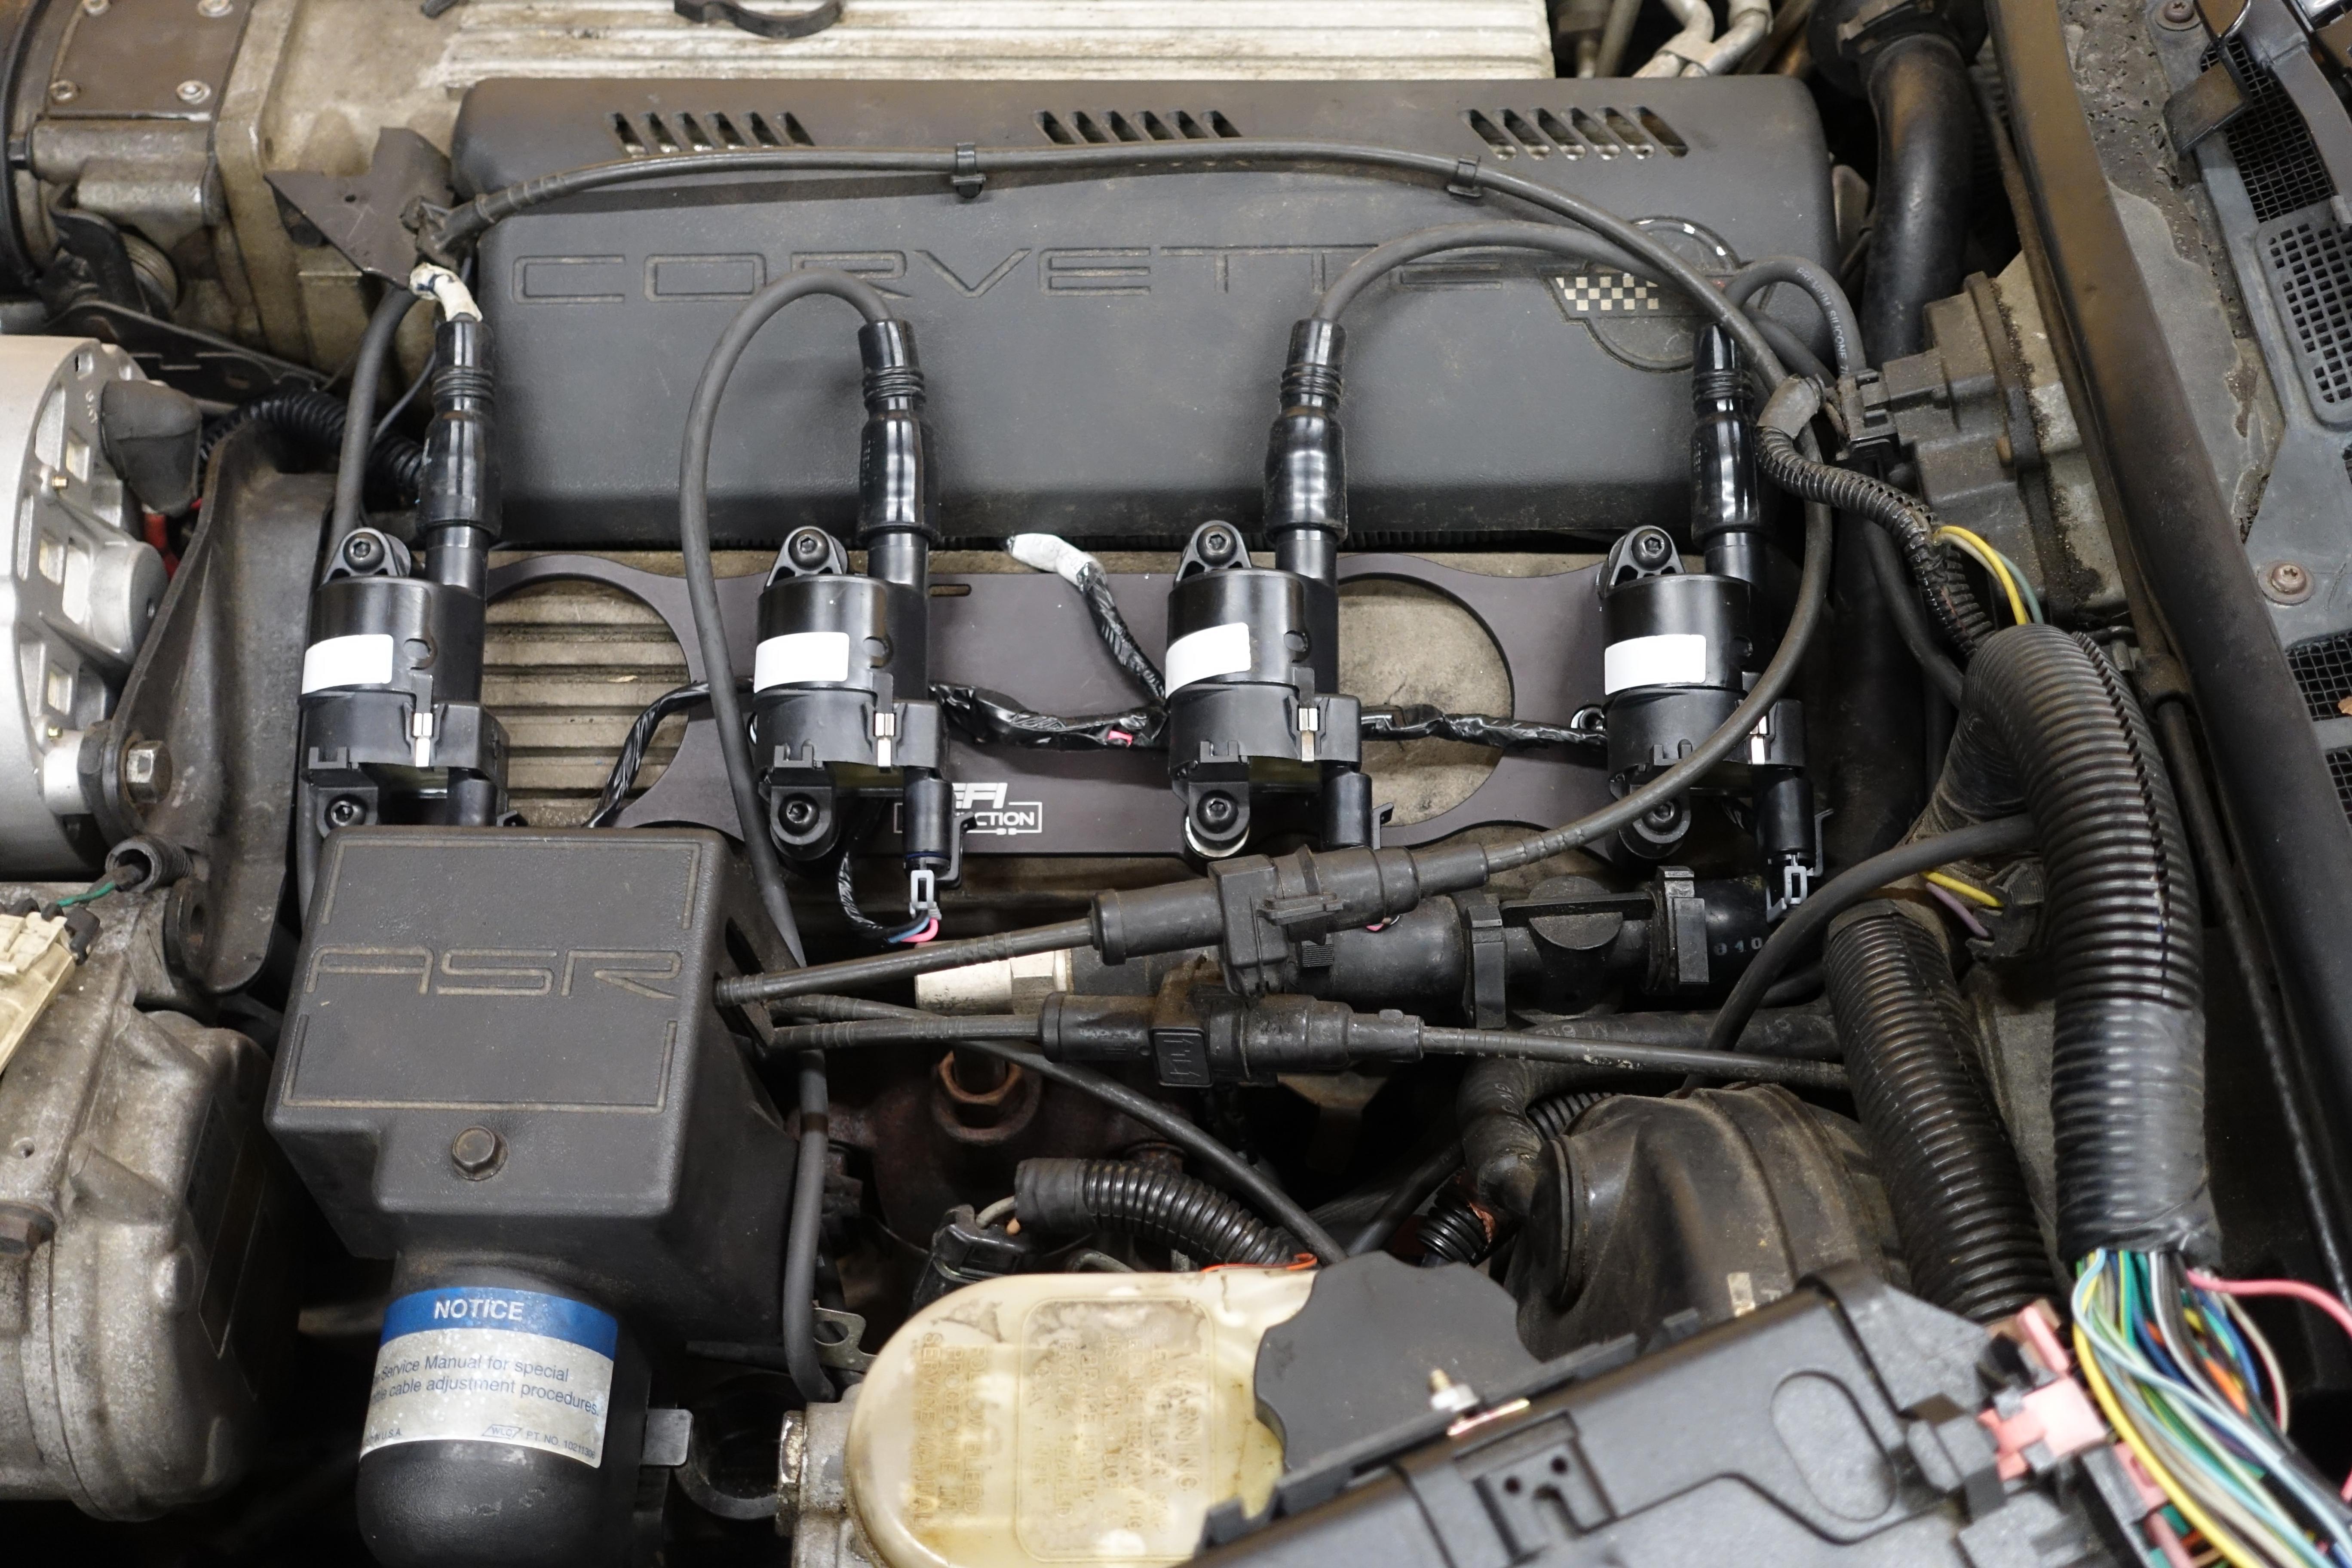
Here is what my coil brackets look like with the coils mounted.
Drivers side:
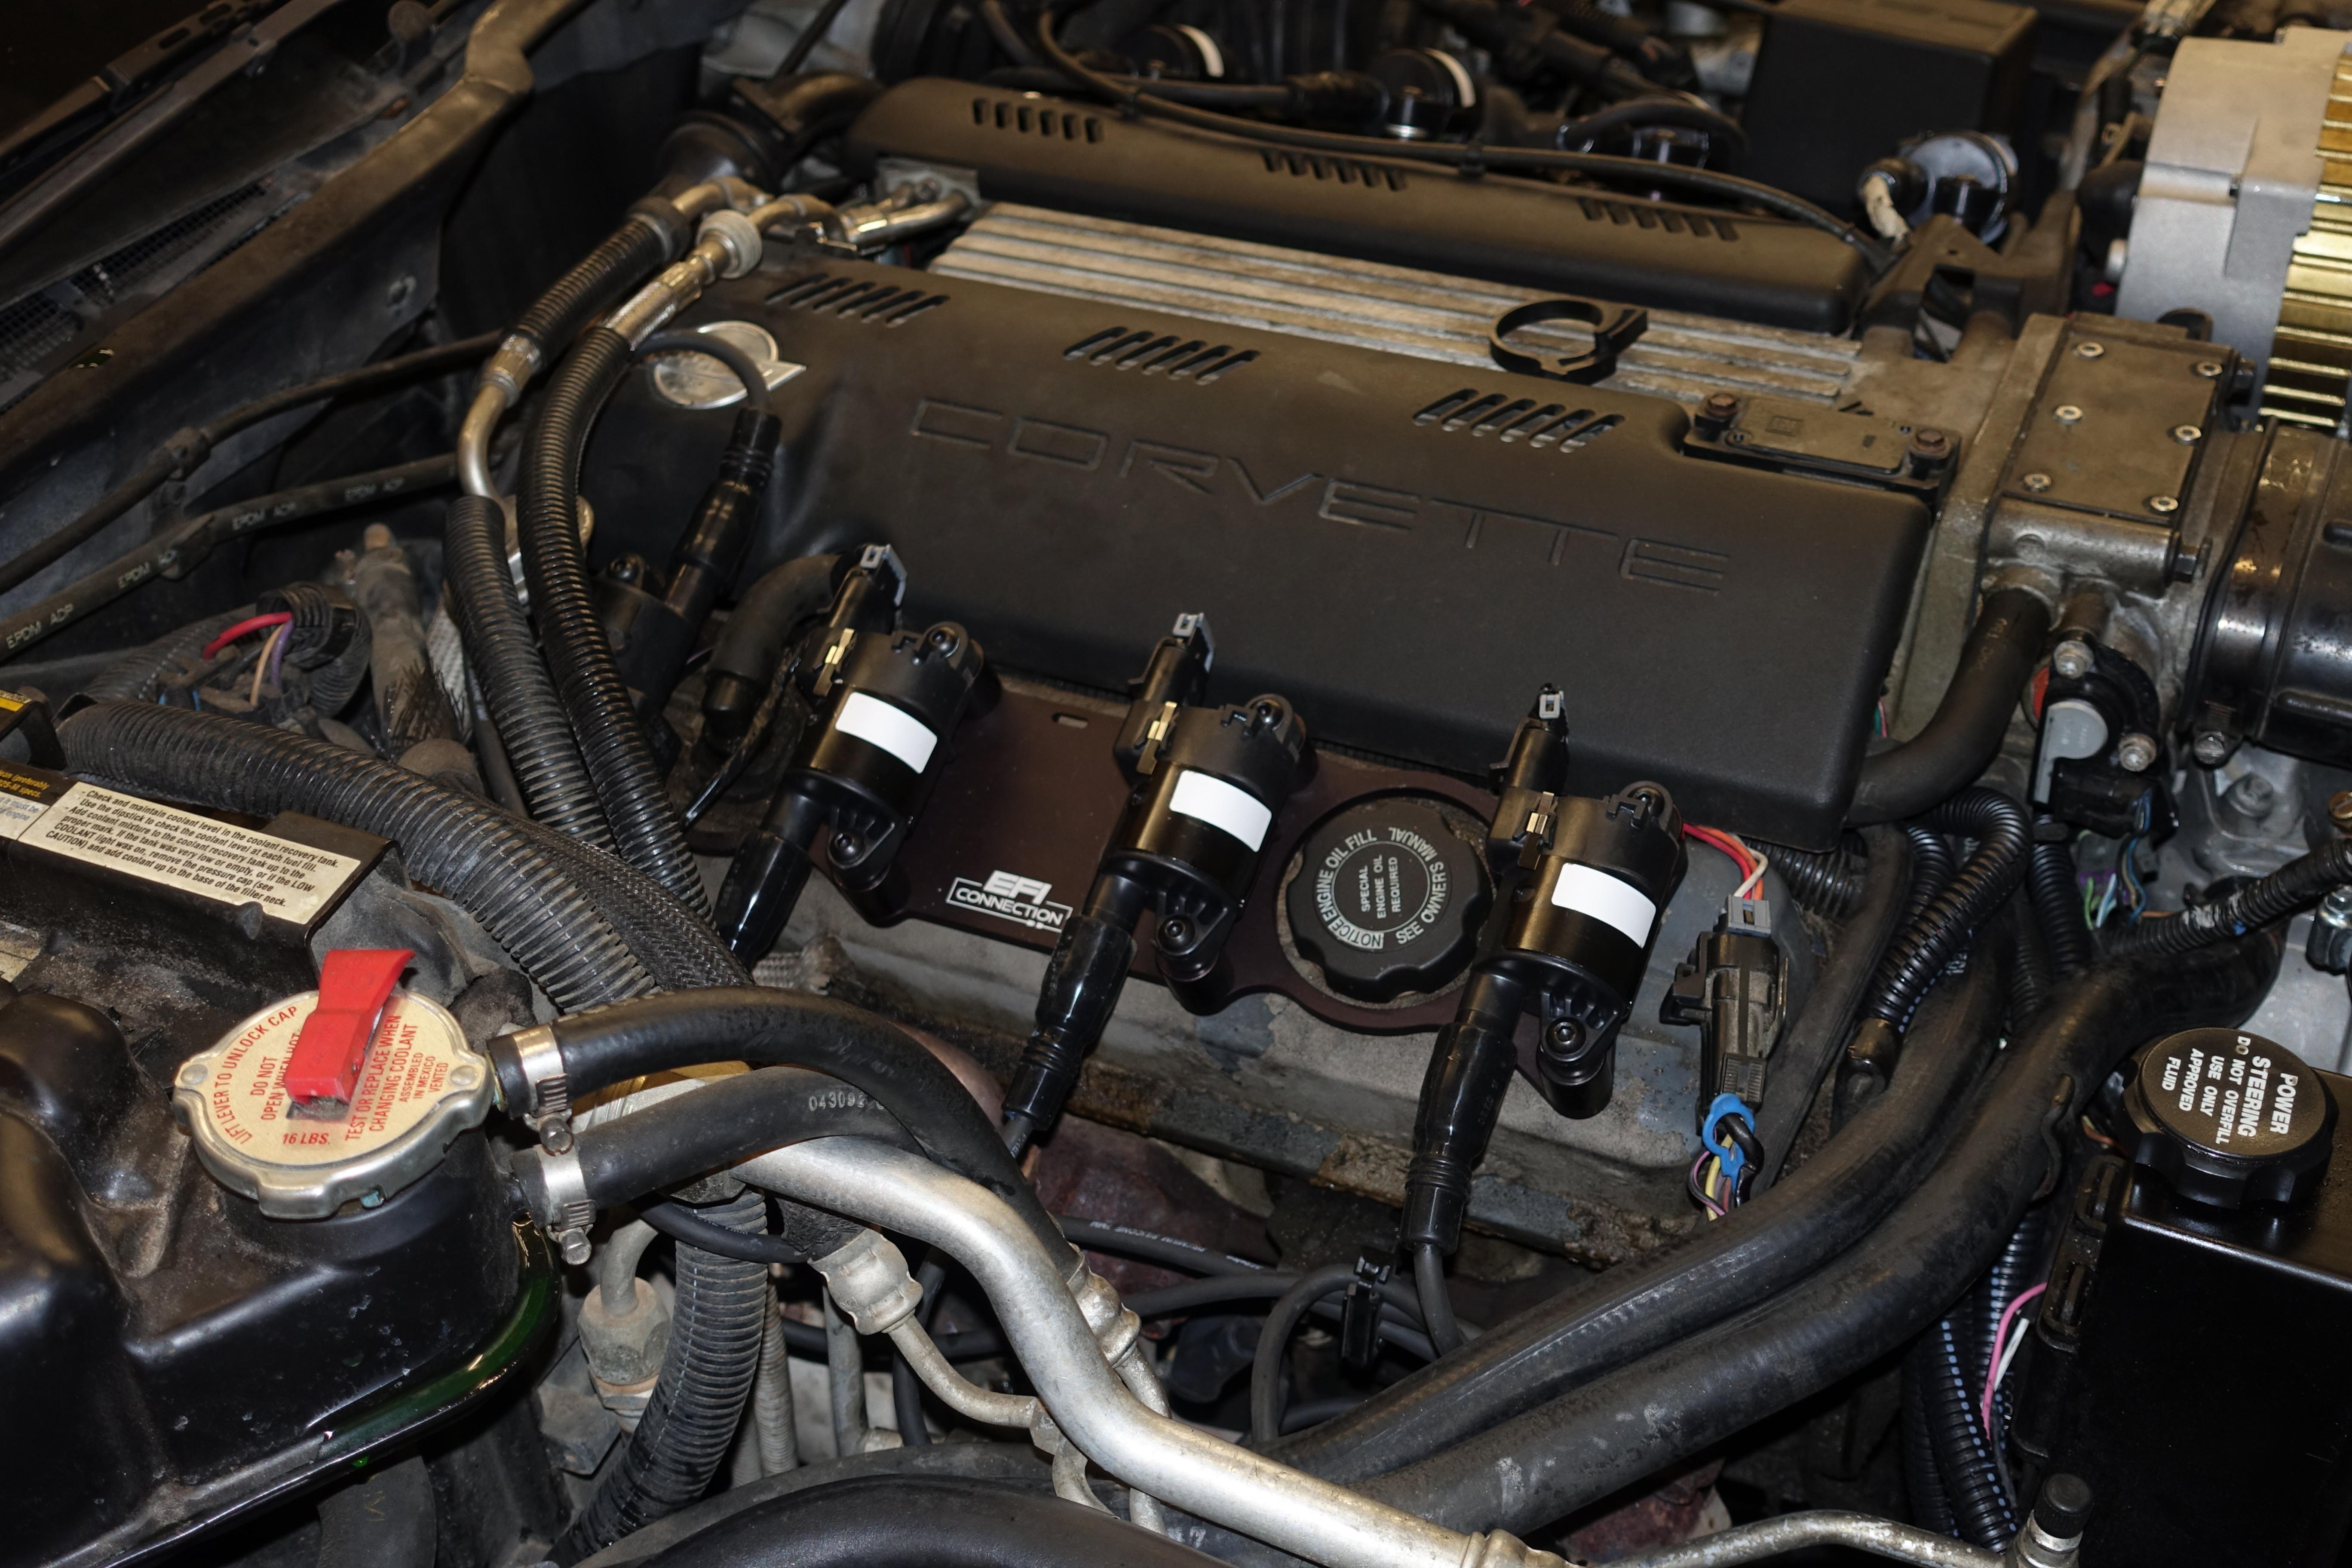
Passenger side:
Wire Hook-ups:
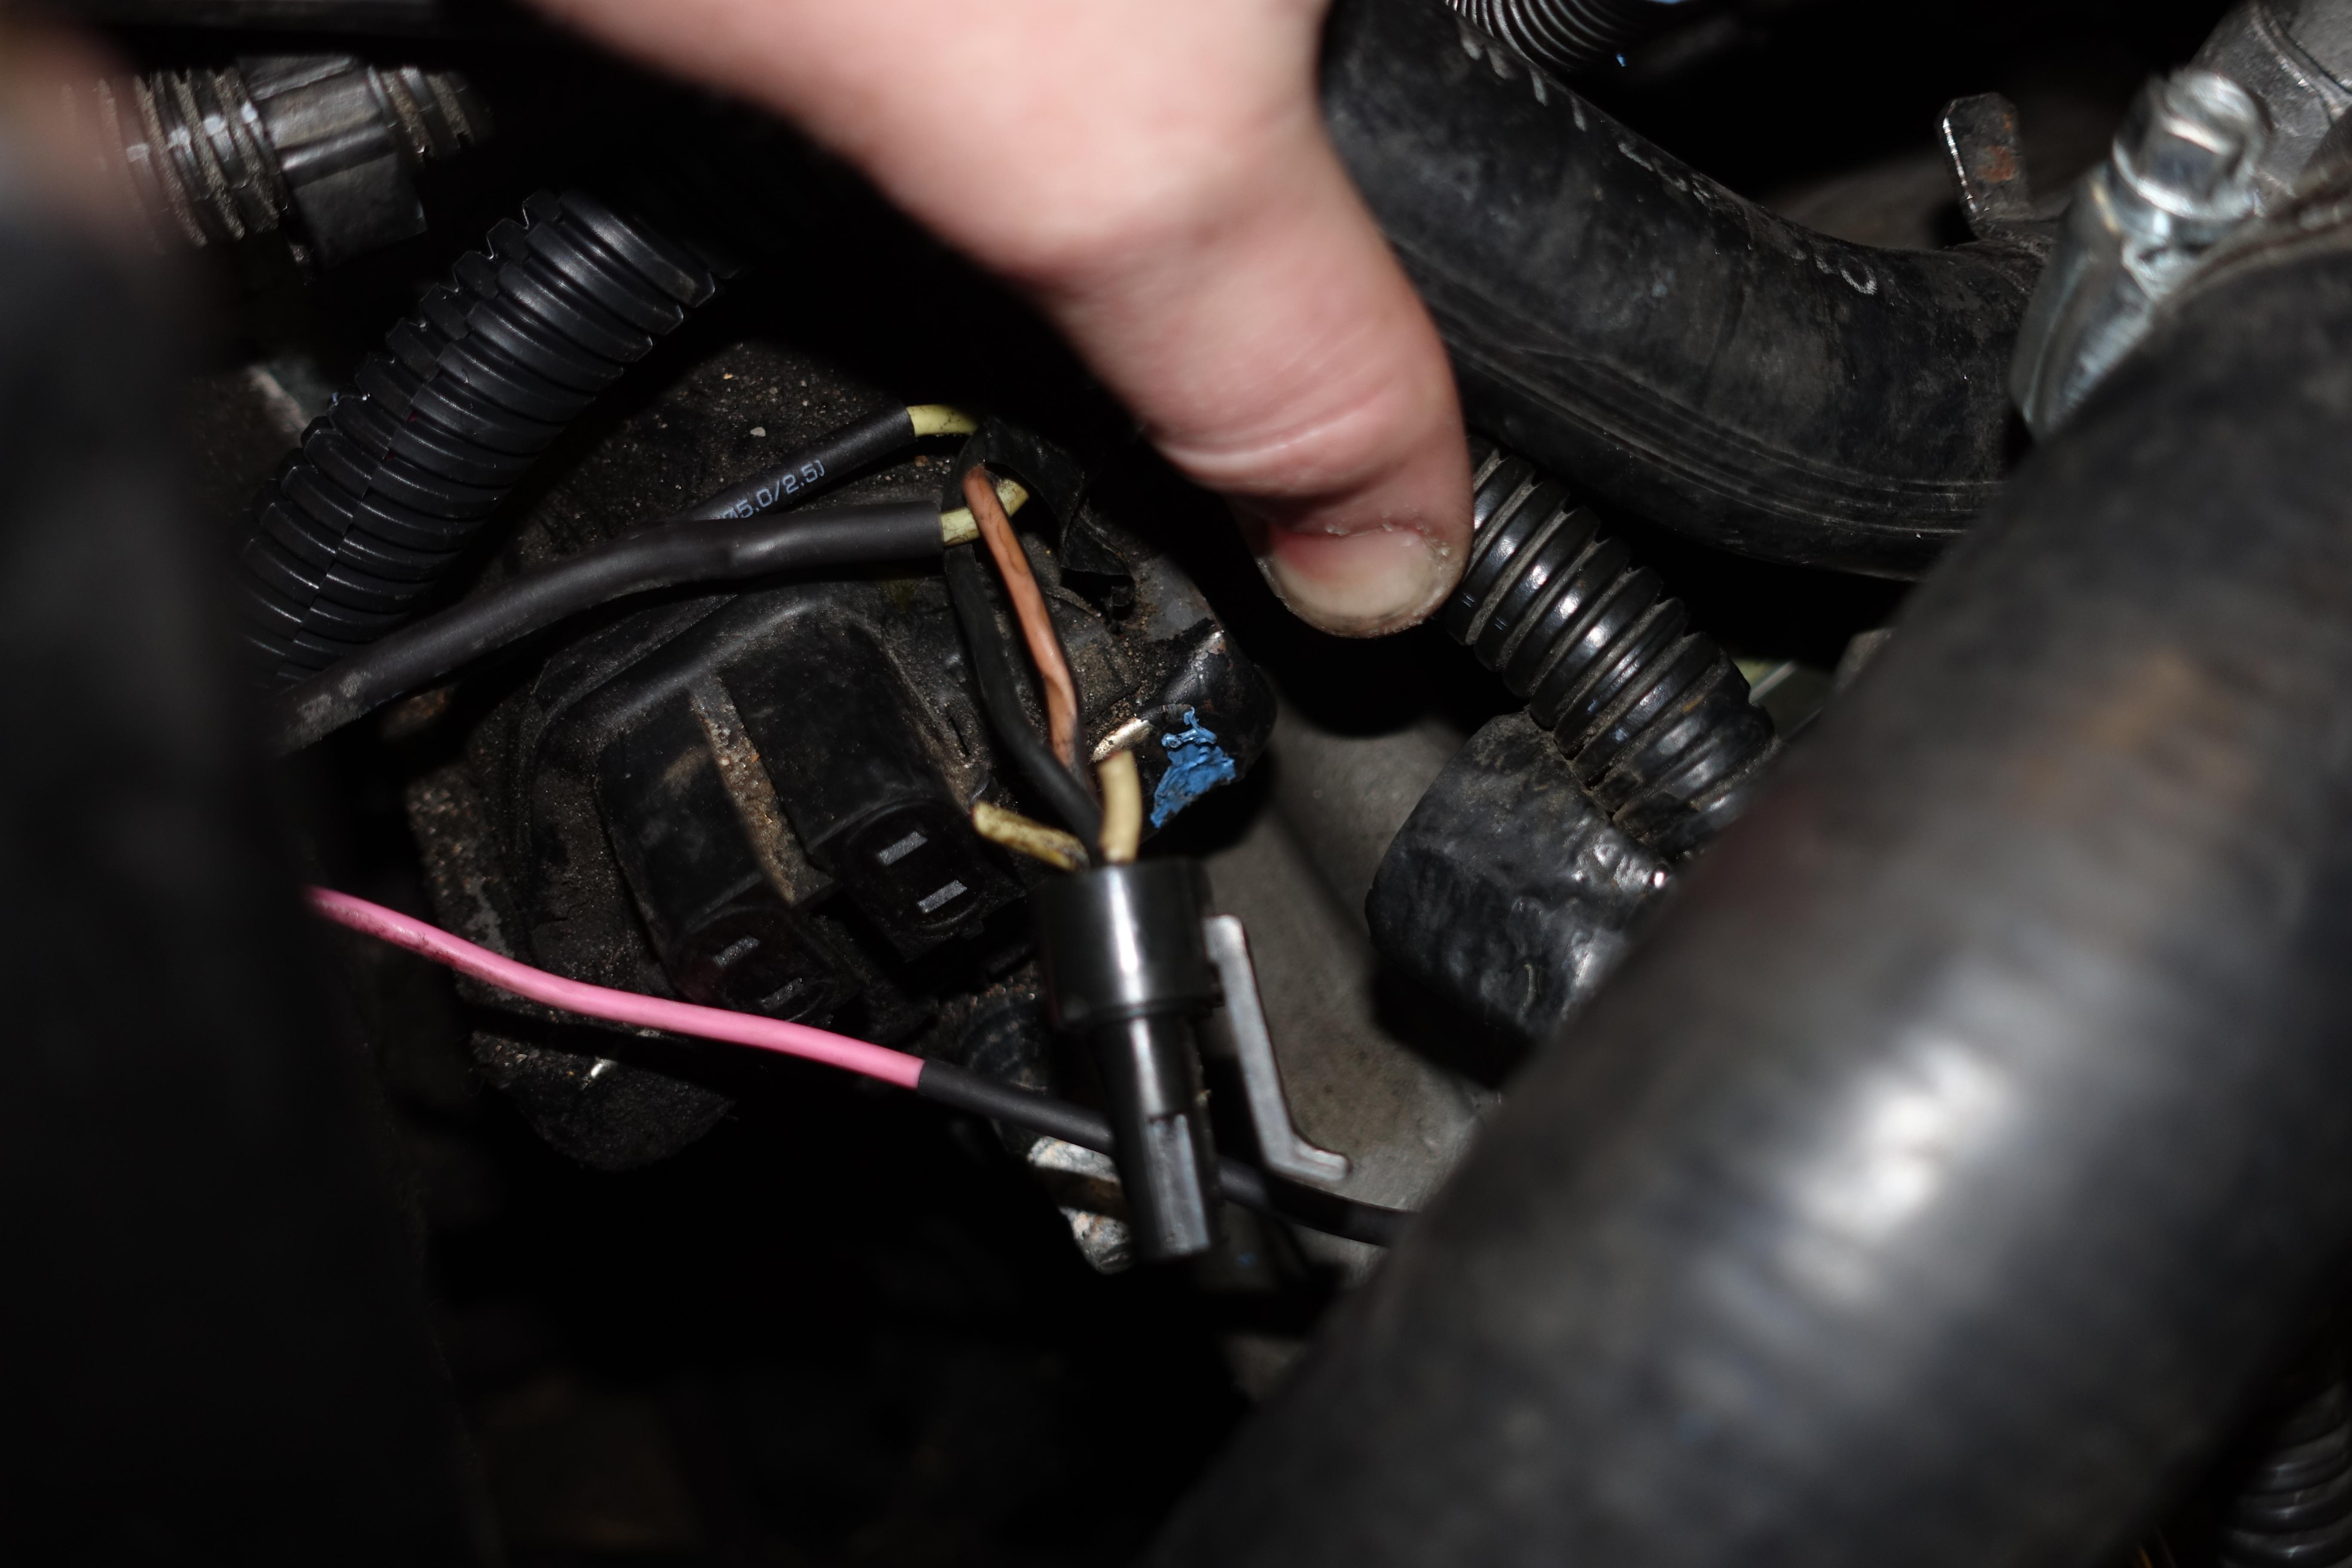
I tried my best to show a picture of the connections I made, but I'll describe them too. On a 1992 Corvette, there are 3 connections that need to be hand made(other than grounding coils and box), the rest is plug and play. The first connection is power to the LTCC box.
This consists of connection the two red wires from the LTCC harness to the pink/black wire that drove the coil. (Note: there are two pink/black wires that drove the coil, but only one of them is 12V with key on. If I recall I think it is the pink/black wire on the black connector.)
The second connection to be made is the EST connection which is pin B (white wire from the old ignition control module connector.)
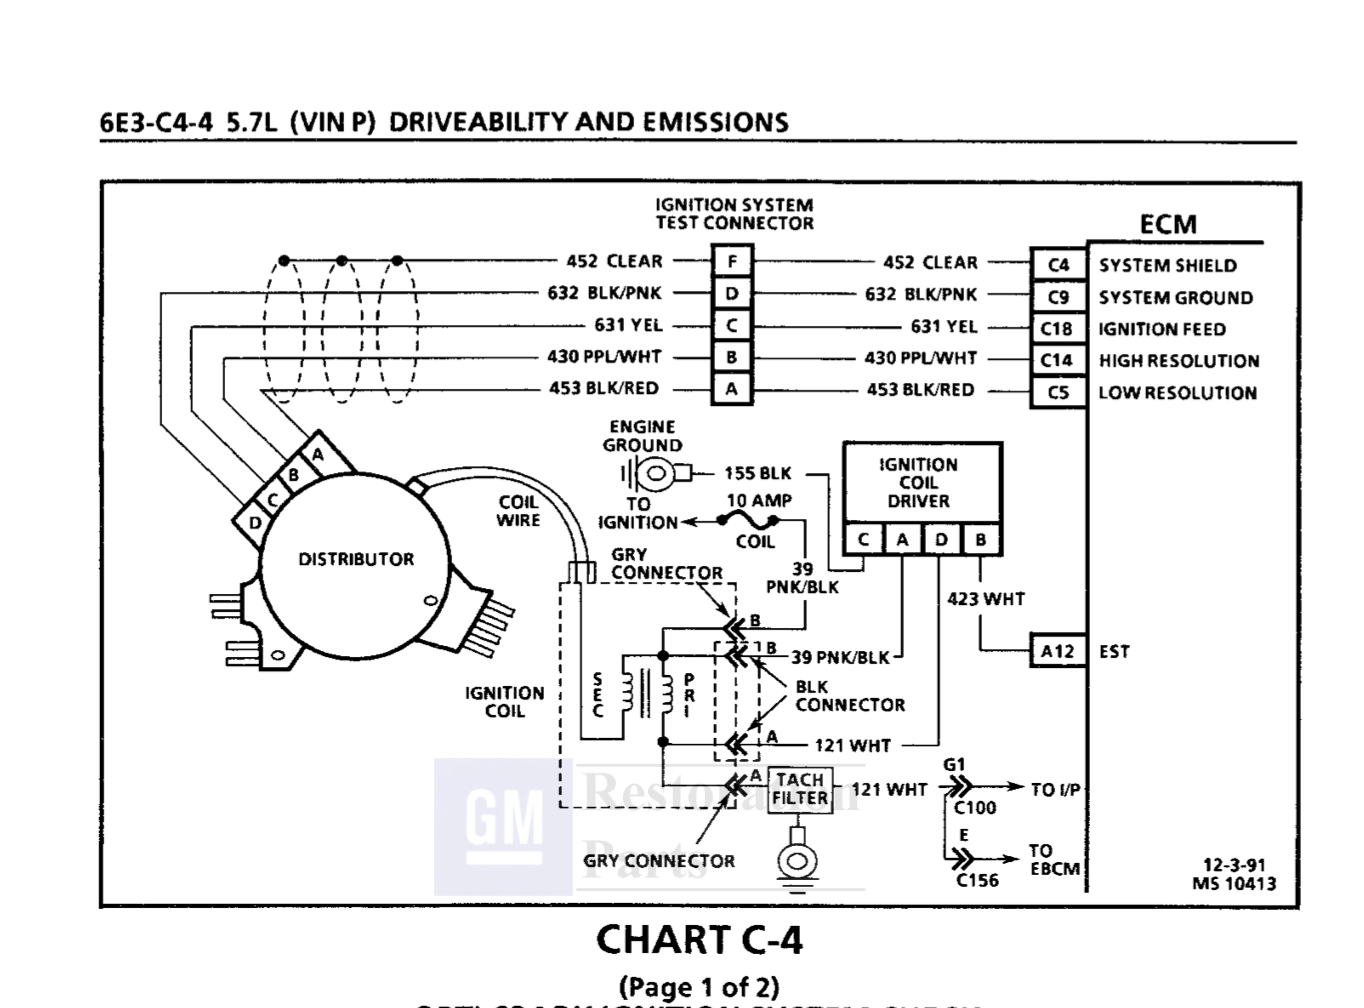
The third connection is the Tach Filter. This one I found was a little difficult because the instructions didn't say much about it, or I just failed to read that part. On the tach filter there are three wires. One black and two white wires. The white/black wire from the LTCC harness connects to the outside white wire that is connected to the tach filter.
Grounds:
There are three grounds that need to be made. Two grounds for the coils (one for each bank) and one for the "brain". I grounded the coils to the fuel rail. The "brain" is grounded in the same place the horn is grounded. This can be seen in the last picture.
Mounting location of the LTCC "brain":
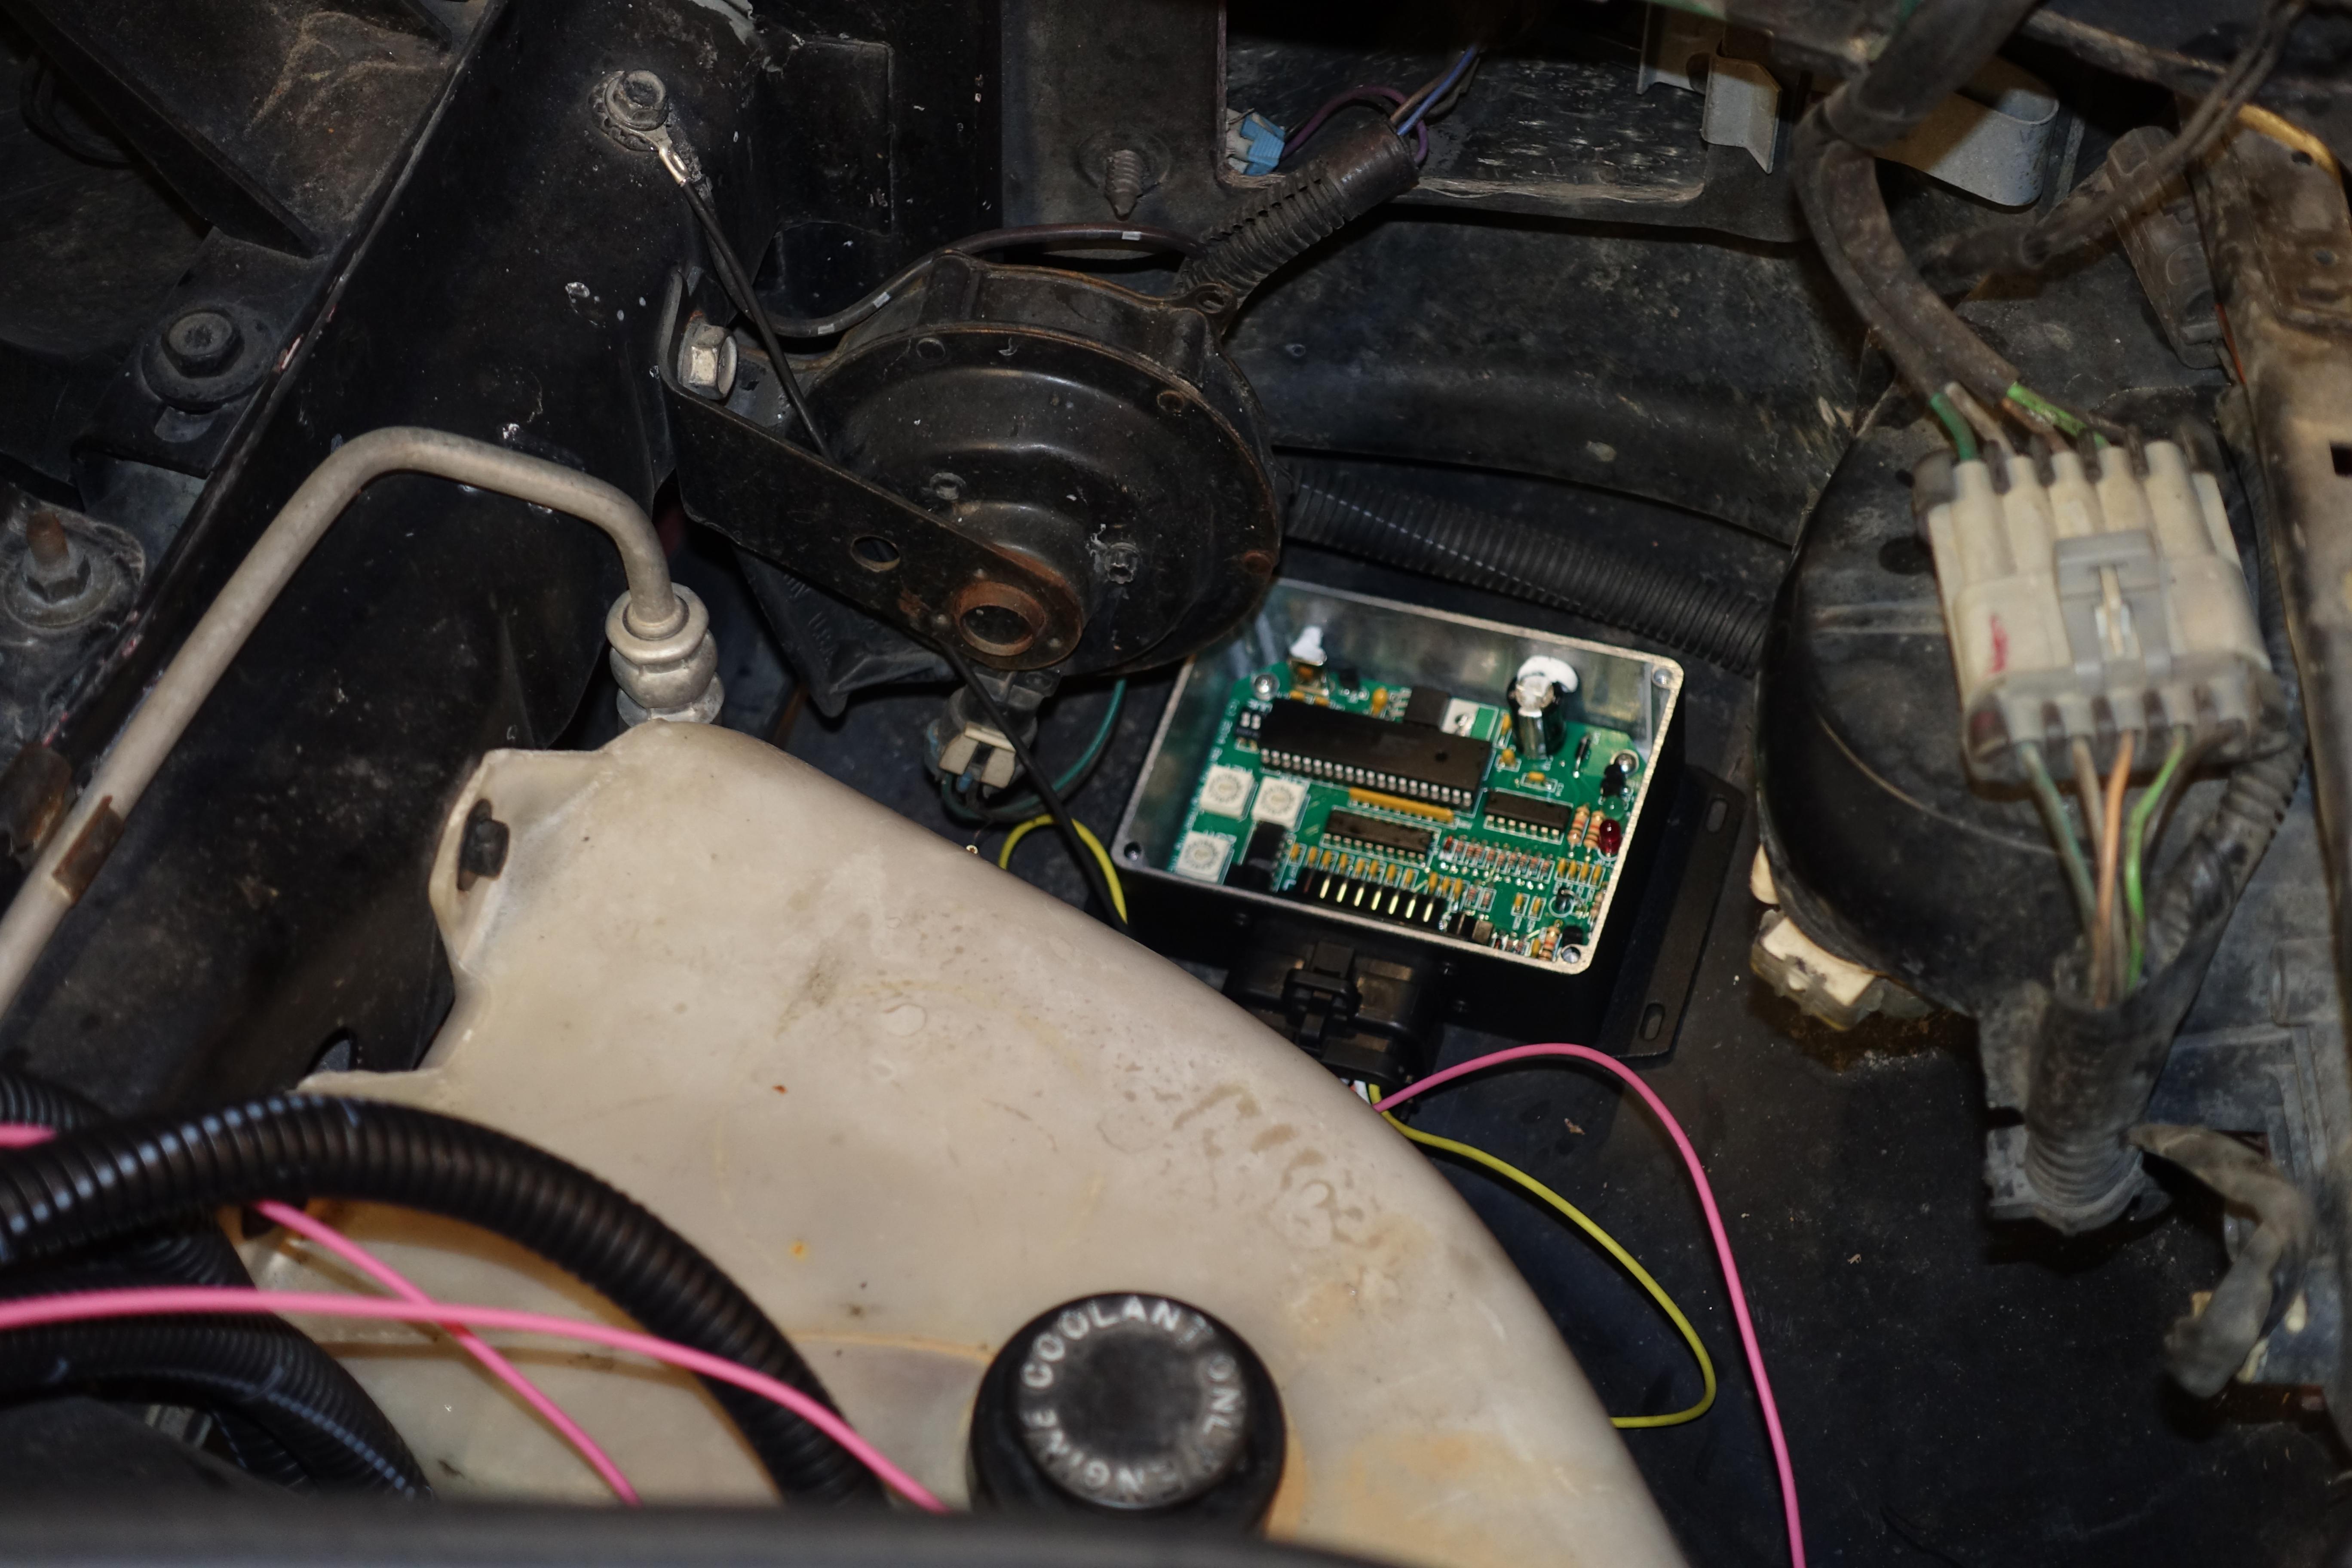
I mounted the box right in front of the coolant reservoir tank and uses heavy duty gorilla double sided tape to mount the box to the car.
I haven't had a chance to put miles on the system yet, but the car seems to idle smoother and may pull a little harder, but in my case that may be due to the failing MSD optispark that was on it before.
One last thing to note, when running the wires to the odd bank for the coil harness, becareful that the harness doesn't interfere with the throttle cable. That happened to me and caused the car to idle at 4500 RPM I thought I had a huge vacuum leak but turned out to be something really simple... whew. Overall the job was not too difficult to do. Also, LS3 style coils will work, but with a little extra work. The coil on the number 5 cylinder needs to be lifted so it will clear enough to connect the coil to the harness. this can be done with two or three washers.
Hope this helps with any question anyone may have. Also I'll provide updates as time goes on to let y'all know how the car is after I put miles on the LTCC system.
So, I spent $399.00 on the LTCC kit from Bob Bailey, $180.00 on 2 mounting brackets D514A from EFI Connections and $20.00 on the screw to mount the brackets to the valve covers (replaced the old valve cover screws), $92.72 for 8 LS3 coils from Rock Auto, $91.58 for 2 LS3 coil harnesses, $107.89 for a new WPS optispark (hopefully I get luck with a cheap one since there is no high voltage running through the cap).
The entire setup set me back a whopping $891.19. Could have been a lot more, and had potential to be a lot less if I didn't have to buy a new optispark and if I made my own brackets to mount the coils.
As far as the install went, the instructions that were supplied with the unit were very descriptive and helped with the install. The only thing that was a bit vague was the Tach Filter connection that had to be made... I'll get into that later.
Here is what my coil brackets look like with the coils mounted.
Drivers side:
Passenger side:
Wire Hook-ups:
I tried my best to show a picture of the connections I made, but I'll describe them too. On a 1992 Corvette, there are 3 connections that need to be hand made(other than grounding coils and box), the rest is plug and play. The first connection is power to the LTCC box.
This consists of connection the two red wires from the LTCC harness to the pink/black wire that drove the coil. (Note: there are two pink/black wires that drove the coil, but only one of them is 12V with key on. If I recall I think it is the pink/black wire on the black connector.)
The second connection to be made is the EST connection which is pin B (white wire from the old ignition control module connector.)
The third connection is the Tach Filter. This one I found was a little difficult because the instructions didn't say much about it, or I just failed to read that part. On the tach filter there are three wires. One black and two white wires. The white/black wire from the LTCC harness connects to the outside white wire that is connected to the tach filter.
Grounds:
There are three grounds that need to be made. Two grounds for the coils (one for each bank) and one for the "brain". I grounded the coils to the fuel rail. The "brain" is grounded in the same place the horn is grounded. This can be seen in the last picture.
Mounting location of the LTCC "brain":
I mounted the box right in front of the coolant reservoir tank and uses heavy duty gorilla double sided tape to mount the box to the car.
I haven't had a chance to put miles on the system yet, but the car seems to idle smoother and may pull a little harder, but in my case that may be due to the failing MSD optispark that was on it before.
One last thing to note, when running the wires to the odd bank for the coil harness, becareful that the harness doesn't interfere with the throttle cable. That happened to me and caused the car to idle at 4500 RPM
I thought I had a huge vacuum leak but turned out to be something really simple... whew. Overall the job was not too difficult to do. Also, LS3 style coils will work, but with a little extra work. The coil on the number 5 cylinder needs to be lifted so it will clear enough to connect the coil to the harness. this can be done with two or three washers. Hope this helps with any question anyone may have. Also I'll provide updates as time goes on to let y'all know how the car is after I put miles on the LTCC system.
Last edited by twichy2011; 12-31-2016 at 12:06 AM.
 12-31-2016, 01:23 AM
#2
Melting Slicks

Cool project! Thank you for sharing and hats off to you for taking this on and finishing it successfully.
The following users liked this post:
twichy2011 (12-31-2016)
12-31-2016, 02:38 PM
#3
Team Owner


Member Since: Aug 2005
Location: Riverside County Southern California
Posts: 34,988
Received 501 Likes
on
342 Posts
Co-winner 2020 C4 of the Year - Modified
2018 Corvette of Year Finalist
2017 C4 of Year
2016 C7 of Year Finalist
St. Jude Donor '09-'10-'11-'12-'13-'14-'15-'16-'17-'18-'19-'20


Well done!!
 01-01-2017, 06:20 PM
#5
Instructor
Thread Starter
Where are you trying to get your tach signal from? I had trouble with that too. If you look at the tach filter there is a black wire on the outside, a bigger white wire in the middle and a smaller white wire on the outside. You want to splice in to the outside white wire on the tach filter
Hope this helps!
Connor
Hope this helps!
Connor
Last edited by twichy2011; 01-01-2017 at 09:45 PM.
01-01-2017, 11:59 PM
#6
Race Director

Where are you trying to get your tach signal from? I had trouble with that too. If you look at the tach filter there is a black wire on the outside, a bigger white wire in the middle and a smaller white wire on the outside. You want to splice in to the outside white wire on the tach filter
Hope this helps!
Connor
Hope this helps!
Connor
01-02-2017, 12:10 AM
#7
Instructor
Thread Starter
Connor
The following users liked this post:
1993C4LT1 (01-02-2017)
01-02-2017, 09:11 AM
#8
Safety Car

I have a couple questions that some might consider elementary, but I have only been in the C4 world since July 2016.
1. what type of valve covers does a 1992 have ? I have a '96. The reason I ask is because of the verbiage on EFI's site that talks about the composite valve covers.
per their website:
2. which bolt(s) and pieces did you use (not the bracket, you detailed that).
I am getting ready to buy the LTCC box myself. I have my coils and just need to finalize the attachment. I really like the way EFI's brackets look once installed and need to determine all the parts I really need to acquire.
Thanks..............
1. what type of valve covers does a 1992 have ? I have a '96. The reason I ask is because of the verbiage on EFI's site that talks about the composite valve covers.
per their website:
* LT1/LT4 Corvette black composite plastic valve covers have a unique attaching bolt grommet that will not directly allow for mounting our coil bracket on top of the valve covers.
I am getting ready to buy the LTCC box myself. I have my coils and just need to finalize the attachment. I really like the way EFI's brackets look once installed and need to determine all the parts I really need to acquire.
Thanks..............
01-02-2017, 10:51 AM
#9
Instructor
Thread Starter
I have a couple questions that some might consider elementary, but I have only been in the C4 world since July 2016.
1. what type of valve covers does a 1992 have ? I have a '96. The reason I ask is because of the verbiage on EFI's site that talks about the composite valve covers.
per their website:
2. which bolt(s) and pieces did you use (not the bracket, you detailed that).
I am getting ready to buy the LTCC box myself. I have my coils and just need to finalize the attachment. I really like the way EFI's brackets look once installed and need to determine all the parts I really need to acquire.
Thanks..............
1. what type of valve covers does a 1992 have ? I have a '96. The reason I ask is because of the verbiage on EFI's site that talks about the composite valve covers.
per their website:
2. which bolt(s) and pieces did you use (not the bracket, you detailed that).
I am getting ready to buy the LTCC box myself. I have my coils and just need to finalize the attachment. I really like the way EFI's brackets look once installed and need to determine all the parts I really need to acquire.
Thanks..............
Hope this helped. If you still have questions don't hesitate to ask!
Connor
Here is the link also:
https://www.eficonnection.com/home/p...n-coil-bracket
01-02-2017, 10:57 AM
#10
Safety Car
thank you ! I will take further questions about them (valve covers) into another thread and any pertinent answers that would help other folks I will blend back here. Just don't want to hijack your thread.
Last edited by drcook; 01-02-2017 at 11:01 AM.
01-02-2017, 11:15 AM
#11
Instructor
Thread Starter
I think torchtarga did the conversion on a vette with composite valve covers. He wrote a post about his install. Good luck with your conversion!
01-02-2017, 08:22 PM
#12
Melting Slicks
Very nice, great job! I wish I could use the EFI Connection bracketry on my composite covers. They were of little help when I tried to email them. Mine do the job though!
01-02-2017, 09:09 PM
#13
Safety Car
I have been studying the connection and the composite bolts. There are some used ones out on eBay (valve cover bolts) and I am going to buy one. I have an idea about how to build a new bolt assembly that will work for holding down the covers and also allow using EFI bracketry. It will require some lathe work though. I need to measure the bolt flange and the threaded length. I realize that I could just go pull one but I would rather just have one to work with.
Last edited by drcook; 01-02-2017 at 09:14 PM.
01-02-2017, 10:25 PM
#14
Team Owner
Member Since: Aug 2005
Location: Riverside County Southern California
Posts: 34,988
Received 501 Likes
on
342 Posts
Co-winner 2020 C4 of the Year - Modified
2018 Corvette of Year Finalist
2017 C4 of Year
2016 C7 of Year Finalist
St. Jude Donor '09-'10-'11-'12-'13-'14-'15-'16-'17-'18-'19-'20
I have been studying the connection and the composite bolts. There are some used ones out on eBay (valve cover bolts) and I am going to buy one. I have an idea about how to build a new bolt assembly that will work for holding down the covers and also allow using EFI bracketry. It will require some lathe work though. I need to measure the bolt flange and the threaded length. I realize that I could just go pull one but I would rather just have one to work with.
 01-02-2017, 10:28 PM
#15
Melting Slicks
I have been studying the connection and the composite bolts. There are some used ones out on eBay (valve cover bolts) and I am going to buy one. I have an idea about how to build a new bolt assembly that will work for holding down the covers and also allow using EFI bracketry. It will require some lathe work though. I need to measure the bolt flange and the threaded length. I realize that I could just go pull one but I would rather just have one to work with.
01-29-2017, 02:10 PM
#18
Instructor
Thread Starter
Connor
01-29-2017, 07:19 PM
#19
Safety Car
As soon as I get over the recent shoulder surgery I had, I am going to start working on my idea to be able to use their brackets on later composite valve covers. I have an idea, I just have to machine the parts on a mill and a lathe and right now I am not allowed to pick up anything heavier than a cup of coffee or even drive because the surgeon is concerned if someone pulls out in front of me I could rip out the repairs doing evasive maneuvers.
I thought about just getting a set of the 1st year LT1 valve covers, but they are hard to find at a reasonable cost.
I thought about just getting a set of the 1st year LT1 valve covers, but they are hard to find at a reasonable cost.
01-31-2017, 11:21 AM
#20
Instructor
Thread Starter
Well 818 miles on the conversion and the cheap WPS opti so far and its still running strong.
Good Luck with shoulder recovery drcook. I've had two surgeries and the recoveries aren't fun.
Good Luck with shoulder recovery drcook. I've had two surgeries and the recoveries aren't fun.
Last edited by twichy2011; 01-31-2017 at 11:21 AM.