headlight repair w/pic...
 05-06-2008, 05:45 PM
#21
1st Gear


Member Since: May 2006
Posts: 1
Likes: 0
Received 0 Likes
on
0 Posts
I've replaced the gears in both headlights of my 88. The job wasn't nearly as difficult as I expected but.... Thought I reassembled properly but I must've missed something. Intermittently, the headlights either don't open or don't close. To cure the problem I need to turn the adjusting wheel on top of the motor which gets very tight. Any ideas....? Suggestions on how to correct this problem would be appreciated!!
 07-30-2008, 10:27 AM
#22
Intermediate

Member Since: Jun 2008
Location: Franklin TN
Posts: 43
Likes: 0
Received 0 Likes
on
0 Posts
Great tutorial! I used this one a couple of weeks back, and it worked great. I used the metal eBay brushings hoping that I won't have to do this again for a while. Thanks for a great write-up!
08-01-2008, 03:19 PM
#23
1st Gear

Member Since: Feb 2008
Posts: 1
Likes: 0
Received 0 Likes
on
0 Posts

Great write-up. I did mine last summer and it was a pain to get the motor off even on the bench after I removed the whole assembly.
I changed the notorous bushings (what a crappy Design) and it worked ok. Had trouble finding repacement bushings for hinges and etc,and
finally made some from hardware standard teflon bushings.
Thats the good news, now a year later,the bad headlight (left) has again decided to take the summer off and not open.
Can't believe those bushings died that quick. Took the motor off again (easier this time) and the bushings look like new with no obvious problems visiable. The motor runs either way with 12 volts applied to it.
I changed the contoller module last year which didn't help so I may try the old one which I kept.
Anybody got any ideas?: The door sometimes opens half way but then stops and sometimes won't close and sometimes will. It sounds like the bushing thing but they are ok???
08-03-2008, 12:56 PM
#24
Advanced

You're really good. You information and pictures are very informative. Ain't digital cameras great! Being a child of the 60's, my memory isn't what it used to be and a documented procedure, with pictures, saves me from figuring out the same thing over and over,
08-03-2008, 02:41 PM
#25
Advanced
Member Since: Dec 2007
Location: Raleigh North Carolina
Posts: 63
Likes: 0
Received 0 Likes
on
0 Posts
Sometimes it will disengage when it hits the broken tooth and the headlight stops rotating. Other times it will have enough momentum to continue past the broken tooth and re-engage on the other side.
08-03-2008, 06:32 PM
#26
Racer

Member Since: Apr 2008
Location: Trenton Michigan
Posts: 257
Likes: 0
Received 0 Likes
on
0 Posts
my headlight dosent close all the way it wobbles up and down
and when the motor is connected it runs continuously but will still go up and down with the switch
bushings?
and when the motor is connected it runs continuously but will still go up and down with the switch
bushings?
08-03-2008, 11:46 PM
#27
Safety Car

Thread Starter

Member Since: Oct 2007
Location: :45 minutes from everywhere / E-I-E-I-O
Posts: 3,816
Likes: 0
Received 0 Likes
on
0 Posts
Sounds a whole lot like bushings, especially the halfway rotate part. I just got lucky on the fix. Didn't know what I was doing from the start (the original thread in another forum was a comedy/mystery of error, without screwing up anything fortunately).
 08-16-2008, 12:53 AM
#30
Racer
I did this tonight EXACTLY as you did, however when installed, the right headlight goes up when the left goes down, and vice versa. I didn't do anything to the wires...HELPPPPPP.........
08-16-2008, 07:29 AM
#32
Team Owner

Member Since: Mar 2001
Location: Boston, Dallas, Detroit, SoCal, back to Boston MA
Posts: 30,606
Received 239 Likes
on
167 Posts

In case you didn't see my post:
As some of you might now, I've been having trouble blowing my fusible link on my car.

Right next to the battery, remember reading about mysterious C4 fires.
A while back my driver's side headlight stopped working.
I bought headlight motors, and a controller, as well as the window regulator off a forum member who was turning his car into a track car.
When I went to change them out I found this little surprize!

This is right where the wire feeds though the headlight bucket framework.
Seems it managed to chafe through.
Seems if you have a short in the system, the controller keeps feeding it POWER and will fry the fusible link trying to get the motor to spin!
So, if you lights stopped working, or your car stopped charging, be sure to check it out.
Right next to the battery, remember reading about mysterious C4 fires.
A while back my driver's side headlight stopped working.
I bought headlight motors, and a controller, as well as the window regulator off a forum member who was turning his car into a track car.
When I went to change them out I found this little surprize!
This is right where the wire feeds though the headlight bucket framework.
Seems it managed to chafe through.
Seems if you have a short in the system, the controller keeps feeding it POWER and will fry the fusible link trying to get the motor to spin!
So, if you lights stopped working, or your car stopped charging, be sure to check it out.
08-16-2008, 10:28 AM
#33
Racer
Actually, a search on Google revealed this :Corvette c4 headlight motor rebuild after replacing the main gear from wear and the three plastic rotatating parts upon reassembly one light goes up while the other goes down the wiring is not reversed?" on Wikipedia, but no answers.....other than "There are many responses to this on corvetteforum.com.
Can somebody help me with this? The 'vette is apart in the driveway.........
Can somebody help me with this? The 'vette is apart in the driveway.........
08-25-2008, 12:05 AM
#35
Melting Slicks


I just finished replacing the bushings in my 90' and the same thing is now happening to me.. One side goes up.. the other goes down.. Would be humorous but I just spent about 2 hours on it..

Did you remove your electric motor completely? I did.. Maybe I put it back in 180 off?
Any idea what causes the motor to spin in one direction or the other?
08-25-2008, 11:11 AM
#36
Melting Slicks
I just finished replacing the bushings in my 90' and the same thing is now happening to me.. One side goes up.. the other goes down.. Would be humorous but I just spent about 2 hours on it..
Did you remove your electric motor completely? I did.. Maybe I put it back in 180 off?
Any idea what causes the motor to spin in one direction or the other?
Did you remove your electric motor completely? I did.. Maybe I put it back in 180 off?
Any idea what causes the motor to spin in one direction or the other?
Ok.. just fixed this... What I did to fix was to unbolt (not remove) the electric motor on the side I just replaced the bushings in and turn the motor 180, then bolted it back up.. Now the headlights are working correctly.
When I removed the electric motor I must have re-installed it 180 off.. (I didnt think it mattered... but now I know it does!)
-Bill
09-18-2008, 01:00 AM
#37
Melting Slicks
Member Since: Apr 2002
Location: St. Charles, MO Route 66 Corvette Club
Posts: 2,118
Likes: 0
Received 0 Likes
on
0 Posts
Schrade: Thanks for taking the time to do this post. I have been having a problem with the right headllight on my 89 and finally she just stopped staying closed. I used the GM Helms manual and your write up to remove the light assembly. I had one "mell of a time" getting the little metal clip that holds both the light and the motor power lead to the edge of the hood.
You asked for suggestions to improve this and here they are:
1. Make a photo of the fasteners you have to remove to get the assembly off the hood.
2. The first step would be to move the roll pin (using the 5/32 punch) while the assembly is attached to the hood. You can manually move the light assy (using the **** on top of the motor) to allow easy removal of the roll pin. I had problems holding the assembly on a table while removing the roll pin. Do this while it is attached to the hood!
3. Make a photo of the fasteners you need to remove to free the motor.
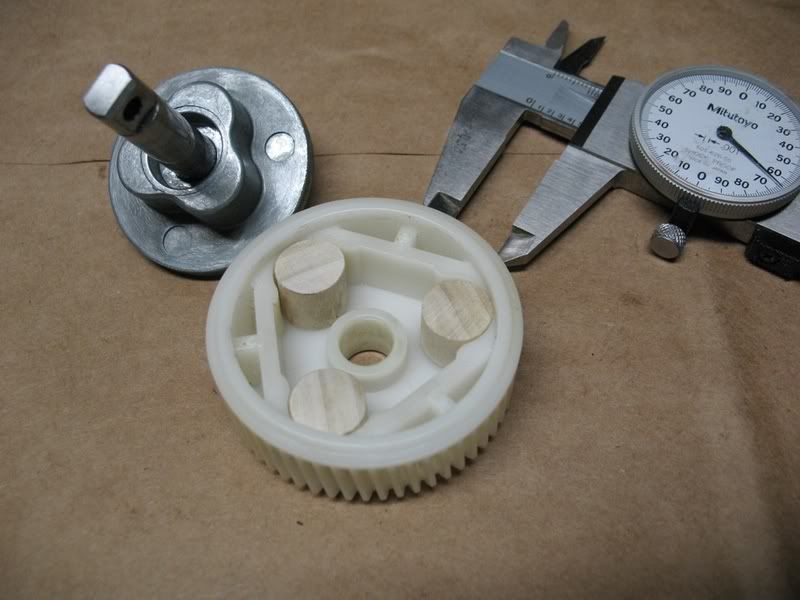
4. Here is something that no one has mentioned or suggested! Instead of paying $2 each for three little plastic parts (these cannot cost more than $.03 to $.04 each to make......and Ecklers charges $6 for three small pins???), you can make 'em out of hardwood dowel. Get some 1/2 inch hardwood dowel from Homer Depot and cut the dowell lenght to 3/8 -7/16 in length. Do not exceed 15/32 in length as this is the height of the cavity for the three pins. I put three wooden dowels in my right light and she works like a charm. Here is a photo of the dowels in the gear if anyone is interested.
5. I highly recommend that you lubricate each bronze bearing with a few drops of motor oil as you re-assemble the motor.
The fishing line trick for the brushes is pure genius
Ole Sam
You asked for suggestions to improve this and here they are:
1. Make a photo of the fasteners you have to remove to get the assembly off the hood.
2. The first step would be to move the roll pin (using the 5/32 punch) while the assembly is attached to the hood. You can manually move the light assy (using the **** on top of the motor) to allow easy removal of the roll pin. I had problems holding the assembly on a table while removing the roll pin. Do this while it is attached to the hood!
3. Make a photo of the fasteners you need to remove to free the motor.
4. Here is something that no one has mentioned or suggested! Instead of paying $2 each for three little plastic parts (these cannot cost more than $.03 to $.04 each to make......and Ecklers charges $6 for three small pins???), you can make 'em out of hardwood dowel. Get some 1/2 inch hardwood dowel from Homer Depot and cut the dowell lenght to 3/8 -7/16 in length. Do not exceed 15/32 in length as this is the height of the cavity for the three pins. I put three wooden dowels in my right light and she works like a charm. Here is a photo of the dowels in the gear if anyone is interested.
5. I highly recommend that you lubricate each bronze bearing with a few drops of motor oil as you re-assemble the motor.
The fishing line trick for the brushes is pure genius
Ole Sam
Last edited by Sam Lam; 09-29-2008 at 09:52 AM. Reason: spell errors and clarifying words.

 10-19-2008, 08:41 PM
#40
Melting Slicks
Member Since: Apr 2002
Location: St. Charles, MO Route 66 Corvette Club
Posts: 2,118
Likes: 0
Received 0 Likes
on
0 Posts
In order to solve your problem, you must first understand how the headlight motor system works. It works like this:
1. A DC motor drives each headlight up/down after you activate the switch on the dash.
2. The direct current motor is driven by 12 volts and draws a certain current as it moves the door assembly up or down. When the door assembly reaches its stop (up or down), the current draw of the motor increases very rapidly.
3. The headlight relay (on my 89) has a current sensor that detects the increase in current and opens a switch to turn off the motor.
If the plastic bushings (inside the motor) are broken into little bitty pieces, the plastic gear will not drive the metal gear and the high current needed to stop the motor is not seen.
From the brief description of your problem, you either have two headlight motors with detiorated plastic drive pins or your headlight relay is defective.
I hope this info is useful to you!
Sam