Finally took the plunge
 12-23-2007, 03:29 PM
#21
Team Owner

Thread Starter
Member Since: Mar 2001
Location: Boston, Dallas, Detroit, SoCal, back to Boston MA
Posts: 30,606
Received 239 Likes
on
167 Posts

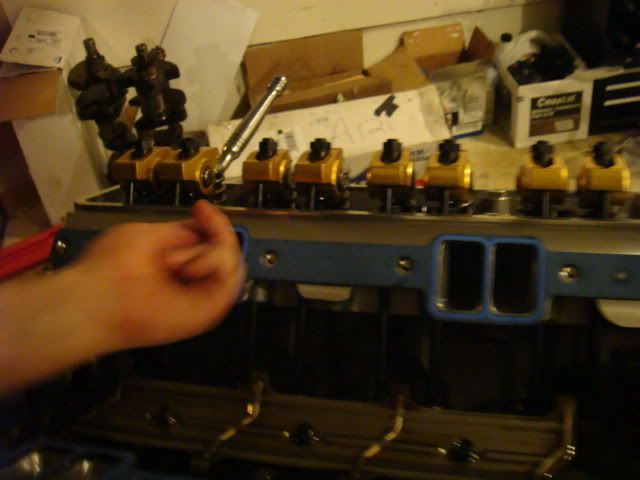
Just unwrapped my EM LT's today.
The quality of the jet coating is amazing, they looked like they were chromed

Gaskets and hardware came with it


The quality of the jet coating is amazing, they looked like they were chromed
Gaskets and hardware came with it
 02-18-2008, 10:42 AM
#23
Team Owner
Thread Starter
Member Since: Mar 2001
Location: Boston, Dallas, Detroit, SoCal, back to Boston MA
Posts: 30,606
Received 239 Likes
on
167 Posts
Update:
Ron convinced me that for the $ I'm spending that I'm better off going to a casting better than stock. I went ahead and ordered up AFR's new Eliminator 195 castings for the LT4. You can make pretty good peak intake #'s with the stock casting, but there's not way you can ever make it flow on the exhaust like that. Which on a supercharged engine will be the choke point.

http://www.airflowresearch.com/195sbc_lt4.php
Next Ron will see if we can modify an LT1 intake or pick up a used LT4 or perhaps Edelbrocks new intake.
I'll also talked to Tony @ AFR and I'm going to have him make me a custom cam grind. Getting the cam grind for these aftermarket heads will be critical.
Ron convinced me that for the $ I'm spending that I'm better off going to a casting better than stock. I went ahead and ordered up AFR's new Eliminator 195 castings for the LT4.
You can make pretty good peak intake #'s with the stock casting, but there's not way you can ever make it flow on the exhaust like that. Which on a supercharged engine will be the choke point.http://www.airflowresearch.com/195sbc_lt4.php
Next Ron will see if we can modify an LT1 intake or pick up a used LT4 or perhaps Edelbrocks new intake.
I'll also talked to Tony @ AFR and I'm going to have him make me a custom cam grind. Getting the cam grind for these aftermarket heads will be critical.
-----Original Message-----
From: cuisinartvette
Subject: they're heeeeeeeeeeere.....
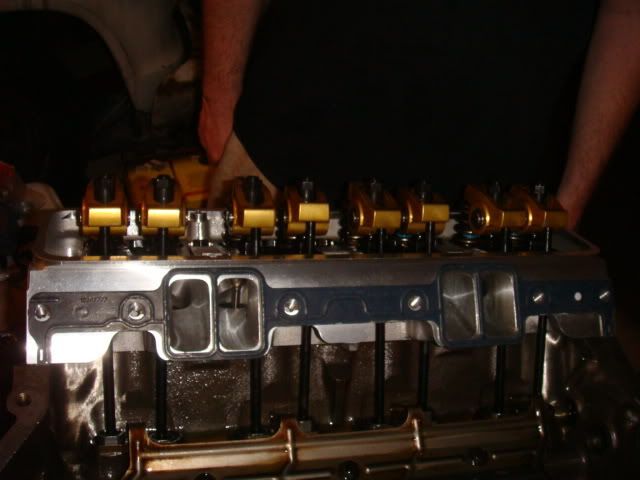
Dude, these things are gorgeous...Doesnt look like a CNC'ed head, they look like more of a ***** out race head seriously. The exhaust ports look absolutely sick on this thing.
From: cuisinartvette
Subject: they're heeeeeeeeeeere.....
Dude, these things are gorgeous...Doesnt look like a CNC'ed head, they look like more of a ***** out race head seriously. The exhaust ports look absolutely sick on this thing.
Last edited by BrianCunningham; 02-18-2008 at 11:47 AM.
07-26-2008, 05:18 PM
#25
Team Owner
Thread Starter
Member Since: Mar 2001
Location: Boston, Dallas, Detroit, SoCal, back to Boston MA
Posts: 30,606
Received 239 Likes
on
167 Posts
In case your wondering how I'm going to get all this power to the groud.
I just got back from Tom's (astock165 ) place, picked up my rear suspension links with spherical rod ends
Nice
All top quality stuff. It's nice when an engineer works on this stuff.
the for sale thread:
http://forums.corvetteforum.com/show...post1566463543
Here's a review from 'another forum':
OK then
http://www.corvette-guru.com/modules...mode=0&start=0
I just got back from Tom's (astock165 ) place, picked up my rear suspension links with spherical rod ends
Nice
All top quality stuff. It's nice when an engineer works on this stuff.
the for sale thread:
http://forums.corvetteforum.com/show...post1566463543
I have these same kits on my 93 coupe and have been very happy with the results. The rear end stays planted much better than when I had the stock aluminum links and poly bushings. I have had great results at both autocross and at the track.
I developed this kit with Gary from Hardbar and although there are other kits on the market we both feel this kit is superior in many ways. The bodies are knurled for easy grip and adjustment, even when on the car. The ends of the links are slotted like a collet and use Omega style clamps to lock the rod ends in place and eliminates the jam nuts, which can come loose. All you need to fully tighten the rod ends in place is a 1/4" 12 point socket. No need for 2 large wrenches to go in tight spaces like with jam nuts.
I have sold five kits so far and have gotten some great feedback from the buyers. I have more parts on order and will be able to ship in about a week.
The kits are as follows:
Red anodized aluminum turnbuckle links with steel bodied, Teflon lined spherical rod ends. All components are American made.
Nuts & bolts are all Grade 8 hardware.
All necessary spacers and washers are provided.
Trailing Arm Kit: $350 + $20 S&H

Camber Rod Kit: $225 + $10 S&H

If you have any questions, please don�t hesitate to ask. You can PM me through the forum or use my email below.
The easiest method of payment right now is PayPal, but I will discuss other methods if you prefer.
I developed this kit with Gary from Hardbar and although there are other kits on the market we both feel this kit is superior in many ways. The bodies are knurled for easy grip and adjustment, even when on the car. The ends of the links are slotted like a collet and use Omega style clamps to lock the rod ends in place and eliminates the jam nuts, which can come loose. All you need to fully tighten the rod ends in place is a 1/4" 12 point socket. No need for 2 large wrenches to go in tight spaces like with jam nuts.
I have sold five kits so far and have gotten some great feedback from the buyers. I have more parts on order and will be able to ship in about a week.
The kits are as follows:
Red anodized aluminum turnbuckle links with steel bodied, Teflon lined spherical rod ends. All components are American made.
Nuts & bolts are all Grade 8 hardware.
All necessary spacers and washers are provided.
Trailing Arm Kit: $350 + $20 S&H
Camber Rod Kit: $225 + $10 S&H
If you have any questions, please don�t hesitate to ask. You can PM me through the forum or use my email below.
The easiest method of payment right now is PayPal, but I will discuss other methods if you prefer.
OK then
http://www.corvette-guru.com/modules...mode=0&start=0
CentralCoaster wrote:
Finally got everyone off my back and got some time to install these.


Car feels great. It really freed up the rear suspension. The car actually dropped a bit due to less binding, yet I did not adjust the ride height at all. I scraped my exhaust for the first time after backing out of my steep driveway. (Car is lowered.) I can articulate the rear knuckle easily by hand when the car is on jackstands.
Going over speed bumps, I hear the front end squeak and bounch with the poly bushings. Rear end is quiet as a mouse and transmits less to the chassis.
Took it in the twisties, but improvements there are going to be impossible to quantify without lap times.
I don't know when my next track day is, but I'll have to repeat a track that I've been to recently and compare. May not be until a few months from now when it cools off.
.....
Everyone (without these installed) seems to think they'll ride very rough.
If anything, I found the opposite to be true. Now my car has never rode very smooth, but with the new Bilsteins and these installed, it's as good as ever. I had poly bushings on prior to this, and petrified stock rubber bushings on before that.
I'm not convinced how spherical rod ends can hurt ride quality, when you can easily articulate the suspension by hand, that means the suspension can react quickly to an uneven road surface. The stock pieces in their bound up state are very stiff and hard to move, and so they would transfer more energy directly to the frame, not allowing the suspension to soak it up.
I'll get pics this evening.
Posted on: 7/18 14:06
Finally got everyone off my back and got some time to install these.
Car feels great. It really freed up the rear suspension. The car actually dropped a bit due to less binding, yet I did not adjust the ride height at all. I scraped my exhaust for the first time after backing out of my steep driveway. (Car is lowered.) I can articulate the rear knuckle easily by hand when the car is on jackstands.
Going over speed bumps, I hear the front end squeak and bounch with the poly bushings. Rear end is quiet as a mouse and transmits less to the chassis.
Took it in the twisties, but improvements there are going to be impossible to quantify without lap times.
I don't know when my next track day is, but I'll have to repeat a track that I've been to recently and compare. May not be until a few months from now when it cools off.
.....
Everyone (without these installed) seems to think they'll ride very rough.
If anything, I found the opposite to be true. Now my car has never rode very smooth, but with the new Bilsteins and these installed, it's as good as ever. I had poly bushings on prior to this, and petrified stock rubber bushings on before that.
I'm not convinced how spherical rod ends can hurt ride quality, when you can easily articulate the suspension by hand, that means the suspension can react quickly to an uneven road surface. The stock pieces in their bound up state are very stiff and hard to move, and so they would transfer more energy directly to the frame, not allowing the suspension to soak it up.
I'll get pics this evening.
Posted on: 7/18 14:06
BrianCunningham wrote:
Yes, but with the stock C4's it's even worse since it's not a ball joint, but just a rubber bushed cylindrical hole, that really should just be used for 2d movements.
Here's a recent pic of my stock suspension, you can see the old stock rubber bushings binding up so much that they are being forced out.

Next time you have your wheels off, or it's up on a lift, check it out.
Poly bushings would actually make it worse since they take away compliance in the the off axis direction.
Yes, but with the stock C4's it's even worse since it's not a ball joint, but just a rubber bushed cylindrical hole, that really should just be used for 2d movements.
Here's a recent pic of my stock suspension, you can see the old stock rubber bushings binding up so much that they are being forced out.
Next time you have your wheels off, or it's up on a lift, check it out.
Poly bushings would actually make it worse since they take away compliance in the the off axis direction.
09-15-2008, 09:24 PM
#27
Team Owner
Thread Starter
Member Since: Mar 2001
Location: Boston, Dallas, Detroit, SoCal, back to Boston MA
Posts: 30,606
Received 239 Likes
on
167 Posts
Well, it looks like I'll be starting this build a little sooner than anticipated. While I was on the road course at NHMS, one of my front seals cut loose  Since I have to tear it down anyways, I might as well put the blower on
Ron will be shipping my stuff out to me shortly.
I talked to my tuner, SloRvette, he's going to order me a custom cam, injectors and handle the tuning.
Also, when I bought my AFR's I did so for a 383 build, so they have large 65cc chambers. He said he's put a S-trim on iron LT1's with stock bottom ends and they've handled it no problem. So even though my S trim has been upgraded for more boost, with the compression lowered by the large chambered heads, I can go with the stock bottom end no problem.
Since I have to tear it down anyways, I might as well put the blower on Ron will be shipping my stuff out to me shortly.
I talked to my tuner, SloRvette, he's going to order me a custom cam, injectors and handle the tuning.
Also, when I bought my AFR's I did so for a 383 build, so they have large 65cc chambers. He said he's put a S-trim on iron LT1's with stock bottom ends and they've handled it no problem. So even though my S trim has been upgraded for more boost, with the compression lowered by the large chambered heads, I can go with the stock bottom end no problem.
09-26-2008, 01:07 PM
#28
Team Owner
Thread Starter
Member Since: Mar 2001
Location: Boston, Dallas, Detroit, SoCal, back to Boston MA
Posts: 30,606
Received 239 Likes
on
167 Posts
The parts are all at the shipper today!
heads, spare intake, blower, cat back, MSD opti.
~400lbs of stuff!
Can hardly wait!
heads, spare intake, blower, cat back, MSD opti.
~400lbs of stuff!
Can hardly wait!
09-26-2008, 05:45 PM
#29
Drifting

Member Since: Sep 2002
Location: Suwanee,Ga
Posts: 1,642
Likes: 0
Received 0 Likes
on
0 Posts

I would love to do the same front mount set up on my L98.
Seems like it would be a bracket issue to ovecome?
Looking forward to hearing how it runs [ if you can find gas?].
TJM


 10-02-2008, 10:11 PM
#33
Melting Slicks

Brian, one thing I'd do is powdercoat the blower bracket setup black and get black silicone sleeves. On my car the red looked awesome and really was an improvement from the "as cast" finish but it may clash a tad with your green. You could probably get the powder coat off with bead blasting.
10-02-2008, 10:19 PM
#34
Team Owner
Thread Starter
Member Since: Mar 2001
Location: Boston, Dallas, Detroit, SoCal, back to Boston MA
Posts: 30,606
Received 239 Likes
on
167 Posts
I was going to polish it actually, but plans kinda fell through.
I thought about bead blasting, your right, especially since my intake will be "as cast"
I thought about bead blasting, your right, especially since my intake will be "as cast"


 10-03-2008, 05:17 PM
#37
Team Owner
Thread Starter
Member Since: Mar 2001
Location: Boston, Dallas, Detroit, SoCal, back to Boston MA
Posts: 30,606
Received 239 Likes
on
167 Posts
I may hold off and stick with the gameplan, doing a shortblock, for another reason.
I'm a contractor, I don't want to get this thing halfway torn apart, only to get called out on a contract. If I leave it together, when I get the call I can drop off the car and my parts to SloRvette, and let him have at it. It's not like I'll be driving it while I'm away.
Right now I'm fighting an oil leak. I blew a seal up at NHMS, one of the three on the front cover. I'm betting on the mechanical drive for the WP which I left in when I put the Electric WP on. It's OK for the street, I just can't race it anymore till it's fixed. Since I need to tear it down anyways...
10-07-2008, 06:23 PM
#38
Team Owner
Thread Starter
Member Since: Mar 2001
Location: Boston, Dallas, Detroit, SoCal, back to Boston MA
Posts: 30,606
Received 239 Likes
on
167 Posts
Guys,
I just got off the phone with my builder.
I misunderstood him
He was talking about putting the blower on or heads & cam not both
I'd just like to publicly appologize to him for misunderstanding.
I'm just glad he's still interested in doing this project.
So, looks like I'll be doing a shortbock.
I just got off the phone with my builder.
I misunderstood him
He was talking about putting the blower on or heads & cam not both
I'd just like to publicly appologize to him for misunderstanding.
I'm just glad he's still interested in doing this project.
So, looks like I'll be doing a shortbock.
11-22-2008, 02:03 PM
#39
Team Owner
Thread Starter
Member Since: Mar 2001
Location: Boston, Dallas, Detroit, SoCal, back to Boston MA
Posts: 30,606
Received 239 Likes
on
167 Posts
It turns out a stock LT1 intake will work with the new AFR's
So I'm just going to use the spare one I have
So I'm just going to use the spare one I have
Brian,
Here is the pic from Nolands engine thread.
This is a Fel Pro stock replacement LT1 gasket (PN1284) up to his AFR 195 Comp Ports . I actually used this Fel Pro LT1 gasket (added just <.060 to the roof) to port match his LT4 intake and when we put it on the motor the port alignment was perfect.
We then put the GM "LT4 Off Road" gasket (777) up to them to show the difference.
Now in the end since Noland had an LT4 intake which has more sealing surface above the intake port I just used the GM LT4 777 gasket for assy. It expidited assy (no gasket trimming) and Noland didn't seem to keen on me taking a pocket knife to his brand new gaskets if I didn't have to...
Another option is SCE, which has a few different LTX gaskets (that have different port heights) and you could get one that didn't require any trimming on the 195's. I had to go with SCE intake gaskets on my 210's.
Reguardless LT1 intake and gaskets on the 195 Comp Ports is easily done.
Will
11-23-2008, 12:59 AM
#40
Melting Slicks

nice!
I run the second gaskets on my trickflows and I port the roofs out to match all the way to the valve bowl.. and I run a ported LT4 Edelbrock manifold currently but think I will be swithcing to a single plane setup in the spring.
Looking good man!!
Chris
I run the second gaskets on my trickflows and I port the roofs out to match all the way to the valve bowl.. and I run a ported LT4 Edelbrock manifold currently but think I will be swithcing to a single plane setup in the spring.
Looking good man!!
Chris