LT-4 Suspension Rebuild "LOTS of Pictures"
 06-07-2008, 04:24 PM
#1
Drifting

Thread Starter

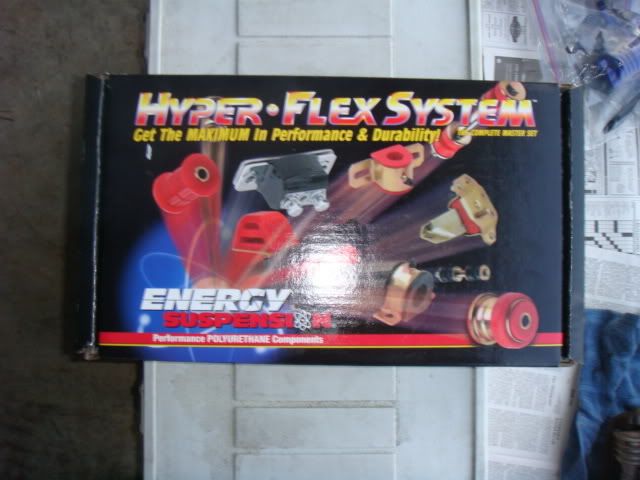
Just to get this information out there as I'm going through the car, this first post will be the work on the front suspension. I've pulled the front apart with the exception of the spring, which I will do either this evening or tomorrow in order to get the wedges attached and curing. This was a high mileage LT4 that just wasn't treated the best, so I'm doing everything to make her better than new. I'm using the Energy Suspension Master Set # 3-18122 for the 84-95 Corvette which I ordered through Summit. I was looking at Prothane before I started this journey, and discovered that Prothane has received some bad press about the fitment and inconsistencies with the tolerances of there bushings. Due to the number of and various folks on this forum that have had success with ES, it was a no-brainer for me to take this route. I also ordered the 3-5151G Rear Polyurethane sway bar bushing 84-96 corvette 24mm in Black, and 3-5154G Front Polyurethane sway bar bushing 84-96 Corvette 26mm Black from Summit, but they are on back order and not in stock.
I am replacing every last bushing, bearing, and seal in this cars suspension while I�m here I�m also lowering the car with the kit that I ordered from Mid America. I�m doing a C-5 front brake upgrade with slotted and cross drilled rotors. Keeping the C4 brakes in the rear (6-Speed�s REALLY need that parking brake). Braided lines, and cleaning everything up. I�m not going to change shocks right now, because the Bilstein�s that are on the car are less than 8K miles and are just going to be cleaned up to look good. I�ll continue to post the different aspects of this build as I go.
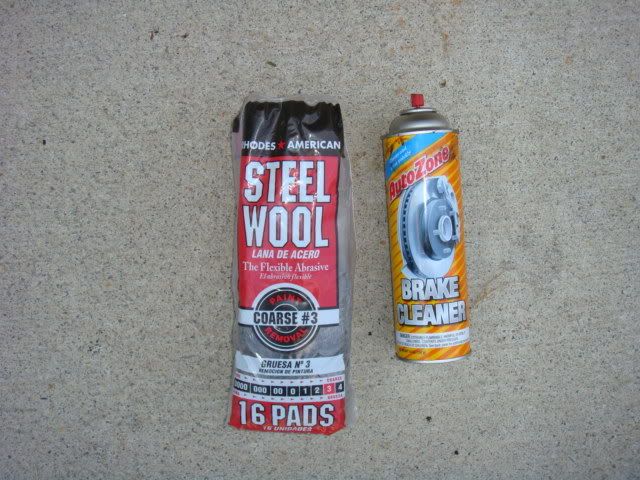
These are the tools of the trade for today, I just went to Wally-World and picked up a cheap bag of steel wool. I also grabbed a few cans of brake cleaner to help cut through the nasty buildup of grease and God-Knows what else.
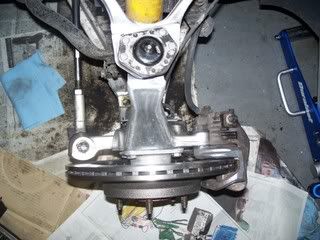
I�m currently cleaning up the upper and lower A-arms and front knuckle so that I can replace the ball joints with new units that I ordered from Corvette Central.
Here's a few shots of the one side that I've completed and the other side that's waiting for a bath .HUGE HUGE HUGE difference and really doesn't take much to get this stuff clean, especially with the steel wool pads.
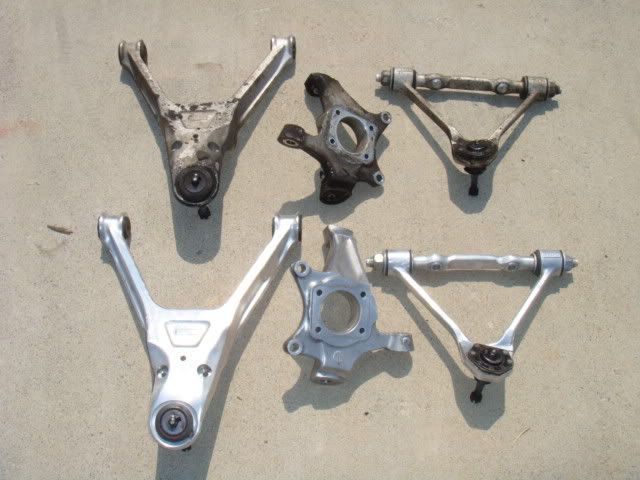
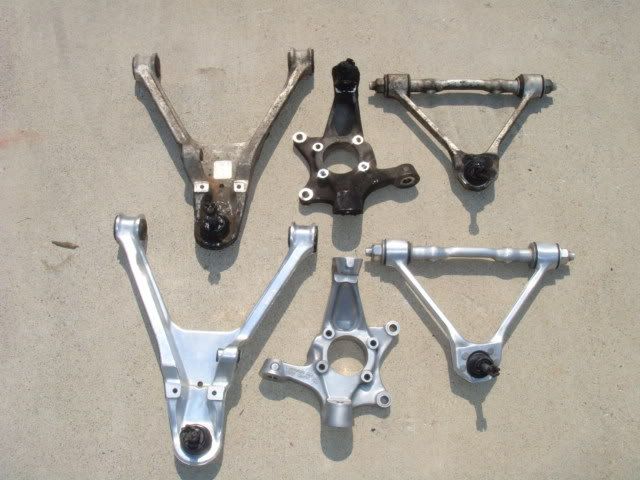
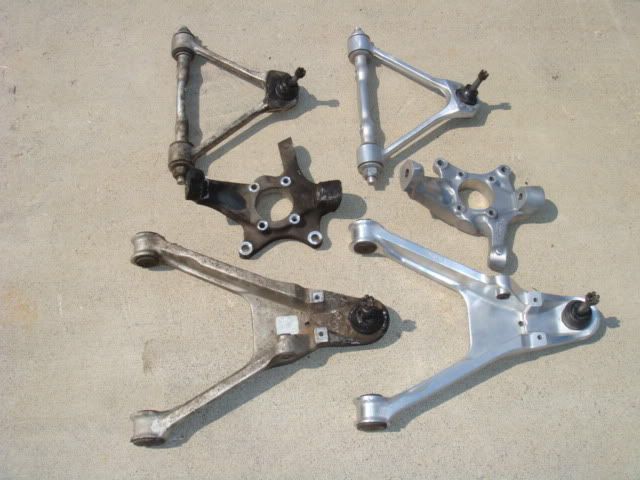

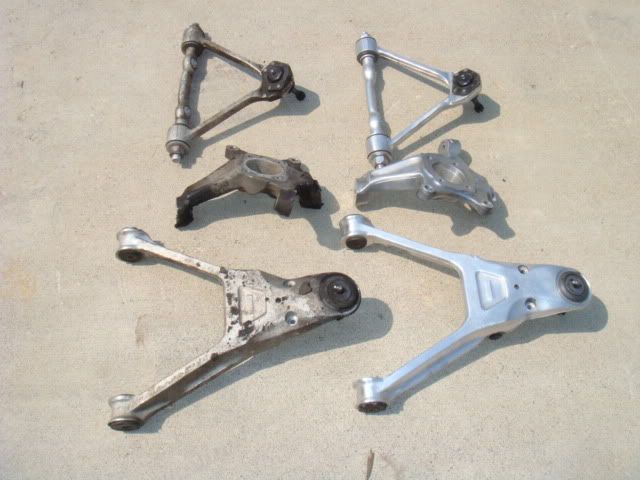
I was going to go with the full blown polish it til it makes you cry shine, but realized that with the way I'm going to drive this thing, it wouldn't last long at all. Too much effort for a non-show car. So I'm doing it right to clean it up and hopefully will be able to stay on top of the natural aluminum and not have to deal with metal polish day in and day out. Even with the steel wool and brake cleaner, the metal shines pretty nice and is a HECK of alot nicer looking! Enjoy the pics!
R/Noland
I am replacing every last bushing, bearing, and seal in this cars suspension while I�m here I�m also lowering the car with the kit that I ordered from Mid America. I�m doing a C-5 front brake upgrade with slotted and cross drilled rotors. Keeping the C4 brakes in the rear (6-Speed�s REALLY need that parking brake). Braided lines, and cleaning everything up. I�m not going to change shocks right now, because the Bilstein�s that are on the car are less than 8K miles and are just going to be cleaned up to look good. I�ll continue to post the different aspects of this build as I go.
These are the tools of the trade for today, I just went to Wally-World and picked up a cheap bag of steel wool. I also grabbed a few cans of brake cleaner to help cut through the nasty buildup of grease and God-Knows what else.
I�m currently cleaning up the upper and lower A-arms and front knuckle so that I can replace the ball joints with new units that I ordered from Corvette Central.
Here's a few shots of the one side that I've completed and the other side that's waiting for a bath .HUGE HUGE HUGE difference and really doesn't take much to get this stuff clean, especially with the steel wool pads.
I was going to go with the full blown polish it til it makes you cry shine, but realized that with the way I'm going to drive this thing, it wouldn't last long at all. Too much effort for a non-show car. So I'm doing it right to clean it up and hopefully will be able to stay on top of the natural aluminum and not have to deal with metal polish day in and day out. Even with the steel wool and brake cleaner, the metal shines pretty nice and is a HECK of alot nicer looking! Enjoy the pics!
R/Noland
 06-07-2008, 04:55 PM
#2
Burning Brakes

Nice work man. When I put new front rotors, pads, and SpeedBleeders I was afraid of scratching my suspension parts with the steel wool, so I just used lots of brakleen and shop towels. When I finally get a chance to put on my Earl's SS lines, I'll use the steel wool. I'll probably change the balljoints at the same time too so it'll get a good clean like yours - oh and I guess I'll probably upgrade the swaybars while I'm down there!! 
Here's a pic - definitely not as clean as yours though, but better than what I started with!
Here's a pic - definitely not as clean as yours though, but better than what I started with!
Last edited by janarvae; 06-07-2008 at 05:37 PM.
06-07-2008, 05:26 PM
#3
Drifting
Thread Starter
Nice work man. When I put new front rotors, pads, and SpeedBleeders I was afraid of scratching my suspension parts with the steel wool, so I just used lots of brakleen and shop towels. When I finally get a chance to put on my Earl's SS lines, I'll use the steel wool. I'll probably change the balljoints at the same time too so it'll get a good clean like yours.
Here's a pic - definitely not as clean as yours though, but better than what I started with!
Here's a pic - definitely not as clean as yours though, but better than what I started with!
J,
Thanks but from what I see yours is ALOT cleaner than mine. I need to get you pictures of the rest of the car right now so you can do a true Apples-to-Apples comparison. Your setup looks sweet and I also went with speed bleeders for my front and rear calipers. I'll post pics when I go over to Andy's to pull the front spring and as I put things back together I'll get shots of that too! Thanks and goodluck with your setup!
Noland
06-07-2008, 05:30 PM
#4
Burning Brakes
J,
Thanks but from what I see yours is ALOT cleaner than mine. I need to get you pictures of the rest of the car right now so you can do a true Apples-to-Apples comparison. Your setup looks sweet and I also went with speed bleeders for my front and rear calipers. I'll post pics when I go over to Andy's to pull the front spring and as I put things back together I'll get shots of that too! Thanks and goodluck with your setup!
Noland
 I'll be going with the C-5 upgrade too, but I'm in no hurry for that as I'll need new rims or spacers for my saw-wheels.
 Jonathan
Last edited by janarvae; 06-07-2008 at 05:35 PM.
06-08-2008, 10:37 PM
#5
Drifting
Thread Starter
Well today I went to pull the front spring out of the car. Not a hard job, but I do understand why it's so important to get the car high off of the ground. If the car isn't high enough, the curvature of that spring will leave you stranded. Lucky for me, I had my car up high enough to help with the removal of the tranny prior to the motor pull so it worked out well.
Here's a shot of the car without the engine, spring still in place.
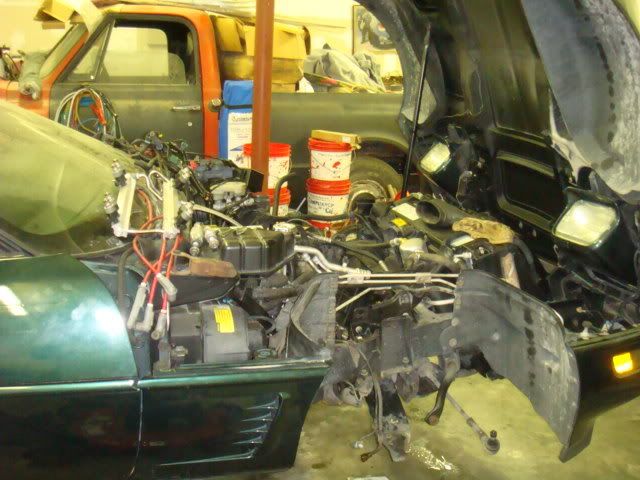
Here's a shot of both sides of this dirt monster as she sits right now.
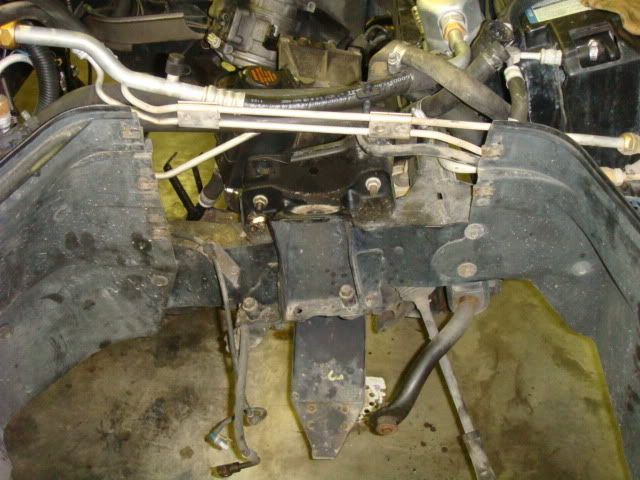
An underside shot of the spring in place
And a shot of the spring retainers just before I losened the four 5/8" bolts and dropped the retainers.
Once I got all four bolts out, the rest was easy. I just picked a side and carefully pulled the spring out from the chassis. It sits in a channel, so be careful not to ding or damage the spring.


And here she is, out of the car sitting on the ground just waiting for a good cleaning and some lowering pads.
Noland
Here's a shot of the car without the engine, spring still in place.
Here's a shot of both sides of this dirt monster as she sits right now.
An underside shot of the spring in place
And a shot of the spring retainers just before I losened the four 5/8" bolts and dropped the retainers.
Once I got all four bolts out, the rest was easy. I just picked a side and carefully pulled the spring out from the chassis. It sits in a channel, so be careful not to ding or damage the spring.
And here she is, out of the car sitting on the ground just waiting for a good cleaning and some lowering pads.
Noland
06-08-2008, 10:46 PM
#6
Drifting
Thread Starter
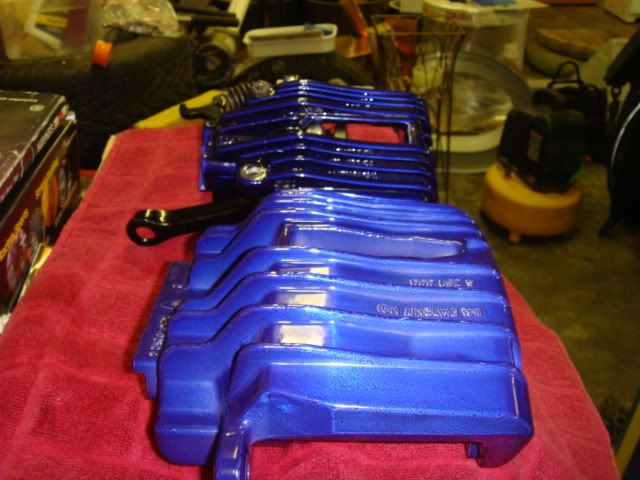
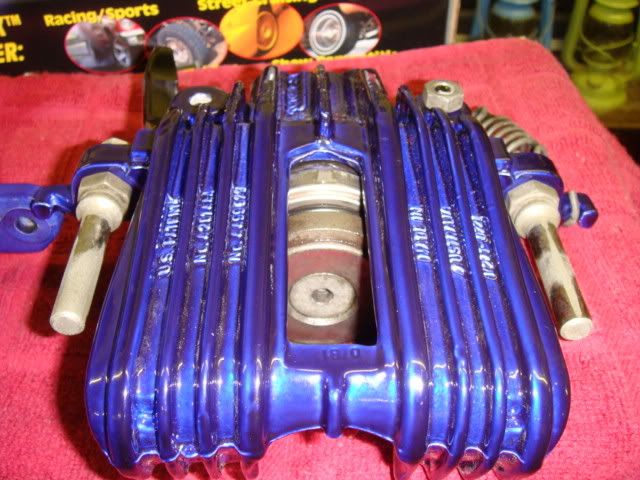
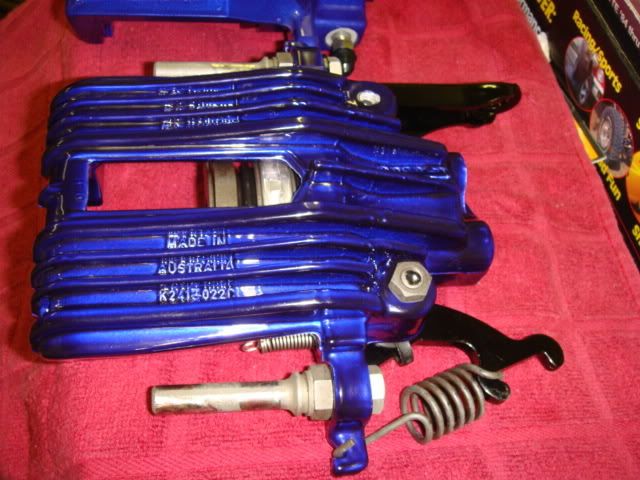
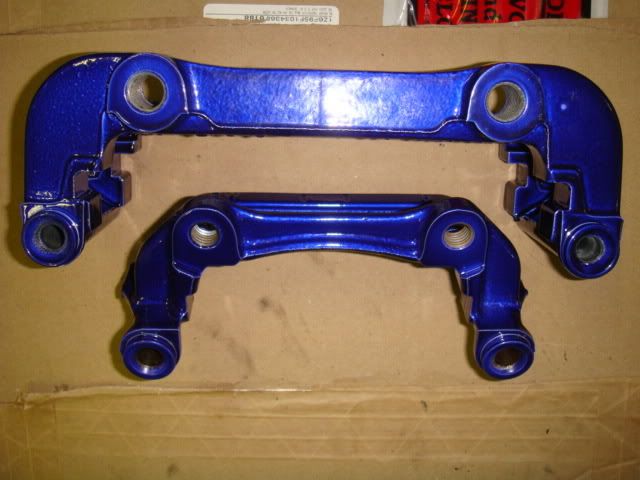
While I'm at it, here's the suspension kit that I went with for this build.
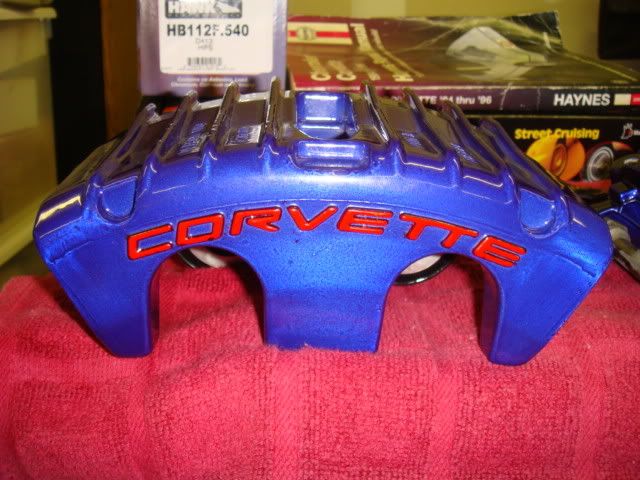
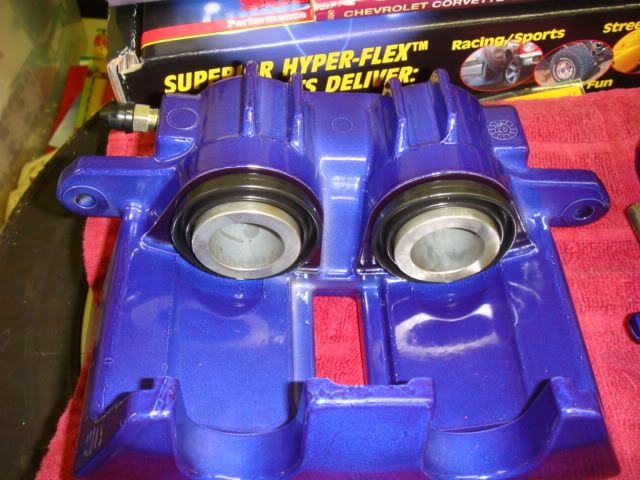
I also found a VERY good powder coater in my area that I have these Red Z-06 calipers to, and ordered new brackets for this build. The rears are the ones off of my 91, but since I didn't want to wait, I had him powder coat all of these peices for me. Oh yeah, did I say it was going to be a Grand Sport Replica?......LOL
Front
Both
Rears
Brackets
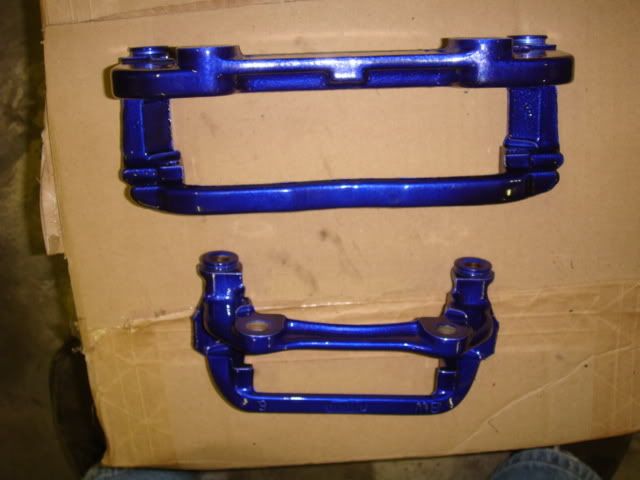
There ya go, I'm going to pull the power steering, clean it up and replace the bushing on that next weekend right after I push it outside of the garage and power wash all of this crap out of the engine bay and the rear end. I should have the wedges installed and curing this week. I'll post pictues of that once I get that going. Disassembly of the rear suspension should be next weekend as well, then I'll start putting all of these pieces back together so that when Will is done with the motor, that'll be the last thing that I'll need to do. Thanks again.
Noland
I also found a VERY good powder coater in my area that I have these Red Z-06 calipers to, and ordered new brackets for this build. The rears are the ones off of my 91, but since I didn't want to wait, I had him powder coat all of these peices for me. Oh yeah, did I say it was going to be a Grand Sport Replica?......LOL
Front
Both
Rears
Brackets
There ya go, I'm going to pull the power steering, clean it up and replace the bushing on that next weekend right after I push it outside of the garage and power wash all of this crap out of the engine bay and the rear end. I should have the wedges installed and curing this week. I'll post pictues of that once I get that going. Disassembly of the rear suspension should be next weekend as well, then I'll start putting all of these pieces back together so that when Will is done with the motor, that'll be the last thing that I'll need to do. Thanks again.
Noland
The following users liked this post:
Kagnus (01-07-2021)

 06-08-2008, 11:04 PM
#9
Burning Brakes
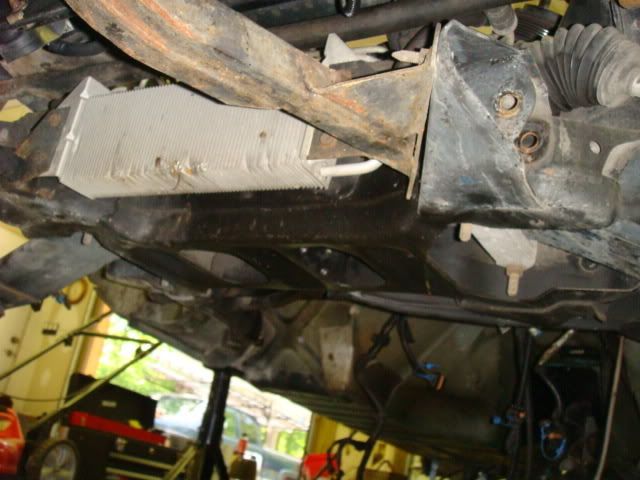
Great work so far, I anticipate the final results, including the new engine! While you're in the wheel well vicinity, might as well give them a new coat of rubberized undercoat spray. Check out this pic from LD85's QA1 coilover conversion (I hope he doesn't mind  ). Again, props to LD85 for the great clean set-up he has - I love reading all of his mod threads. If he happens to pass this thread, I hope he can give some more details on the coating process as I'm interested in doing it with my C5 brake upgrade also.
*Of course you would have 3 pieces to the wheel well area if your LT4 shares that in common with my '91.

). Again, props to LD85 for the great clean set-up he has - I love reading all of his mod threads. If he happens to pass this thread, I hope he can give some more details on the coating process as I'm interested in doing it with my C5 brake upgrade also. *Of course you would have 3 pieces to the wheel well area if your LT4 shares that in common with my '91.
Last edited by janarvae; 06-08-2008 at 11:10 PM.
06-08-2008, 11:11 PM
#10
Drifting
Thread Starter
That is VERY sweet looking!.......I also have a 91 that I did a C5 brake upgrade to as well. The 91 and 96 both share the three piece wheel well covers just like you have and what's shown in this picture. I could only WISH I get my car that clean!
06-09-2008, 10:29 AM
#11
Le Mans Master


 06-09-2008, 02:34 PM
#13
Drifting
Thread Starter
Great work so far, I anticipate the final results, including the new engine! While you're in the wheel well vicinity, might as well give them a new coat of rubberized undercoat spray. Check out this pic from LD85's QA1 coilover conversion (I hope he doesn't mind ). Again, props to LD85 for the great clean set-up he has - I love reading all of his mod threads. If he happens to pass this thread, I hope he can give some more details on the coating process as I'm interested in doing it with my C5 brake upgrade also.
*Of course you would have 3 pieces to the wheel well area if your LT4 shares that in common with my '91.
). Again, props to LD85 for the great clean set-up he has - I love reading all of his mod threads. If he happens to pass this thread, I hope he can give some more details on the coating process as I'm interested in doing it with my C5 brake upgrade also. *Of course you would have 3 pieces to the wheel well area if your LT4 shares that in common with my '91.
Noland
06-09-2008, 02:53 PM
#15
Drifting
Thread Starter
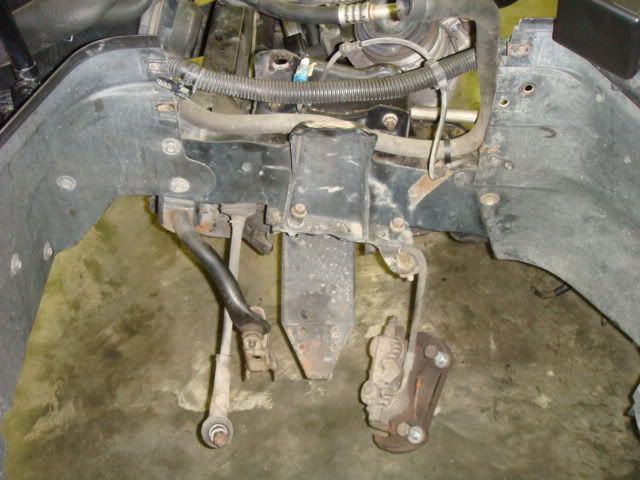
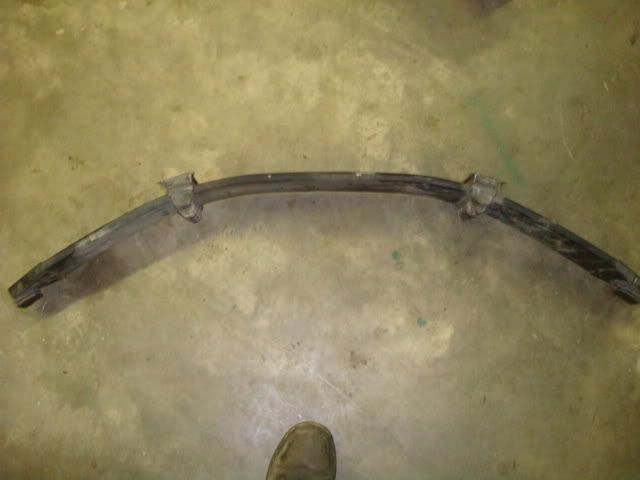
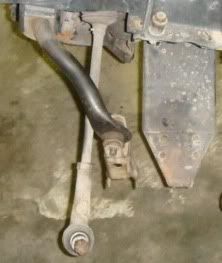
So I have a stuck bolt which welded itself to the front right swaybar endlink. I'm in the process of cutting the bolt off, but was wondering if there was a better solution to the cheap-O stamped steel piece that Chevy put on these cars? Someone mentioned Heims Joints or something like that before, but is there a replacement part that keeps the rubber bushings, or am I stuck?
Here's a pic of the bad endlink still attached to the sway bar.
Noland
Here's a pic of the bad endlink still attached to the sway bar.
Noland
06-09-2008, 03:03 PM
#16
Burning Brakes
Jonathan
 06-09-2008, 04:22 PM
#18
Drifting
Thread Starter
Noland
06-09-2008, 04:53 PM
#19
Team Owner

Member Since: Mar 2001
Location: Boston, Dallas, Detroit, SoCal, back to Boston MA
Posts: 30,607
Received 239 Likes
on
167 Posts

I'm in the process of cutting the bolt off, but was wondering if there was a better solution to the cheap-O stamped steel piece that Chevy put on these cars? Someone mentioned Heims Joints or something like that before, but is there a replacement part that keeps the rubber bushings, or am I stuck?
The various vendors have them.

I'm going to be upgrading my entire rear suspension to Heim links.