Air Pump delete Pulley,68448 Header, brace fitment opinions etc... (Pics)
 07-21-2010, 02:32 PM
#1
Le Mans Master

Thread Starter

Hi guys, just came back from mocking up the Air Delete pulley i got from Breathless performance,im not sure if its right or not but in my opinion it set the alternator too far away its touching the edge.
Maybe its Ok that way and im being paranoid about everything as always What you think ?


A possible issue i found is that the top alternator threaded hole
is actually smaller than the Delete brace hole,so the bolt will have
a lot of play in the brace , but maybe with a tight nut and washer it won't happen.
As for the lower alternator brace,it would work perfect except for one small problem....there is NO WAY i can put the stock bolt w/included stud on the second header hole....

I have a set of nice locking header bolts..but i need to reuse the
original bolt or something like it on the second header hole to use the lower alt brace:
I think i have to use a shorter one,any measure on what do i have to use and get just the exact fit ...???

And about the Hedman 68448 Elite header...i think the fitment
its just fine ...i like them very much and they were very very easy to install !
Driver's side from top....in less than 3 minutes
Passenger's side from below,but we have to move the starter wires
a bit by loosing the nut and that was it !
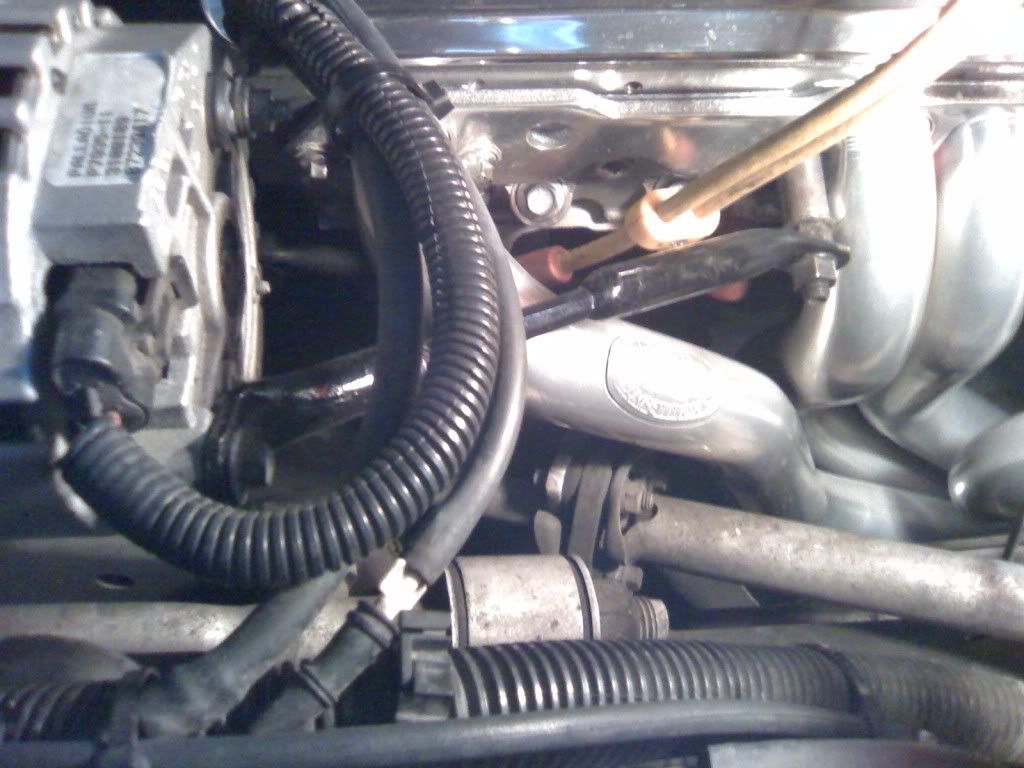
What you think of the oil filter / cooler hose distance ?
I think its pretty good , maybe i dont even have to shield them:


Close to the steering but pretty fine ...

Later i will take pics of the Passenger side...
Thanks,any tips/advice will be greatly appreciated!
Sammy
Maybe its Ok that way and im being paranoid about everything as always What you think ?
A possible issue i found is that the top alternator threaded hole
is actually smaller than the Delete brace hole,so the bolt will have
a lot of play in the brace , but maybe with a tight nut and washer it won't happen.
As for the lower alternator brace,it would work perfect except for one small problem....there is NO WAY i can put the stock bolt w/included stud on the second header hole....
I have a set of nice locking header bolts..but i need to reuse the
original bolt or something like it on the second header hole to use the lower alt brace:
I think i have to use a shorter one,any measure on what do i have to use and get just the exact fit ...???
And about the Hedman 68448 Elite header...i think the fitment
its just fine ...i like them very much and they were very very easy to install !
Driver's side from top....in less than 3 minutes
Passenger's side from below,but we have to move the starter wires
a bit by loosing the nut and that was it !
What you think of the oil filter / cooler hose distance ?
I think its pretty good , maybe i dont even have to shield them:
Close to the steering but pretty fine ...
Later i will take pics of the Passenger side...
Thanks,any tips/advice will be greatly appreciated!
Sammy

 07-21-2010, 07:52 PM
#4
Melting Slicks

Member Since: Oct 2000
Location: Heidelberg PA
Posts: 3,426
Likes: 0
Received 4 Likes
on
4 Posts
Cruise-In V Veteran

You could make a brace - use the bolt on the 3rd bolt hole. 85's bolt this way,
I do not have a problem with the alternator bolted similar to yours.
Looking good!!!
See pic above!!!
I do not have a problem with the alternator bolted similar to yours.
Looking good!!!
See pic above!!!
 07-21-2010, 08:18 PM
#6
Le Mans Master
Thread Starter
Thanks ....is that air delete setup OK ?
its impossible to bolt it to the second hole,so i must make a brace !
Im looking forward to make my own brace...
maybe with this ones ?
http://www.jegs.com/i/Competition+En.../6017/10002/-1
any suggestions ?
its impossible to bolt it to the second hole,so i must make a brace !
Im looking forward to make my own brace...
maybe with this ones ?
http://www.jegs.com/i/Competition+En.../6017/10002/-1
any suggestions ?
Last edited by Calderone; 07-21-2010 at 08:56 PM.
07-21-2010, 10:03 PM
#7
Team Owner


The brace in this pic looks like it's a piece of electrical conduit. Don't know what there is in the way of availability in your country, but it is a very common item throughout the US and Canada used for running electrical wires. It's usually referred to as "EMT conduit" and the diameter to ask for is 1/2". EMT conduit is rust-resistant but it can be painted after appropriate preparation. Use a high heat engine paint.
One end of the piece is flattened (a vise will easily flatten most of it) and then use a hammer to finish making it flat. Drill a hole for the bolt on the flat part. Measure the length you need and the angle for the other end which is flattened in the same way. Drill another hole and bolt it in place.
You may have to try a couple of times to get the correct length, but it is an easy and cheap way to build a bracket. You may have to do the same thing for the other side for the A/C rear support bracket if it does not bolt up in the right spot.
07-21-2010, 11:19 PM
#8
Race Director

The nut is not on the air delete bracket but this alternator bracket is the stock bracket for an 84 or 85. My car is sort of a hybrid and I can't remember what year I used.

07-21-2010, 11:25 PM
#9
Le Mans Master
Sammy, Just use the brace you have now. first cut it in half, then bolt one end to the alternator and the other end to the third bolt back..Once you have the 2 halfs bolted up take a measurement between the to pieces and add about 3"..Find a piece of rod, or a long bolt that you can cut the head off so it will slide up inside the 2 halfs. Once you get it up inside the 2 halfs weld it into place and paint it and you have a new brace..Picture below of mine..WW
07-22-2010, 12:00 AM
#11
Race Director
Hi guys, just came back from mocking up the Air Delete pulley i got from Breathless performance,im not sure if its right or not but in my opinion it set the alternator too far away its touching the edge.
Maybe its Ok that way and im being paranoid about everything as always What you think ?
Maybe its Ok that way and im being paranoid about everything as always What you think ?
Have you tried to see if the belt will fit yet?
Serve with brownies and ice cream!
gp
07-22-2010, 03:04 AM
#12
Race Director
This gives you an idea how an AIR delete kit sits even with another brand of kit....
Of course, you also get a sneak preview of where mines gonna end up when my install is complete.

Of course, you also get a sneak preview of where mines gonna end up when my install is complete.
07-22-2010, 04:19 AM
#13
Le Mans Master
Thread Starter
You can't beat the look of a TPI ....its wonderful Gregg
i will post another thread about it
Congrats !!!!
What brand is it ? it looks very nice polished ..mine is black
i think its anodized ...i wish i could remove it and give it the polished look !
i will post another thread about it
Congrats !!!!
What brand is it ? it looks very nice polished ..mine is black
i think its anodized ...i wish i could remove it and give it the polished look !
07-22-2010, 10:03 AM
#14
Race Director
Mine is a TPIS. I waited a few months for them to make me a [special-order] NON-anodized piece. After polishing their anodized EGR plate, I found out how much harder it is to (sand down and) polish something thats been anodized. You don't want to do it!!!
07-22-2010, 04:35 PM
#15
Le Mans Master
Thread Starter
Guys every option is excellent !
I found conduit tubes here its really cheap !
i might try that or rod ends as well ...i will check what's faster and cheaper
if i try the rod ends ....how can i give them angle ???? bending the rod ?
i like 383vett's idea but im not sure how or where to find that spacers ...
WW7 idea is killer but i don't want to kill my original brace in case i reuse it someday...
Thanks !
Last edited by Calderone; 07-22-2010 at 04:46 PM.
07-22-2010, 08:28 PM
#17
Le Mans Master
Thread Starter
Sammy-
The brace in this pic looks like it's a piece of electrical conduit. Don't know what there is in the way of availability in your country, but it is a very common item throughout the US and Canada used for running electrical wires. It's usually referred to as "EMT conduit" and the diameter to ask for is 1/2". EMT conduit is rust-resistant but it can be painted after appropriate preparation. Use a high heat engine paint.
One end of the piece is flattened (a vise will easily flatten most of it) and then use a hammer to finish making it flat. Drill a hole for the bolt on the flat part. Measure the length you need and the angle for the other end which is flattened in the same way. Drill another hole and bolt it in place.
You may have to try a couple of times to get the correct length, but it is an easy and cheap way to build a bracket. You may have to do the same thing for the other side for the A/C rear support bracket if it does not bolt up in the right spot.
i bolted up the alt / air delete and its pretty tight, and its not touching the fender,its close but it doest touch it.
There's one bolt thats too close to the PS pulley but its fine, here are the pics :
Alt to fender pics :


Air delete pulley too close to Power steering pulley...should i take off the washer ?


Last edited by Calderone; 07-22-2010 at 08:41 PM.
07-22-2010, 09:02 PM
#18
Race Director
Huh? Which "lower" bracket?
For the A/C brace, I cut the OEM bracket and removed about 1.5" of rod. I will thread it for shortening/reconnection using a threaded coupler.
For the Alt brace, I'm also gonna try the EM conduit trick -- except with some 1/2" pipe I found in the neighbor's trash yesterday! LOL It was a floor lamp with a nice silver shaft. If it's strong enough, it should look nice because of it's finish.
For both brackets, I made a new attachment point on each side. I used 3/8" x 1" alum stock to fab a 3/8" studded mounting point. You can see one in the pic above. It's on the head between #1 and #3 tubes. (I posted a thread on this 3-4 weeks ago.)
Edit: You should be fine w/o removing the washer shown in the photo above. If you're worried, grind off the head a bit (not much) and/or use a flat washer. You shouldn't need a lack washer on that. More importantly, how would the belt get up that high? Look at my pic? Have you tried mouting the belt yet?
Last edited by GREGGPENN; 07-22-2010 at 09:06 PM.
07-22-2010, 09:15 PM
#19
Le Mans Master
Thread Starter
HEHE Yes i meant alt brace ! i always confuse ..brace with bracket !
No i haven't tried to mount the belt ...i will do it tomorrow !
i have 7 belts here...the shorter is
6PK2195 6 Ribs x 2195 mm or 6 Ribs x 86.5 Inch
the second shorter belt is what i had on the car ...that was
6PK2250 6 Ribs x 2250 mm or 6 Ribs x 89.24 Inch
i have march 3 piece UD pulleys and BPP air delete...so tomorrow we'll see if the
6PK2195 works or maybe i will need a shorter one !
07-22-2010, 10:30 PM
#20
Le Mans Master
Huh? Which "lower" bracket?
For the Alt brace, I'm also gonna try the EM conduit trick -- except with some 1/2" pipe I found in the neighbor's trash yesterday! LOL It was a floor lamp with a nice silver shaft. If it's strong enough, it should look nice because of it's finish.
?
For the Alt brace, I'm also gonna try the EM conduit trick -- except with some 1/2" pipe I found in the neighbor's trash yesterday! LOL It was a floor lamp with a nice silver shaft. If it's strong enough, it should look nice because of it's finish.
?
Guys driving Corvettes should not be going through peoples trash cans, its bad for our image.I realize sometimes its tempting but..
 ..WW
..WW
Last edited by WW7; 07-22-2010 at 10:52 PM.