When you click on links to various merchants on this site and make a purchase, this can result in this site earning a commission. Affiliate programs and affiliations include, but are not limited to, the eBay Partner Network.
2. door isnt closing very good so i have to adjust the hinges. but if i do this, the glass is going have clearance issues.
3. so i have removed my in er door panels and am staring at this mess. I will scrape off all this gunk. not sure if it was to hold the panel on or to hold previous vapour barrier on.
4. vapor barrier is missing and i plan on buying very thick poly and then cutting to shape. advice?
5. there is a. end in the meta portion of the door panel that is right behind the vinyl panel. see pics. is this supposed to be here? i intend to pull the metal panels off and clean everything up so i could pound out this bend with wood and a hammer while off.
get a load of these pics.
see bend. supposed to be here?
edit: ^ yes it supposed to be there.
Last edited by VikingTrad3r; 03-03-2017 at 12:31 AM.
1. i cleaned up the goop. saw a photo online that made it seem like the white goop was used for vapour barrier from the factory. it comes off with varsol but u have to scrape off the chunkies first. plan is to get some real thick poly and cut to fit.
2. i think i have the original door motors. i lubbed them up and cycled the window multiple times.
3. there was a **** that bolts through a hole in the glass. bottom, front of glass. it was loose. i assume its. ot supposed to be loose. the rubber plastic handle is moving around the bolt. its got a hex head in the bolt so that worked.
4. my door harness is hooped, broken wires, 5 in total. the brn wt pair the hatch switch. i think the green grey are going to be the interior light pressure switch on the door. which isnt hooked up.
the last is the center orange wire going to the map light.
this works out. icely as the wide black plug has 5 wires ripped out of it. so now just need to know which go where.
all electrical connections are filthy. will hit with electrical cleaner.
i do have an 87 manual, not an 86.
hopefully it'll be the same.
5. speakers. well they work. a great start. im not sure what type. they say "type S" in blue. i googled it and i think they are alline. the front doors are 4".
6. the power door locks didnt have enough jam to make a full open or lock. had to hit button numerous times. the linkage on the aluminum panel, was so gritty it sounded like sandpaper was jammed in the rotating assembly. all cleaned up now im sure it will work great.
late last night i had the aluminum panel in the kitchen sink to clean it off. it didnt really work with hot water soap and a dish scrubber. just too gummy.
i assume this is from spraying white lithium grease into the door and it misting everywhere.
ive read up over lunch hour and it seems like people use sil glide, or, silicon grease.
because silicon based grease doesnt affect plastics which alot of the door apparatus is made from.
looking fwd to getting it lubed to ight then adjusting the door hinges for a perfect door close, then adjusting the glass.
Question for the electrical gurus (my first time with electrical)
my 86 4+3 came with keyless entry. it functions.
in post number 3 above you see the flat connector labelled a-h, 8 pins.
the 8th one, h, is missing any plug like it kind of looks like its supposed to be missing. but on the ither side of the plug, clear plastic, there is a yellow wire.
so not sure if i am missing a wire or if maybe the car just isnt provisioned for something.
this car does have the defrost side mirrors.
second question, could my wireless remote entry have something to do with why these 5 wires are ripped out of this 8 pin connector?
ive read through some other posts about others journeys with remote start and i didnt see anything mentioned about ripping the open/close detection (button) switch being pulled out, or the orange wire from the side map light being pulled out.
Cool door repair thread Vikingtra3r. This is very useful info for all of us C4 owners. I was lucky and just had to deal with my door panel being broken but nothing was wrong with my door, aside from the speakers being mounted improperly.
Thanks for posting, I'll be following along as you repair your door. Best of luck with it.
2020 Corvette of the Year Finalist (appearance mods)
C4 of Year Winner (appearance mods) 2019
Hard to say what's up with your keyless w/o tracking down where the "head unit" is mounted. If I were you, I'd look in your FSM for the wiring colors going into the power locks. The blue and black wires (of the 8pc connector) continue to the power lock plug -- which lends itself to a partial bastardization during the keyless install.
I put keyless in my 89 but hooked into the circuit under the dash WITHOUT changing what's inside the doors. Without a manual, someone might be more apt to go inside -- like yours looks.
I remember there was one "factory" or "factory-like" add-on kit but can't remember the name. Maybe that's what you have?
For adjustment of the windows, you'll find a nice youtube vid made by CorvetteCentral.
I can't suggest [adjustment] details beyond what I think you're figuring out....though I've been in my doors several times.
I have seen people make a complete box for the door handle pull. It makes a lot of sense to keep from pulling the "door handle" out of the inner panel. I'm planning on the same this summer.
It does look like someone glued an inner sound panel at one time. Mine isn't near that messy. Obviously, someone got carried away with the silicone. Beyond using heavy [drop cloth] plastic, I am also open to ideas regarding material for making door insulators out of. To be honest, using something simple -- like heavy cardboard might be an easy fallback. You could spray it with undercoating (rattlecan).
2020 Corvette of the Year Finalist (appearance mods)
C4 of Year Winner (appearance mods) 2019
Oh yeah...to replace the missing/broken "tabs" that hold the door handle, I found some plastic square license plate receivers at my local ACE. They fit SO tight, I had to use pliers to snap them in that metal armrest "shelf"....the one that's exposed by removal of the door panel.
I may have used slightly longer screws with larger heads for the same application.
The design of the handle "cinch" is why I think a metal box (dropped in the grab area) would strengthen everything. Cut them out of sheet metal -- with "bend-up" sides. Epoxy corners if welding isn't possible/easy. Finish with black paint....or glue the factory plastic on the inside of your fabbed box?
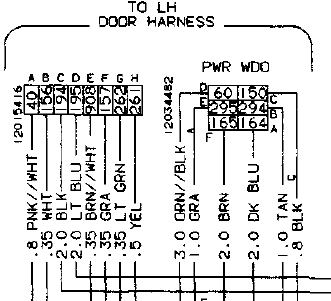
This is how the WHITE connector should be pinned in the LEFT DOOR, the circuit #'s are included. I would think you could use the '87 FSM to confirm what was done to accommodate the remote entry. It's ironic maybe that the '86 FSM says that connector (C251) is actually behind the LEFT KICK PANEL, an '87 says "middle of door"! I assume it's an error in the '86 FSM - I didn't check the supplement for corrections if there are.
Having the circuit #'s and the '87 FSM I'd think you could sort it. there's four pages of circuit identification in the '86 FSM or I'd post them. I didn't compare '86 to '87 so if you've questions .............................
The only thing I noticed that could confuse you is maybe that PIN A on the "BLACK" connector is going to change to ORG from the PNK/BLK. The actual diagnostic diagrams in '86 seem to mention ORG/BLK instead of PNK/WHT but the actual diagram I believe is correct.
I'd think at this point you could maybe delete any snapshots that actually aren't relevant.
Im in uncharted waters with electrical. i've no experience with it and these diagrams look like mumbo jumbo to me. i watched a couple "how to read electrical diagrams" vids last night and im feeling a bitmore educated.
Note that the hatch release does not work on the pssenger side as well.
so, given the driver side hatch release didnt work and that it was severed, i thought perhaps the pssenger side had also been cut. and if so, maybe it all ties into the keyless entry that was installed.
so i took the panel off last night and lo and behold, the harness is not cut. its all present, though it appears to have many tape repairs throughout it.
i can see copper corrosion in the large 8pin flat plug that was all broken on the driver side.
so btwn the diagrams supplied by wvzr1 and the passenger side being intact, i think ill be able to get it reconnected.
i will solder and shrink wrap any bubbad wires and repair the pin connectors.
as for the goop that was behind the interior panel on the driver door, same thing. but only the white stuff. they had used it as a method to assist with the screws holding the panel to the fiberglass and metal insert. it worked well actually as once the screws were off i had to carefully peel the panel off the door.
there was no moisture barrier on the passenger side either.
i will be definately getting very thick poly and cutting to shape. i can see the oem push pins to hold it in place on this side that were absent on the deiver side.
just so much bubba.
also, one more thing that was present on the passenger side but missing on the deiver side. the wire that goes up to the lock cylinder ?? i could see the plastic retainer loops on the driver side and was cuirios as to why there was no wire in them. must be missing. on the passenger side there is a wire that runs up to the door handle which i assume has something to do with when you turn the key?
but yes in my 87. its very clear to see what will cause it now that im familiarized with the door internals.
very easy to fix but will likely require some corvette specific parts purchased new.
go slow when you remove the interior door panels and be VERY CAREFUL of the power door lock switch. make sure you have a stubby phillips driver on hand when you remove it. if tou pull hard you will damage the small brittle screw hole tabs. then u will need to buy a new housing like i saw dmittz had to. and so will i. im going to need 4 of them.
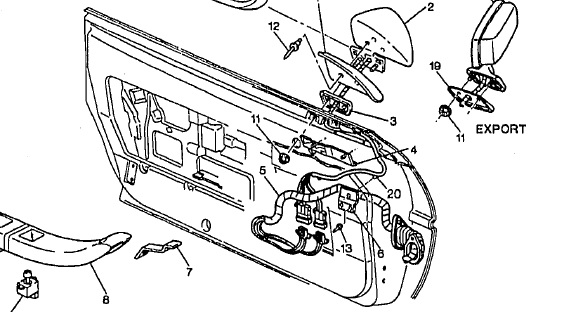
thnx! its clearly not required as the mirror is on the car!
good thing this was only $650!
It really should be there so that the mirror wires don't get caught up in the window regulator/glass hardware. You need to anchor the wire/harness in some fashion and that's the function that part offered/accomplished. It's pretty much the only conduit that keeps the wires out of the mix.
*** What you do is use a couple "rose-bud" push-ins that fit the holes that are there presently. There's many styles available.
You rock Wvzr1, thnx. ill see if its in the other door and emulate its install. thnx
If you're in there and regulators look original, replace is a good idea...unless you don't have a problem with re-doing the door.
I know you're planning on selling when done, so maybe doesn't need.
Anyway, I can't see clearly from pics, but those look like the old scissor regulators. Those things are terrible, google for that and you'll see complaints. Replace with newer style, can get pic if you wish.
I'm guessing here the motors are like mine, they have glue holding the magnets inside. This stuff ages and let's go when it feels like it, dead motor. Mine did after cold garage storage, both motors dead in spring. Not fun replacing, I know.
If you're in there and regulators look original, replace is a good idea...unless you don't have a problem with re-doing the door.
I know you're planning on selling when done, so maybe doesn't need.
Hi Kael,
yeah they both work right now, i lubricated the driver side, first cutting all the old dried up white lithium grease with brake clean, then after it dried i used silicon grease and it operates so much better now. i will be doing same to passenger side.
question for you guys:
can anybody tell me what the electrical wire does that connects to the key lock on the door? it was connected on the passenger side but not on the driver side.
i assume it has something to do with the built in horn tooting alarm?
like if the door is opened without the door key cylinder knowing it then it toots the alarm?
just curious what it does. i have to sort it out and find the right plug to get up to the door lock. it is a green and black pair of wires off the harness with a plug that connects to the key locks pigtail.
 01-25-2017, 05:51 PM